|
Domibus |
Extensions Upgrade |
Documentation Contents
Here’s a summary of the contents you can find here about installing, configuring and extending Domibus.
Domibus Guides
Detailed technical specifications of Domibus' extension mechanism and extension implementation guidelines. |
|
This guide allows the user to quickly get started with Domibus. After completing this document, you will have a local Domibus instance up and running locally on a Tomcat/MySQL environment. |
|
How to deploy and configure Domibus on WebLogic, Tomcat and WildFly with MySQL or Oracle. |
|
Set of checks to perform on Domibus installations and a starting point for test case creation. |
-
Available from eDelivery’s Digital Portal, the Access Point Component Offering Description document holds technical specifications and implementation instructions.
Plugins
Outlining of the JMS Data Format Exchange to be used as part of the default JMS backend plugin. |
|
Description of the WSDL and the observable behaviour of the interface provided in the default WS plugin. |
|
Description of the WSDL and the observable behaviour of the previous implementation of the interface provided in the default WS plugin. |
|
Outlining of the file system messages exchange of the default File System (FS) backend integration solution for the Domibus Access Point. |
|
Detailed information on how to configure and deploy the File System Plugin available in Domibus 3.3 and later versions. |
|
How to develop a custom integrations for Domibus for developers familiar with the AS4 protocol. |
Extensions
Detailed technical specifications of Domibus' extension mechanism and extension implementation guidelines. |
|
Detailed technical specifications for validating Domibus' extensions. |
Properties Reference
List of properties available per configuration topic with their descriptions, possible and default values. |
Domibus Technical Documentation
|
1. Domibus Architecture
Domibus Access Point is a compliant implementation of the eDelivery profile of the OASIS ebMS3/AS4 standard.
This content provides an overview and description of the most significant decisions underlying its current architecture on different levels: Use Case, Logical, Process, Deployment, Implementation, Data.
We also provide some considerations regarding Sizing, Performance and Quality.
|
Note
|
It’s not our goal with this content to explain the ebMS3/AS4 standards, the four-corner model or any other concepts described in the provided references. For more about this see OASIS AS4 Profile. |
1.1. Architecture Overview
This overview is organized in the following views of the system:
- Use Case
-
each relevant Use Case is described via a diagram and a short explanation of their impact on the architecture.
- Logical
-
provides a high-level view of the platform presenting the structure of the system through its components and their interactions.
- Implementation
-
describes the software layers and the main software components. A component diagram is used in this view.
- Deployment
-
view provides a description of the hardware components and how they are linked together. This view gives a technical description of protocols and hardware nodes used.
- Data
-
provides information about the data persistence. A class diagram will be used to model the main system data.
Check the UML diagrams provided featuring the above mentioned views of the system.
1.1.1. Goals and Constraints
The following non-functional requirements that affect the architectural solution have been identified:
| Non-functional requirement | Description |
|---|---|
Adaptability |
The application shall be easy to be integrated into existing business workflows using different communication protocols and data formats |
Portability |
The application shall be able to be deployed on a wide variety of software/hardware systems |
Interoperability |
The system shall be interoperable with both commercial and free alternative implementations of the eDelivery profile. |
1.1.2. Security
The Domibus Access Point provides built-in security in accordance to the implemented specification and industry best practices. It can also be easily integrated into existing security domains.
|
See Also
|
1.1.3. Communication
Corner 1 - Corner 2
As no assumptions can be made about the security architecture of corner 1/4 (backoffice), the integration into the existing architecture has to be provided by the Domibus plugins. While the default plugins do not include any security constraints, they can be easily extended to accommodate most of the security requirements.
Corner 2 - Corner 3
The communication between corner 2 and corner 3 is able to fulfil all the security requirements specified in the eDelivery AS4 profile. The configuration is handled via WS-Policy files and PMode configuration. All webservice security is enforced by the Apache CXF/WSS4J/Santuario frameworks.
Certificate Configuration
The location and credentials of private and public certificates used by CXF are configured in the domibus.properties property configuration file.
Client Certificate
The client certificate for use with client authentication (two-way SSL) is configured in the “clientauthentication.xml” spring configuration file. Incoming TLS secured connections terminate at the proxy server (e.g., Apache httpd) and must be configured according to the employed proxy server’s documentation.
Corner 3 - Corner 4
The security between corner 3 and corner 4 is handled via the same mechanisms used in the communication corner 1 – corner 2.
1.1.4. Administrative Sites
Access to the Domibus administration page is secured with username/password. The credentials are managed by a Spring authentication manager and multiple authentication providers can be plugged into it by default. The credentials are stored in the database and they are managed by an authentication provider that uses a Bcrypt strong hashing function for encoding them. Integration into an existing authentication scheme (i.e., LDAP) can be performed via Spring configuration.
|
Important
|
SECURITY DISCLAIMER
On top of the security that Domibus provides, the user is responsible for taking additional security measures according to best practices and regulations. This includes, but is not limited to: using firewalls, IP whitelists, and file system/database encryption. DIGIT shall not be held responsible for any security breach that might occur due to User not respecting this recommendation. |
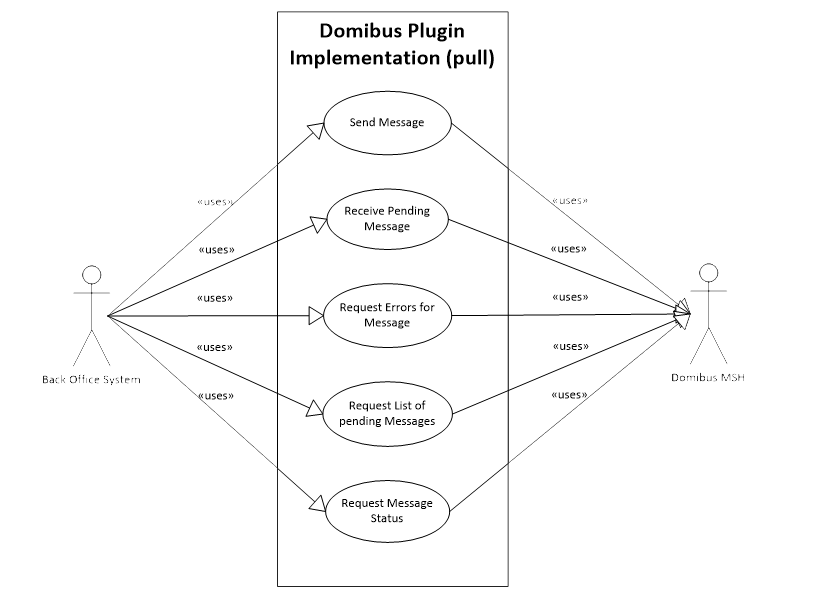
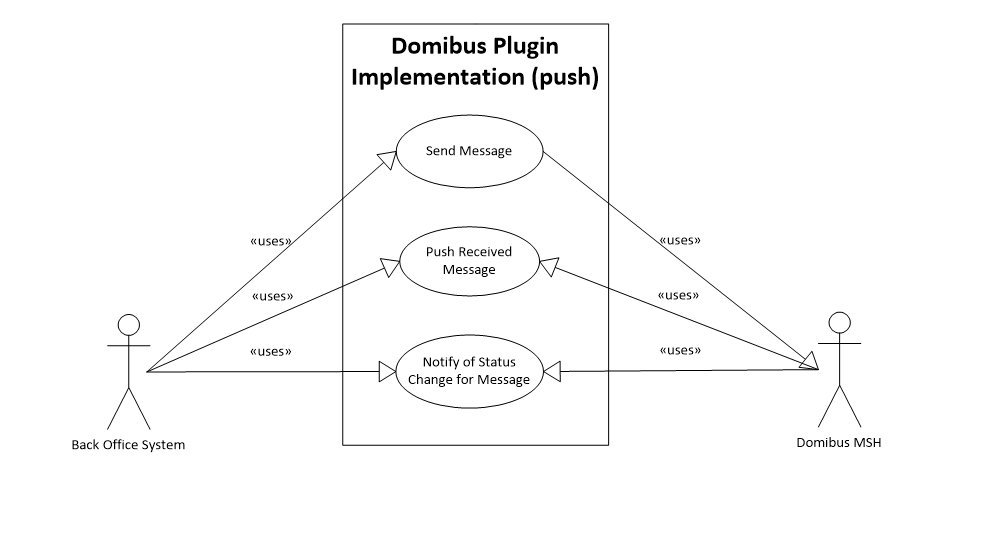
1.2. Use Case View
This section provides a representation of the use cases relevant for the architecture.
The use cases relevant for the architecture have been selected based on the following criteria:
-
Use cases affecting the exchange between the backoffice system and the Domibus MSH.
-
Use cases representing critical parts of the architecture, thereby addressing the technical risks of the project at an earlier stage.
The following use cases have been selected:
-
Backoffice integrations using pull communication (i.e., WebService)
-
Backoffice integrations using push communication (i.e., JMS)
-
Usage of the administrative GUI

1.3. Logical View
Here we describe the main application modules, how they interact and how they implement the specification and profile.
1.3.1. Architecturally Significant Components
The following diagram provides a high-level view of the main components of the system.
You can find below a short description for each component:
-
C1/C4 – the backend system integrating with Domibus.
-
Domibus Plugin API – API used to implement a plugin.
-
Plugins – the Domibus default plugins, WS Plugin, JMS Plugin and the FS Plugin or a custom developed plugin.
-
Domibus Ext Model – domain model used by Domibus plugins.
-
Domibus Plugin Delegate – component that delegates calls from the plugins to the Domibus core.
-
Domibus Logger – custom logger used by Domibus Plugins and Domibus Core.
-
Domibus MSH SPI – API used to implement a Domibus extension.
-
Domibus API – domain and services used by the internal Domibus modules.
-
Domibus Core – the core Domibus implementation
-
Domibus Tomcat – implementation and configuration specific to the Tomcat server.
-
Domibus WebLogic - implementation and configuration specific to the WebLogic server.
-
Domibus WildFly - implementation and configuration specific to the WildFly server.
-
Domibus JMS SPI – the internal API used to support a specific JMS broker implementation.
-
ActiveMQ JMS SPI – implementation to support the ActiveMQ classic JMS broker.
-
WebLogic JMS SPI – implementation to support the WebLogic internal JMS broker.
-
WildFly JMS SPI- implementation to support the WildFly internal JMS broker.
-
Domibus IAM SPI – the API used to implement an IAM extension.
-
DSS IAM SPI – the implementation of the IAM extension using the DSS library.
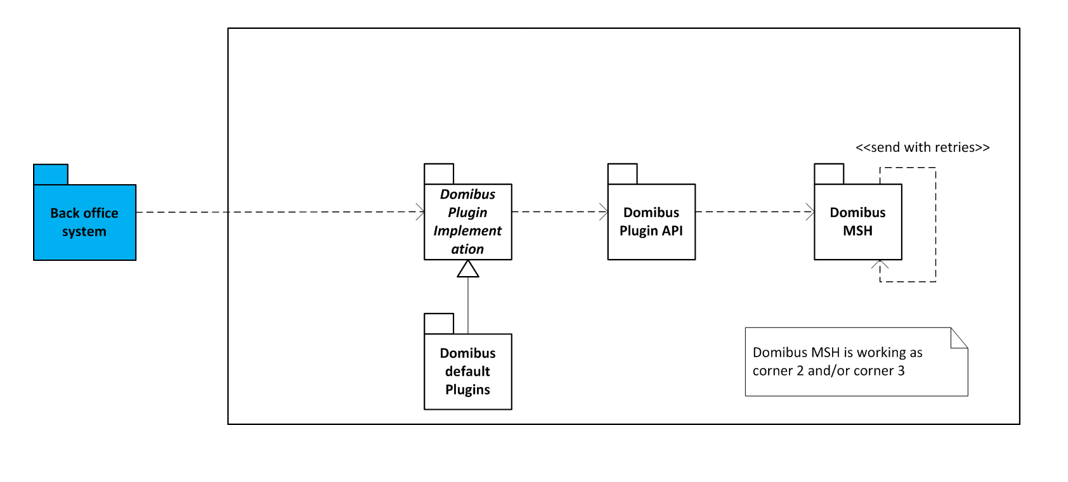
1.3.2. Backoffice system (Corner 1 of 4)
The purpose of Domibus as an Access Point is to connect different backoffice systems via structured, secure message exchange. While, regarding a single message exchange, corners 1 and 4 are usually different applications running in different environments, within a single deployment the role of corner 1 and corner 4 (for different message exchanges) is usually taken by the same application. Therefore, from a logical point of view, corners 1 and 4 are the same package.
1.3.3. Domibus plugin implementation
This module is responsible for the communication between the backoffice system and Domibus and for the mapping from the backoffice internal data format to Domibus internal data format. The communication and the mapping of the data can be done in both directions. Integration into existing security architecture can also be implemented here.
As there can be made few assumptions about the backoffice system, this module is commonly implemented by the Domibus user. Details on this process can be found inside the Domibus Plugin Cookbook.
1.3.4. Domibus default plugins
Domibus provides three default plugins, which can be used to integrate a backoffice, acting as C1 or C4, with Domibus: Web Service Plugin, File System Plugin and JMS Plugin.
A custom plugin can be implemented in case one of the default plugins do not accommodate the needs of a backoffice.
1.3.5. Domibus plugin API
This package contains all necessary interfaces and classes required to implement a Domibus plugin.
1.3.6. Domibus MSH (Corner 2 of 3)
The Domibus MSH (Message Service Handler) is the main module, representing corner 2 and/or 3 in a 4-corner message exchange. All the implementation relevant to the eDelivery profile is done inside this package. It can be deployed on Tomcat, WebLogic and WildFLy.
1.3.7. Administrative GUI
This package contains of a Spring MVC web application providing basic monitoring and configuration options. === Deployment View
Here you can find a description of the hardware nodes running the execution environment for the system.
The diagram below provides a view of hardware components involved in this project. Note that the diagram features a clustered environment is shown. Whenever a single server deployment is sufficient (i.e., for testing purposes), a load balancer and multiple hardware nodes are not required.

|
Note
|
Not all physical nodes are represented in this diagram. Load balancers, database servers and JMS servers can be multiplied for scalability and, performance and availability improvements. Also, note that we are not featuring security mechanisms like Firewalls. |
These are the identified hardware nodes:
-
Load balancers are responsible for distributing requests among multiple Domibus nodes. A random round robbing/no sticky session setup is recommended.
-
Java servlet containers with deployed Domibus instances are responsible for message processing.
-
A database server (MySQL or Oracle) is responsible for storing messages and PMode configuration data.
-
The shared file system contains shared Domibus configuration data, file based PMode data (Keystores) and, depending on configuration, binary data of message attachments.
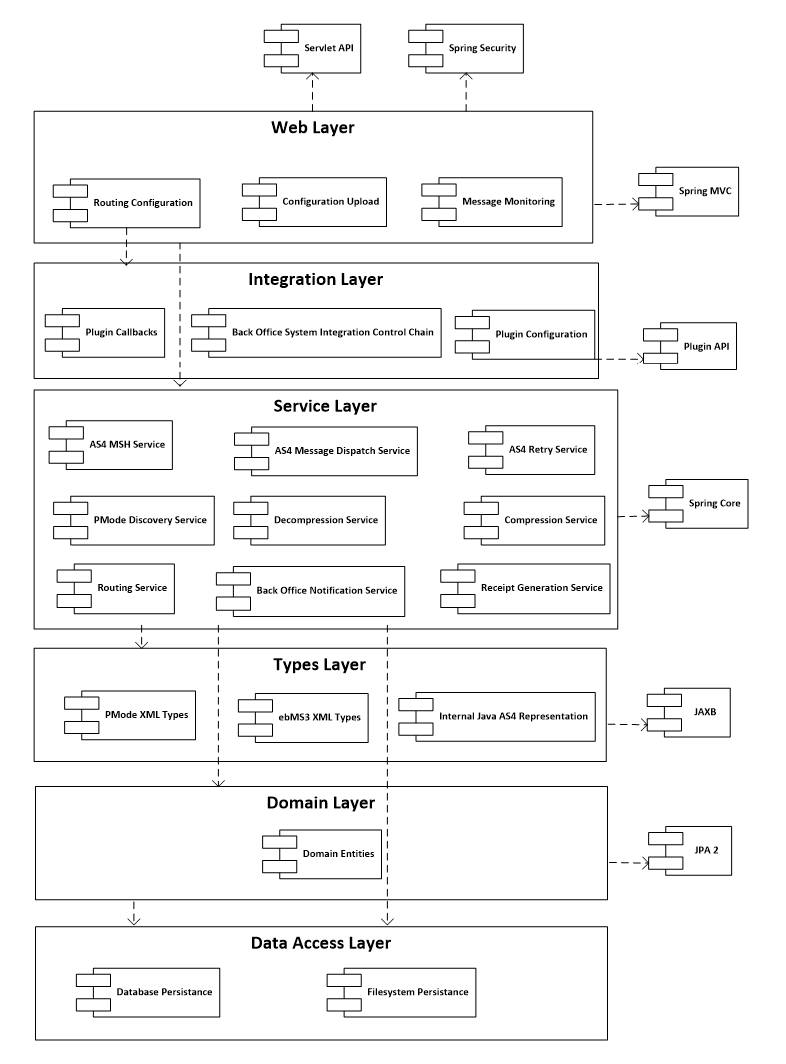
1.4. Implementation View
The following diagram describes the software layers of the system and their components.
The AS4 MSH Service is the web service which is exposed on the internet
that accepts the AS4 requests, and called by the external systems.
The AS4 Message Dispatch Service, used by Domibus acting as C2,
is a web service client capable of sending AS4 requests
and is responsible for sending messages to other C3 Access Points.
The Web Layer is accessed typically by a web browser. The MSH SOAP
handling is implemented using the Apache CXF framework.
- Web Layer
-
is accessed typically by a web browser. The MSH SOAP handling is implemented using the Apache CXF framework.
- Integration Layer
-
uses the Spring framework and is responsible for the integration of custom plugins and all communication processes and data format translations between backoffice systems and Domibus.
- Services Layer
-
offers access to the domain objects of the platform as well as to the platform data layer. These services are Plain Old Java Objects relying on the Spring framework for dependency injection and for transaction management.
- Types Layer
-
contains all the java objects generated from the XSDs used by the platform. These are JAXB generated objects.
- Domain Layer
-
holds all the platform entities. The persistence of these entities is implemented using the Java Persistence API version 2.0.
- Data Persistence
-
relies on the database and the file system to persist the data. The file system is used to store configuration data and the database to persist the incoming and outgoing messages.
All these layers run on a Java Servlet Container.
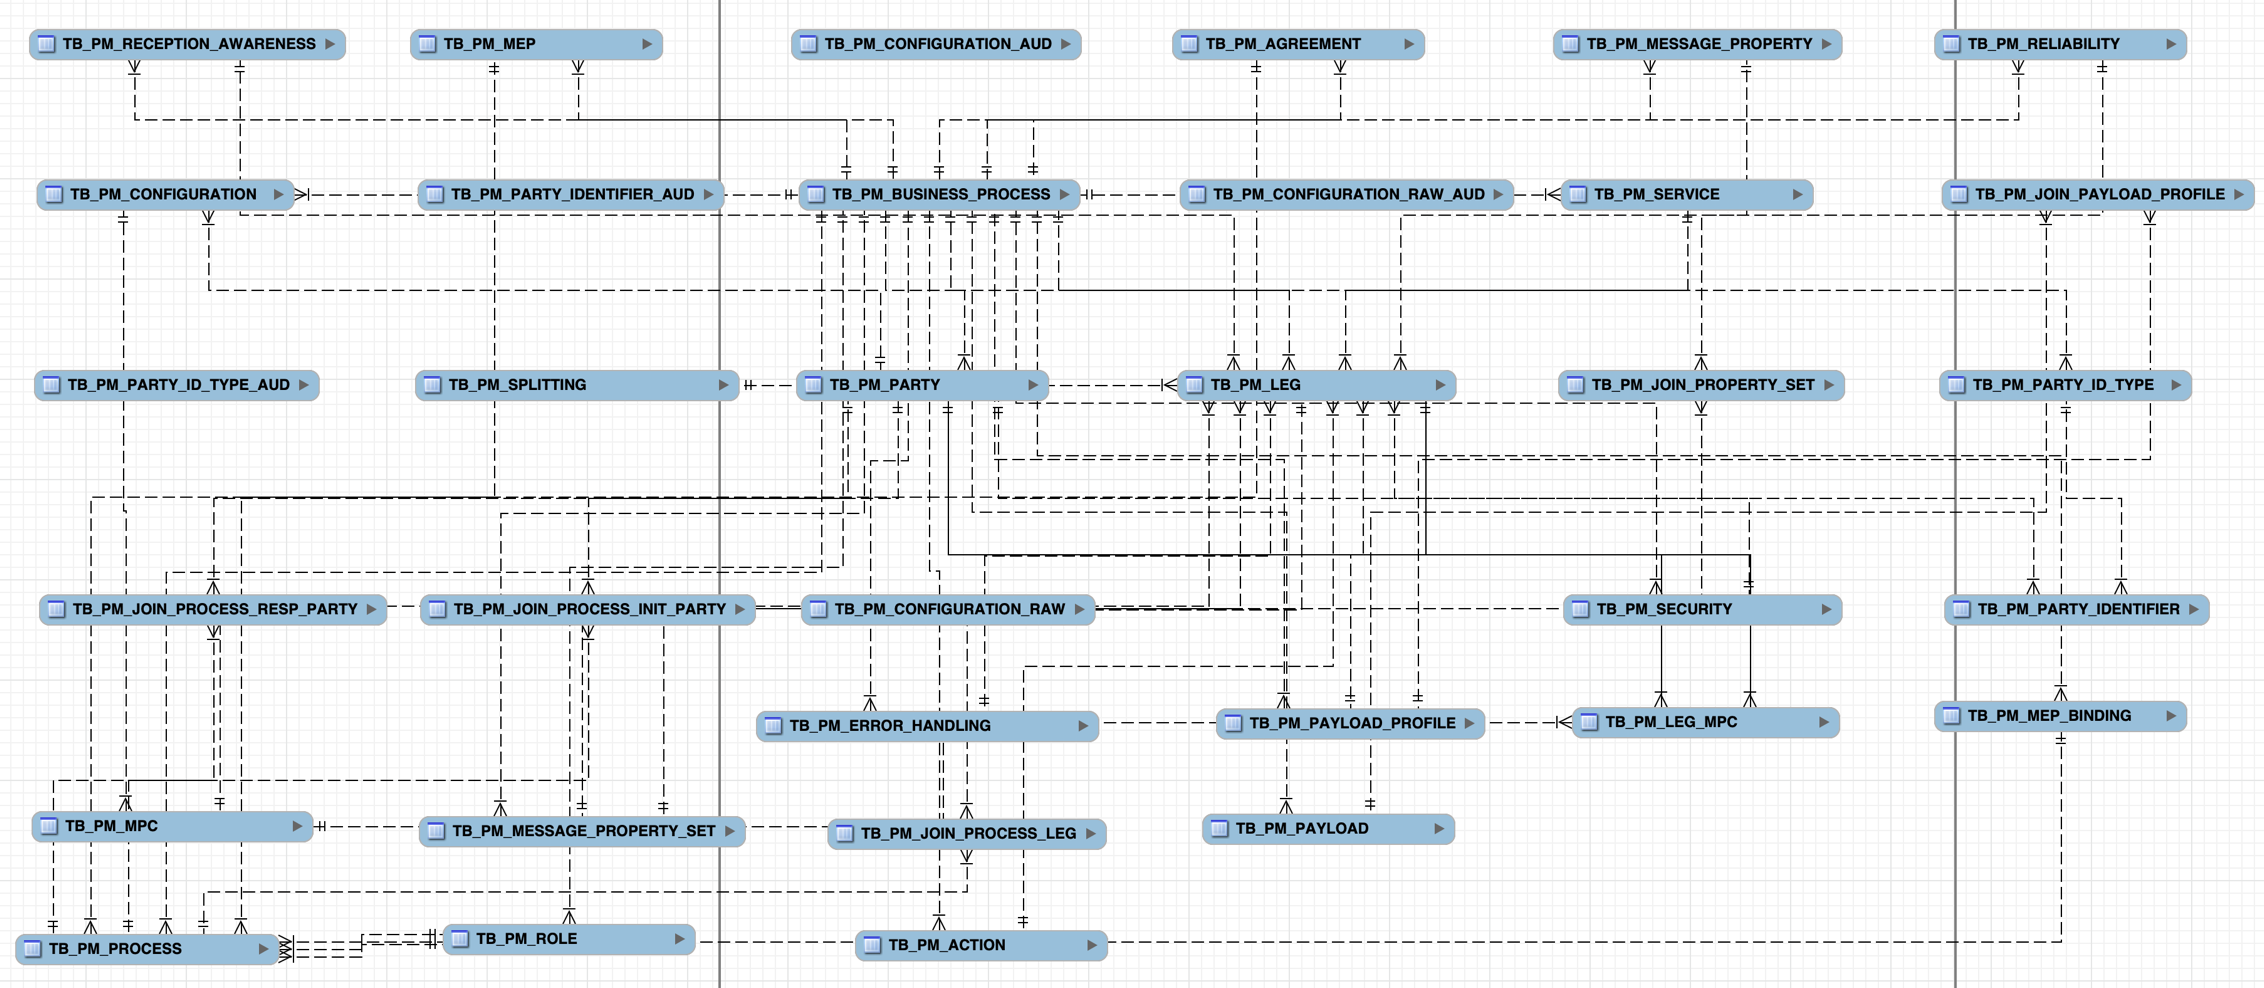
1.5. Data View
1.5.1. Data Model
The following diagrams show a high-level abstraction of the data entities, which must be implemented by the system:
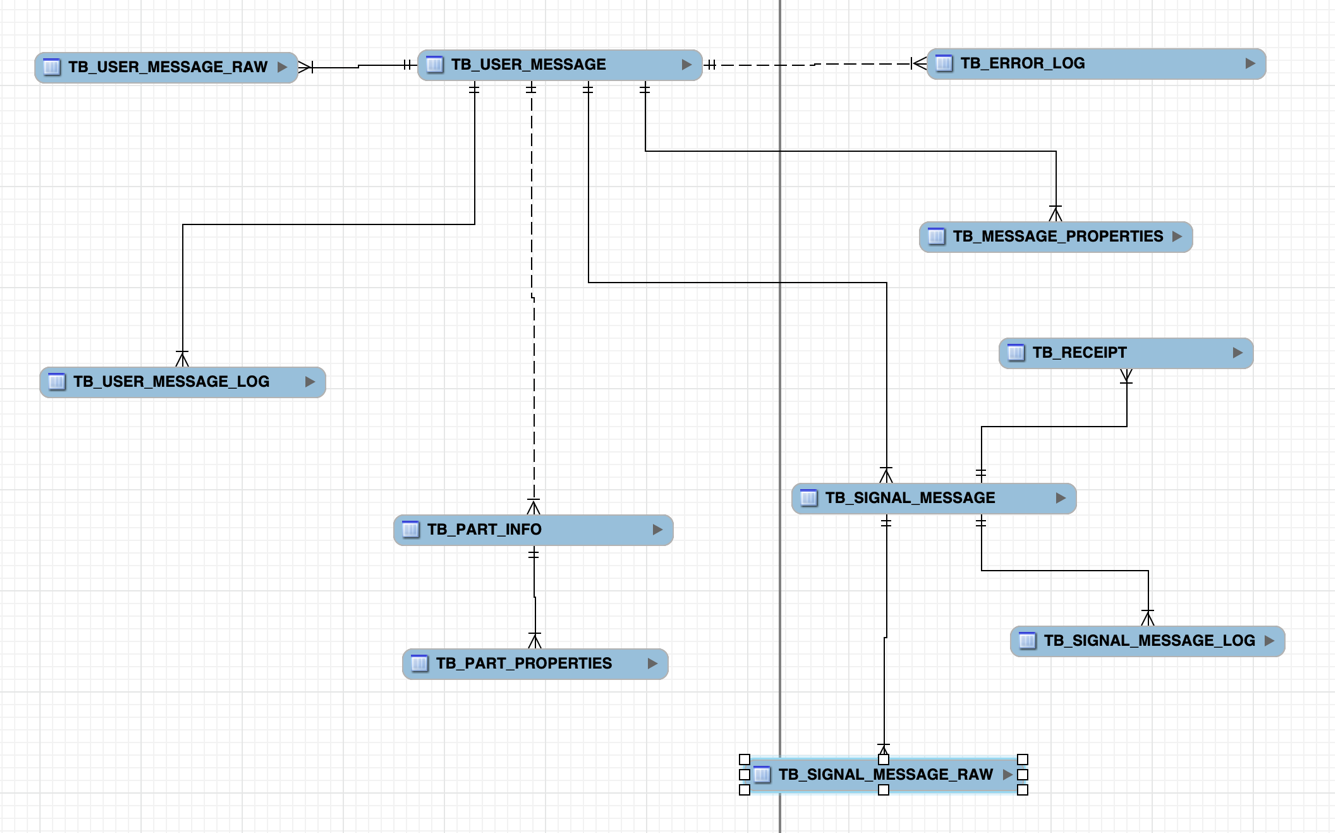
The above tables represent a mapping of the ebMS3 XSD to database tables.
TB_USER_MESSAGE-
table containing information about the AS4 UserMessage metadata (both sent and received ones).
TB_USER_MESSAGE_LOG-
table containing runtime information about the User Message (both sent and received ones) such the message status, retry information, etc.
TB_USER_SIGNAL_MESSAGE-
table containing information about the AS4 SignalMessage metadata (both sent and received ones).
TB_SIGNAL_MESSAGE_LOG-
table containing runtime information about the Signal Messages(acknowledgements) for sent User Messages.
The above tables represent a 1:1 mapping of the PMode configuration XSD to database tables.
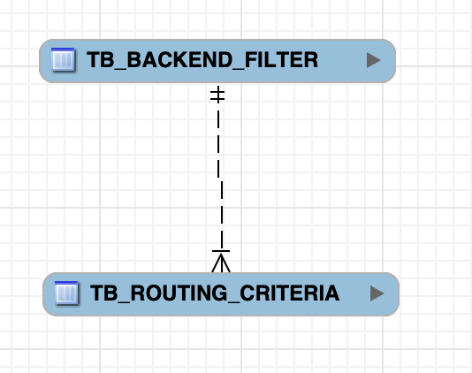
Routing criteria contains the data that are needed to perform the routing of the messages to a specific plugin implementation.
Backend filters are collections of routing criteria associated with a specific backend representation.
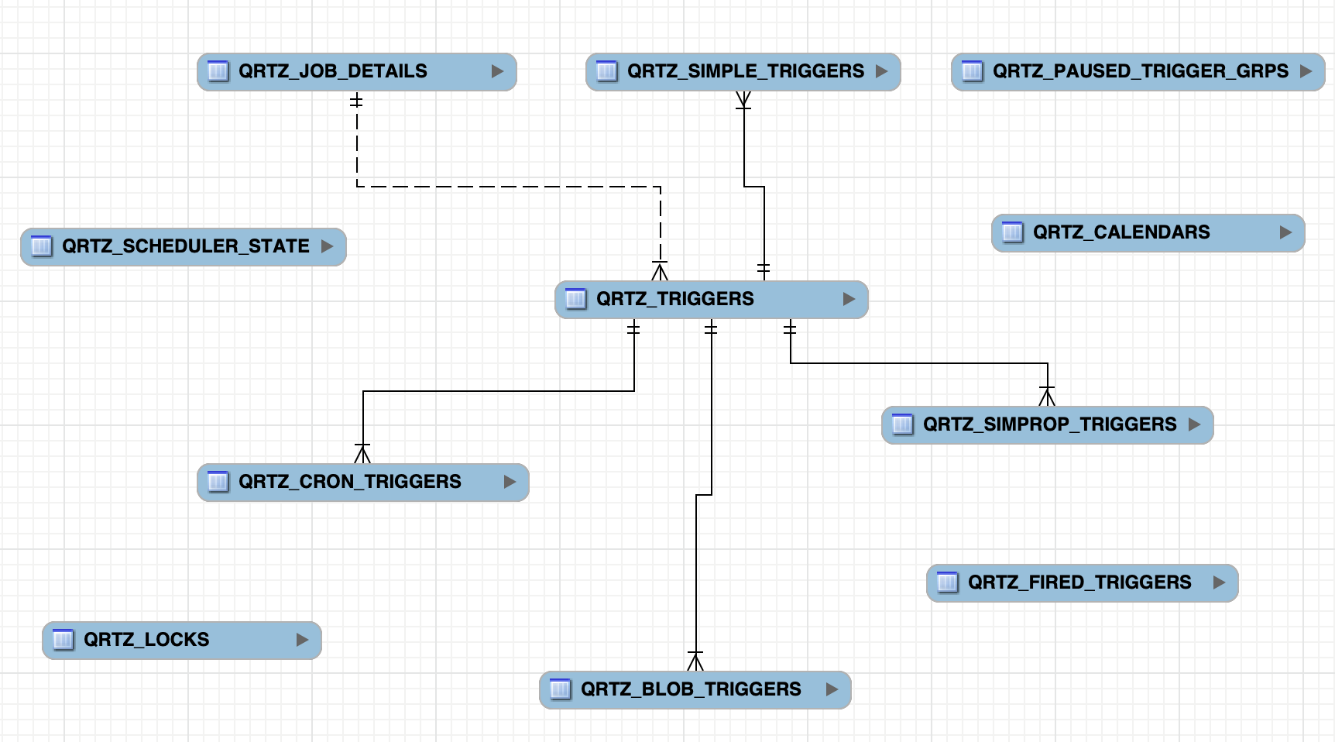
The above tables are used by the Quartz library which is used by Domibus for crontab like jobs.
Data Auditing
The database tables contain information which provide audit information about their entries including the name of the user who created or last updated a particular entry or about the creation time or the last update time of a particular entry. The stored values are the following:
CREATED_BY, MODIFIED_BY, CREATION_TIME, MODIFICATION_TIME
These values are not visible to the Domibus user and can be only
inspected at the database level. Data created or updated by the Domibus
users will use their usernames for the CREATED_BY and MODIFIED_BY
columns. Data created using plugin users will use their plugin usernames
for the CREATED_BY and MODIFIED_BY columns. The rest of the entries
(e.g., created during the invocation of an asynchronous JMS listener)
will use the username used to connect to the database for MySQL or the
Oracle user schema for the CREATED_BY and MODIFIED_BY columns.
There is one exception involving reference data (i.e., data that
has to exist before the application can be used) on MySQL where we
use the value DOMIBUS for the CREATED_BY and MODIFIED_BY columns.
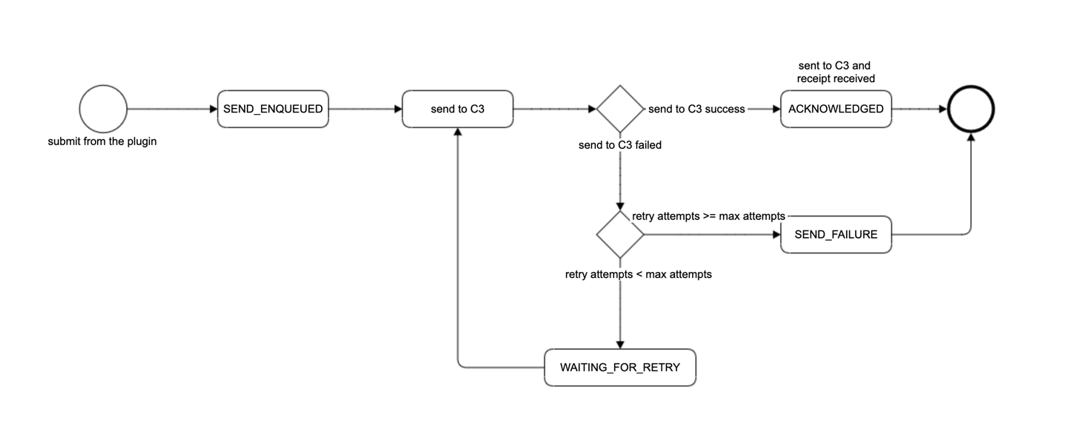
1.5.2. State Machines
Outgoing Message State Machine
The outgoing messages have the following state machine:
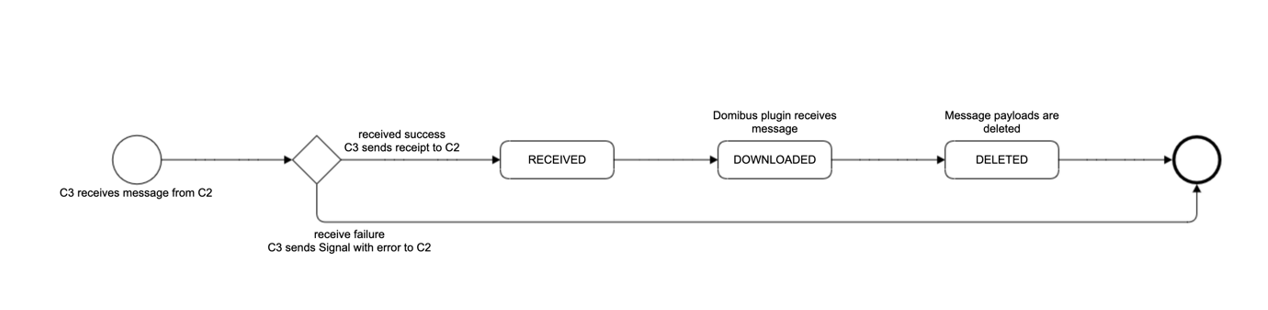
Incoming Message State Machine
The incoming messages have the following state machine:
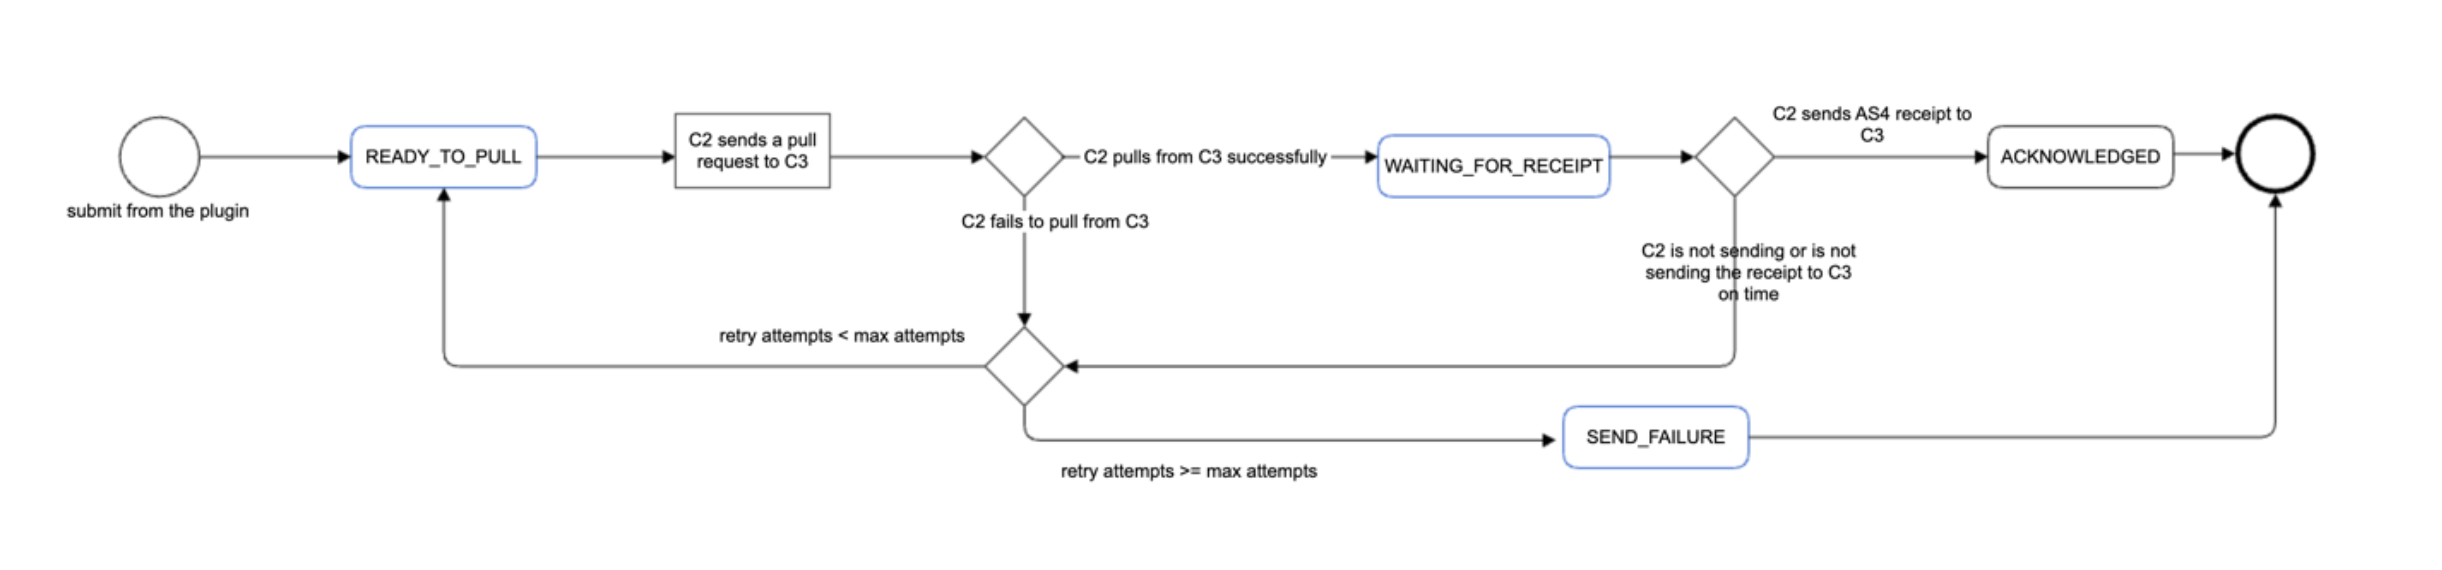
Pull Messages State Machine
1.6. Size and Performance
1.6.1. Size
Size restrictions applied on the data that is exchanged by the backoffice systems, but not on the application or its components themselves, have an impact on the architecture and on the configuration of the system.
To support the exchange of large binary files, the plugin API supports payload submission by reference, meaning that Domibus can download a payload from a given URI. Additionally, payloads can be stored on the file system instead of the database to avoid the processing of huge blobs.
As the eDelivery AS4 profile provides no provisions for ebMS large file handling (split/join) the transfer of data is limited by bandwidth and memory constraints.
Extra restrictions can be implemented via the business process PModes. These restrictions concern the maximum size of a payload and the maximum number of payloads in a message.
1.6.2. Performance
An important architectural decision that benefits the performance of Domibus includes the decoupling of the solution into corner 1/4 representing the backoffice systems and corner 2/3 representing the Domibus Access Point.
The backoffice systems (corner1/4) interact with the Domibus MSH (corner 2/3) via the interfaces (web services, JMS, REST, etc.) exposed by the plugins deployed on the Domibus MSH side.
Domibus MSH is using internally JMS queues to perform the processing of the messages coming from the backoffice systems via the plugins or from other access points.
All these architectural decisions lead to an improved throughput and load distribution of the messages.
1.7. Logging
1.7.1. Implementation
The logging framework used by Domibus is SLF4J API together with Logback as the SLF4j implementation.
The domibus-logging module provides the custom SLF4J logger
DomibusLogger. This logger must be used for all the logs within the
Domibus application.
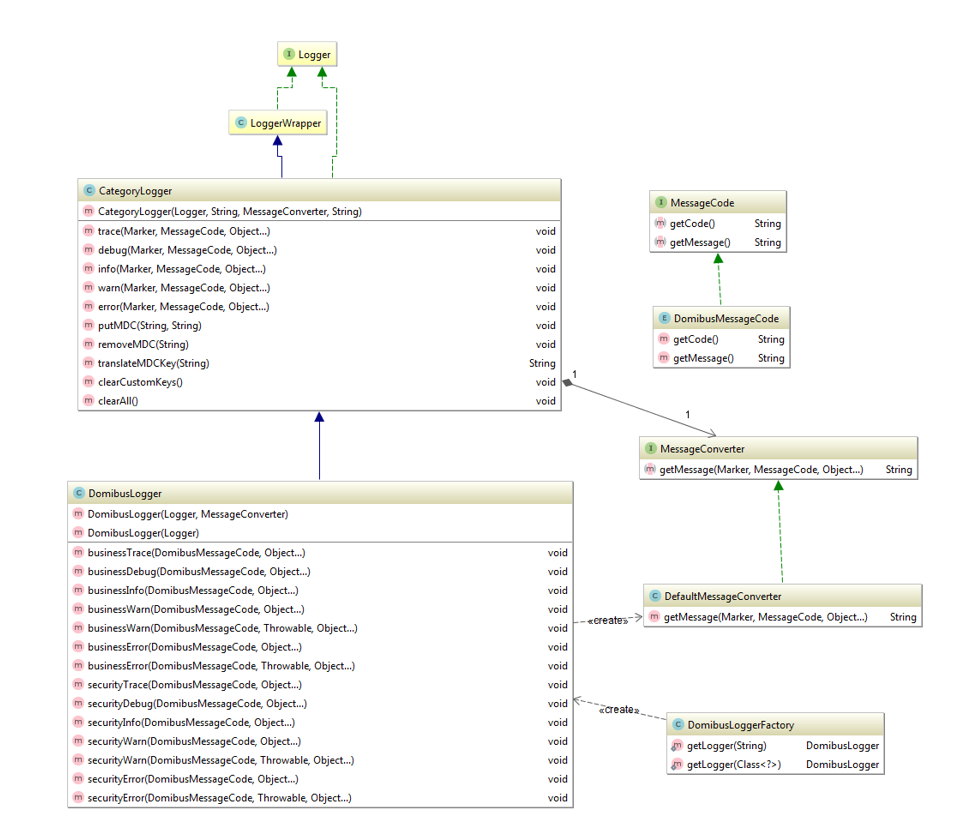
There are three types of logs:
-
security logs
-
business logs
-
miscellaneous logs
Each log category has its own marker defined in the DomibusLogger class.
By default, each category will be logged in a separate file:
-
domibus-security.log: This log file contains all the security related information. For example, you can find information about the clients who connect to the application. -
domibus-business.log: This log file contains all the business-related information. For example, when a message is sent or received, etc. -
domibus.log: This log file contains both the security and business logs plus miscellaneous logs like debug information, logs from one of the framework used by the application, etc. -
error.log: This log file contains all the errors which occurred in Domibus including errors from third party libraries used by Domibus.
The security and business logs require a code that is defined in the
DomibusMessageCode class.
The logs pattern is defined in the logback.xml file.
%d{ISO8601} [%X{d_user}] [%X{d_messageId}] %5p %c{1}:%L - %m%n
Where:
-
d_useris the authenticated user. -
d_messageIdis the message id currently being sent/received.
-
The values for the
d_userandd_messageIdproperties can be set by calling the methodDomibusLogger.putMDC(String key, String value). -
The prefix
d_is added automatically by theDomibusLoggerin order to easily identity the Domibus specific MDC properties.
LOGGER.putMDC(DomibusLogger.MDC_USER, authenticationResult.getName());The MDC values need to be always cleaned after the thread execution. Otherwise, the thread might be returned back to the thread pool with previously set MDC values and on the next thread execution, the old MDC values will be used.
In order to easily clear the MDC values after a method execution a
custom annotation, MDCKey, has been created in order to mark a method
that is setting values in the MDC. An AOP aspect is detecting the
methods annotated with the MDCKey annotation and after the execution
of the method it is clearing the MDC values.
@MDCKey(DomibusLogger.MDC_MESSAGE_ID)
public String submit(final Submission messageData, final String backendName)
1.7.2. Domibus Log Codes
| Event code | Description |
|---|---|
SEC-001 |
Unsecure login is allowed, no authentication will be performed |
SEC-002 |
Basic authentication is used |
SEC-003 |
X509Certificate authentication is used |
SEC-004 |
Blue coat authentication is used |
SEC-005 |
The host [\{}] attempted to access [\{}] |
SEC-006 |
The host [\{}] has been granted access to [\{}] with roles [\{}] |
SEC-007 |
The host [\{}] has been refused access to [\{}] |
SEC-008 |
Certificate is not valid at the current date [\{}]. |
SEC-009 |
Certificate is not yet valid at the current date [\{}]. |
SEC-010 |
No security policy (intended for testing alone) is used. |
SEC-011 |
User [\{}] is trying to access a message having final recipient: [\{}] |
SEC-012 |
X509Certificate invalid or not found |
SEC-013 |
The user [\{}] is unknown |
SEC-014 |
The user [\{}] is not active |
SEC-015 |
The user [\{}] is suspended |
SEC-016 |
The user [\{}] is trying to login with bad credentials |
SEC-017 |
The user [\{}] is locked after trying to login for [\{}] wrong attempts. |
SEC-018 |
The certificate with alias [\{}] will be revoked on [\{}] |
SEC-019 |
The certificate with alias [\{}] is revoked since [\{}] |
SEC-020 |
The password for user [\{}] will expire on [\{}] |
SEC-021 |
The password for user [\{}] expired on [\{}] |
| Event code | Description |
|---|---|
BUS-001 |
Message successfully received |
BUS-002 |
Failed to receive message |
BUS-003 |
Failed to validate message |
BUS-004 |
Failed to notify backend for incoming message |
BUS-005 |
Invalid charset [\{}] used |
BUS-006 |
Invalid NonRepudiationInformation: no security header found |
BUS-007 |
Invalid NonRepudiationInformation: multiple security headers found |
BUS-008 |
Invalid NonRepudiationInformation: eb:Messaging not signed |
BUS-009 |
Invalid NonRepudiationInformation: non repudiation information |
BUS-010 |
There is no content inside the receipt element received by the responding gateway |
BUS-011 |
Reliability check failed, check your configuration |
BUS-012 |
Reliability check was successful |
BUS-013 |
Compression failure: no mime type found for payload with cid [\{}] |
BUS-014 |
Error compressing payload with cid [\{}] |
BUS-015 |
Payload with cid [\{}] has been compressed |
BUS-016 |
Decompression failure: no mime type found for payload with cid [\{}] |
BUS-017 |
Payload with cid [\{}] will be decompressed |
BUS-018 |
Decompression is not performed: leg |
BUS-019 |
Decompression is not performed: partInfo with cid [\{}] is in body |
BUS-020 |
Message action [\{}] found for value [\{}] |
BUS-021 |
Message action not found for value [\{}] |
BUS-022 |
Message agreement [\{}] found for value [\{}] |
BUS-023 |
Message agreement not found for value [\{}] |
BUS-024 |
Party id [\{}] found for value [\{}] |
BUS-025 |
Party id not found for value [\{}] |
BUS-026 |
Party [\{}] is not a valid URI [CORE] 5.2.2.3 |
BUS-027 |
Message service [\{}] found for value [\{}] |
BUS-028 |
Message service not found for value [\{}] |
BUS-029 |
Message service [\{}] is not a valid URI [CORE] 5.2.2.8 |
BUS-030 |
Leg name found [\{}] for agreement [\{}], senderParty [\{}], receiverParty [\{}], service [\{}] and action [\{}] |
BUS-031 |
Matching Process or Leg not found for agreement [\{}], senderParty
[\{}], receiverParty [\{}], service [\{}] and action [\{}]. |
BUS-032 |
Preparing to send message |
BUS-033 |
Message sent successfully |
BUS-034 |
Message send failure |
BUS-035 |
No Attachment found for cid [\{}] |
BUS-036 |
More than one Partinfo referencing the SOAP body found |
BUS-037 |
Payload profile validation skipped: payload profile is not defined for leg [\{}] |
BUS-038 |
Payload profiling for this exchange does not include a payload with CID [\{}] |
BUS-039 |
Payload profiling for this exchange requires all message parts to declare a MimeType property [\{}] |
BUS-040 |
Payload profiling error, missing payload [\{}] |
BUS-041 |
Payload profile [\{}] validated |
BUS-042 |
Property profile validation skipped: property profile is not defined for leg [\{}] |
BUS-043 |
Property profiling for this exchange does not include a property named [\{}] |
BUS-044 |
Property profile [\{}] validated |
BUS-045 |
Message persisted |
BUS-046 |
Message receipt generated with nonRepudiation value [\{}] |
BUS-047 |
Message receipt generation failure |
BUS-048 |
Message status updated to [\{}] |
BUS-049 |
All payloads data for user message [\{}] have been cleared |
BUS-050 |
Policy [\{}] was not found for outgoing message |
BUS-051 |
Policy [\{}] is used for outgoing message |
BUS-052 |
Algorithm [\{}] is used for outgoing message |
BUS-053 |
Algorithm [\{}] is used for incoming message |
BUS-054 |
Encryption username [\{}] is used for outgoing message |
BUS-055 |
Policy [\{}] for incoming message was not found |
BUS-056 |
Policy [\{}] for incoming message is used |
BUS-057 |
No Role with value [\{}] has been found |
BUS-058 |
Party with name [\{}] has not been found |
BUS-059 |
Message with id [\{}] has not been found |
BUS-060 |
Message with id [\{}] has been consumed from the queue [\{}] |
BUS-061 |
Received payload with cid [\{}] for message [\{}] of size [\{}] (in bytes) |
BUS-062 |
Saved payload with cid [\{}] for message [\{}] of size [\{}] (in bytes) for sending |
BUS-063 |
Notifying about message status change from [\{}] to [\{}] |
BUS-064 |
Message submitted |
BUS-065 |
Message submission failed |
BUS-066 |
Message retrieved |
BUS-067 |
Message retrieval failed |
BUS-068 |
Test message successfully received from [\{}] to [\{}] |
BUS-069 |
Failed to receive test message from [\{}] to [\{}] |
BUS-070 |
Preparing to send test message from [\{}] to [\{}] |
BUS-071 |
Test message sent successfully from [\{}] to [\{}] |
BUS-072 |
Test message sending from [\{}] to [\{}] failed |
BUS-073 |
Message property [\{}] exceeds [\{}] characters limit |
BUS-074 |
Receiver Party id [\{}] found for value [\{}] |
BUS-075 |
Receiver Party id not found for value [\{}] |
BUS-076 |
Duplicate Message Property found for property name [\{}] |
BUS-077 |
Payload size is greater than maximum size [\{}] defined in payload profile [\{}]. |
BUS-078 |
Mandatory Message Header metadata [\{}] is not provided |
BUS-079 |
Value of [\{}] is too long (over 255 characters). |
BUS-080 |
Value of [\{}] does not conform to the required MessageIdPattern: [\{}]. Value provided: [\{}]. |
BUS-081 |
Message with id [\{}] already exists. |
1.7.3. Logging and Multitenancy
To associate each log statement to a specific domain, the Logback format pattern contains the domain name.
<pattern>%d\{ISO8601} [%X\{d_user}] *[%X\{d_domain}]*
[%X\{d_messageId}] %5p %c\{1}:%L - %m%n</pattern>
The domain name is added:
-
in the MDC context so that every log statement contains the domain name.
-
in the MDC context as soon as a thread is started:
-
for a web service, a CXF interceptor is adding the domain to MDC as close as possible to the START phase. The MDC context value is cleared with a CXF interceptor added at before the END phase.
-
for a JMS message listener, the domain name is extracted from the JMS message that is being consumed and added programmatically to MDC.
-
The separation of logs per domain is achieved using the existing Logback marker mechanism and a Logback configuration file distributed in each server configuration archive.
As a result, separate log files are created containing only the logs for one domain.
As a result, separate log files are created containing only the logs for one domain.
For instance, for a domain named DOMAIN1 the following log files are saved
under the logs/DOMAIN1 directory:
-
DOMAIN1-domibus.log -
DOMAIN1-business.log -
DOMAIN1-security.log
provided that the DOMAIN1-logback.xml is configured.
To separate the configuration of each logger instance per domain, the following provisions have been made:
-
The loggers defined in the domain-specific Logback XML file have names prefixed with
${domainName}.-
For example
<logger name="${domainName}.eu.domibus" level="INFO">).
-
-
Each logger in the application will have as many instances as there are domains, each instance having the configuration for a particular domain with all instances being stored in
DomibusLoggersCache. The appropriate logger instance to perform an operation is selected using a proxy mechanism each time a logging method is invoked.
This configuration is managed in the Domibus logback.xml file, and it is independent of the Domibus application.
|
Important
|
This mechanism applies only to eu.domibus loggers.Loggers from third-party libraries cannot be configured independently for a tenant, they should be added to the main logback.xml file with the settings that apply to all tenants.
|
|
See Also
|
For more on how to configure the Domibus logging, see Administration Guide. |
1.8. Caching
In order to enhance the performance domibus uses caching in specific areas of the application:
-
caching of security policies
-
caching of backend filter configuration
-
caching of PModes, when using the
CachingPModeProvider
Domibus has two types of caching mechanisms available:
-
Local cache - available when Domibus is deployed in a single instance as well as in a cluster. The local cache must be used when you don’t want to replicate the cache across the cluster deployment.
-
Distributed cache - only available in a cluster deployment. It should be used when you want to replicate the cache across the cluster members. The cache replication is performed automatically.
1.9. Local cache
Domibus uses Ehcache implementation for local caching. Ehcache is configured in ${domibus.config.location}/internal/ehcache.xml. All the caches defined in the ehcache.xml file are preconfigured with default values and are commented out. In order to customize one of the cache configuration you can uncomment it and adapt the necessary values.
The local cache is also available to the plugins. A plugin can define its own cache configuration on top of the existing configuration provided in Domibus. For more details how to configure the local caching at plugin level, please check for more details in the Plugin Cookbook
1.10. Distributed cache
In a cluster deployment, Domibus activates also the distributed cache. The distributed cache is implemented with the Hazelcast library. The list of the Hazelcast cluster members are specified in domibus.properties and a Hazelcast member is created on each cluster machine.
In a cluster deployment, once you add an entry in a distributed cache, the change is replicated automatically amongst the cluster members. By default, a distributed cache is configured with a near cache in order to reduce the network overhead between the cluster members.
The distributed cache is accessible via Java API and via REST.
In a non-cluster deployment, the distributed cache defaults to the local cache.
The distributed cache is also available to the plugins. A plugin can define its own cache configuration using the API from the domibus-plugin-api module. For more details how to configure the distributed caching at plugin level, please check Domibus Plugin Cookbook document.
1.11. Multitenancy
There were multiple options to choose from to support Multitenancy:
-
One Schema per tenant: tenant’s data is saved in the same database for all tenants but in different schemas. When a new tenant needs to be added a new related DB schema is created in the same database instance. It is easier to add new tenants comparing with the DB per tenant as the same connection pool can be reused. Switching between tenants is performed centrally by selecting the DB schema related to the tenant. A huge advantage of this approach is that the application code impact is limited compared to the Discriminator field approach described below.
-
One DB per tenant: each tenant has its own separate database. This is the highest level of isolation; however, it is complex and cumbersome to maintain. Whenever a new tenant must be added a new database instance needs to be created, a new database connection pool also needs to be created in Domibus which points to the tenant database, etc.
-
Discriminator field: All tenants' data is saved on common tables, and each table holds a discriminator field to distinguish data from each tenant. This approach has quite some disadvantages: no physical isolation of data between tenants (a bug in the application might leak between tenants), performance decrease as the data for all the tenants are saved into the same tables (resulting in bigger tables and more complex/heavier queries), and significant changes to the application code to take into account that discriminator field.
1.11.1. Multitenancy Approach
Domibus implements the One Schema per tenant" solution for Multitenancy support because of its many advantages. The Hibernate library, which is used in Domibus, comes with support by default for the One Schema per tenant strategy.
|
See Also
|
For more info about Multitenancy in Hibernate, see https://docs.jboss.org/hibernate/orm/5.0/userguide/html_single/chapters/multitenancy/MultiTenancy.html |
1.11.2. Domain Identification
|
Note
|
In Domibus documentation, the term tenant (technical) is used interchangeably and with the term domain (business). |
For every outgoing/incoming message, the related unique domain id needs to be specified in order to use the applicable configuration for the involved domain (such as DB schema, PMode, keystore, truststore, Domibus properties, etc.).
-
for Outgoing messages, sent by C2 to C3, the association to a specific domain is performed based on the Spring Security info available in the current thread after the authentication has been done by the plugins.
-
for Incoming messages, received by C3 from C2, the association to a domain is based on an HTTP parameter (
domain) appended by C2 to the MSH endpoint of C3. In case the domain name sent by C2 is not defined in C3, an EBMS3 exception will be sent to C2.
Example:
-
C3 exposes the MSH endpoint with URL:
http://localhost:8080/domibus/service/msh. -
C2 belonging to the domain DIGIT will call the MSH C3 endpoint using:
http://localhost:8080/domibus/service/msh?domain=DIGIT.
Please note that adding the HTTP parameter in the MSH endpoint is in-line with eDelivery AS4 specification.
1.11.3. Database schema selection
In Multitenancy mode, the database schema has to be configured per domain in the Domibus domain properties.
|
See Also
|
For more about how to configure it, see Administration Console. |
1.11.4. User to Domain Association
When a user authenticates in the Admin Console, the domain is not yet
identified and Domibus must find out which DB schema to select. In order
to achieve this, a general DB schema is used. In this general DB
schema, a table tells which user that has access to the Admin Console
(defined in the tb_user table) and to the domain he belongs to. This
association is automatically updated by Domibus when users are added or
removed. Therefore, a constraint has been added in Domibus: a username
needs to be unique amongst the existing domains. The same mechanism and
constraints apply to the tb_user table and has been implemented for
the table supporting plugins security: tb_authentication_entry.
1.11.5. Plugins
The introduction of Multitenancy has an impact on how the plugins manage the incoming/outgoing messages.
-
for Outgoing messages, C1 to C2, the plugins need to authenticate first so that Domibus can identify the domain of the user and treat the message accordingly.
Domibus identifies the associated domain of the user based on the Spring Security information from the current thread (for instance the logged in user id) and the user’s configuration in table
tb_authentication_entry. As a result, it is mandatory for C1 to authenticate itself so that Domibus can determine the domain related to the authenticated user. It is possible for the same C1 to send messages to different domains C1 needs to authenticate with different user credentials -
for Incoming messages, e.g., from C3 to C4, the plugins have to segregate the messages based on the domain name received from Domibus and deliver to C4 only the messages associated to the C4’s domain.
The changes implemented in the Default Plugin for Multitenancy are described in the following sections.
Plugin Security
The plugins security configuration is stored in database table
tb_authentication_entry. As every domain has its own separate schema,
the table tb_authentication_entry will contain entries specific to
each domain.

As mentioned in the Domain Identification section, the
username should be unique across all domains. Also, there is a
table tb_user_domain in the general DB schema that maps all usernames
defined in the tb_authentication_entry to one associated domain.
When multiple domains are configured in Domibus, the plugins security activates automatically overriding the value configured using the following property.
#To activate security set this to false
domibus.auth.unsecureLoginAllowed=false
If Domibus is running only with one domain, the plugins security activation is optional.
Plugin API
As every domain has its own dedicate DB schema, there are little changes
required in the Plugin API. The only change that is required is to
include in the class eu.domibus.plugin.Submission a new field named
domain. This way the plugins can select the domain for a specific
message. This is specifically useful for the incoming messages, C3 to
C4, when the plugins need to segregate messages and expose to C4 only
messages that are intended to C4 domain.
WS Plugin
Security is already implemented in the WS Plugin using the
CustomAuthenticationInterceptor and the
eu.domibus.ext.services.AuthenticationService, which retrieves
information from the DB table tb_authentication_entry.
For the WS Plugin security, activation is mandatory in order to use Domibus with multiple domains.
The implementation of the WS Plugin has been changed to take into account the domain according to the general requirements stated in the Plugins section.
JMS Plugin
The JMS Plugin is implemented using five queues:
-
One queue for outgoing messages, C1 to C2:
domibus.backend.jms.inQueue -
One queue for incoming messages, C3 to C4:
domibus.backend.jms.outQueue -
Three queues for reporting message statuses and errors:
-
domibus.backend.jms.replyQueue -
domibus.backend.jms.errorNotifyConsumer -
domibus.backend.jms.errorNotifyProducer
-
C1 and C4 interact with the JMS Plugin by sending/receiving messages from queues mentioned above so the JMS Plugin does not really have control on the messages once they are put in a JMS queue.
In order to segregate the data between domains, the JMS Plugin needs to
connect to queues dedicated to each domain. Therefore, every domain will
have its own set of 4 queues mentioned above with the exception of the
domibus.backend.jms.inQueue.
The queue domibus.backend.jms.inQueue is common to all the domains but when sending message to Domibus, C1 needs to authenticate with specific domain credentials. This is needed to allow Domibus to associate the submitted message with a specific domain. The association of the JMS queues and the domain are be done in the jms-plugin.properties file.
In order to make the migration easier the existing queue names used by the JMS plugin and associated to the default domain will not be modified.
The following convention to prefix the JMS queues with the domain name
must be used to associate the JMS queues to a specific domain in the
jms-plugin.properties file:
domain_name.domibus.backend.jms.inQueueWhere
domain_name is the name of the domain.
-
for Outgoing messages, C1 to C2, C1 sends JMS messages containing the credentials of a specific domain to the IN queue
domibus.backend.jms.inQueue. The JMS Plugin reads the JMS message, performs the authentication using the credentials sent by C1 and determines the domain based on Spring Security information from the current thread. -
for Incoming messages, C3 to C4, the JMS Plugin receives the domain name from Domibus API and then sends the incoming message to the JMS OUT queue associated to the domain where C4 is listening to.
FS Plugin
The FS Plugin has been designed in such a way that it is already domain aware. Briefly, the domain concept is implemented in the FS Plugin as follows:
A file system location is defined per domain, which is protected with username/password. The username/password credentials are defined per domain in the FS Plugin property file
In order to send messages, a user α belonging to domain A will copy the payloads to be "sent" directory in the file system location configured for domain A (the user α must have access to the protected file location). A similar process is happening when user A wants to retrieve messages.
-
for Outgoing messages (C1 to C2), the FS Plugin authenticates itself using credentials (username/password) configured per FS Plugin domain. These new credentials are configured in the FS Plugin properties file. Once the user is authenticated, user information is extracted from the Spring Security data, associated to the current thread and passed to the Domibus Core.
-
for Incoming messages (C3 to C4), the FS Plugin receives the domain name from Domibus so that the incoming messages are into the directory associated to the respective domain.
The domains configured in Domibus, and the domains configured in the FS Plugin properties must match. An error will be raised if the domain is not configured as needed in the FS Plugin properties.
1.11.6. Domibus Properties
The Domibus properties defined in the domibus.properties file are used
for the single domain, when Domibus manages one single domain.
When Domibus is configured with multiple domains, several properties will have to be customized per domain. More information on which properties can be overridden per domain are available in the Administration Guide.
There are three types of properties in Multitenancy mode:
-
Global/Infrastructure properties that have a meaning for the whole application and, as such, a single value
-
Domain properties that can/should be customized for each domain. In case a value is not defined for a domain, it falls back to the one defined in global properties file (or an error is thrown in case the fallback is not allowed by the property metadata)
-
Super properties applicable to super-users. Same behaviour as domain properties.
To distinguish between these types of properties, one needs to define a property metadata in the appropriate metadata manager (each module has its own property metadata manager). If a property does not have a metadata defined, then it is treated as global.
In order to define a property, the following conventions are used:
| Property Type | File where it is defined | Property name |
|---|---|---|
Global/Infrastructure |
domibus.properties |
domibus.config.location |
Domain property, |
domain1-domibus.properties |
domain1.domibus.security.keystore.location |
Domain property, |
default-domibus.properties |
default.domibus.security.keystore.location |
Super property |
super-domibus.properties |
super.domibus.console.login.maximum.attempt |
All common properties are defined in core metadata manager. The properties that are specific to a server (Tomcat, WildFly, WebLogic and WebLogic-ecas) are defined in a specific metadata manager like TomcatMetadataManager. All these properties are managed by the Domibus Property Provider.
These are considered as internal properties, as opposed to properties defined in external modules and plugins (DSS module, JmsPlugin). Each external module has also a property manager that gets and sets its own properties.
External modules can manage their properties by using their own property bag (as do default WS and FS plugins) or by delegating to the Domibus Property Provider bag (as do default JMS plugin and DSS module).
All property metadata, both internal and external, are managed centrally by the Domibus Property Provider.
The property metadata is used by the Domibus Property Provider to determine how and from where to get and set its value.
Domibus Property Provider is the single-entry point for getting and setting property values in MSH.
An external module can use its own property manager to do the same or it can call the Domibus Property Provider Delegate to do the same (as it manages all properties and knows how to route the call to the appropriate module manager).
1.11.7. Message Payloads
Domibus supports two strategies for saving the messages payloads: in the
database or in a local directory on the file disk. Each domain can
customize the strategy for saving the payloads via the
domibus.properties file.
In case a domain chooses to save the payloads in the database, the payloads segregation is ensured as only the users registered in that domain have access to the domain specific schema.
In case a domain chooses to save the payloads in a local filesystem directory configured per domain, the payloads segregation needs to be ensured via OS access rights. It is recommended that each domain configures its own dedicated filesystem directory.
1.11.8. Quartz
In the current version of Domibus, each domain can customize the Quartz
jobs (like the retry job expression defined with the property
domibus.msh.retry.cron).
The Quartz jobs are saved in the database schemas of each domain.
A Quartz Scheduler can only be configured to work with one DB schema at a time.
In order to support Multitenancy, a Quartz Scheduler instance is created for each domain with specific properties for that domain. The creation of a Quartz Scheduler per domain is performed at runtime during the Domibus starts up.
|
2. Quick Start Guide
The eDelivery Access Point (AP) Domibus implements a standardised message exchange protocol that ensures interoperable, secure and reliable data exchange.
Domibus is the AS4 Access Point open source project maintained by the European Commission.
The current release of Domibus supports Tomcat, WebLogic and WildFly and contains the following archives:
Binary |
Contents |
|---|---|
Tomcat |
|
|
Contains the full Tomcat distribution. |
|
Contains the Domibus war for Tomcat. |
|
Contains the Domibus configuration files for Tomcat. |
WebLogic |
|
|
Contains the Domibus war for WebLogic. |
|
Contains the Domibus configuration files for WebLogic. |
WildFly |
|
|
Contains the full WildFly distribution. |
|
Contains the Domibus war for WildFly. |
|
Contains the Domibus configuration files for Wildfly 26.1.x. |
Other |
|
|
Contains a sample of certificates, PMode configuration files and the test SoapUI project. |
|
Contains SQL scripts (full and migration) for the creation and manipulation of the database
schema as well as deletion scripts for MySQL and Oracle. |
|
Contains the JMS plugin’s binaries and configuration file. |
|
Contains the Web Service plugin’s binaries and configuration file. |
|
Contains the File System plugin’s the binaries and configuration file. |
This release contains the AS4 Access Point of the eDelivery building block. For more information about this release, please refer to Domibus at the eDelivery Portal.
This release of the eDelivery Access Point is the result of significant collaboration among different EU policy projects, IT delivery teams and the eDelivery building block. Nevertheless, this eDelivery release is fully reusable by any other policy domain of the EU.
This release supports:
-
Tomcat 9.x
-
WebLogic Version 12.2.1.4 (tested versions, future versions might also work)
-
WildFly 26.1.x (tested versions, future versions might also work)
-
Oracle 12c R2 and Oracle 19c
-
MySQL 8
In this guide, we are covering Static discovery on Single server Tomcat/MySQL configuration.
|
Note
|
For other scenarios such as Dynamic Discovery, Installation on WildFly or WebLogic please refer to the full Administration Guide of your corresponding Domibus release. |
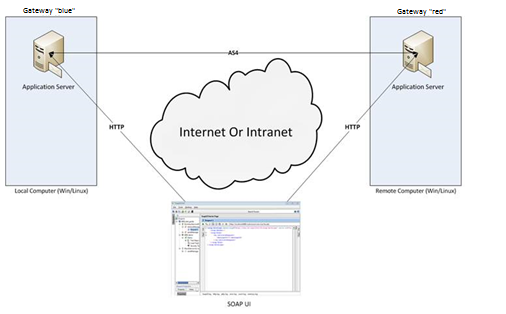
We will guide you to setup two Tomcat standalone Access Points, deployed on different machines, to exchange B2B documents securely over AS4 by:
-
Deploying and configuring both Access Points (blue and red)
-
Configuring processing mode files for both AS4 Access Points
-
Using the provided AS4 Access Points certificates
-
Setup the Access Points blue and red for running test cases (see $10- Testing)
|
Note
|
|
2.1. Prerequisite
-
Oracle Java runtime environment (JRE) or Oracle OpenJDK11:
-
Oracle 8u291+ for Tomcat, WildFly and WebLogic.
http://www.oracle.com/technetwork/java/javase/downloads/index.html -
Oracle OpenJDK 11 version 11.0.11 for Tomcat and WildFly:
https://openjdk.java.net/projects/jdk/11/
-
-
Database Management Systems :
-
MySQL 8
-
Version tested, future versions might work
-
-
Please install the above software on your host machine. For further information and installation details, refer to the manufacturers' websites.
2.2. Configure your environment
2.2.1. Package Overview
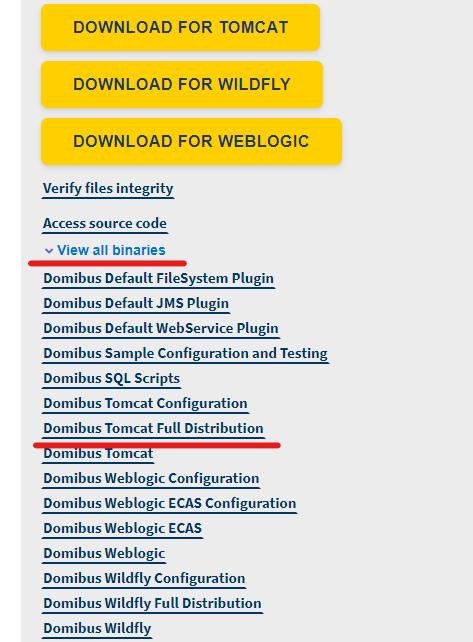
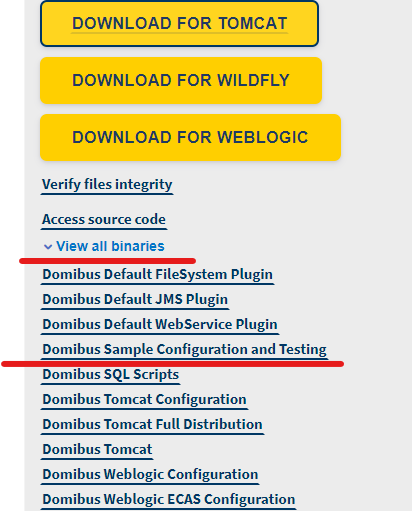
Download the Domibus Tomcat Full Distribution from Digital website as shown in below picture:
This downloaded package has the following structure:
-
<edelivery_path>contents and structure is as can be seen in the Package Contents figure above, and is not to be confused with thedomibus/conf/domibusfolder subfolder. -
<edelivery_path>/bincontains either the executable batch file (Windows) or the shell script (Linux) which are required for launching the Access Point. -
sql-scriptscontains the required application SQL code that needs to be executed on the MySQL database (and scripts for Oracle DB).
<edelivery_path>: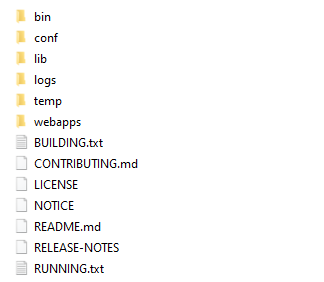
-
/conf: where you can find XML the configuration files used to administer your Tomcat and the default domibus configuration file. -
/logs: where the logs are stored -
/webapps: where the WAR files are stored -
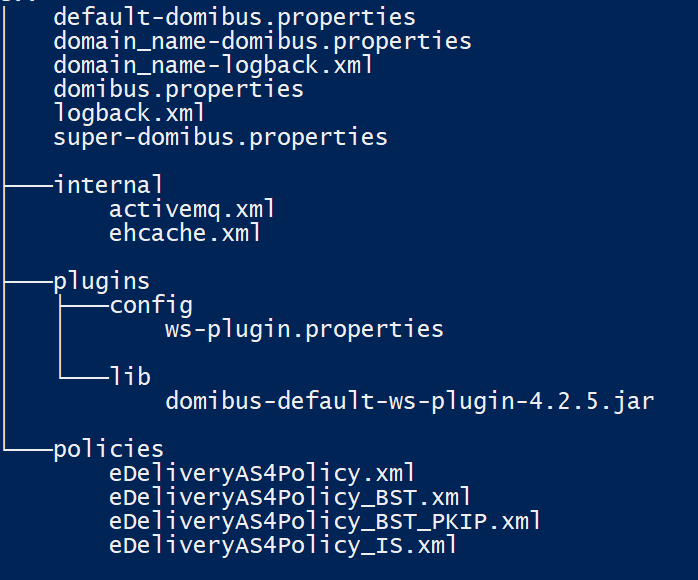
cef_edelivery_path_/conf/domibuscontains the domibus configuration files:
Sample Configuration and Resting Resources
To download:
-
the Domibus sample configuration
-
testing zip -
domibus-msh-distribution-X..Z-sample-configuration-and-testing.zip
☞ Click here,
or
☞ Navigate to from the eDelivery Portal and click on Domibus Sample Configuration and Testing.
The Sample Configuration archive has the following contents and structure:
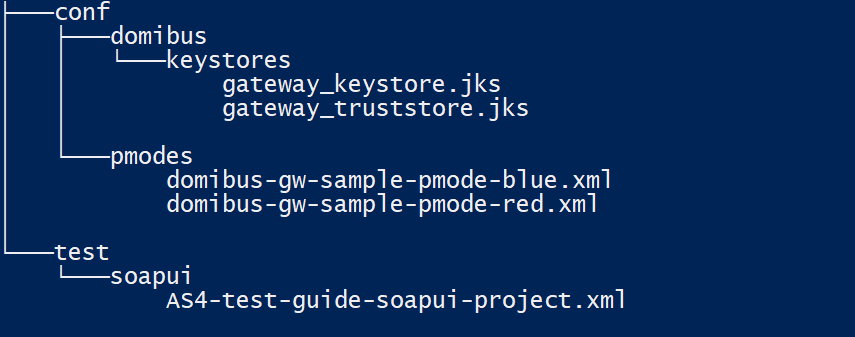
-
<edelivery_path>/testcontains a SOAP UI test project. -
<edelivery_path>/conf/pmodescontains two AS4 processing modes XML files (one for blue and other for red Access Point) pre-configured to use compression, payload encryption, message signing and non-repudiation, according to the eDelivery AS4 profile. -
<edelivery_path>/conf/domibus/keystorescontains a keystore (with the private keys of Access Point blue and Access Point red) and a truststore (with the public keys of Access Point blue and Access Point red) that can be used by both Access Points. Note that the keystore contains the private keys of both Access Points blue and red. This setup is not secure and is used for demonstration purpose only. In production, the private key should only be known, and deployed in the keystore of its owner (one participant). For this test release, each Access Point uses self-signed certificates.
|
See Also
|
For more information about AS4 security, see Annex 5 - Introduction to AS4 security. |
|
Note
|
The /conf folder in the sample archive should be unzipped and merged
with the edelivery_path/conf folder that already exists.
|
2.2.2. Tomcat Standalone Access Point
As described in the purpose of this guide, we need to configure two
Access Points running on two separate machines.
This means the procedure below needs to be performed on both machines:
-
Hostname "blue" (<blue_hostname>:8080) and
-
Hostname "red" (<red_hostname>:8080).
You will need the following resources:
-
domibus-msh-distribution-5.1.8-tomcat-full.zip
|
Note
|
All binaries can be downloaded from Domibus release page in eDelivery Portal |
To install the access point:
-
Download and unzip
domibus-msh-distribution-5.1.8-tomcat-full.zipto a location on your physical machine,<edelivery_path>. With<edelivery_path>we refer to the path in your system where you are installing Domibus.
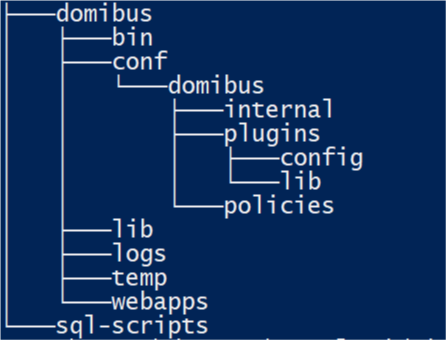
This folder will hold Domibus' folder content as shown below.Unzip Domibus configuration files -
Unzip the archive
domibus-msh-distribution-5.1.8-sample-configuration-and-testing.zip.The conf folder in the sample archive should be unzipped and merged with the
<edelivery_path>/conffolder that already exists. Ensure the<edelivery_path>/conf/domibusfolder structure looks like in the figure below:Domibus folder structure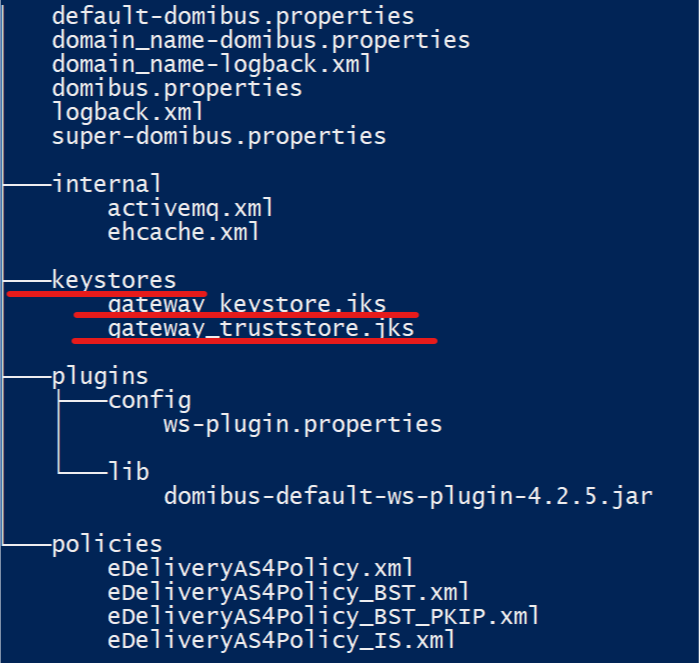
Prepare the MySQL database
You will need admin rights to perform some of these operations):
-
Open a command prompt and navigate to this directory:
sql-scripts. -
Execute the following MySQL commands at the command prompt:
Please ensure you replace the
<root_user>and<root_password>with the corresponding root user and password.mysql -h localhost -u <root_user> --password=<root_password> -e \ "DROP SCHEMA IF EXISTS domibus; CREATE SCHEMA domibus; ALTER DATABASE domibus charset=utf8mb4 collate=utf8mb4_bin; CREATE USER edelivery@localhost IDENTIFIED BY 'edelivery';" mysql -h localhost -u <root_user> --password=<root_password> -e \ "GRANT ALL ON domibus.* TO edelivery@localhost;"The script above creates a schema (
domibus) and a user (edelivery) that have all the privileges on the schema.NoteIt is possible that you are now allowed to choose eDeliveryas the password based on your MySql Password policy.
In that case, you would need to increase the complexity of your password.Please update the new password in the Domibus property file accordingly.
-
Execute the following MYSQL commands individually and sequentially:
Step 1mysql -h localhost -u <root_user> --password=<root_password> -e \ "GRANT <xa_recover_admin> ON *.* TO <edelivery>@localhost;"Step 2mysql -h localhost -u <root_user> --password=<root_password> \ domibus < mysqlinnoDb-<x.y.z>.ddl (1)Step 3mysql -h localhost -u <root_user> --password=<root_password> \ domibus < mysqlinnoDb-<x.y.z>-data.ddl (1)Where:
-
(Steps above)
<x.y.z>stands for the Domibus version (5.1.8).TipIf you are using MySQL 8 under Windows, then please set the database timezone. It is recommended that the database timezone is the same as the timezone of the machine where Domibus is installed:
default-time-zone='+00:00'.ImportantIf you are using Windows:
-
Make sure the parent directory of mysql.exe is added to your PATH.
-
You can also use MYSQL Workbench, instead of the command line statements to create the database.
-
Verify that the
<edelivery_path>/conf/domibus/domibus.propertiesfile has the relevant database parameters, if required (in case you have changed the username/password or schema name).
Database properties# --------------- Database-------- # Database server name domibus.database.serverName=localhost # Database port domibus.database.port=3306 domibus.database.schema=domibus # General schema. If uncommented Domibus will run in multi-tenancy mode #domibus.database.general.schema=general_schema #Database schema #Comment this property when Domibus is in multi-tenancy mode. #Comment this property when Domibus is configured in single tenancy mode with an Oracle database. domibus.database.schema=domibus # Non-XA Datasource # MySQL # Connector/J 8.0.x domibus.datasource.driverClassName=com.mysql.cj.jdbc.Driver domibus.datasource.url=jdbc:mysql://${domibus.database.serverName}:${domibus.database.port}/${domibus.database.schema}?useSSL=false&allowPublicKeyRetrieval=true&useLegacyDatetimeCode=false&serverTimezone=UTC -
-
-
Download the Mysql V8 Connector jar file from the MYSQL website and add it to your installation’s lib folder:
<edelivery_path>\lib\<mysql_v8connector.jar>
2.3. Keystore
In order to exchange B2B messages and documents between Access Points blue and red, it is necessary to check the following:
| For blue | For red |
|---|---|
In |
In |
In a production environment, each participant would need a certificate delivered by a certification authority and remote exchanges between business partners would be managed by each partner’s PMode (that should be uploaded on each Access Point).
2.4. Domibus Config location
Domibus expects a single environment variable domibus.config.location,
pointing towards the <edelivery_path>/conf/domibus folder.
You can do this by editing the first command lines of:
-
<edelivery_path>\domibus\bin\setenv.bat(Windows) or -
<edelivery_path>/bin/setenv.sh(Linux).
Set CATALINA_HOME with the absolute path of the installation <edelivery_path>/domibus.*.
Windows:
-
Edit
<edelivery_path>\domibus\bin\setenv.batand add the following:set CATALINA_HOME=<edelivery_path> set CATALINA_TMPDIR=<temp_directory_path> set JAVA_OPTS=%JAVA_OPTS% -Dfile.encoding=UTF-8 -Xms128m -Xmx1024m -XX:PermSize=64m set JAVA_OPTS=%JAVA_OPTS% -Ddomibus.config.location=%CATALINA_HOME%\conf\domibus
Linux:
-
Edit
<edelivery_path>/bin/setenv.sh
by adding the following:
export CATALINA_HOME=<edelivery_path>
export CATALINA_TMPDIR=<temp_directory_path>
export JAVA_OPTS="$JAVA_OPTS -Xms128m -Xmx1024m"
export JAVA_OPTS="$JAVA_OPTS -Ddomibus.config.location=$CATALINA_HOME/conf/domibus"
2.5. Launch the Domibus application
Windows:
Execute,
-
cd <edelivery_path>\bin\ -
startup.bat
Linux:
-
Execute
cd <edelivery_path>/bin/chmod u+x *.sh ./startup.sh -
Nav to: http://localhost:8080/domibus to display the Domibus home page on your browser.
If you can access the page, it means the deployment was successful.NoteBy default user=admin. For the password, look in the logs for the phrase:
“Default password for user admin is”.
You will be asked to change the default password when logging in for the first time.Domibus administration page
-
To allow the remote application to send a message to this machine, you would need to create a dedicated rule (to allow this port) from your local firewall.
See also ☞ Annex 2 - Firewall Settings -
If you intend to install both Access Points on the same server, you will need to change the ports of the red Access Point and create a separate database schema, update the domibus.properties file and change the ActiveMQ ports before starting the server to avoid conflicts.
-
2.6. Upload PModes
Edit the two PMode files:
-
<edelivery_path>/conf/pmodes/domibus-gw-sample-pmode-blue.xml -
domibus-gw-sample-pmode-red.xml
and replace <blue_hostname> and <red_hostname> with their real hostnames or IPs:
<party name="red_gw" endpoint="Error! Hyperlink reference not valid.">
    <identifier partyId="domibus-red" partyIdType="partyTypeUrn" />
</party>
<party name="blue_gw" endpoint="Error! Hyperlink reference not valid.">
    <identifier partyId="domibus-blue" partyIdType="partyTypeUrn" />
</party>|
See Also
|
For more details about the provided PMode, see Annex 3 - Processing Mode. |
2.7. Upload the PMode file on both Access Points
To upload a PMode XML file,
-
Connect to the administration console using your credentials.
NoteBy default login=admin. For the password, look in the logs for the phrase:Default password for user admin is) tohttp://localhost:8080/domibus:Login to the administration console -
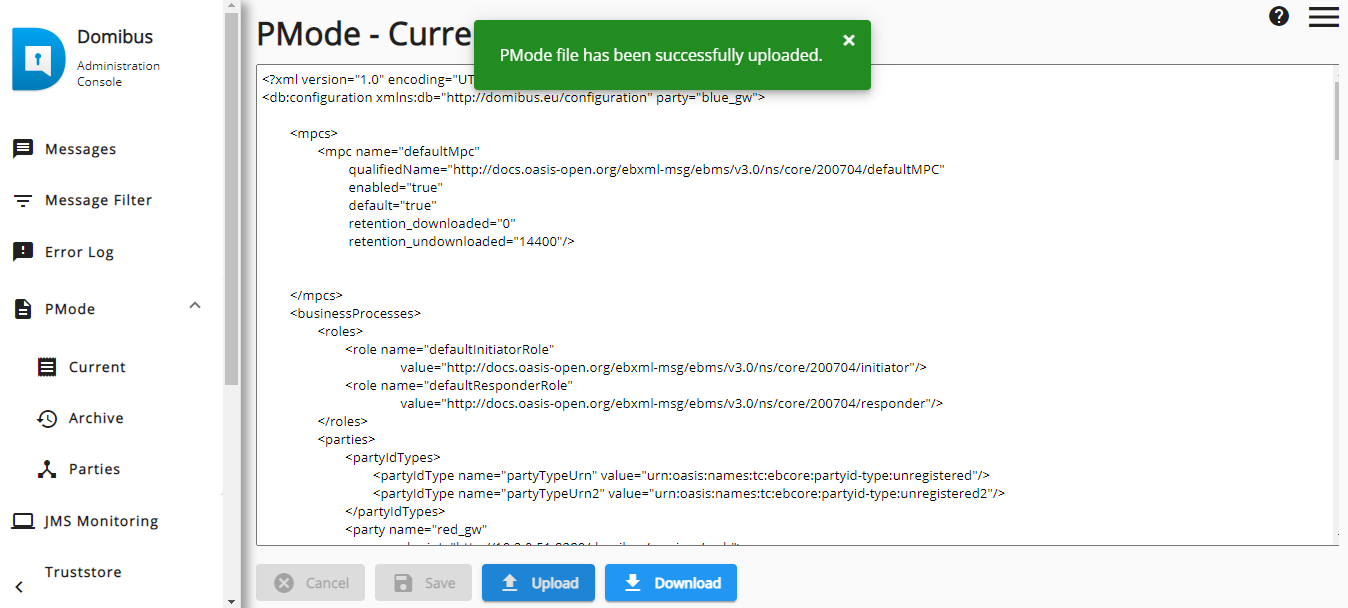
Select the menu PMode → Current → Upload.
PMode update
A popup window appears where you can select the PMode file.
-
Select PMode file and click on the Upload button.
When the operation is successful you will get the following window:
Now your Tomcat Access Points are running and ready to send or receive messages.
|
Note
|
Every time a PMode is updated, the Truststore is also refreshed from the file system. |
2.8. Test
As explained in the Release Notes document, and to facilitate testing, we have developed a Reference Web Service endpoint to illustrate how participants can connect and interact with the AS4 Access Point to send messages.
In addition, it is possible for the backends to download received
messages from their Access Point using a request (downloadMessage)
defined in the same WSDL.
|
See Also
|
For more details about:
|
|
Note
|
Domibus provides three default plugins for sending and receiving/downloading messages via Domibus, a Web Service plugin, a JMS plugin and a File System plugin. The Web Service plugin is deployed by default with the tomcat-full distribution. For more information about the Other Plugins please refer to the complete Domibus admin guide. |
2.9. Annex 1 - Parameters
| Parameters | Local Access Point (Gateway "blue") |
Remote Access Point (Gateway "red") |
|---|---|---|
Hostname |
|
|
Database |
MySQL database |
MySQL database |
Administrator Page |
Username: |
Username: |
Database Schema |
edelivery |
edelivery |
Database connector |
Username: |
Username: |
DB username/password |
edelivery/edelivery |
edelivery/edelivery |
PModes XML files |
|
|
|
Note
|
localhost represents the server name that hosts the database and the application server for their respective Access Point. |
2.10. Annex 2 - Firewall Settings
The firewall settings may prevent you from exchanging messages between your local and remote Tomcat Access Points.
To test the status of a port, run the command:
telnet <server_ip> <port>
Tomcat uses the following ports, make sure those are opened on both machines "blue" and "red" (TCP protocol):
-
8080(HTTP port) -
3306(MySQL port)
This is how you can open a port on the Windows Firewall:
-
Click on Start → Control Panel
-
Go to Windows → Firewall and click on Advanced Settings
-
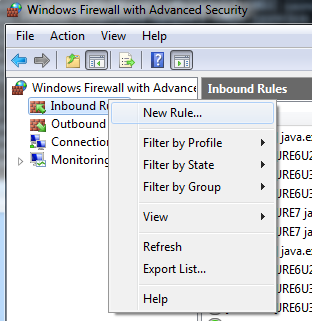
Right-click on Inbound Rules and select New Rule:
-
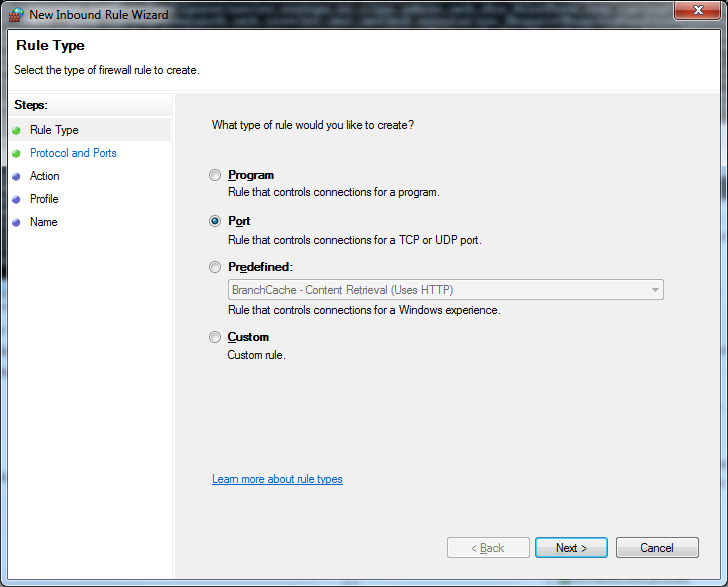
Select Port and click on Next:
-
Enter a specific local port (e.g. 8080) and click on Next:

-
Click on Next:
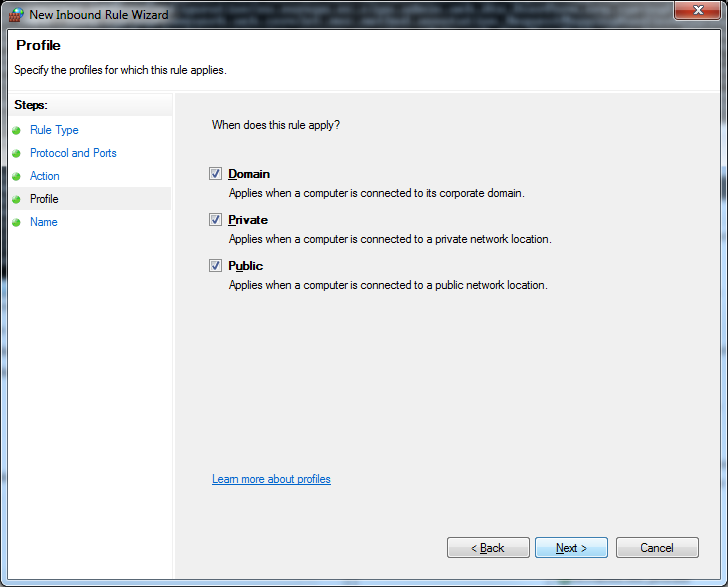
-
Choose a name for the new rule and click on Finish to end:
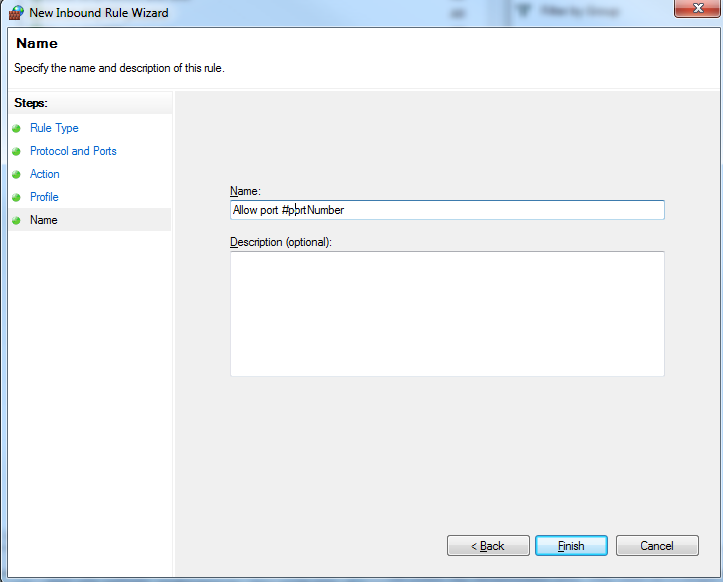
2.11. Annex 3 - Processing Mode
Processing modes (PModes) describe how messages are exchanged between AS4 partners (Access Point blue and Access Point red). These files contain the identifiers of each AS4 Access Point (identified as parties in the PMode file below).
Sender Identifier and Receiver Identifier represent the organizations that send and receive the business documents (respectively "domibus- blue" and "domibus-red"). They are both used in the authorization process (PMode). Therefore, adding, modifying or deleting a participant implies modifying the corresponding PMode files.
Here is an example of the content of a PMode XML file:
-
In this setup we have allowed each party (blue_gw or red_gw) to initiate the process. If only blue_gw is supposed to send messages, we need to put only blue_gw in <initiatorParties> and red_gw in <responderParties>.
<?xml version="1.0" encoding="UTF-8"?>
<db:configuration
    xmlns:db="http://domibus.eu/configuration" party="blue_gw">
    <mpcs>
        <mpc name="defaultMpc"
            qualifiedName="http://docs.oasis-open.org/ebxml-msg/ebms/v3.0/ns/core/200704/defaultMPC"
            enabled="true"
            default="true"
            retention_downloaded="0"
            retention_undownloaded="14400"/>
    </mpcs>
    <businessProcesses>
        <roles>
            <role name="defaultInitiatorRole" value="http://docs.oasis-open.org/ebxml-msg/ebms/v3.0/ns/core/200704/initiator"/>
            <role name="defaultResponderRole" value="http://docs.oasis-open.org/ebxml-msg/ebms/v3.0/ns/core/200704/responder"/>
        </roles>
        <parties>
            <partyIdTypes>
                <partyIdType name="partyTypeUrn" value="urn:oasis:names:tc:ebcore:partyid-type:unregistered"/>
            </partyIdTypes>
            <party name="red_gw"  endpoint="http://
                <red_hostname>:8080/domibus/services/msh">
                    <identifier partyId="domibus-red" partyIdType="partyTypeUrn"/>
                </party>
                <party name="blue_gw" endpoint="http://
                    <blue_hostname>:8080/domibus/services/msh">
                        <identifier partyId="domibus-blue" partyIdType="partyTypeUrn"/>
                    </party>
                </parties>
                <meps>
                    <mep name="oneway" value="http://docs.oasis-open.org/ebxml-msg/ebms/v3.0/ns/core/200704/oneWay"/>
                    <mep name="twoway" value="http://docs.oasis-open.org/ebxml-msg/ebms/v3.0/ns/core/200704/twoWay"/>
                    <binding name="push" value="http://docs.oasis-open.org/ebxml-msg/ebms/v3.0/ns/core/200704/push"/>
                    <binding name="pushAndPush" value="http://docs.oasis-open.org/ebxml-msg/ebms/v3.0/ns/core/200704/push-and-push"/>
                </meps>
                <properties>
                    <property name="originalSenderProperty"
                            key="originalSender"
                            datatype="string"
                            required="true"/>
                    <property name="finalRecipientProperty"
                            key="finalRecipient"
                            datatype="string"
                            required="true"/>
                    <propertySet name="eDeliveryPropertySet">
                        <propertyRef property="finalRecipientProperty"/>
                        <propertyRef property="originalSenderProperty"/>
                    </propertySet>
                </properties>
                <payloadProfiles>
                    <payload name="businessContentPayload"
                            cid="cid:message"
                            required="true"
                            mimeType="text/xml"/>
                    <payload name="businessContentAttachment"
                            cid="cid:attachment"
                            required="false"
                            mimeType="application/octet-stream"/>
                    <payloadProfile name="MessageProfile" maxSize="40894464">
                        <!-- maxSize is currently ignored -->
                        <attachment name="businessContentPayload"/>
                        <attachment name="businessContentAttachment"/>
                    </payloadProfile>
                </payloadProfiles>
                <securities>
                    <security name="eDeliveryAS4Policy"
                            policy="eDeliveryAS4Policy.xml"
                            signatureMethod="RSA_SHA256" />
                </securities>
                <errorHandlings>
                    <errorHandling name="demoErrorHandling"
                                errorAsResponse="true"
                                businessErrorNotifyProducer="true"
                                businessErrorNotifyConsumer="true"
                                deliveryFailureNotifyProducer="true"/>
                </errorHandlings>
                <agreements>
                    <agreement name="agreement1" value="A1" type="T1"/>
                </agreements>
                <services>
                    <service name="testService1" value="bdx:noprocess" type="tc1"/>
                    <service name="testService" value="http://docs.oasis-open.org/ebxml-msg/ebms/v3.0/ns/core/200704/service"/>
                </services>
                <actions>
                    <action name="tc1Action" value="TC1Leg1"/>
                    <action name="testAction" value="http://docs.oasis-open.org/ebxml-msg/ebms/v3.0/ns/core/200704/test"/>
                </actions>
                <as4>
                    <receptionAwareness name="receptionAwareness"
                                        retry="12;4;CONSTANT"
                                        duplicateDetection="true"/>
                    <reliability name="AS4Reliability"
                                nonRepudiation="true"
                                replyPattern="response"/>
                </as4>
                <legConfigurations>
                    <legConfiguration name="pushTestcase1tc1Action"
                                        service="testService1"
                                        action="tc1Action"
                                        defaultMpc="defaultMpc"
                                        reliability="AS4Reliability"
                                        security="eDeliveryAS4Policy"
                                        receptionAwareness="receptionAwareness"
                                        propertySet="eDeliveryPropertySet"
                                        payloadProfile="MessageProfile"
                                        errorHandling="demoErrorHandling"
                                        compressPayloads="true"/>
                    <legConfiguration name="testServiceCase"
                                        service="testService"
                                        action="testAction"
                                        defaultMpc="defaultMpc"
                                        reliability="AS4Reliability"
                                        security="eDeliveryAS4Policy"
                                        receptionAwareness="receptionAwareness"
                                        propertySet="eDeliveryPropertySet"
                                        payloadProfile="MessageProfile"
                                        errorHandling="demoErrorHandling"
                                        compressPayloads="true"/>
                </legConfigurations>
                <process name="tc1Process"
                            mep="oneway"
                            binding="push"
                            initiatorRole="defaultInitiatorRole"
                            responderRole="defaultResponderRole">
                    <initiatorParties>
                        <initiatorParty name="blue_gw"/>
                        <initiatorParty name="red_gw"/>
                    </initiatorParties>
                    <responderParties>
                        <responderParty name="blue_gw"/>
                        <responderParty name="red_gw"/>
                    </responderParties>
                    <legs>
                        <leg name="pushTestcase1tc1Action"/>
                        <leg name="testServiceCase"/>
                    </legs>
                </process>
            </businessProcesses>
        </db:configuration>
2.12. Annex 4 - Domibus Pconf to ebMS3 mapping
The following table provides additional information concerning the Domibus PMode configuration (pconf) files.
| Domibus pconf | EbMS3 Specification [ebMS3CORE] [AS4-Profile] |
Description |
|---|---|---|
|
- |
Container which defines the different MPCs (Message Partition Channels). |
|
|
Message Partition Channel allows the partition of the flow of messages
from a |
|
- |
Retention interval for messages already delivered to the backend. |
|
- |
Retention interval for messages not yet delivered to the backend. |
|
- |
Container which defines the different PartyIdTypes, Party and Endpoint. |
|
maps to the attribute |
Message Unit bundling happens when the Messaging element contains multiple child elements or Units (either User Message Units or Signal Message Units). |
|
maps to the element |
The ebCore Party ID type can simply be used as an identifier format and therefore as a convention for values to be used in configuration and – as such – does not require any specific solution building block. |
|
maps to |
The endpoint is a party attribute that contains the link to the MSH. +
The value of this parameter represents the address (endpoint URL) of the
|
AS4 |
- |
Container |
Reliability [@Nonrepudiation] [@ReplyPattern] |
|
|
|
+
|
These parameters are stored in a composite string.
|
|
- |
Container |
|
- |
Container |
|
|
The parameter in the pconf file defines the name of a WS-SecurityPolicy file. |
|
|
This parameter is not supported by WS-SecurityPolicy and therefore it is defined separately. |
|
- |
Container |
Agreements |
maps to |
This optional element occurs zero times or once. The |
Actions |
- |
Container |
Action |
maps to |
This required element occurs once. The element is a string identifying an operation or an activity within a Service that may support several of these. |
|
- |
Container |
|
maps to |
This required element occurs once. It is a string identifying the service that acts on the message and it is specified by the designer of the service. |
|
- |
An ebMS MEP defines a typical choreography of ebMS User
Messages which are all related through the use of the referencing
feature (RefToMessageId). Each message of an MEP Access Point refers to
a previous message of the same Access Point, unless it is the first one
to occur. Messages are associated with a label (e.g. |
|
- |
Container |
|
- |
The previous definition of ebMS MEP is quite abstract and ignores any binding consideration to the transport protocol. This is intentional, so that application level MEPs can be mapped to ebMS MEPs independently of the transport protocol to be used. |
|
- |
Container |
|
maps to For Responder: |
The required role element occurs once, and identifies the authorized
role ( Other possible values are subject to partner agreement. |
|
- |
Container |
|
- |
Container |
|
- |
Container |
|
maps to |
This parameter allows specifying some constraint or profile on the payload. It specifies a list of payload parts. A payload part is a data structure that consists of five properties:
The message payload(s) must match this profile. |
|
- |
Container |
|
- |
Container |
|
maps to |
This Boolean parameter indicates (if |
|
maps to |
This Boolean parameter indicates whether (if |
|
maps to |
This Boolean parameter indicates whether (if |
|
maps to |
When sending a message with this reliability requirement ( * The Receiving MSH successfully delivers ( |
|
- |
Container |
|
- |
Because messages in the same MEP may be subject to different
requirements - e.g. the reliability, security and error reporting of a
response may not be the same as for a request – the PMode will be
divided into |
|
- |
In |
2.13. Annex 5 - Introduction to AS4 security
To secure the exchanges between Access Points "blue" and "red" (Access
Point "blue" is sending a message to Access Point "red" in this
example), it is necessary to set up each Access Point’s keystore and
truststore accordingly.
The diagram below shows a brief explanation of the main steps of this process:
It is necessary to open the required ports when Access Point blue or
Access Point red is behind a local firewall. For instance, the port 8080
is not opened by default in Windows. Therefore, we would need to create
a dedicated rule on Windows firewall to open the TCP 8080 port.
See also Annex 2 - Firewall Settings.
|
3. Administration Guide
The Administration Guide is a collection of sections on how to install and configure Domibus:
4. Installing Domibus
This chapter provides instructions on how to install and configure Domibus for the supported webservers and databases. They are:
Webservers
-
WebLogic
-
Tomcat
-
WildFly
Databases
-
MySQL
-
Oracle
Additionally, you can find relevant configurations, plugin development and management as well as troubleshooting.
|
Note
|
These instructions aimed at users responsible for installing, managing and troubleshooting eDelivery Access Points. |
Before downloading and installing Domibus please consider:
-
If you are opting for a single-server or a cluster scenario.
-
The pre-requisites listed below.
4.1. Pre-requisites
Below you can find a list of requirements for your Dominus installation.
Select and the relevant combination of software required to deploy Domibus on the target system(s).
See also ☛ Downloading Resources.
Java |
|||
|---|---|---|---|
Java 8 features, compile with Oracle JDK 8. Domibus supported webservers were tested to run correctly against the following Java Development Kits: |
|||
Webservers |
|||
Single Server General scenario |
|||
In this scenario you need install one of the following:
|
|
||
Clustered scenario |
|||
If deploying Domibus across multiple server instances, then it’s required to install one the following supported versions: |
|
||
Databases |
|||
Supported Database Management Systems: |
|
||
For additional information and installation details regarding the third-party software listed above, refer to its manufacturer’s documentation.
4.2. Downloading Resources
4.2.1. Binaries
Binary |
Contents |
|---|---|
Tomcat |
|
|
Contains the full Tomcat distribution. |
|
Contains the Domibus war for Tomcat. |
|
Contains the Domibus configuration files for Tomcat. |
WebLogic |
|
|
Contains the Domibus war for WebLogic. |
|
Contains the Domibus configuration files for WebLogic. |
WildFly |
|
|
Contains the full WildFly distribution. |
|
Contains the Domibus war for WildFly. |
|
Contains the Domibus configuration files for Wildfly 26.1.x. |
Other |
|
|
Contains a sample of certificates, PMode configuration files and the test SoapUI project. |
|
Contains SQL scripts (full and migration) for the creation and manipulation of the database
schema as well as deletion scripts for MySQL and Oracle. |
|
Contains the JMS plugin’s binaries and configuration file. |
|
Contains the Web Service plugin’s binaries and configuration file. |
|
Contains the File System plugin’s the binaries and configuration file. |
4.3. Databases
In the sections below you can find information on how to configure the supported databases, MySQL and Oracle.
4.3.1. MySQL
|
Note
|
Whenever mentioned,<edelivery_path> refers to the path in your system where you have installed the Domibus package. Some instructions refer to locations relative to this base path.
|
To configure your MySQL database:
-
Download
domibus-msh-distribution-5.1.8-sql-scripts.zip. See Download resources. -
Extract the downloaded archive into
<edelivery_path>/sql-scripts. -
From your command-line interface (CLI), explore the
<edelivery_path>/sql-scriptspath where you placed the scripts. -
From the that location, execute the MySQL commands as instructed bellow.
Create the Domibus DB Schema
To create the <domibus_schema> and the <edelivery_user> user with all the privileges for the schema, execute:
mysql -h localhost -u <root_user> --password=<root_password> -e \
"drop schema if exists domibus_schema
CREATE SCHEMA <domibus_schema>;
ALTER DATABASE <domibus_schema> charset=utf8mb4 collate=utf8mb4_bin;
CREATE USER <edelivery_user>@localhost IDENTIFIED BY 'edelivery_password';
GRANT ALL ON <domibus_schema>.* TO <edelivery_user>@localhost;"
Create domibus schema required objects
To create the required objects in the Domibus schema, execute:
mysql -h localhost -u <root_user< --password=<root_password> -e \
"grant <xa_recover_admin> on *.* to <edelivery_user>@localhost;"
mysql -h localhost -u <edelivery_user> --password=<edelivery_password> \
<domibus_schema> < mysql-<x.y.z>.ddl (1)
Where:
-
<x.y.z>stands for the Domibus version (5.1.8).
Populate the tables
mysql -h localhost -u edelivery_user --password=edelivery_password \
<domibus_schema> < mysql-<x.y.z>-data.ddl (1)
Where:
-
<x.y.z>stands for the Domibus version (5.1.8).
Additional Settings
Here are some additional server settings we recommend setting for your MySQL DB.
Storing payload messages with size over 30 Mb in a database
Domibus can store the messages in the database temporarily. So it is advised to increase the maximum allowed size for packets.
To increase max size for packets, edit my.ini file in Windows or, in Linux, the my.cnf file, and update the following default properties as indicated below:
-
Edit the
max_allowed_packetproperty:# The maximum size of one packet or any generated or intermediate string, # or any parameter sent by the # mysql_stmt_send_long_data() C API function. max_allowed_packet=512M -
Edit the
innodb_log_file_sizeproperty:# Size of each log file in a log group. You should set the combined size # of log files to about 25%-100% of your buffer pool size to avoid # unnecessary buffer pool flush activity on log file overwrite. # However, the larger logfile size will increase the time needed for the recovery process. innodb_log_file_size=5120M -
Restart MySQL service (Windows)
Storing payload messages in the file system instead of a DB
See Domibus properties.
Setting the database timezone to UTC
For MySQL 8 and Connector/J 8.0.x please
One way of setting the timezone is to modify the MySQL my.ini configuration file by adding the following property with the adjusted timezone to UTC.
default-time-zone='+00:00'The connector is now configured to use the UTC server timezone by default. For future date time values – e.g. next attempts for the retry mechanisms) – we also save the timezone offset when persisting in order to be able to recreate the correct instant when reading back later on, in the event the timezone offset will have changed while waiting for the future event to occur.
|
Note
|
If you are using Windows, make sure to have the parent directory of mysql.exe added to your PATH variable. |
4.3.2. Oracle
To configure your Oracle DB:
-
Unzip
domibus-msh-distribution-5.1.8-sql-scripts.zipin<edelivery_path>/sql-scripts. -
Open a command prompt and navigate to the
<edelivery_path>/sql-scriptsdirectory.
Open a command line session, log in and execute the following commands:sqlplus sys as sysdba /* Password should be the one assigned during the Oracle installation */ -
Once you’re logged in in Oracle, in:
CREATE USER <edelivery_user> IDENTIFIED BY <edelivery_password> (1) DEFAULT TABLESPACE <tablespace> (2) QUOTA UNLIMITED ON <tablespace>; GRANT CREATE SESSION TO <edelivery_user>; GRANT CREATE TABLE TO <edelivery_user>; GRANT CREATE VIEW TO <edelivery_user>; GRANT CREATE SEQUENCE TO <edelivery_user>; GRANT CREATE PROCEDURE TO <edelivery_user>; GRANT CREATE JOB TO <edelivery_user>; GRANT EXECUTE ON DBMS_XA TO <edelivery_user>; GRANT EXECUTE ON DBMS_LOCK TO <edelivery_user>; GRANT SELECT ON PENDING_TRANS$ TO <edelivery_user>; GRANT SELECT ON DBA_2PC_PENDING TO <edelivery_user>; GRANT SELECT ON DBA_PENDING_TRANSACTIONS TO <edelivery_user>; CONNECT <edelivery_user> SHOW USER; /* Should return: <edelivery_user>. */ @oracle-<x.y.z>.ddl (3) @oracle-<x.y.z>-data.ddl EXIT
Where:
-
<edelivery_user>and<edelivery_password>is to be replaced in accordance with your DB. -
and
<tablespace>is created and assigned by your DBA; for local/test installations just replace it with user’s tablespace. The quota could be limited to a specific size. -
<x.y.z>stands for the Domibus version (5.1.8). DDL/SQL scripts must be run with the@sign from the location of the scripts.
|
Note
|
The Oracle JDBC driver is configured now to use the UTC server timezone by default when persisting and reading date time values. For future date time values – e.g. next attempts for the retry mechanisms – we also save the timezone offset when persisting in order to be able to recreate the correct instant when reading back later on, in the event the timezone offset will have changed while waiting for the future event to occur. |
4.3.3. Deletion scripts
A deletion script for MySQL and Oracle Domibus DB is available in the domibus-msh-distribution-5.1.8-sql-scripts.zip.
This script’s purpose is deleting all messages within a user-defined period to recover disk space. The script requires setting the START_DATE end END_DATE parameters.
The tables affected by this script’s execution are:
-
TB_MESSAGING -
TB_ERROR_LOG -
TB_PARTY_ID -
TB_RECEIPT_DATA -
TB_PROPERTY -
TB_PART_INFO -
TB_RAWENVELOPE_LOG -
TB_ERROR -
TB_USER_MESSAGE -
TB_SIGNAL_MESSAGE -
TB_RECEIPT -
TB_MESSAGE_INFO -
TB_MESSAGE_LOG -
TB_MESSAGE_UI
Any information relevant to a message received or sent during that predefined period, is removed from these tables.
|
Tip
|
We recommend executing this script using an UI tool such as SQL developer or MySQL workbench. |
|
Important
|
To keep the JMS queues synchronized with the DB data that eventually deleted by this script, the Domibus Administrator should remove manually the associated JMS messages from the plugin notifications queues. |
4.4. Servers
In the sections below you can find information on how to configure the supported Webservers: Weblogic, Tomcat and Wildfly.
4.4.1. WebLogic
This section does not include the installation of WebLogic server. It is assumed that the WebLogic Server is installed and a Domain is created. From this point forwards, we will refer to the domain location as`DOMAIN_HOME<user-defined name>`.
☛ Single Server Deployment
Below you can find a list of the resources you need for a base deployment.
|
Tip
|
If you have questions about the levels of support for the releases, check the type of the release you’re selecting and see Support Arrangement. |
To install Domibus with WebLogic:
-
Download and extract the archive
domibus-msh-distribution-5.1.8-weblogic-configuration.zipinto the directoryDOMAIN_HOME/conf/domibus.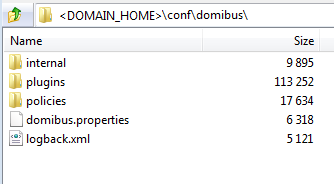
-
Configure your Keystore. See the Certificates section.
-
Follow the instructions below that apply to your target OS.
On Windows
-
Edit
DOMAIN_HOME\bin\setDomainEnv.cmd. -
Locate the
set DOMAIN_HOMEstatement and add the sample below:set DOMAIN_HOME set EXTRA_JAVA_PROPERTIES=%EXTRA_JAVA_PROPERTIES% -Ddomibus.config.location=%DOMAIN_HOME%/conf/domibus -Djava.io.tmpdir=<temp_directory_path> #set JAVA_OPTIONS="%JAVA_OPTIONS% -Dweblogic.transaction.allowOverrideSetRollbackReason=true"
On Linux
-
Edit
DOMAIN_HOME/bin/setDomainEnv.sh -
Locate the
export DOMAIN_HOMEstatement and add the following sample:# ... export DOMAIN_HOME # Added for Domibus ****************************************************************** EXTRA_JAVA_PROPERTIES="$EXTRA_JAVA_PROPERTIES - Ddomibus.config.location=$DOMAIN_HOME/conf/domibus -Djava.io.tmpdir=<temp_directory_path>" (1) export EXTRA_JAVA_PROPERTIES # ************************************************************************************ JAVA_OPTIONS="${JAVA_OPTIONS} -Dweblogic.transaction.allowOverrideSetRollbackReason=true” export JAVA_OPTIONS -
Run the WebLogic Scripting Tool (WLST) to create the JMS resources and the Database datasources from the command line.
-
Download the WSLT Package from the following location:
-
Configure the WSLT API tool.
-
Unzip the
wslt-api-1.9.1.zip. -
Define the
WL_HOMEas a system environment variable to point to the WebLogicwlserverdirectory as defined in theDOMAIN_HOME/bin/setDomainEnv.[cmd|sh]for e.g.WL_HOME=/wls12130/wlserver. -
Take the script WeblogicSingleServer.properties from
domibus-msh-distribution-5.1.8-weblogic-configuration.zipunder the scripts directory and copy theWeblogicSingleServer.propertiesfile into thewslt-api-1.9.1directory and adapt the following properties:Connecting to the WebLogic domain:domain.loading.type=connect domain.connect.url=t3://localhost:7001 domain.connect.username=<weblogic_name> domain.connect.password=<weblogic_password> domain.name=<my_domain1> -
Adapt the
jdbc.datasourceproperties for the datasources, see the section below.-
Domain configuration
-
The configuration of the properties below applies to to both MySQL and Oracle.
-
Cross-module
#Domibus application module target application.module.target=AdminServer
-
JMS Configuration
#Domibus JMS application server name jms.server.name=eDeliveryJMS #Domibus JMS application module name jms.module.name=eDeliveryModule #Domibus JMS file store name jms.server.store=eDeliveryFileStore #Domibus JMS application module group jms.queue.subdeployment.name=eDeliverySubD
-
Database Configuration
#Domibus database url jdbc.datasource.driver.url=jdbc:oracle:thin:@127.0.0.1:1521:<SID/Service> #Domibus database user name jdbc.datasource.driver.username=<your_username> #Domibus database user password jdbc.datasource.driver.password=<your_password>
-
For Oracle database
jdbc.datasource.0.name=eDeliveryDs
jdbc.datasource.0.targets=${application.module.target}
jdbc.datasource.0.jndi.name=jdbc/cipaeDeliveryDs
jdbc.datasource.0.pool.capacity.max=50
jdbc.datasource.0.pool.connection.test.onreserv.enable=true
jdbc.datasource.0.pool.connection.test.onreserv.sql=SQL SELECT 1 FROM DUAL
jdbc.datasource.0.driver.name=oracle.jdbc.driver.OracleDriver
jdbc.datasource.0.driver.url=${jdbc.datasource.driver.url}
jdbc.datasource.0.driver.password=${jdbc.datasource.driver.password}
jdbc.datasource.0.driver.username=${jdbc.datasource.driver.username}
jdbc.datasource.0.driver.properties.items=0
jdbc.datasource.0.xa.transaction.timeout.branch=true
jdbc.datasource.1.name=edeliveryNonXA
jdbc.datasource.1.targets=${application.module.target}
jdbc.datasource.1.jndi.name=jdbc/cipaeDeliveryNonXADs
jdbc.datasource.1.transaction.protocol=None
jdbc.datasource.1.pool.capacity.max=50
jdbc.datasource.1.pool.connection.test.onreserv.enable=true
jdbc.datasource.1.pool.connection.test.onreserv.sql=SQL SELECT 1 FROM DUAL
jdbc.datasource.1.driver.name=oracle.jdbc.OracleDriver
jdbc.datasource.1.driver.url=${jdbc.datasource.driver.url}
jdbc.datasource.1.driver.password=${jdbc.datasource.driver.password}
jdbc.datasource.1.driver.username=${jdbc.datasource.driver.username}
jdbc.datasource.1.driver.properties.items=0
|
Note
|
MySQL configuration is commented by default. To enable MySQL, remove the comment from the lines below. Remember to comment Oracle configuration settings to disable them. |
-
For MySQL:
#jdbc.datasource.0.name=eDeliveryDs
#jdbc.datasource.0.targets=${application.module.target}
#jdbc.datasource.0.jndi.name=jdbc/cipaeDeliveryDs
#jdbc.datasource.0.transaction.protocol=LoggingLastResource
#jdbc.datasource.0.pool.connection.test.onreserv.enable=true
#jdbc.datasource.0.pool.connection.test.onreserv.sql=SQL SELECT 1
#jdbc.datasource.1.driver.name=com.mysql.cj.jdbc.Driver
#jdbc.datasource.0.driver.url=${jdbc.datasource.driver.url}
#jdbc.datasource.0.driver.password=${jdbc.datasource.driver.password}
#jdbc.datasource.0.driver.username=${jdbc.datasource.driver.username}
#jdbc.datasource.0.driver.properties.items=0
#jdbc.datasource.1.name=edeliveryNonXA
#jdbc.datasource.1.targets=${application.module.target}
#jdbc.datasource.1.jndi.name=jdbc/cipaeDeliveryNonXADs
#jdbc.datasource.1.transaction.protocol=None
#jdbc.datasource.1.pool.capacity.max=50
#jdbc.datasource.1.pool.connection.test.onreserv.enable=true
#jdbc.datasource.1.pool.connection.test.onreserv.sql=SQL SELECT 1
#jdbc.datasource.0.driver.name=com.mysql.cj.jdbc.Driver
#jdbc.datasource.1.driver.url=${jdbc.datasource.driver.url}
#jdbc.datasource.1.driver.password=${jdbc.datasource.driver.password}
#jdbc.datasource.1.driver.username=${jdbc.datasource.driver.username}
#jdbc.datasource.1.driver.properties.items=0
-
Adapt the property for location of the filestore:
persistent.filestore.0.location.For example,
persistent.filestore.0.location=DOMAIN_HOME/filestore.NoteMake sure the filestore path contains forward slashes ( /). -
Adapt if necessary the JMX security configuration:
For example:
## Policy configuration
security.policies.0.mode = CREATE
security.policies.0.resource = type=<jmx>, operation=invoke, application=mbeanType=weblogic.management.runtime.JMSDestinationRuntimeMBean
security.policies.0.realm = myrealm
security.policies.0.authorizer = XACMLAuthorizer
security.policies.0.expression= Rol(Admin)|Grp(Administrators)|Grp(JMSManagers)
security.policies.items = 1Users configuration
security.users.0.realm=.myrealm.
security.users.0.name=.jmsManager.
security.users.0.password=.jms_Manager1.
security.users.0.comment=
security.users.0.authenticator=.DefaultAuthenticator.
security.users.items=1Groups configuration
security.groups.0.realm=.myrealm.
security.groups.0.name=.JMSManagers.
security.groups.0.description=
security.groups.0.authenticator=.DefaultAuthenticator.
security.groups.items=1Groups Membership configuration
security.group.member.0.user=.jmsManager.
security.group.member.0.groups=.JMSManagers.
security.group.member.0.realm=.myrealm.
security.group.member.0.authenticator=.DefaultAuthenticator.
security.group.member.items=1-
Start the WebLogic domain from within
DOMAIN_HOME:-
In Windows:
startWebLogic.cmd -
In Linux:
startWebLogic.sh
-
-
Execute the following command from within the
wlstapi-1.9.1/bindirectory:-
In Windows:
wlstapi.cmd ../scripts/import.py --property ../WeblogicSingleServer.properties -
In Linux:
wlstapi.sh ../scripts/import.py --property ../WeblogicSingleServer.propertiesNoteTo send messages containing bodyload payloads, you must ensure the Weblogic server is started with the following extra parameter: -Dorg.apache.cxf.binding.soap.messageFactoryClassName=com.sun.xml.internal.messaging.saaj.soap.ver1_2.SOAPMessageFactory1_2Impl.Expected result:

-
-
Activate the use of the authorization providers to protect the JMX access:

The database dialect is pre-configured to use the Oracle database. If you are using a MySQL database, you should adapt the following properties in <DOMAIN_HOME>/conf/domibus/domibus.properties as highlighted in the example below:
# ----EntityManagerFactory---
domibus.entityManagerFactory.jpaProperty.hibernate.connectio.driver_class=com.mysql.cj.jdbc.Driver
domibus.entityManagerFactory.jpaProperty.hibernate.dialect=org.hibernate.dialect.MySQL8Dialect-
Install the WS Plugin. For more details, see WS Plugin.
-
Deploy
domibus-msh-distribution-5.1.8-weblogic.war. -
Click on Install.

-
Navigate to the location of the .war file and click Next:
-
Choose Install this deployment as an application and click Next:
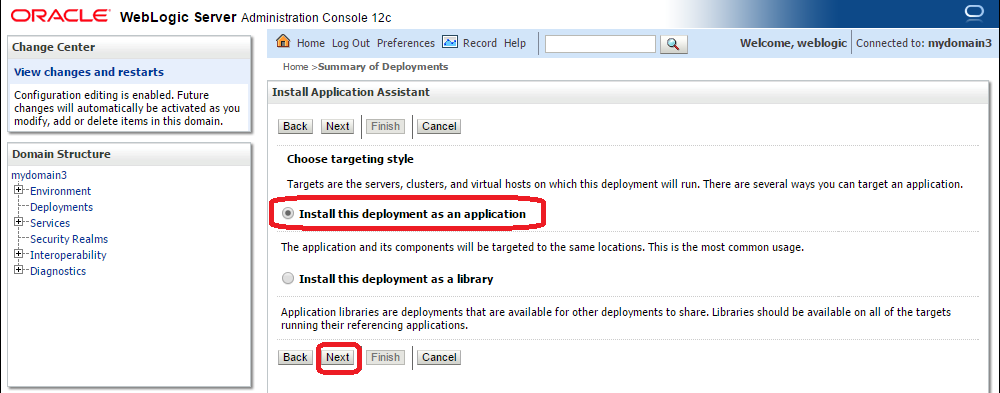
-
Accept the default options and click Next:
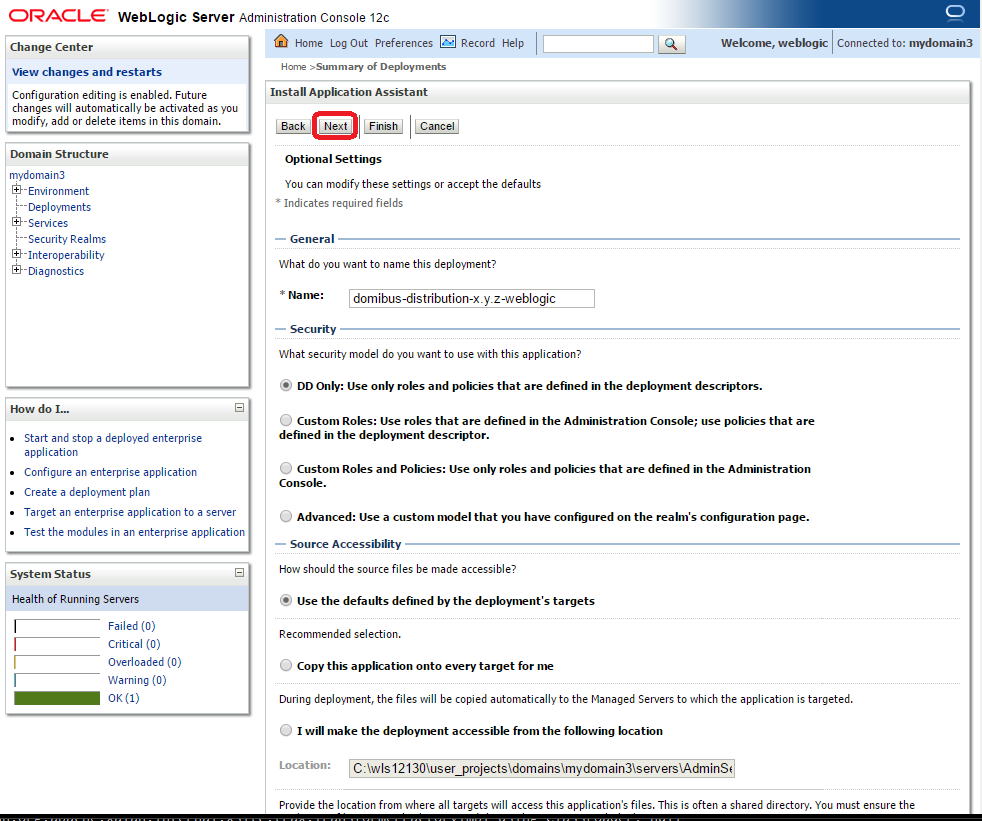
-
Select the following option and click Finish:
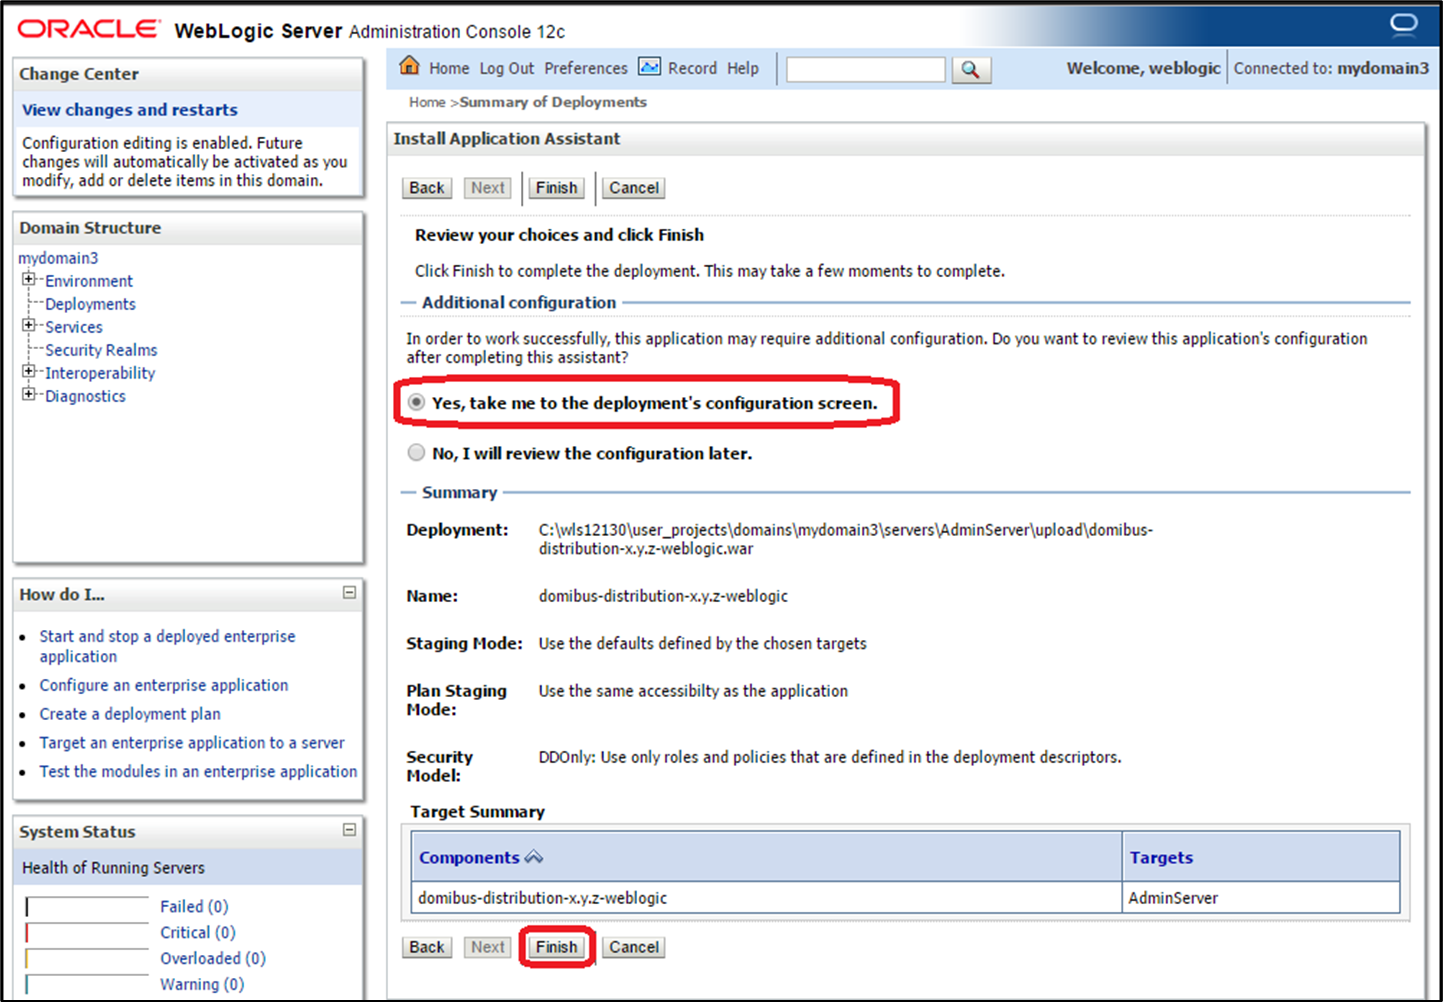
-
Here is an overview of the resulting settings, you can now click on the Save button:

The expected positive response to the deployment request should be the following:

-
Verify the installation by navigating with your browser to http://localhost:_7001_/domibus: if you can access the page it means the deployment was successful.
|
Note
|
By default, User = admin; for the password, look in the logs for the phrase: “Default password for user admin is”. It is recommended to change the passwords for the default users. For more see, Administration.
|
Expected result:

☛ Clustered Deployment

|
Note
|
In this section, we assume that a Domain and a WebLogic Cluster are already setup. |
For this step, you will have to use the following resources (see section Downloading Resources for the download location):
-
domibus-msh-distribution-5.1.8-weblogic-war.zip -
domibus-msh-distribution-5.1.8-weblogic-configuration.zip
At least one of the following plugins should be downloaded and installed:
-
domibus-msh-distribution-5.1.8-default-ws-plugin.zip -
domibus-msh-distribution-5.1.8-default-jms-plugin.zip -
domibus-msh-distribution-5.1.8-default-fs-plugin.zip-
Download and unzip
domibus-msh-distribution-5.1.8-weblogic-configuration.zipin a shared location that is accessible by all the nodes from the cluster. We will refer to this directory as<shared_edelivery_path>. -
Download and unzip
domibus-msh-distribution-5.1.8-weblogic-war.zipin a temporary folder to prepare it for deployment. -
Configure your Keystore based on the Certificates section.
-
Add the following lines in:
-
DOMAIN_HOME\bin\setDomainEnv.cmd
-
Locate the
set DOMAIN_HOMEstatement and add the following lines after it:
set DOMAIN_HOME
# ...
set DOMAIN_HOME
# Added for Domibus ******************************************************************
set EXTRA_JAVA_PROPERTIES="%EXTRA_JAVA_PROPERTIES% - Ddomibus.config.location=%SHARED_LOCATION%/conf/Domibus -Djava.io.tmpdir=<temp_directory_path>"
# *************************************************************************************
set JAVA_OPTIONS="%JAVA_OPTIONS% -Dweblogic.transaction.allowOverrideSetRollbackReason=true"
# ...|
Note
|
SHARED_LOCATION is the shared location where Domibus configuration is found for a clustered installation.
|
DOMAIN_HOME/bin/setDomainEnv.sh
-
Locate the
export DOMAIN_HOMEstatement and add the following lines after it:
export DOMAIN_HOME
# ...
export DOMAIN_HOME
# Added for Domibus ******************************************************************
EXTRA_JAVA_PROPERTIES="$EXTRA_JAVA_PROPERTIES -Ddomibus.config.location=$SHARED_LOCATION/conf/domibus -Djava.io.tmpdir=<temp_directory_path>"
export EXTRA_JAVA_PROPERTIES
# ************************************************************************************
JAVA_OPTIONS="$\{JAVA_OPTIONS} -Dweblogic.transaction.allowOverrideSetRollbackReason=true”
export JAVA_OPTIONS
# ...|
Note
|
SHARED_LOCATION is the shared location where
Domibus configuration is found for a clustered installation.
|
-
Run the WebLogic Scripting Tool (WLST) to create the necessary JMS resources and Database datasources from the command line:
-
Download the WLST Package from the following location: https://ec.europa.eu/digital-building-blocks/artifact/content/repositories/eDelivery/eu/europa/ec/digit/ipcis/wslt-api/1.9.1/wslt-api-1.9.1.zip
Configure the WSLT API tool:
-
Unzip the
wslt-api-1.9.1.zip -
Define the WL_HOME (SET or export command depending on your operating system) environment variable to point to the WebLogic
wlserverdirectory, for example,
WL_HOME=/wls12130/wlserver
-
Take the script
WeblogicCluster.propertiesfromdomibus-msh-distribution-5.1.8-weblogic-configuration.zipunder the scripts directory and copy theWeblogicCluster.propertiesfile into thewslt-api-1.9.1directory and apply the following changes: -
Adapt the properties for connecting to the WebLogic domain:
## Domain configuration
## Variables
##---------Cross module--------
#Domibus application module target
application.module.target= _cluster_name_
##---------JMS configuration--------
#Domibus JMS application server name
jms.server.name = eDeliveryJMS
#Domibus JMS application module name
jms.module.name=eDeliveryModule
#Domibus JMS file store name
jms.server.store=eDeliveryFileStore
#Domibus JMS application module group
jms.queue.subdeployment.name=eDeliverySubD
##---------Database configuration--------
#Domibus database url
jdbc.datasource.driver.url=
jdbc:oracle:thin:@127.0.0.1:1521:<SID/Service>
#Domibus database user name
jdbc.datasource.driver.username= your_username
#Domibus database user password
jdbc.datasource.driver.password= your_password## JDBC datasource Server [eDeliveryDs]
############################################################
# Oracle configuration
jdbc.datasource.0.name=eDeliveryDs
jdbc.datasource.0.targets=$\{application.module.target}
jdbc.datasource.0.jndi.name=jdbc/cipaeDeliveryDs
jdbc.datasource.0.pool.capacity.max=50
jdbc.datasource.0.pool.connection.test.onreserv.enable=true
jdbc.datasource.0.pool.connection.test.onreserv.sql=SQL SELECT 1 FROM DUAL
jdbc.datasource.0.driver.name= oracle.jdbc.driver.OracleDriver
jdbc.datasource.0.driver.url=$\{jdbc.datasource.driver.url}
jdbc.datasource.0.driver.password=$\{jdbc.datasource.driver.password}
jdbc.datasource.0.driver.username=$\{jdbc.datasource.driver.username}
jdbc.datasource.0.driver.properties.items=0
jdbc.datasource.0.xa.transaction.timeout.branch=true
############################################################
## JDBC datasource Server [edeliveryNonXA]
############################################################
# Oracle configuration
jdbc.datasource.1.name=edeliveryNonXA
jdbc.datasource.1.targets=$\{application.module.target}
jdbc.datasource.1.jndi.name=jdbc/cipaeDeliveryNonXADs
jdbc.datasource.1.transaction.protocol=None
jdbc.datasource.1.pool.capacity.max=50
jdbc.datasource.1.pool.connection.test.onreserv.enable=true
jdbc.datasource.1.pool.connection.test.onreserv.sql=SQL SELECT 1 FROM DUAL
jdbc.datasource.1.driver.name=oracle.jdbc.OracleDriver
jdbc.datasource.1.driver.url=$\{jdbc.datasource.driver.url}
jdbc.datasource.1.driver.password=$\{jdbc.datasource.driver.password}
jdbc.datasource.1.driver.username=$\{jdbc.datasource.driver.username}
jdbc.datasource.1.driver.properties.items=0|
Note
|
MySQL configuration is commented out by default. To enable MySQL, remove uncomment the lines below. Do not forget to comment the lines regarding Oracle to disable it. |
############################################################
## JDBC datasource Server [eDeliveryDs]
############################################################
# MySQL configuration
jdbc.datasource.0.name=eDeliveryDs
jdbc.datasource.0.targets=$\{application.module.target}
jdbc.datasource.0.jndi.name=jdbc/cipaeDeliveryDs
jdbc.datasource.0.pool.capacity.max=50
jdbc.datasource.0.transaction.protocol=LoggingLastResource
jdbc.datasource.0.pool.connection.test.onreserv.enable=true
jdbc.datasource.0.pool.connection.test.onreserv.sql=SQL SELECT 1
jdbc.datasource.0.driver.name=com.mysql.cj.jdbc.Driver
jdbc.datasource.0.driver.url=$\{jdbc.datasource.driver.url}
jdbc.datasource.0.driver.password=$\{jdbc.datasource.driver.password}
jdbc.datasource.0.driver.username=$\{jdbc.datasource.driver.username}
jdbc.datasource.0.driver.properties.items=0
# MySQL configuration
jdbc.datasource.1.name=edeliveryNonXA
jdbc.datasource.1.targets=$\{application.module.target}
jdbc.datasource.1.jndi.name=jdbc/cipaeDeliveryNonXADs
jdbc.datasource.1.transaction.protocol=None
jdbc.datasource.1.pool.capacity.max=50
jdbc.datasource.1.pool.connection.test.onreserv.enable=true
jdbc.datasource.1.pool.connection.test.onreserv.sql=SQL SELECT 1
jdbc.datasource.0.driver.name=com.mysql.cj.jdbc.Driver
jdbc.datasource.1.driver.url=$\{jdbc.datasource.driver.url}
jdbc.datasource.1.driver.password=$\{jdbc.datasource.driver.password}
jdbc.datasource.1.driver.username=$\{jdbc.datasource.driver.username}
jdbc.datasource.1.driver.properties.items=0Adapt the property for location of the file store: persistent.filestore.0.location.
For example: persistent.filestore.0.location=DOMAIN_HOME/filestore
|
Caution
|
Make sure that the path for the file store contains forward slashes (/). |
-
Adapt if necessary the JMX security configuration:
jms.module.0.targets=cluster_name. -
Set the domibus.deployment.clustered option to true:
domibus.deployment.clustered=true. -
Start the WebLogic domain from within
DOMAIN_HOME:-
For Windows:
startWebLogic.cmd. -
For Linux:
startWebLogic.sh. -
Execute the following command from within the
wlstapi-1.9.1/bindirectory: For Windows:
-
wlstapi.cmd ../scripts/import.py --property ../WeblogicCluster.properties
For Linux:
wlstapi.sh ../scripts/import.py --property ../WeblogicCluster.propertiesExpected result:

-
Activate the use of the authorization providers to protect the JMX access:
-
The database dialect is pre-configured to use the Oracle database. If you are using the MySQL database you should adapt the dialect as highlighted in the text below in <DOMAIN_HOME>/conf/domibus/domibus.properties file:
#EntityManagerFactory
domibus.entityManagerFactory.jpaProperty.hibernate.connection.driver_class=
com.mysql.jdbc.jdbc2.optional.MysqlXADataSource
domibus.entityManagerFactory.jpaProperty.hibernate.dialect=org.hibernate.dialec.MySQL8Dialect-
Install the WS plugin. For more details, refer to chapter See WebLogic.
-
Deploy
domibus-msh-distribution-5.1.8-weblogic.war.
-
-
Click Install
-
Navigate to location
DOMAIN_HOME/conf/domibuswhere thedomibus-msh-distribution-5.1.8-weblogic.warfile has been previously copied to. -
Select the
domibus-msh-distribution-5.1.8-weblogic.warfile and click Next:
-
Choose Install this deployment as an application and click Next:
-
Select your cluster for the deployment target and click Next:
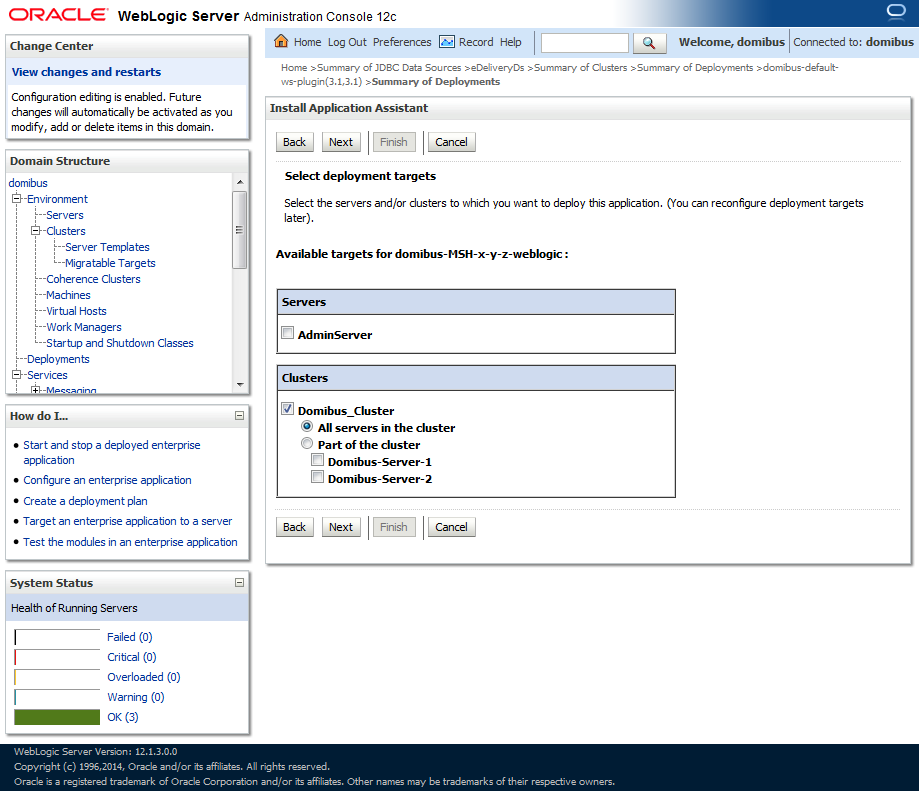
-
Select the following options and click Next:
-
Select the following option and click Finish:
Here is an overview of the resulting settings, you can now click on the Save button:
The expected positive response to the deployment request should be the following:
-
Verify the installation by navigating with your browser to http://localhost:_7001_/domibus
If you can access the page, it means the deployment was successful.
By default, the password is: user=admin. Search the logs for the string: Default password for user admin is.
|
Important
|
We highly recommend that you change any users' default passwords. See ☞ Administration Console for more information. |

-
For performance improvement in a Weblogic cluster, enable transaction cluster affinity and click Save.
|
See Also
|
☞ XA Transaction Cluster Affinity in Oracle documentation. |
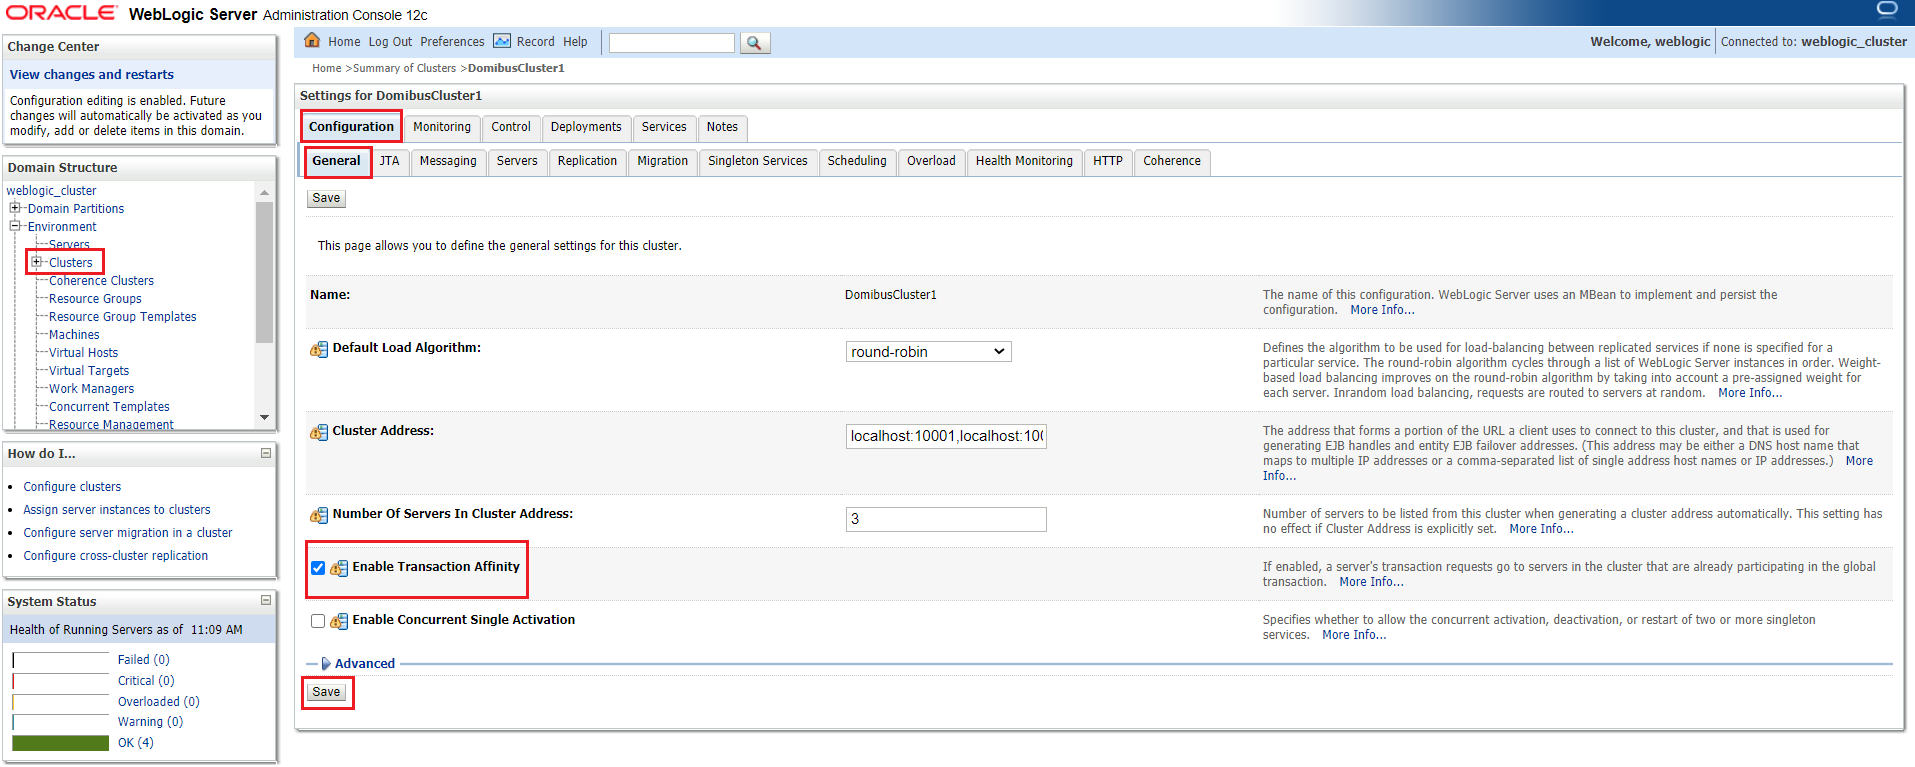
|
Note
|
NOTE: To send messages containing bodyload payloads, you must ensure the Weblogic server is started with the following extra parameter:
-Dorg.apache.cxf.binding.soap.messageFactoryClassName=com.sun.xml.internal.messaging.saaj.soap.ver1_2.SOAPMessageFactory1_2Impl.
|
4.4.2. Tomcat
Before deploying Domibus with Tomcat, please read the notes below.
Check the instructions according to your desired scenario:
☛ Pre-Defined Single Server Deployment
To deploy Domibus on Tomcat in a single server scenario:
-
Download
domibus-msh-distribution-5.1.8-tomcat-full.zip. See Downloading Resources. -
Extract the contents of
domibus-msh-distribution-5.1.8-tomcat-full.zipto:<edelivery_path>.
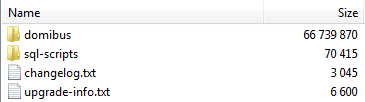
MySQL
-
Download the MySQL JDBC driver.
ImportantThe JDBC driver version needs to be 8.0.23 or higher. -
Add the MySQL JDBC driver to
<edelivery_path>/lib. -
Edit the properties file
<edelivery_path>/domibus/conf/domibus/domibus.propertiesand adjust the parts in the text below according to your environment.
The properties associated to the database configuration are pre-configured for the MySQL database:
# ------------Database-----------
#Database server nam
domibus.database.serverName=localhost
#Database port
domibus.database.port=3306
#Non-XA Datasource
domibus.datasource.driverClassName=com.mysql.cj.jdbc.Driver
domibus.datasource.url=jdbc:mysql://$\{domibus.database.serverName}:$\{domibus.databas.port}/domibus_schema?useSSL=false&useLegacyDatetimeCode=false&serverTimezone=UTC
domibus.datasource.user=edelivery_user
domibus.datasource.password=edelivery_password
domibus.datasource.maxLifetime=1800
domibus.datasource.connectionTimeout=30
domibus.datasource.idleTimeout=600
domibus.datasource.maxPoolSize=10
domibus.datasource.minimumIdle=10
domibus.datasource.poolName=Oracle
-
Download the Oracle JDBC driver. Available on the Oracle official website, see ebMS3 Core)
-
Add the Oracle JDBC driver (for e.g.
ojdbc8-21.1.0.0.jar) to<edelivery_path>/lib folder. -
Edit the properties file
<edelivery_path>/conf/domibus/domibus.propertiesand adjust the highlighted parts in the text below according to your environment:# ----------Database-------------------------- #Database server name domibus.database.serverName=localhost #Database port domibus.database.port=1521 #General schema. Mandatory only if Domibus is configured in multi-tenancy mode. #domibus.database.general.schema=general_schema #set domibus.database.schema=oracle_username domibus.database.schema= *oracle_username* #Non-XA Datasource #Oracle domibus.datasource.driverClassName=oracle.jdbc.OracleDriver domibus.datasource.url=jdbc:oracle:thin:@$\{domibus.database.serverName}:$\{domibus.database.port}/domibus domibus.datasource.user= *oracle_username* domibus.datasource.password=**edelivery_password** domibus.datasource.maxLifetime=1800 domibus.datasource.connectionTimeout=30 domibus.datasource.idleTimeout=600 domibus.datasource.maxPoolSize=10 domibus.datasource.minimumIdle=10 domibus.datasource.poolName=NoteConfigure the database dialect as it is pre-configured for MySQL by default. (QUESTION) #EntityManagerFactory domibus.entityManagerFactory.jpaProperty.hibernate.connection.driver_class=oracle.jdb.driver.OracleDriverz domibus.entityManagerFactory.jpaProperty.hibernate.dialect=org.hibernate.dialect.OracleDialect -
Configure your Keystore. See Certificates.
-
Set JVM parameters:
Domibus expects a single environment variable,
domibus.config.location, pointing to<edelivery_path>/conf/domibus.You can do this by editing the first command lines of
<edelivery_path>\bin\setenv.bat(Windows) or<edelivery_path>/bin/setenv.sh(Linux). -
Set
CATALINA_HOMEequal to the absolute path of the installation<edelivery_path>.-
For Windows: edit <edelivery_path>\bin\setenv.bat by adding the following:
set CATALINA_HOME=<edelivery_path> set CATALINA_TMPDIR=<temp_directory_path> set JAVA_OPTS=%JAVA_OPTS% -Dfile.encoding=UTF-8 -Xms128m -Xmx1024m -XX:PermSize=64m set JAVA_OPTS=%JAVA_OPTS% -D domibus.config.location=%CATALINA_HOME%\conf\domibus -
For Linux: edit
<edelivery_path>/domibus/bin/setenv.shand add the following:export CATALINA_HOME=<edelivery_path> export CATALINA_TMPDIR=<temp_directory_path> export JAVA_OPTS="$JAVA_OPTS -Xms128m -Xmx1024m" export JAVA_OPTS="$JAVA_OPTS -Ddomibus.config.location=$CATALINA_HOME/conf/domibus"
-
-
Launch the Domibus application:
-
In Windows:
cd <edelivery_path>\bin\ startup.bat -
In Linux:
cd <edelivery_path>/bin chmod u+x *.sh ./startup.sh
-
-
Display the Domibus home page on your browser: http://localhost:8080/domibus.
If you can access the page (see image), it means the deployment was successful.
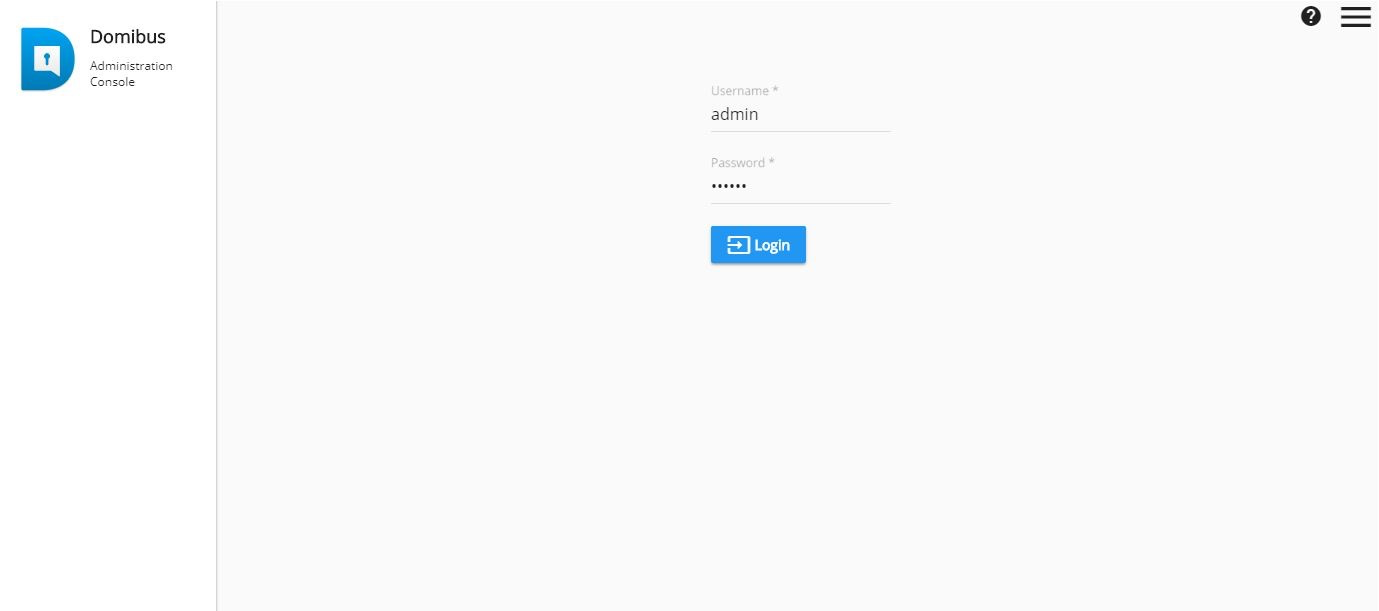
By default, the password is: user=admin. Search the logs for the string: Default password for user admin is.
|
Important
|
We highly recommend that you change any users' default passwords. See ☞ Administration Console for more information. |
☛ Single Server Deployment
For this step, you have the following resources available. See Downloading Resources.
-
domibus-msh-distribution-5.1.8-tomcat-configuration.zip -
domibus-msh-distribution-5.1.8-tomcat-war.zip -
domibus-msh-distribution-5.1.8-sql-scripts.zip -
domibus-msh-distribution-5.1.8-tomcat-configuration.zip -
domibus-msh-distribution-5.1.8-default-ws-plugin.zip -
domibus-msh-distribution-5.1.8-default-jms-plugin.zip (optional) -
domibus-msh-distribution-5.1.8-default-fs-plugin.zip (optional) -
domibus-msh-distribution-5.1.8-tomcat-war.zip -
domibus-msh-distribution-5.1.8-sample-configuration-and-testing.zip -
domibus-MSH-tomcat-5.1.8.war -
Mysql-connector-java-x.y.z driver
(eg.:mysql-connector-java-8.0.23.jar, see OASIS AS4 Profile)We assume that an Apache Tomcat 9.x is already installed and the installation location is now considered as your
<edelivery_path>/.-
Download and unzip the artefact
domibus-msh-distribution-5.1.8-tomcat-configuration.zipinto the directory <edelivery_path>/conf/domibus. -
Configure the MySQL or Oracle datasource as indicated in Pre-Configured Single Server Deployment.
-
Configure your Keystore based on Certificates.
-
Execute step 4 from Pre-Configured Single Server Deployment.
-
If not already present, create a folder and name it
tempunder <edelivery_path>/conf/Domibus. -
Rename domibus-MSH-5.1.8-tomcat.war to
domibus.warand deploy it to <edelivery_path>/webapps.
-
Copy Plugins subfolders to the conf/Domibus/plugins folder
-
Add the
conf/domibuspath (tocatalina.shorsetenv.sh). Add the following highlighted lines:JAVA_OPTS="$JAVA_OPTS -Djava.protocol.handler.pkgs=org.apache.catalina.webresources" export JAVA_OPTS="$JAVA_OPTS -Xms128m -Xmx1024m" export=JAVA_OPTS="$JAVA_OPTS -domibus.config.location=$CATALINA_HOME/conf/domibus" #Check for the deprecated LOGGING_CONFIG -
Copy the Mysql connector (e.g.: mysql-connector-java-8.0.23.jar) to the lib folder.
-
From
domibus-msh-distribution-5.1.8-sample-configuration-and-testing.zip, copy the keystores folder to…/conf/domibus. -
Rename the
domibus-MSH-tomcat-5.1.8.warto Domibus.war and copy it to webapps -
Launch the Domibus application:
-
For Windows:
cd <edelivery_path>\bin\ startup.bat -
For Linux:
cd <edelivery_path>/bin/ chmod +x .sh ./startup.sh
-
-
Display the Domibus home page on your browser: http://localhost:8080/domibus
If you can access the page below, then you have successfully completed the installation.
-
By default, the password is: user=admin. Search the logs for the string: Default password for user admin is.
|
Important
|
We highly recommend that you change any users' default passwords. See ☞ Administration Console for more information. |
☛ Cluster Deployment
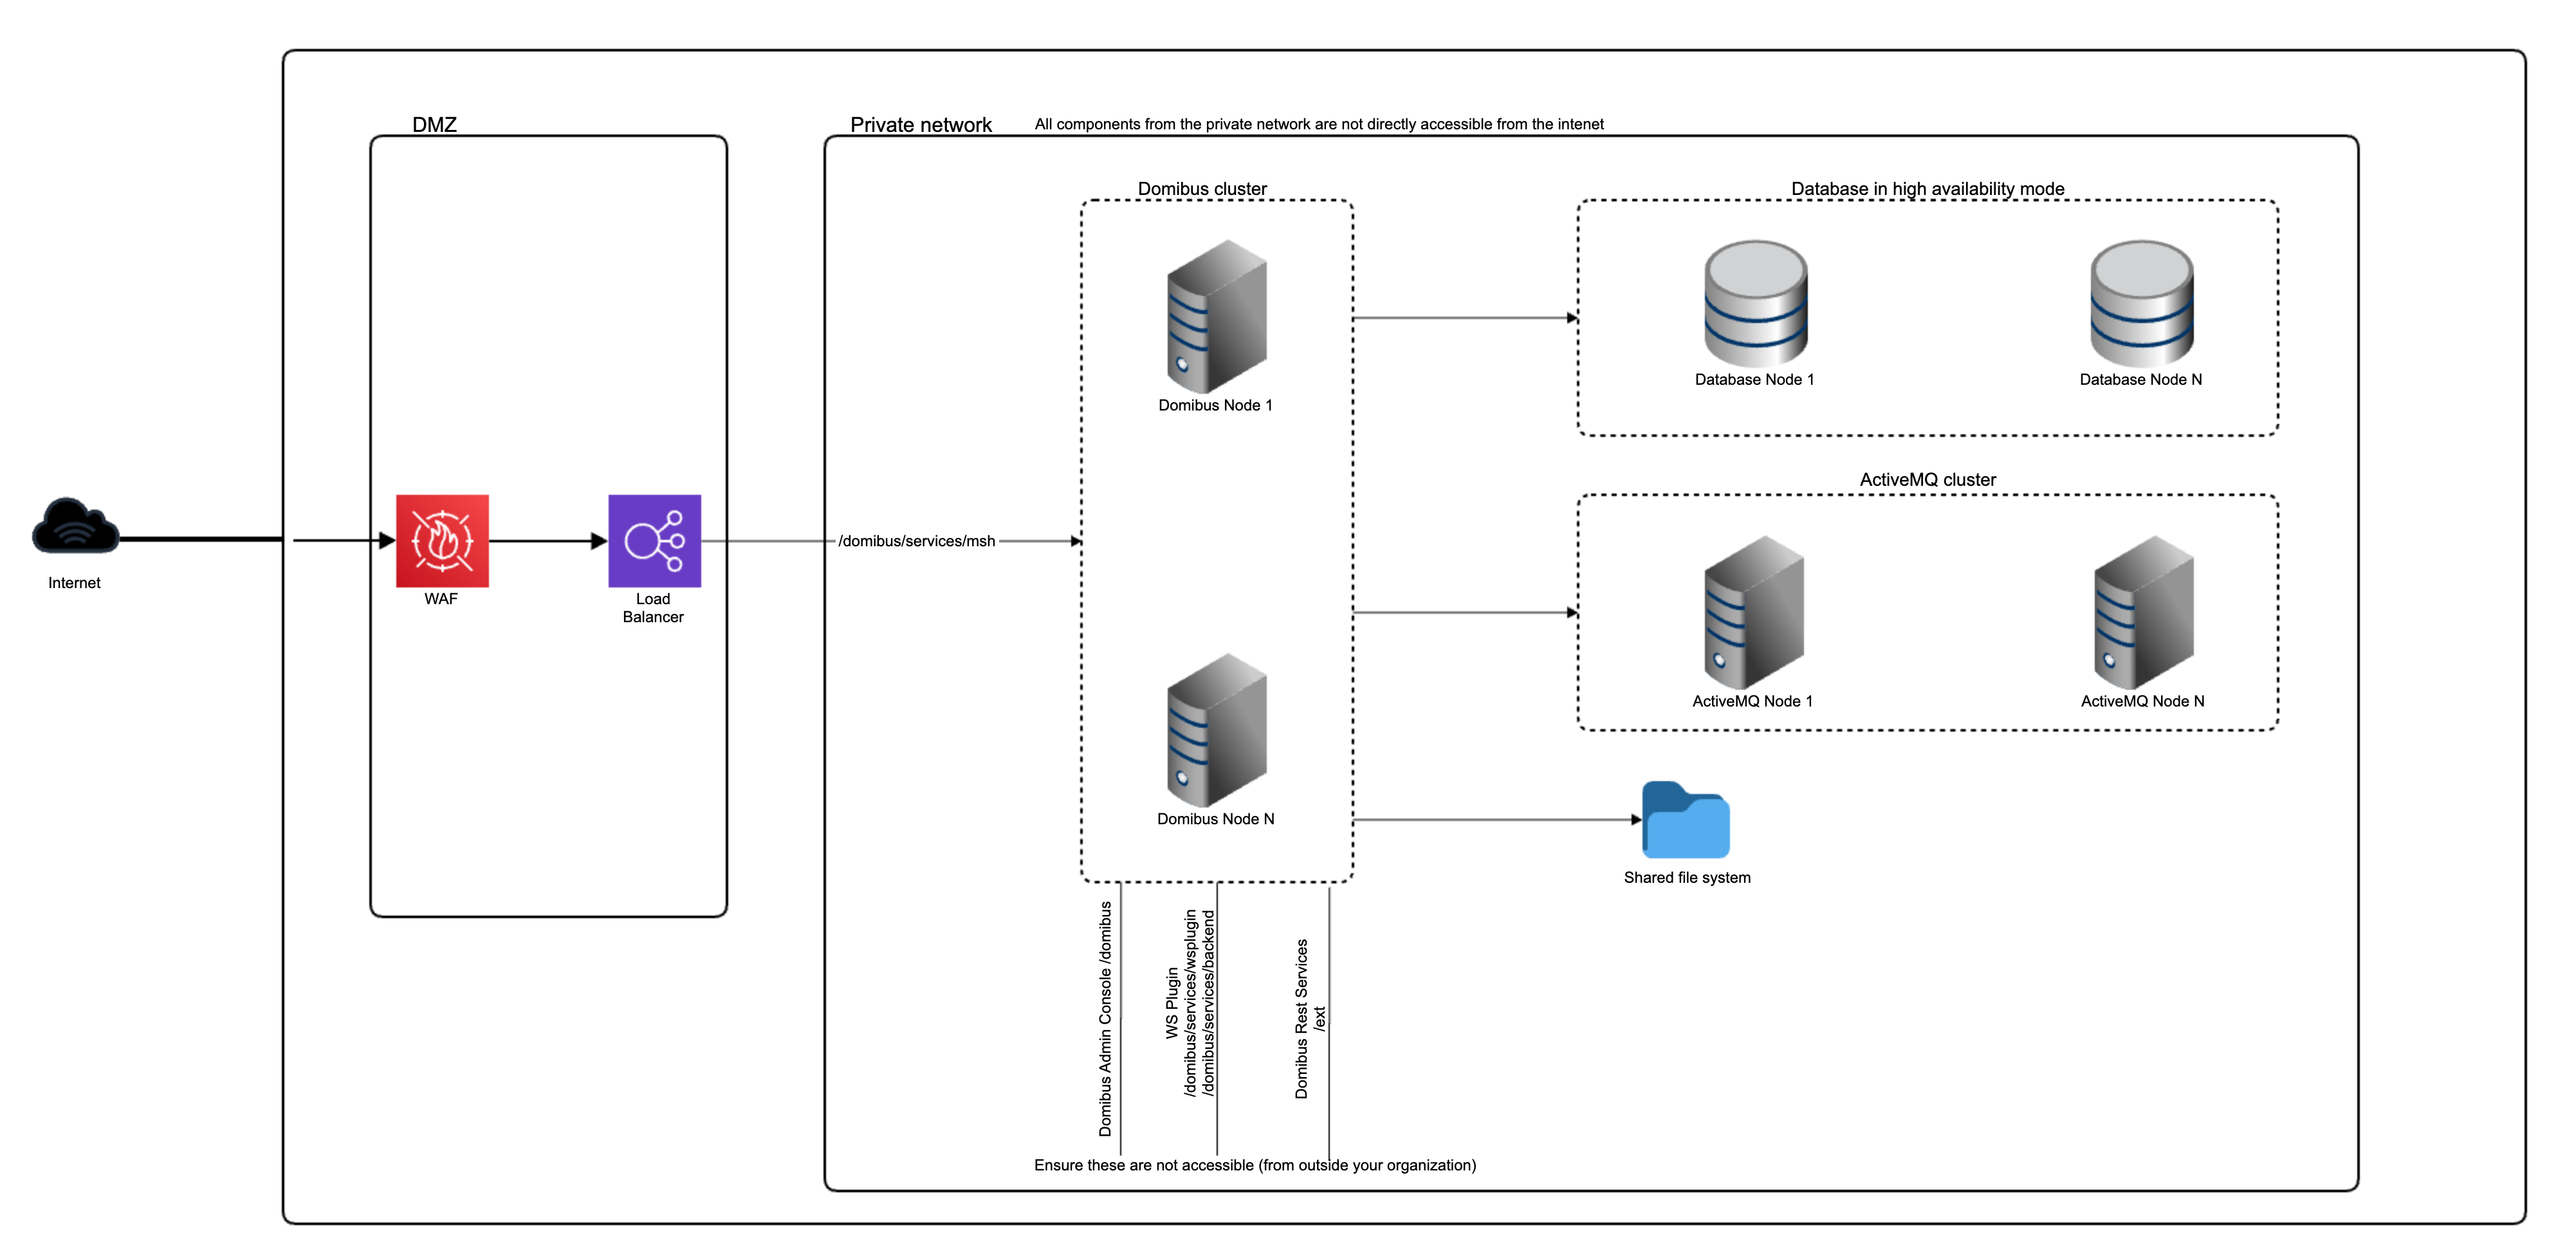
|
Note
|
In this section we assume that one or more JMS Brokers and a load balancer are configured separately (e.g. HTTPD). |
For this deployment, you will need the following resources (see Domibus downloads):
-
domibus-msh-distribution-5.1.8-tomcat-full.zip -
domibus-msh-distribution-5.1.8-tomcat-war.zip
To deploy Domibus in a Cluster on Tomcat:
-
Follow steps 1 through 5 of the Single Server Deployment section.
-
Set the JVM parameters.
-
Set the cluster related Domibus properties.
-
Integrate the external JMS brokers.
-
Follow steps 6 and 7 of the Single Server Deployment section.
Set the JVM parameters
Domibus expects a single JVM parameter $domibus.config.location, pointing to the <edelivery_path> folder. This folder is located on a shared filesystem (e.g. NAS) used by all Tomcat instances. The Tomcat instances must have write permissions to this location.
-
You can do this by editing:
-
Windows:
<edelivery_path>\bin\setenv.bat -
Linux:
<edelivery_path>/bin/setenv.sh
-
Set CATALINA_HOME as <edelivery_path>. Where <edelivery_path> stands for the absolute path of your Domibus installation.
-
For Windows:
Edit
<edelivery_path>\bin\setenv.batand add the following:set CATALINA_HOME=<edelivery_path> set CATALINA_TMPDIR=<temp_directory_path> set JAVA_OPTS=%JAVA_OPTS% -Dfile.encoding=UTF-8 -Xms128m -Xmx1024m -XX:PermSize=64m set JAVA_OPTS=%JAVA_OPTS% -Ddomibus.config.location=%CATALINA_HOME%\conf\domibus set JAVA_OPTS=%JAVA_OPTS% -Ddomibus.node.id=<your_node_id> -
For Linux:
Edit
<edelivery_path>/bin/setenv.shand add the following:export CATALINA_HOME=<edelivery_path> export CATALINA_TMPDIR=<temp_directory_path> export JAVA_OPTS="$JAVA_OPTS –Xms128m –Xmx1024m" export JAVA_OPTS="$JAVA_OPTS -Ddomibus.config.location=$CATALINA_HOME/conf/domibus" export JAVA_OPTS="$JAVA_OPTS -Ddomibus.node.id=>your_node_id>"
|
Note
|
your_node_id in the sample above refers to the installed node in the cluster which starts normally at 01(then 02, etc.).
|
Domibus Properties
-
Set the
domibus.deployment.clusteredDomibus property totruein<edelivery_path>/conf/domibus/domibus.properties.
Integrate JMS Brokers
|
Note
|
Domibus support the integration of ActiveMQ "Classic" external brokers. Domibus does not support the integrating of Artemis (a.k.a. ActiveMQ "New") external brokers. In this section, we will refer to the external JMS brokers as ActiveMQ brokers.
|
When deploying Domibus in a cluster of Tomcat application servers, one or more ActiveMQ brokers are set up externaly having their details configured in <edelivery_path>/conf/domibus/domibus.properties:
-
Delete the
activeMQ.embedded.configurationFileproperty since the ActiveMQ brokers are external. -
Delete the
activeMQ.broker.host,activeMQ.connectorPortandactiveMQ.rmiServerPortproperties. -
Integrate the ActiveMQ brokers with Domibus by adapting the following properties:
#ActiveMQ activeMQ.brokerName=brokerName1,brokerName2 (1) activeMQ.transportConnector.uri=failover:(tcp://activemq1:61616,tcp//activemq2:61616)?maxReconnectDelay=10000&maxReconnectAttempts=5 (2) activeMQ.JMXURL=service:jmx:rmi:///jndi/rmi://activemq1:1199/jmxrmi,service:jmx:rmi:///jndi/rmi://activemq2:1199/jmxrmi (3) activeMQ.username=domibus activeMQ.password=changeitWhere:
-
The broker names assigned to the ActiveMQ brokers, as a comma-separated list of values;
-
The transport connectors used to connect to the ActiveMQ brokers, as a comma-separated list of values;
-
The JMX service URLs used to manage the ActiveMQ brokers, as a comma-separated list of values.
NoteThe values of the activeMQ.brokerName, theactiveMQ.transportConnector.uriand theactiveMQ.JMXURLDomibus properties contain the details of all the external ActiveMQ brokers.WarningThe individual constituents that take part of the full comma-separated values of activeMQ.brokerName,activeMQ.transportConnector.uriandactiveMQ.JMXURLhave the same count across these properties and are defined in the same order. If the value for the name of one broker lands on a particular position inside the value of theactiveMQ.brokerNameproperty then it is used on the same positions inside the values of theactiveMQ.transportConnector.uriandactiveMQ.JMXURLproperties. Domibus will fail to start if you do not configure this correctly.
-
4.4.3. WildFly
To deploy Domibus in Wildfly, check the instructions for your deployment scenario:
|
Important
|
About the Apache CFX Library and known limitations
|
By default, the password is: user=admin. Search the logs for the string: Default password for user admin is.
|
Important
|
We highly recommend that you change any users' default passwords. See ☞ Administration Console for more information. |
By default, the password is: user=admin. Search the logs for the string: Default password for user admin is.
|
Important
|
We highly recommend that you change any users' default passwords. See ☞ Administration Console for more information. |
☛ Pre-Configured Single Server Deployment
|
Note
|
The steps below are applicable to both distributions of Domibus. |
To deploy Domibus in WildFly:
-
Download
domibus-msh-distribution-5.1.8-wildfly-full.zipfrom Domibus downloads page.ImportantDomibus supports WildFly 26.1.0 or higher. -
Unzip the
domibus-msh-distribution-5.1.8-wildfly-full.ziparchive into your<edelivery_path>location.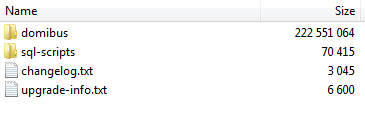
-
Configure your database.
MySQL Configuration
Below you can find information on how to configure driver and datasources.
MySQL Drivers:
-
Create the directory
<edelivery_path>/modules/system/layers/base/com/mysql/main. Under this directory: -
Download the MySQL JDBC driver.
ImportantThe driver’s version needs to be mysql-connector-java-8.0.23.jaror higher. -
Create or edit the file
<edelivery_path>/modules/system/layers/base/com/mysql/main/module.xml -
Copy the module configuration below:
<module xmlns="urn:jboss:module:1.3" name="com.mysql"> <resources> <resource-root path="mysql-connector-java-8.0.23.jar"/> (1) </resources> <dependencies> <module name="javax.api"/> <module name="javax.transaction.api"/> </dependencies> </module>-
Make sure to type the name of the driver you use as an argument of
resource-rootelement. e.g.mysql-connector-java-8.0.23.jar.
-
-
Add your DBMS driver metadata to the Drivers section of the
<edelivery_path>/standalone/configuration/standalone-full.xml.<subsystem xmlns="urn:jboss:domain:datasources:6.0"> <datasources> <drivers> <driver name="h2" module="com.h2database.h2"> <xa-datasource-class>org.h2.jdbcx.JdbcDataSource</xa-datasource-class> </driver> <driver name="com.mysql" module="com.mysql"> <!--Connector/J 8.0.x <driver-class>com.mysql.cj.jdbc.Driver</driver-class> <xa-datasource-class>com.mysql.cj.jdbc.MysqlXADataSource</xa-datasource-class>--> </driver> <!--Oracle <driver name="com.oracle" module="com.oracle"> <driver-class>oracle.jdbc.driver.OracleDriver</driver-class> <xa-datasource-class>oracle.jdbc.xa.client.OracleXADataSource</xa-datasource-class> </driver> --> </drivers> </datasources> </subsystem> <!--- Datasources: Add the datasources as indicated below to <edelivery_path>/standalone/configuration/standalone-full.xml. --> <!--- NOTE: * Please make sure you modify the connection details for the *edeliveryMysqlDS* datasource for MySQL according to your environment. * See ORACLE related changes in *option 2* below when Oracle is used instead of MySQL. --> <subsystem xmlns="urn:jboss:domain:datasources:6.0"> <datasources> <xa-datasource jndi-name="java:/jdbc/cipaeDeliveryDs" pool-name="eDeliveryMysqlXADS" enabled="true" use-ccm="true" statistics-enabled="true"> <connection-url> jdbc:mysql://localhost:3306/domibus_schema?autoReconnect=true&useSSL-false&useLegacyDatetimeCode=false&serverTimezone=UTC </connection-url> <!--Connector/J 8.0.x -> <driver-class>com.mysql.cj.jdbc.Driver</driver-class> <driver>com.mysql</driver> <pool> <min-pool-size>20</min-pool-size> <initial-pool-size>5</initial-pool-size> <max-pool-size>100</max-pool-size> </pool> <security> <user-name>**_edelivery_user_**</user-name> <password>**_edelivery_password_**</password> </security> <validation> <valid-connection-checker class-name="org.jboss.jca.adapters.jdbc.extensions.mysql.MySQLValidConnectionChecker"/> <background-validation>true</background-validation> <exception-sorter class-name="org.jboss.jca.adapters.jdbc.extensions.mysql.MySQLExceptionSorter"/>ß </validation> </datasource> <datasource jndi-name="java:/jdbc/cipaeDeliveryNonXADs" pool-name="eDeliveryMysqlNonXADS" enabled="true" use-ccm="true"> + <connection-url>jdbc:mysql://localhost:3306/domibus_schema?autoReconnect=true&useSSL-false&useLegacyDatetimeCode=false&serverTimezone=UTC </connection-url> <driver-class>com.mysql.cj.jdbc.Driver</driver-class> <!--Connector/J 8.0.x <driver-class>com.mysql.cj.jdbc.Driver</driver-class> <driver>com.mysql</driver> <pool> <min-pool-size>20</min-pool-size> <initial-pool-size>5</initial-pool-size> <max-pool-size>100</max-pool-size> </pool> <security> <user-name>edelivery_user</user-name> <password>edelivery_password</password> </security> <validation> <valid-connection-checker class-name="org.jboss.jca.adapters.jdbc.extensions.mysql.MySQLValidConnectionChecker"/> <background-validation>true</background-validation> <exception-sorter class-name="org.jboss.jca.adapters.jdbc.extensions.mysql.MySQLExceptionSorter"/> </validation> </datasource> </datasources> </subsystem>
Configuring Oracle Databases:
Driver configuration:
-
Create the directory
<edelivery_path>/modules/system/layers/base/com/oracle/main. Under this directory: -
Create or edit the file
<edelivery_path>/modules/system/layers/base/com/oracle/main/module.xmlin the recently created folder. -
Add the following module configuration. Make sure to type the name of the driver you use as an argument of
resource-rootelement. e.g.ojdbc8-21.1.0.0.jar:<module xmlns="urn:jboss:module:1.3" name="com.oracle"> <resources> <resource-root path="_ojdbc8-21.1.0.0.jar_ "/> </resources> <dependencies> <module name="javax.api"/> <module name="javax.transaction.api"/> </dependencies> </module> -
Uncomment Oracle paragraph from the Drivers section in
<edelivery_path>/standalone/configuration/standalone-full.xml.<subsystem xmlns="urn:jboss:domain:datasources:6.0"> <datasources> <drivers> <driver name="h2" module="com.h2database.h2"> <xa-datasource-class>org.h2.jdbcx.JdbcDataSource</xa-datasource-class> </driver> <!-- <driver name="com.mysql" module="com.mysql"> --> <!--Connector/J 8.0.x --> <!-- <driver-class>com.mysql.cj.jdbc.Driver</driver-class> <xa-datasource-class>com.mysql.cj.jdbc MysqlXADataSource</xa-datasource-class> </driver> --> <!-- Oracle --> <driver name="com.oracle" module="com.oracle"> <driver-class>oracle.jdbc.driver.OracleDriver</driver-class> <xa-datasource-class>oracle.jdbc.xa.client.OracleXADataSource </xa-datasource-class> </driver> <drivers> </datasources> </subsystem>
Datasources configuration:
-
Uncomment the Oracle paragraph from the datasources section of
<edelivery_path>/standalone/configuration/standalone-full.xml.NotePlease make sure you modify the connection details for both eDeliveryOracleNonXADSandeDeliveryOracleDSdatasources for Oracle according to your environment.<!-- Oracle <datasource jta="true" jndi-name="java:/jdbc/cipaeDeliveryNonXADs" pool-name="eDeliveryOracleNonXADS" enabled="true" use-ccm="true"> <connection-url>jdbc:oracle:thin:@localhost:1521[:SID|/Service]</connection-url> <driver-class>oracle.jdbc.OracleDriver</driver-class> + <driver>com.oracle</driver> <pool> <min-pool-size>20</min-pool-size> <initial-pool-size>5</initial-pool-size> </pool> <security> <user-name>edelivery_user/user-name> <password>edelivery_password</password> </security> + <validation> + <valid-connection-checker class-name="org.jboss.jca.adapters.jdbc.extensions.oracle.OracleValidConnectionChecker"/> <background-validation>true</background-validation> <stale-connection-checker class-name="org.jboss.jca.adapters.jdbc.extensions.oracle.OracleStaleConnectionChecker"/> <exception-sorter class-name="org.jboss.jca.adapters.jdbc.extensions.oracle.OracleExceptionSorter"/> </validation> </datasource> <!-- Oracle <datasource jndi-name="java:/jdbc/cipaeDeliveryDs" pool-name="eDeliveryOracleDS" enabled="true" use-ccm="true"> <connection-url>jdbc:oracle:thin:@localhost:1521[:SID|/Service]</connection-url> <driver-class>oracle.jdbc.OracleDriver</driver-class> <driver>com.oracle</driver> <pool> <min-pool-size>20</min-pool-size> <initial-pool-size>5</initial-pool-size> <max-pool-size>100</max-pool-size> </pool> <security> <user-name>**_edelivery_user_**</user-name> + <password>**_edelivery_password_**</password> + </security> + <validation> + <valid-connection-checker class-name="org.jboss.jca.adapters.jdbc.extensions.oracle.OracleValidConnectionChecker"/> + <exception-sorter class-name="org.jboss.jca.adapters.jdbc.extensions.oracle.OracleExceptionSorter"/> + </validation> + </datasource> + --> -
Edit the configuration file
<edelivery_path>/conf/domibus/domibus.propertiesand configure the datasources as indicated below.NoteConfigure the database dialect as it is pre-configured for MySQL by default. #EntityManagerFactory domibus.entityManagerFactory.jpaProperty.hibernate.connection.driver_class=oracle.jdbc.driver.OracleDriver domibus.entityManagerFactory.jpaProperty.hibernate.dialect=org.hibernate.dialect.Oracle10gDialect -
Configure your Keystore based on the information in the Certificates section.
-
Run the standalone server:
-
For Windows
-
under
<edelivery_path>\bin\runstandalone.bat --server-config=standalone-full.xml
-
-
For Linux
-
under
<edelivery_path>/bin/runstandalone.sh --server-config=standalone-full.xml
-
-
-
Display the Domibus home page in your browser: http://localhost:_8080_/domibus
By default, the password is: user=admin. Search the logs for the string: Default password for user admin is.
|
Important
|
We highly recommend that you change any users' default passwords. See ☞ Administration Console for more information. |
|
Note
|
Whenever mentioned,<edelivery_path> refers to the path in your system where you have installed the Domibus package. Some instructions refer to locations relative to this base path.
|
☛ Single Server Deployment
In this section we assume that WildFly version 26.1.x is installed at location <edelivery_path>.
For this step, you will need the following resources (see the Domibus downloads page):
-
domibus-msh-distribution-5.1.8-wildfly-war.zip -
domibus-msh-distribution-5.1.8-wildfly-configuration.zip
To configure Domibus in Wildfy:
-
Run the WildFly 26.1 JBOSS CLI in order to configure <edelivery_path>/standalone/configuration/standalone-full.xml from the command line:
-
Extract the configuration scripts from the domibus-msh-distribution-5.1.8-wildfly-configuration.zip file under the scripts directory.
-
Configure the JBOSS CLI tool:
-
For Windows:
configure.bat -
For Linux:
configure.sh
-
-
Extract the script
configure.bat(orconfigure.sh) fromdomibus-msh-distribution-5.1.8-wildfly-configuration.zipunder the scripts directory and adapt the following properties:Windows
NoteThe configure.bat script uses Windows Powershell present on machines running Windows 7 SP1 or later. Oracle and MySQLSET JBOSS_HOME=C:\path\to\wildfly SET SERVER_CONFIG=standalone-full.xmlOracleSET DB_TYPE=Oracle SET DB_HOST=localhost SET DB_PORT=1521 SET DB_USER=edelivery_user SET DB_PASS=edelivery_password SET JDBC_CONNECTION_URL="jdbc:oracle:thin:@%DB_HOST%:%DB_PORT%[:_SID_/Service]" SET ORACLE_JDBC_DRIVER_DIR=%JBOSS_HOME%\modules\system\layers\base\com\oracle\main SET ORACLE_JDBC_DRIVER_NAME=ojdbc-X.Y.Z.jarNoteOracle configuration is commented by default. To enable Oracle, uncomment the lines below. Remember to comment the MySQL setting to disable them. MySQLSET DB_TYPE=MySQL SET DB_HOST=localhost SET "DB_NAME=domibus_schema?autoReconnect=true^&useSSL=false^&useLegacyDatetimeCode=false^&serverTimezone=UTC" SET DB_PORT=3306 SET DB_USER=edelivery SET DB_PASS=edelivery SET JDBC_CONNECTION_URL=jdbc:mysql://%DB_HOST%:%DB_PORT%/!DB_NAME! SET MYSQL_JDBC_DRIVER_DIR=%JBOSS_HOME%\modules\system\layers\base\com\mysql\main SET MYSQL_JDBC_DRIVER_NAME=mysql-connector-java-X.Y.Z.jarLinux
Oracle and MySQLJBOSS_HOME=/path/to/wildfly SERVER_CONFIG=standalone-full.xmlOracle:DB_TYPE=Oracle DB_HOST=localhost DB_PORT=1521 DB_USER=edelivery_user DB_PASS=edelivery_password JDBC_CONNECTION_URL="jdbc:oracle:thin:@$\{DB_HOST}:$\{DB_PORT}[:_SID/Service_]" ORACLE_JDBC_DRIVER_DIR=$\{JBOSS_HOME}/modules/system/layers/base/com/oracle/main ORACLE_JDBC_DRIVER_NAME=ojdbc-X.Y.Z.jarNoteOracle configuration is commented by default. To enable Oracle, uncomment the lines below. Remember to comment the MySQL setting to disable them. MySQLDB_TYPE=MySQL DB_HOST=localhost DB_NAME=domibus_schema?autoReconnect=true\&useSSL=false\&useLegacyDatetimeCode=false\&serverTimezone=UTC DB_PORT=3306 DB_USER=edelivery_user DB_PASS=edelivery_password JDBC_CONNECTION_URL=jdbc:mysql://$\{DB_HOST}:$\{DB_PORT}/$\{DB_NAME}MYSQL_JDBC_DRIVER_DIR=$\{JBOSS_HOME}/modules/system/layers/base/com/mysql/main MYSQL_JDBC_DRIVER_NAME=mysql-connector-java-X.Y.Z.jar
-
-
Execute the following command from within the scripts directory:
-
For Windows: configure.bat
-
For Linux: configure.sh
Expected result:
-
-
Follow steps MySQL or Oracle found in the Pre-Configured Single Server Deployment section and replace the directory:
-
Windows
"%JDBC_DRIVER_DIR%\%JDBC_DRIVER_NAME%" -
Linux
"${JDBC_DRIVER_DIR}\${JDBC_DRIVER_NAME}"with the current JDBC file.
NoteThe files:
-
<edelivery_path>/standalone/configuration/standalone-full.xml, -
<edelivery_path>/modules/system/layers/base/com/mysql/main/module.xml -
<edelivery_path>/modules/system/layers/base/com/oracle/main/modules.xml
should already have the correct details filled in.
-
-
-
Configure the environment variables:
Windows
Edit
<edelivery_path>/bin/standalone.conf.batas follows:set JAVA_OPTS="-Xms128m -Xmx1024m -Djava.net.preferIPv4Stack=true" set JAVA_OPTS="%JAVA_OPTS% -Ddomibus.config.location=<config_directory_path> -Djava.io.tmpdir=<temp_directory_path>" set JBOSS_JAVA_SIZING="-Xms1024M -Xmx4096M -XX:MetaspaceSize=96M -XX:MaxMetaspaceSize=256m -Ddomibus.config.location=%JBOSS_HOME%/conf/domibus"Unix/Linux
Edit
<edelivery_path>/bin/standalone.confas follows:JAVA_OPTS="-Xms128m -Xmx1024m_java.net.preferIPv4Stack=true"JAVA_OPTS="$JAVA_OPTS -Ddomibus.config.location=$JBOSS_HOME/conf/Domibus domibus -Djava.io.tmpdir=<temp_directory_path>" JAVA_OPTS="-Xms64m -Xmx6g -XX:MetaspaceSize=96M -XX:MaxMetaspaceSize=256m -Djava.net.preferIPv4Stack=true -Ddomibus.config.location=$JBOSS_HOME/conf/domibus" -
Download and unzip
domibus-msh-distribution-5.1.8-wildfly-configuration.zipin the directory<edelivery_path>/conf/domibus, excluding the scripts directory. -
Configure your Keystore based on the information in the Certificates section.
-
Connect to the Admin Console of WildFly at http://localhost:9990/console.
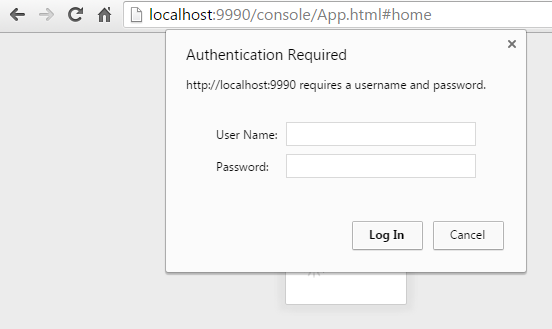
-
Click on Deployments in the console menu then click on Add:
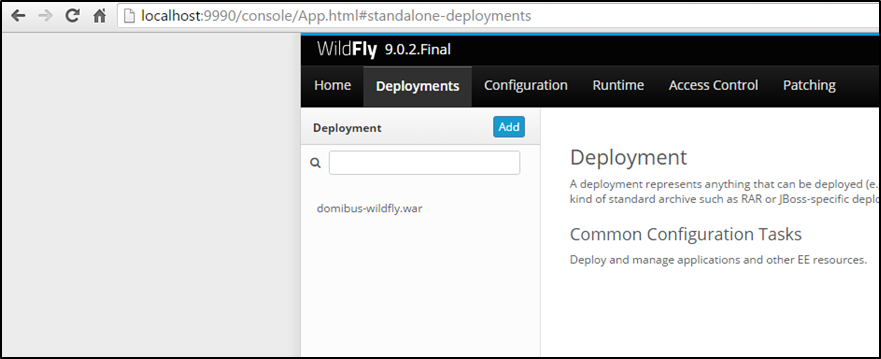
-
Select Choose a file or drag it here.

-
Browse to the location of the domibus-msh-distribution-5.1.8-wildfly.war file, select it and click Next:
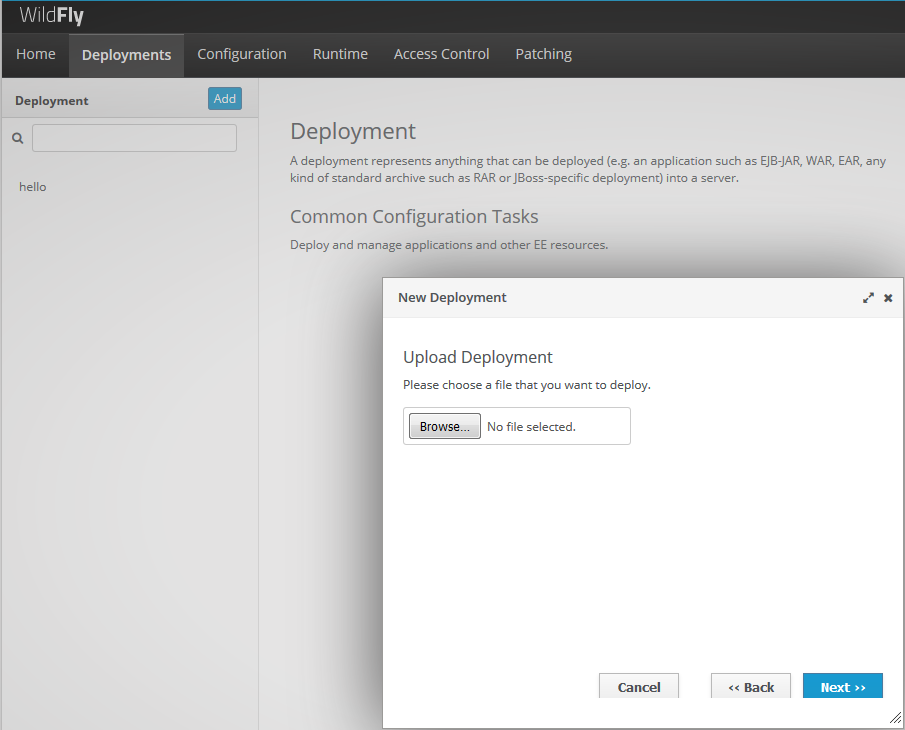
-
Click Finish.
-
The deployment is successful when the name of the .war file appears in the Deployment column.
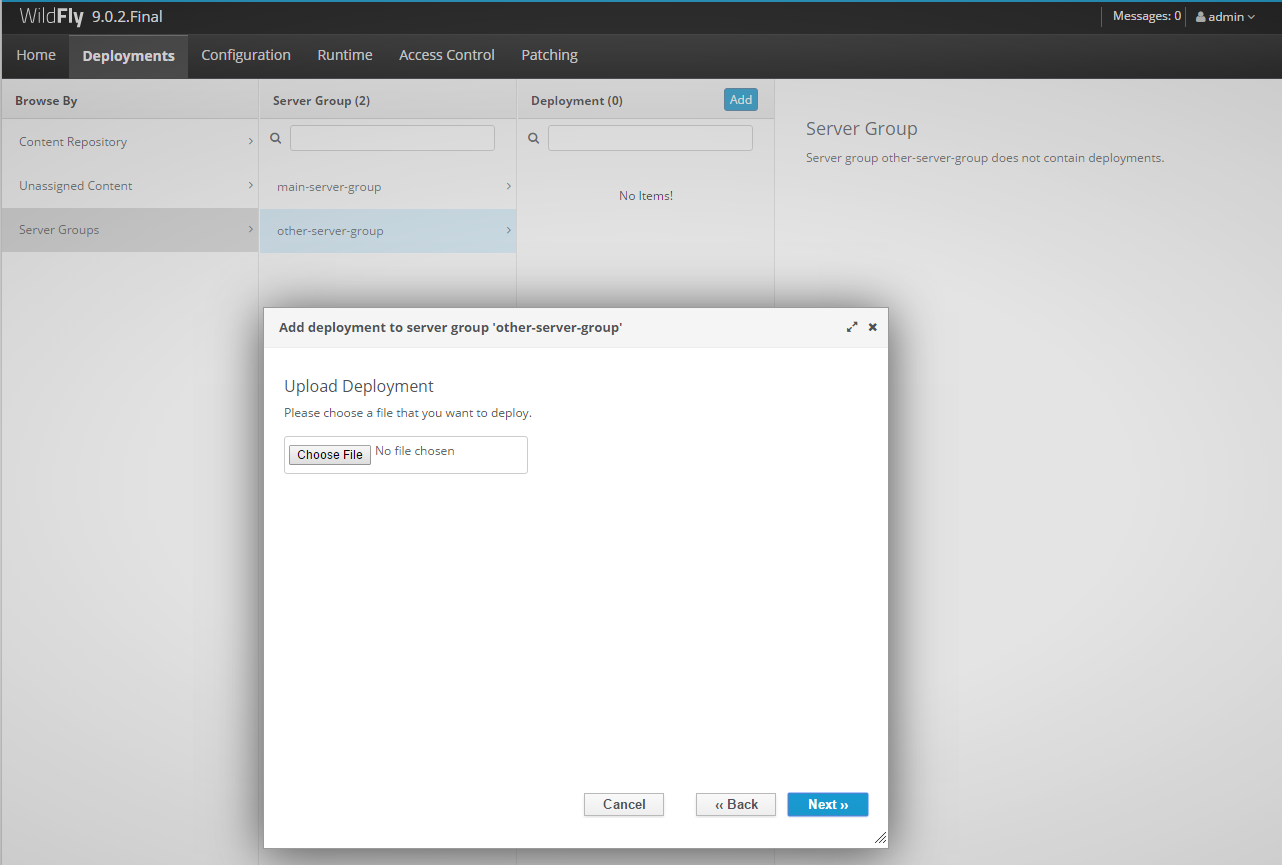
-
Enabled, Managed and exploded must be ticked:

-
In case of WildFly upgrade of single server, you must delete the previously cached version of Domibus.
Therefore, you must delete the following folders:
-
<edelivery_path>\standalone\data -
<edelivery_path>\standalone\tmpOld deployed versions of
domibus-msh-distribution-5.1.8-wildfly.waralso have to be deleted from the path<edelivery_path>\standalone\deploymentsor they must be removed via the WildFly Admin Console.
-
☛ Clustered Deployment
For this step, you will have to use the following resources:
-
domibus-msh-distribution-5.1.8-wildfly-configuration.zip -
domibus-msh-distribution-5.1.8-wildfly-war.zip
See 5.1.8 Release Page to download binaries.
In this section we assume that the setup of WildFly in domain mode has
already been done and that the cluster has been enabled as described in
the official documentation.
For more details on how to perform an installation of WildFly in domain mode, please refer to the official documentation.
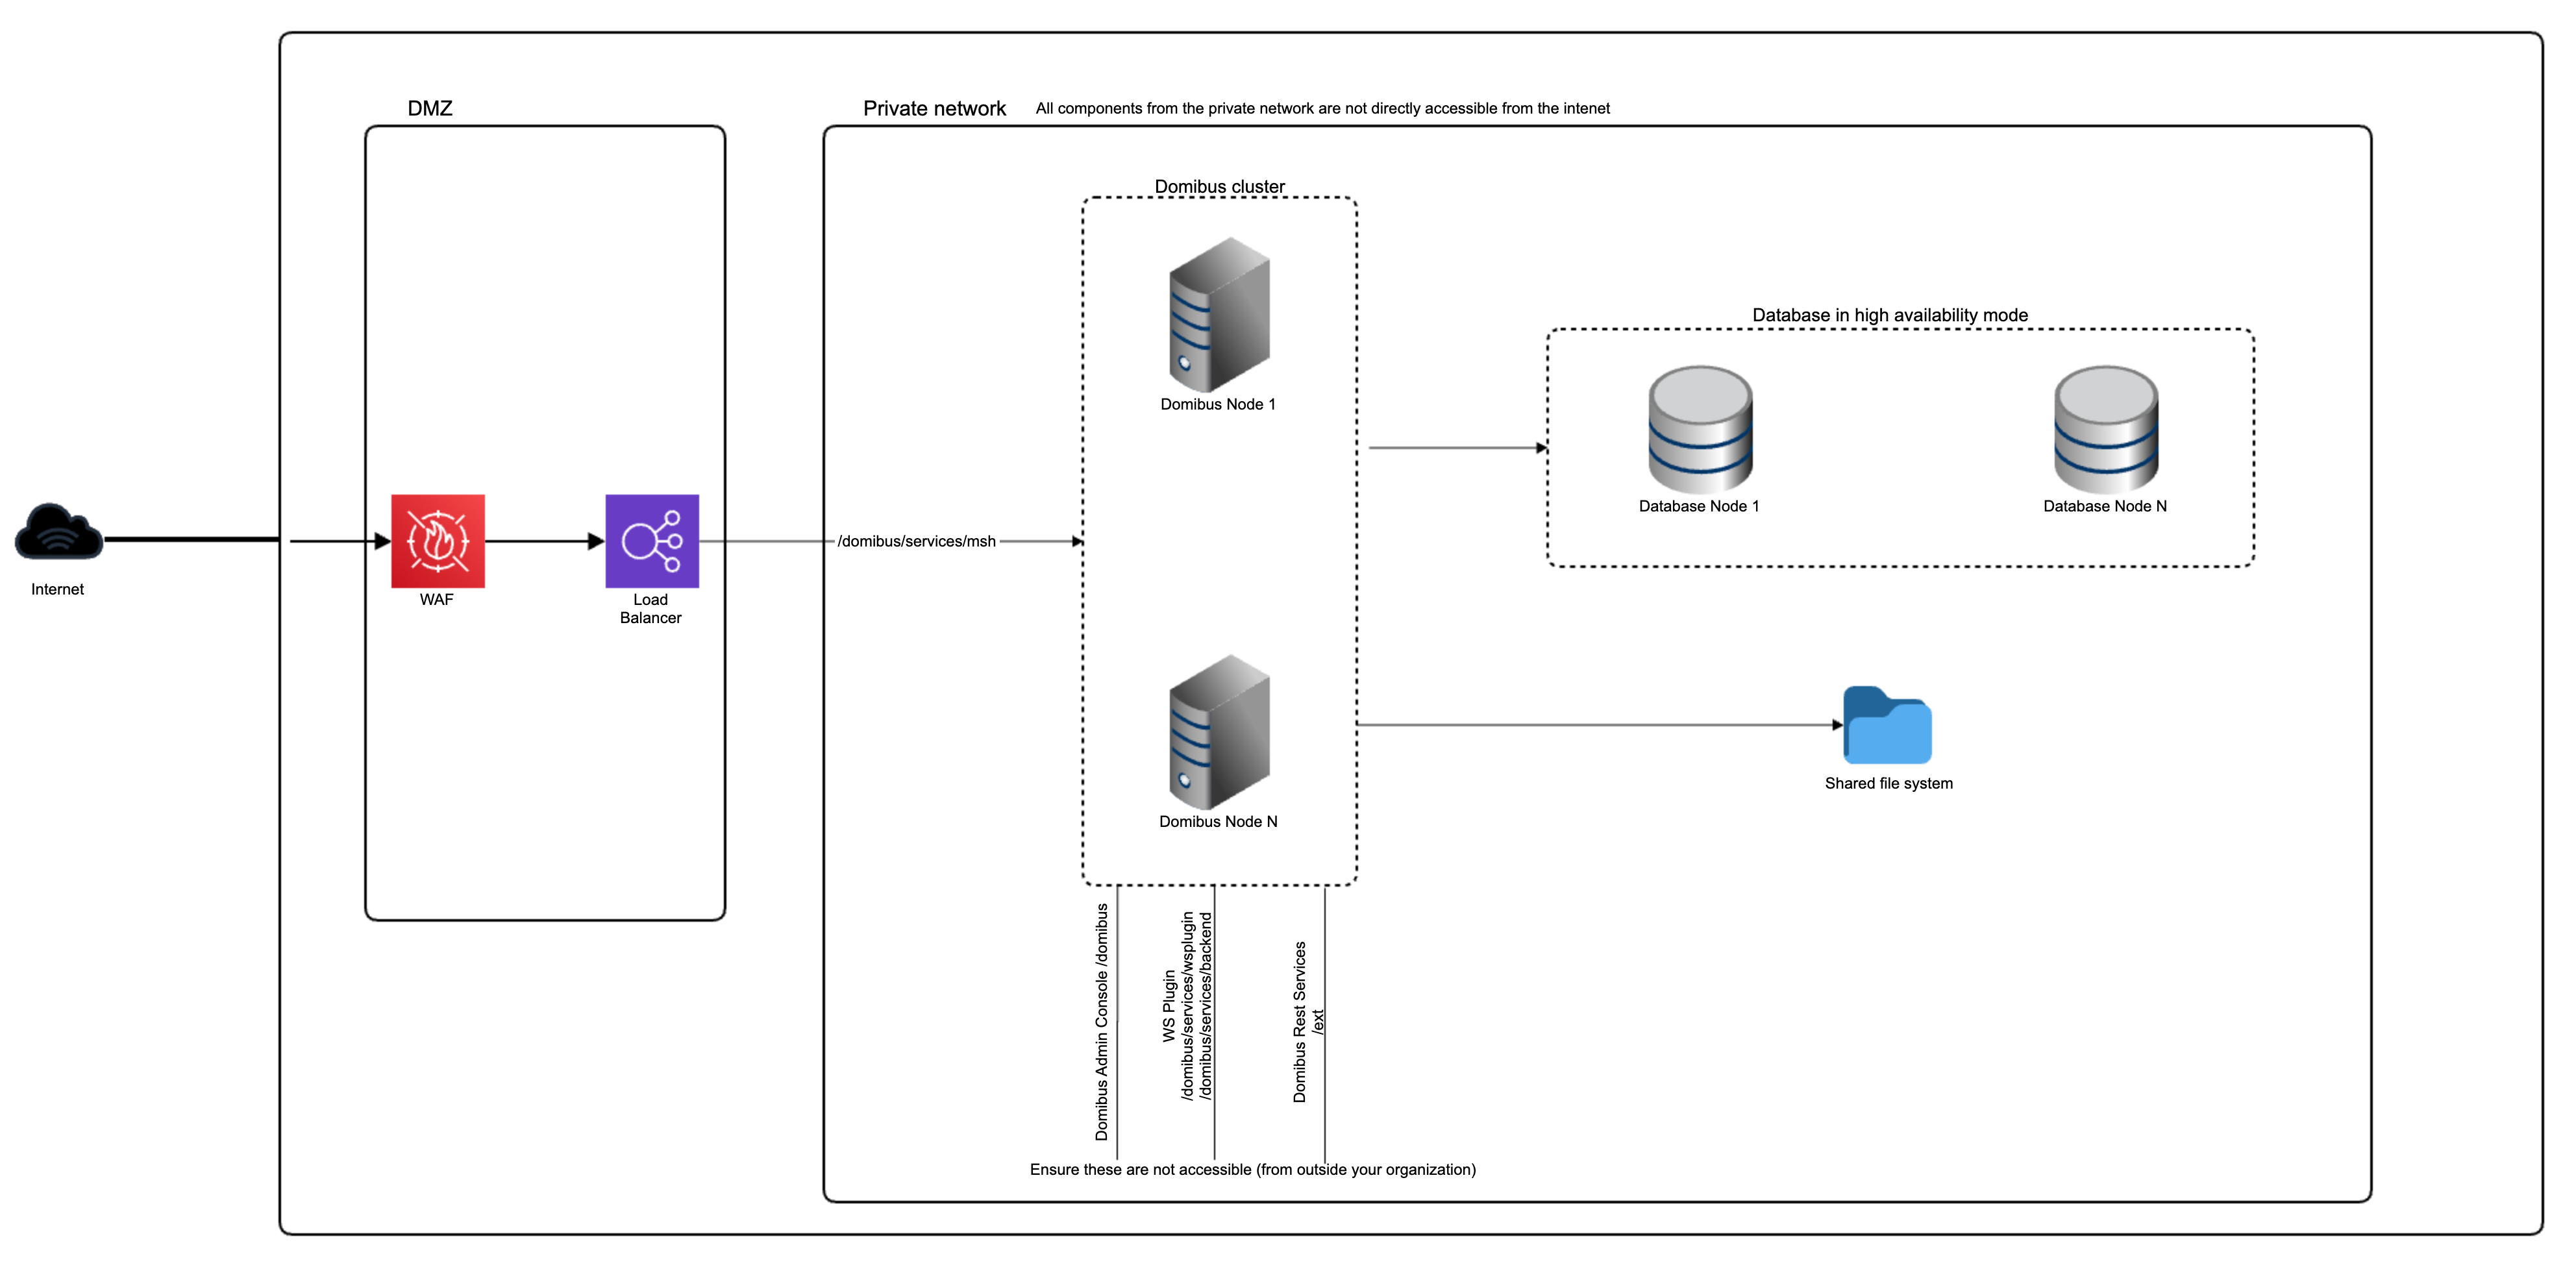
In order to install Domibus in a WildFly cluster please follow the steps below:
-
Download and unzip
domibus-msh-distribution-5.1.8-wildfly-configuration.zip(for WildFly 26.1) in a shared location that is accessible by all the nodes from the cluster. Let’s refer to this directory as <shared_edelivery_path>.-
Follow steps 2 (MySQL) or 3 (Oracle) from the Pre-Configured Single Server Deployment.
NoteThis step needs to be performed on all the nodes from the cluster. In the following 2 steps we will edit the profile full-ha`from the configuration file `domain/configuration/domain.xmllocated in the master node
-
-
Configure the JMS resources in the configuration file <edelivery_path>/standalone/configuration/standalone-full-ha.xml by adding the jms-connection-factories and jms-queues.
Click to View Sample
<subsystem xmlns="urn:jboss:domain:messaging-activemq:3.0"> <server name="default"> <management jmx-enabled="true"/> <!--default for catch all--> <address-setting name="#" dead-letter-address="jms.queue.DLQ" expiry-address="jms.queue.ExpiryQueue" max-size-bytes="10485760" page-size-bytes="2097152" message-counter-history-day-limit="10" redistribution-delay="1000"/> <address-setting name="jms.queue.DomibusSendMessageQueue" expiry-address="jms.queue.ExpiryQueue" redelivery-delay="1000" max-delivery-attempts="1"/> <address-setting name="jms.queue.DomibusSendLargeMessageQueue" expiry-address="jms.queue.ExpiryQueue" redelivery-delay="1000" max-delivery-attempts="1"/> <address-setting name="jms.queue.DomibusSplitAndJoinQueue" expiry-address="jms.queue.ExpiryQueue" redelivery-delay="1000" max-delivery-attempts="1"/> <address-setting name="jms.queue.DomibusPullMessageQueue" expiry-address="jms.queue.ExpiryQueue" dead-letter-address="jms.queue.DomibusDLQ" redelivery-delay="1000" max-delivery-attempts="1"/> <address-setting name="jms.queue.DomibusPullReceiptQueue" expiry-address="jms.queue.ExpiryQueue" redelivery-delay="1000" max-delivery-attempts="3"/> <address-setting name="jms.queue.DomibusRetentionMessageQueue" expiry-address="jms.queue.ExpiryQueue" redelivery-delay="10000" max-delivery-attempts="0"/> <address-setting name="jms.queue.DomibusAlertMessageQueue" dead-letter-address="jms.queue.DomibusDLQ" expiry-address="jms.queue.ExpiryQueue" max-delivery-attempts="1"/> <address-setting name="jms.queue.DomibusUIReplicationQueue" dead-letter-address="jms.queue.DomibusDLQ" expiry-address="jms.queue.ExpiryQueue" redelivery-delay="10000" max-delivery-attempts="1"/> <address-setting name="jms.queue.DomibusBusinessMessageOutQueue" dead-letter-address="jms.queue.DomibusDLQ" expiry-address="jms.queue.ExpiryQueue" redelivery-delay="300000" max-delivery-attempts="10"/> <address-setting name="jms.queue.DomibusNotifyBackendJmsQueue" dead-letter-address="jms.queue.DomibusDLQ" expiry-address="jms.queue.ExpiryQueue" redelivery-delay="300000" max-delivery-attempts="10"/> <address-setting name="jms.queue.DomibusErrorNotifyConsumerQueue" dead-letter-address="jms.queue.DomibusDLQ" expiry-address="jms.queue.ExpiryQueue" redelivery-delay="300000" max-delivery-attempts="10"/> <address-setting name="jms.queue.DomibusErrorNotifyProducerQueue" dead-letter-address="jms.queue.DomibusDLQ" expiry-address="jms.queue.ExpiryQueue" redelivery-delay="300000" max-delivery-attempts="10"/> <address-setting name="jms.queue.DomibusBusinessMessageInQueue" dead-letter-address="jms.queue.DomibusDLQ" expiry-address="jms.queue.ExpiryQueue" redelivery-delay="300000" max-delivery-attempts="10"/> <address-setting name="jms.queue.DomibusPluginToBackendQueue" dead-letter-address="jms.queue.DomibusDLQ" expiry-address="jms.queue.ExpiryQueue" redelivery-delay="300000" max-delivery-attempts="10"/> <address-setting name="jms.queue.DomibusNotifyBackendWebServiceQueue" dead-letter-address="jms.queue.DomibusDLQ" expiry-address="jms.queue.ExpiryQueue" redelivery-delay="300000" max-delivery-attempts="10"/> <address-setting name="jms.queue.DomibusNotifyBackendFileSystemQueue" dead-letter-address="jms.queue.DomibusDLQ" expiry-address="jms.queue.ExpiryQueue" redelivery-delay="300000" max-delivery-attempts="10"/> <address-setting name="jms.queue.DomibusUnknownReceiverQueue" dead-letter-address="jms.queue.DomibusDLQ" expiry-address="jms.queue.ExpiryQueue" redelivery-delay="300000" max-delivery-attempts="10"/> <address-setting name="jms.queue.DomibusNotifyBackendQueue" dead-letter-address="jms.queue.DomibusDLQ" expiry-address="jms.queue.ExpiryQueue" redelivery-delay="300000" max-delivery-attempts="10"/> <address-setting name="jms.queue.DomibusFSPluginSendQueue" expiry-address="jms.queue.ExpiryQueue" redelivery-delay="10000" max-delivery-attempts="0"/> <address-setting name="jms.queue.DomibusClusterCommandTopic" dead-letter-address="jms.queue.DomibusDLQ" expiry-address="jms.queue.ExpiryQueue" redelivery-delay="10000" max-delivery-attempts="3"/> <!-- ……………………… --> <connection-factory name="edeliveryConnectionFactory" entries="java:/jms/ConnectionFactory" discovery-group="dg-group1" compress-large-messages="false" failover-on-initial-connection="false" use-global-pools="true"/> <!-- ……………………… --> <jms-queue name="DomibusBusinessMessageOutQueue" entries="java:/jms/domibus.backend.jms.outQueue java:/jms/queue/DomibusBusinessMessageOutQueue" durable="true"/> <jms-queue name="DomibusNotifyBackendJmsQueue" entries="java:/jms/domibus.notification.jms java:/jms/queue/DomibusNotifyBackendJmsQueue" durable="true"/> <jms-queue name="DomibusErrorNotifyConsumerQueue" entries="java:/jms/domibus.backend.jms.errorNotifyConsumer java:/jms/queue/DomibusErrorNotifyConsumerQueue" durable="true"/> <jms-queue name="DomibusErrorNotifyProducerQueue" entries="java:/jms/domibus.backend.jms.errorNotifyProducer java:/jms/queue/DomibusErrorNotifyProducerQueue" durable="true"/> <jms-queue name="DomibusBusinessMessageInQueue" entries="java:/jms/domibus.backend.jms.inQueue java:/jms/queue/DomibusBusinessMessageInQueue" durable="true"/> <jms-queue name="DomibusPluginToBackendQueue" entries="java:/jms/domibus.backend.jms.replyQueue java:/jms/queue/DomibusPluginToBackendQueue" durable="true"/> <jms-queue name="DomibusSendMessageQueue" entries="java:/jms/domibus.internal.dispatch.queue java:/jms/queue/DomibusSendMessageQueue" durable="true"/> <jms-queue name="DomibusSendLargeMessageQueue" entries="java:/jms/domibus.internal.largeMessage.queue java:/jms/queue/DomibusSendLargeMessageQueue" durable="true"/> <jms-queue name="DomibusSplitAndJoinQueue" entries=="java:/jms/domibus.internal.splitAndJoin.queue java:/jms/queue/DomibusSplitAndJoinQueue" durable="true"/> <jms-queue name="DomibusPullMessageQueue" entries="java:/jms/domibus.internal.pull.queue java:/jms/queue/DomibusPullMessageQueue" durable="true"/> <jms-queue name="DomibusPullReceiptQueue" entries="java:/jms/domibus.internal.pull.receipt.queue java:/jms/queue/DomibusPullReceiptQueue" durable="true"/> <jms-queue name="DomibusRetentionMessageQueue" entries="java:/jms/domibus.internal.retentionMessage.queue java:/jms/queue/DomibusRetentionMessageQueue" durable="true"/> <jms-queue name="DomibusAlertMessageQueue" entries="java:/jms/domibus.internal.alert.queue java:/jms/queue/DomibusAlertMessageQueue" durable="true"/> <jms-queue name="DomibusNotifyBackendWebServiceQueue" entries="java:/jms/domibus.notification.webservice java:/jms/queue/DomibusNotifyBackendWebServiceQueue" durable="true"/> <jms-queue name="DomibusNotifyBackendFileSystemQueue" entries="java:/jms/domibus.notification.filesystem java:/jms/queue/DomibusNotifyBackendFileSystemQueue" durable="true"/> <jms-queue name="DomibusUnknownReceiverQueue" entries="java:/jms/domibus.internal.notification.unknown java:/jms/queue/DomibusUnknownReceiverQueue" durable="true"/> <jms-queue name="DomibusNotifyBackendQueue" entries="java:/jms/domibus.internal.notification.queue java:/jms/queue/DomibusNotifyBackendQueue" durable="true"/> <jms-queue name="DomibusFSPluginSendQueue" entries="java:/jms/domibus.fsplugin.send.queue java:/jms/queue/DomibusFSPluginSendQueue" durable="true"/> <jms-queue name="DLQ" entries="java:/jms/domibus.DLQ java:/jms/queue/DomibusDLQ" durable="true"/> <jms-topic name="DomibusClusterCommandTopic" entries="java:/jms/domibus.internal.command java:/jms/topic/DomibusClusterCommandTopic"/> </server> </subsystem>NotePlease note that the JMX management also has to be enabled so the JMS resources can be monitored in the JMS Monitoring screen. -
Configure the database dialect as indicated in Configure the Oracle Database.
-
Configure the environment variables in the file
bin/domain.conf. -
Set the
domibus.deployment.clusteredproperty toTRUE:domibus.deployment.clustered=trueNotebin/domain.confis located in each WildFly node.
The environment variable setting needs to be performed in every node from the cluster.JAVA_OPTS="-Xms128m –Xmx1024m -java.net.preferIPv4Stack=true" JAVA_OPTS="$JAVA_OPTS -Ddomibus.config.location=<shared_edelivery_path>/conf/Domibus -Djava.io.tmpdir=<temp_directory_path>" -
Deploy the domibus-msh-distribution-5.1.8-wildfly.war (for WildFly 26.1.x) to the cluster. We will use the WildFly Administration console for performing the deployment. We will deploy the application on the other-server-group cluster which is configured step by step in the official documentation.
-
For the upgrade of clustered WildFly server, you must delete the previously cached version of Domibus from the domain before adding the new
distribution-5.1.8-wildfly.warMake sure to remove all old versions of domibus-msh-distribution-5.1.8-wildfly.war if you use the WildFly administration console for the deployment.
4.5. Secure Deployment Recommendations
This section provides essential guidelines and best practices for ensuring a secure and robust deployment of the Domibus Access Point.
These recommendations focus on key aspects for deploying Domibus securely by addressing considerations such as system architecture, network configurations, and access controls. By adhering to these guidelines, organizations can enhance the overall security posture of their Domibus deployments.
|
Important
|
From May 1st 2024, the eDelivery team assumes these recommendations are in place when assessing the impact of security vulnerabilities on a Domibus deployment. |
Recommendations
We provide an overview for each server for a typical deployment topology, see the specific server sections for more information.
5. Configuring Domibus
Domibus exposes the Message Service Handler endpoint as ../services/msh.
Only this endpoint needs to be reachable by the other AS4 Access Points and it is typically exposed on the Internet.
When the default WS Plugin is deployed, Domibus exposes the default WS Plugin endpoint as
../services/backend.
|
Important
|
This endpoint should ONLY be exposed to the backend client(s) within the trusted zone and it should not be exposed to the Internet. |
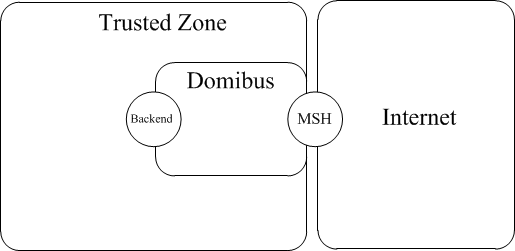
|
Important
|
For optimal security in a production environment, follow the recommended practices outlined in the
Secure Deployment Recommendations section. These recommendations ensure a robust and secure deployment, minimise vulnerabilities and enhance the reliability of JMS plugin’s usage. |
5.1. Security Configuration
5.1.1. Security Policies
The WS-Security policy used by Domibus when exchanging messages can be specified in the PMode configuration file. See PMode Configuration.
Security policy assertions are based on the WS-Policy framework.
As requested by the eDelivery AS4 profile, Domibus supports all three mechanisms to reference a security token, as described below.
Domibus distribution includes one policy file for each mechanism (<edelivery_path>/conf/domibus/policies/):
-
eDeliveryAS4Policy.xml- Reference to a Subject Key Identifier The<wsse:SecurityTokenReference>element contains a<wsse:KeyIdentifier>element that specifies the token data by means of aX.509 SubjectKeyIdentifierreference. A subject key identifier MAY only be used to reference anX.509v3certificate. -
eDeliveryAS4Policy_BST.xml- Reference to a Binary Security Token
The <wsse:SecurityTokenReference> element contains a <wsse:Reference>
element that references a local <wsse:BinarySecurityToken> element or a
remote data source that contains the token data itself.
-
eDeliveryAS4Policy_IS.xml- Reference to an Issuer and Serial Number
The <wsse:SecurityTokenReference> element contains a <ds:X509Data>
element that contains a <ds:X509IssuerSerial> element that uniquely
identifies an end entity certificate by its X.509 Issuer and Serial
Number.
With the eDeliveryAS4Policy.xml, Domibus is able to receive messages
with all 3 referencing methods. When eDeliveryAS4Policy_BST.xml or
eDeliveryAS4Policy_IS.xml are used, the specific reference method
becomes mandatory on both APs involved in the exchange.
For the connectivity with other APs, the three policies may be combined to obtain the required references for initiator/responder and signing/encryption tokens.
In order to validate a certificate chain contained in incoming messages with DSS (see DSS extension configuration).
Domibus also supports:
-
eDeliveryAS4Policy_BST_PKIP.xml- Reference to a PKI Path Binary Security Token
The <wsse:SecurityTokenReference> element contains a <wsse:Reference>
element that references a local <wsse:BinarySecurityToken> element or a
remote data source that contains the token data itself.
With the above policy the entire certificate chain is added to the the Ws-Security header of the AS4 message.
5.1.2. Default authorization
When a message is received by Domibus MSH, the default authorization
service verifies the signing certificate used to sign either the UserMessage or the SignalMessage (for PullRequests).
This means, the validations are performed by the receiving AP on the sender’s certificate for a UserMessage and on the initiator’s certificate for a PullRequest.
There are 3 checks that can be enabled/disabled independently:
-
domibus.sender.trust.validation.truststore_alias: this check verifies that the sender’s certificate matches the certificate stored in the truststore. The certificate is loaded from the truststore based on the alias (party name). By default it is set to true.
With this check, it is ensured that when Domibus is configured to receive from multiple parties, these parties cannot impersonate each other.
Example: red_gw is configured to receive from both blue_gw and green_gw. Without this check enabled, blue_gw can sign with its own certificate (which is accepted by the receiving AP) but pretend it is green_gw.
-
domibus.sender.trust.validation.expression: when this property is not empty, Domibus will verify, before receiving a message, if the subject of the sender’s certificate matches the regular expression. By default it is empty, therefore no check is performed.
This property is mainly meant for chain of certificates, where sender’s certificate is signed by a certificate authority and the leaf certificate is not present in the truststore of the receiving AP.
-
domibus.sender.certificate.subject.check: this check verifies that the subject of the sender’s certificate contains the alias (party name). Because this check is very restrictive, it is set by default to false. -
In addition to these 3 properties, the property
domibus.sender.trust.validation.onreceiving, when set to false, completely disables the authorization (as well as the certificate validation – valid/expired/revoked).
5.1.3. Certificates
The certificates that are used for signing and encrypting the messages
when communicating with the other Access Points can be configured in the
property file located under <edelivery_path>/conf/domibus/domibus.properties.
By default Domibus is pre-configured to use self-signed certificates. Please note that self-signed certificates should be used only for testing purposes and are not intended for production use.
In order to configure Domibus to use custom certificates the following properties need to be modified:
#The location of the keystore
domibus.security.keystore.location=$\{domibus.config.location}/keystores/gateway_keystore.jks
#Type of the used keystore
domibus.security.keystore.type=jks
#The password used to load the keystore
domibus.security.keystore.password=test123
#Private key
#The alias from the keystore of the private key
domibus.security.key.private.alias=blue_gw
#The private key password
domibus.security.key.private.password=test123
#Truststore
#The location of the truststore
domibus.security.truststore.location=$\{domibus.config.location}/keystores/gateway_truststore.jks
#Type of the used truststore
domibus.security.truststore.type=jks
#The password used to load the trustStore
domibus.security.truststore.password=test123-
Create, if not present, a folder
<edelivery_path>/conf/domibus/keystores. -
Get your key pair from an external provider.
-
Self-signed certificates should only be used for testing purposes, not production.
-
If you are interested in using the eDelivery Public Key Infrastructure Solution.
See AlsoFor other certificate providers, see the Guidance on digital certificates.
-
-
Create, if not present, the public and private keys containers (e.g.
truststore.jksandkeystore.jks). -
Import your private key into your keystore.
NoteYour private key and your keystore should always stay secret. Please never share them. -
The keystore alias has to be the same as the party.
|
Important
|
It is strongly recommended to use your key pair (private and public key) and the public key of the other participants you trust in two separate containers. |
|
Note
|
As from Oracle JAVA 11, the KeyStore PKCS12 is the default keystore format and its implementation was moved from the SunJSSE provider. Therefore, if the keystore is in PCKS12 and the Java version is 11, the following error can occur when Domibus tries to load the keystore.: "Could not load key store: keystore password was incorrect" (the password is in fact correct). If such a scenario occurs, the keystore must be recreated from the problematic keystore with a legacy format. To do this, run the following command: |
5.2. Domibus Properties
Most configuration is performed via the domibus.properties files.
In the Domibus guides (Administration Guide, Quickstart Guide, etc ), especially in
Domibus Installation and Domibus Configuration sections, you can find specific information on how to change the default configuration in order to customize
your setup.
|
See Also
|
For a full reference of the Domibus properties, see the Properties Reference Guide. |
5.2.1. Password encryption
Passwords configured in domibus.properties are stored by default in
clear text. The Domibus configuration file, domibus.properties, is not
accessible for third-party users.
Nevertheless, it is good practice to encrypt the configured passwords in order to increase the security level.
Domibus encrypts the configured passwords using symmetric encryption
with AES/GCM/NoPadding algorithm. In order to activate the password
encryption, please set the property domibus.password.encryption.active=true and uncomment the domibus.password.encryption.properties to enable the list of configured passwords to be encrypted.
Once activated, all the passwords configured under the property domibus.password.encryption.properties will be encrypted.
Domibus generates the symmetric key the first time the password
encryption is activated. The generated symmetric key is stored in the
file encrypted.key, in the location specified by the property
domibus.password.encryption.key.location.
For instance, the property domibus.security.keystore.password=test123
will be encrypted to
domibus.security.keystore.password=ENC(4DTXnc9zUuYqB0P/q7RtRHpG9VJLs3E=).
5.3. PMode Configuration
Processing Modes (PModes) are used to configure Access Points. The PMode parameters are loaded into the Access Point via an XML file.
The features described in the PMode file are:
-
Security
-
Reliability,
-
Transport
-
Business Collaborations
-
Error Reporting
-
Message Exchange
-
Patterns (MEPs)
-
Message Partition Channels (MPCs)
As different messages may be subject to various types of processing or,
as different business domains may have several requirements, Access
Points commonly support several PModes.
Some PMode parameters are mandatory, others are optional.
-
Available from eDelivery’s Digital Portal, the Access Point Component Offering Description document holds technical specifications and implementation instructions.
5.3.1. PMode Configuration Files
In Domibus, PModes are XML files that you can create or edit.
Participants are represented and configured via the party element in configuration files.
You can configure the provided files:
-
<edelivery_path>/conf/pmodes/domibus-gw-sample-pmode-party_id_name1.xml -
<edelivery_path>/conf/pmodes/domibus-gw-sample-pmode-party_id_name2.xml
Where:
-
<edelivery_path>stands for directory where you have have Domibus installed. -
party_id_name1andparty_id_name2, are placeholders representing names for existing parties.
|
Important
|
The corresponding partyName attribute’s value needs to match the alias of the certificate in the keystore and the endpoint must be the external access link to your instance.
This step could be managed by a PMode Configuration Manager, known to your Business Owner.
|
<party name="party_id_name2" endpoint="http://party_id_name2_hostname:8080/domibus/services/msh">
<identifier partyId="party_id_name2_1" partyIdType="partyTypeUrn"/>
</party>
<party name="party_id_name1" endpoint="http://party_id_name1_hostname:8080/domibus/services/msh">
<identifier partyId="party_id_name1_1" partyIdType="partyTypeUrn"/>
</party>Adding a new participant
If a new Access Point participant is joining your network, you need to configure your PMode accordingly and re-upload it as mentioned in Uploading New Configuration.
party element<party name="new_party_name" endpoint="http://new_party_msh" >
<identifier partyId="new_party_id" partyIdType="partyTypeUrn"/>
</party>☞ Participants with initiator role are message senders. See a sample below:
party<initiatorParties>
<!-- ... -->
<initiatorParty name="new_party_name"/>
</initiatorParties>☞ Participants with responder role are message receivers. See a sample below:
party<responderParties>
…
<responderParty name="new_party_name"/>
</responderParties>5.3.2. Sample PMode file
Processing modes (PModes) describe how messages are exchanged between AS4 partners (in this case Access Points blue_gw and red_gw). These files contain the identifiers of each AS4 Access Point (identified as parties in the PMode file below).
Sender and Receiver Identifiers represent the organizations that send and receive the business documents. They are both used in the authorization process (PMode). Therefore, adding, modifying or deleting a participant implies modifying the corresponding PMode files.
An an example of a PMode XML file is shown below:
|
Note
|
In this setup, we have allowed each party (blue_gw or red_gw) to initiate the process. If only blue_gw is supposed to send messages, then put only blue_gw in <initiatorParties> and red_gw in <responderParties>. |
<?xml version="1.0" encoding="UTF-8"?>
<db:configuration xmlns:db="http://domibus.eu/configuration" party="blue_gw">
<mpcs>
<mpc name="defaultMpc"
qualifiedName="http://docs.oasis-open.org/ebxml-msg/ebms/v3.0/ns/core/200704/defaultMPC"
enabled="true"
default="true"
retention_downloaded="0"
retention_undownloaded="14400"
retention_sent="14400"
delete_message_metadata="false"
max_batch_delete="1000"/>
</mpcs>
<businessProcesses>
<roles>
<role name="defaultInitiatorRole"
value="http://docs.oasis-open.org/ebxml-msg/ebms/v3.0/ns/core/200704/initiator"/>
<role name="defaultResponderRole"
value="http://docs.oasis-open.org/ebxml-msg/ebms/v3.0/ns/core/200704/responder"/>
</roles>
<parties>
<partyIdTypes>
<partyIdType name="partyTypeUrn"
value="urn:oasis:names:tc:ebcore:partyid-type:unregistered"/>
</partyIdTypes>
<party name="red_gw" endpoint="http://red_hostname:8080/domibus/services/msh">
<identifier partyId="domibus-red" partyIdType="partyTypeUrn"/>
</party>
<party name="blue_gw" endpoint="http://blue_hostname:8080/domibus/services/msh">
<identifier partyId="domibus-blue" partyIdType="partyTypeUrn"/>
</party>
</parties>
<meps>
<mep name="oneway"
value="http://docs.oasis-open.org/ebxml-msg/ebms/v3.0/ns/core/200704/oneWay"/>
<mep name="twoway"
value="http://docs.oasis-open.org/ebxml-msg/ebms/v3.0/ns/core/200704/twoWay"/>
<binding name="push"
value="http://docs.oasis-open.org/ebxml-msg/ebms/v3.0/ns/core/200704/push"/>
<binding name="pull"
value="http://docs.oasis-open.org/ebxml-msg/ebms/v3.0/ns/core/200704/pull"/>
<binding name="pushAndPush"
value="http://docs.oasis-open.org/ebxml-msg/ebms/v3.0/ns/core/200704/push-and-push"/>
</meps>
<properties>
<property name="originalSenderProperty"
key="originalSender"
datatype="string"
required="true"/>
<property name="finalRecipientProperty"
key="finalRecipient"
datatype="string"
required="true"/>
<propertySet name="eDeliveryPropertySet">
<propertyRef property="finalRecipientProperty"/>
<propertyRef property="originalSenderProperty"/>
</propertySet>
</properties>
<payloadProfiles>
<payload name="businessContentPayload"
cid="cid:message"
required="true"
mimeType="text/xml"/>
<payload name="businessContentAttachment"
cid="cid:attachment"
required="false"
mimeType="application/octet-stream"/>
<payloadProfile name="MessageProfile" maxSize="2147483647">
<attachment name="businessContentPayload"/>
<attachment name="businessContentAttachment"/>
</payloadProfile>
</payloadProfiles>
<securities>
<security name="eDeliveryAS4Policy"
policy="eDeliveryAS4Policy.xml"
signatureMethod="RSA_SHA256" />
</securities>
<errorHandlings>
<errorHandling name="demoErrorHandling"
errorAsResponse="true"
businessErrorNotifyProducer="true"
businessErrorNotifyConsumer="true"
deliveryFailureNotifyProducer="true"/>
</errorHandlings>
<agreements>
<agreement name="agreement1" value="A1" type="T1"/>
</agreements>
<services>
<service name="testService1" value="bdx:noprocess" type="tc1"/>
<service name="testService"
value="http://docs.oasis-open.org/ebxml-msg/ebms/v3.0/ns/core/200704/service"/>
</services>
<actions>
<action name="tc1Action" value="TC1Leg1"/>
<action name="testAction"
value="http://docs.oasis-open.org/ebxml-msg/ebms/v3.0/ns/core/200704/test"/>
</actions>
<as4>
<receptionAwareness name="receptionAwareness" retry="12;4;CONSTANT" duplicateDetection="true"/>
<reliability name="AS4Reliability" nonRepudiation="true" replyPattern="response"/>
</as4>
<legConfigurations>
<legConfiguration name="pushTestcase1tc1Action"
service="testService1"
action="tc1Action"
defaultMpc="defaultMpc"
reliability="AS4Reliability"
security="eDeliveryAS4Policy"
receptionAwareness="receptionAwareness"
propertySet="eDeliveryPropertySet"
payloadProfile="MessageProfile"
errorHandling="demoErrorHandling"
compressPayloads="true"
asyncNotification="false"/>
<legConfiguration name="testServiceCase"
service="testService"
action="testAction"
defaultMpc="defaultMpc"
reliability="AS4Reliability"
security="eDeliveryAS4Policy"
receptionAwareness="receptionAwareness"
propertySet="eDeliveryPropertySet"
payloadProfile="MessageProfile"
errorHandling="demoErrorHandling"
compressPayloads="true"/>
</legConfigurations>
<process name="tc1Process"
mep="oneway"
binding="push"
initiatorRole="defaultInitiatorRole"
responderRole="defaultResponderRole">
<initiatorParties>
<initiatorParty name="blue_gw"/>
<initiatorParty name="red_gw"/>
</initiatorParties>
<responderParties>
<responderParty name="blue_gw"/>
<responderParty name="red_gw"/>
</responderParties>
<legs>
<leg name="pushTestcase1tc1Action"/>
<leg name="testServiceCase"/>
</legs>
</process>
</businessProcesses>
</db:configuration>5.3.3. Domibus versus ebMS3
In this section you can find information regarding how PMode configuration is done in Domibus and its counterparts in ebMS3 PMode configuration.
See the table below:
| Domibus PMode Configuration | EbMS3 Specification [ebMS3CORE][AS4-Profile] |
Description |
|---|---|---|
Message Partition Channels (MPCs) |
- |
Container which defines the different MPCs. |
Message Partition Channel (MPC) |
|
MPC allows the partition of the flow of messages from a + The value of this parameter is the identifier of the MPC to which the message is assigned. |
|
- |
Retention interval for messages already delivered to the backend. |
|
- |
Retention interval for messages not yet delivered to the backend. |
|
Retention interval for messages already sent with success or failed to the other MSH. |
|
|
When true, message metadata is deleted together with the payload. |
|
|
Sets the maximum batch to be used when deleting messages in bulk. |
|
|
- |
Container which defines the different PartyIdTypes, Party and Endpoint. |
|
maps to the attribute |
Message Unit bundling happens when the Messaging element contains multiple child elements or Units (either User Message Units or Signal Message Units). |
|
maps to the element |
The ebCore Party ID type can simply be used as an identifier format and therefore as a convention for values to be used in configuration and – as such – does not require any specific solution building block. |
|
maps to |
The endpoint is a party attribute that contains the link to the MSH. The value of this parameter represents the address (endpoint URL) of the
|
AS4 |
- |
Container. |
Reliability [@Nonrepudiation] [@ReplyPattern] |
|
|
false'
set as * `PMode[1].Security.SendReceipt.ReplyPattern: value = ‘Response |
Callback’` Set as Response to send receipts on the HTTP response or back-channel Set as Response to send receipts using a separate connection |
ReceptionAwareness [@retryTimeout] [@retryCount] [@strategy][@duplicateDetection] |
retryTimeout maps to PMode[1].ReceptionAwareness.Retry=true PMode[1].ReceptionAwareness.Retry.Parameters retryCount maps to PMode[1].ReceptionAwareness.Retry.Parameters strategy maps to PMode[1].ReceptionAwareness.Retry.Parameters duplicateDetection maps to PMode[1].ReceptionAwareness.DuplicateDetection |
These parameters are stored in a composite string.
|
Securities |
- |
Container |
Security |
- |
Container |
Policy |
PMode[1].Security.* NOT including PMode[1].Security.X509.Signature.Algorithm |
The parameter defines the name of a WS-SecurityPolicy file. |
SignatureMethod |
PMode[1].Security.X509.Signature.Algorithm |
This parameter is not supported by WS-SecurityPolicy and therefore it is defined separately. |
BusinessProcessConfiguration |
- |
Container |
Agreements |
maps to |
This OPTIONAL element occurs zero times or once. The AgreementRef element is a string that identifies the entity or artifact governing the exchange of messages between the parties. |
Actions |
- |
Container. |
Action |
maps to |
This REQUIRED element occurs once. The element is a string identifying an operation or an activity within a Service that may support several of these. |
Services |
- |
Container |
ServiceTypes Type |
maps to |
This REQUIRED element occurs once. It is a string identifying the service that acts on the message and it is specified by the designer of the service. |
|
- |
An ebMS MEP defines a typical choreography of ebMS User Messages which are all related through the use of the referencing feature ( |
Bindings |
- |
Container. |
Binding |
- |
The previous definition of ebMS MEP is quite abstract and ignores any binding consideration to the transport protocol. This is intentional, so that application level MEPs can be mapped to ebMS MEPs independently from the transport protocol to be used. |
Roles |
- |
Container |
Role |
Maps to
|
The required role element occurs once, and identifies the authorized
role ( |
Processes |
- |
Container |
PayloadProfiles |
- |
Container |
Payloads |
- |
Container |
Payload |
maps to |
This parameter allows specifying some constraint or profile on the payload. It specifies a list of payload parts. A payload part is a data structure that consists of five properties:
|
ErrorHandlings |
- |
Container. |
ErrorHandling |
- |
Container. |
ErrorAsResponse |
maps to PMode[1].ErrorHandling.Report.AsResponse |
This Boolean parameter indicates (if true) that errors generated from receiving a message in error are sent over the back-channel of the underlying protocol associated with the message in error. If false, such errors are not sent over the back-channel. |
ProcessErrorNotifyProducer |
maps to PMode[1].ErrorHandling.Report.ProcessErrorNotifyProducer |
This Boolean parameter indicates whether (if true) the Producer (application/party) of a User Message matching this PMode should be notified when an error occurs in the Sending MSH, during processing of the User Message to be sent. |
ProcessErrorNotifyConsumer |
maps to PMode[1].ErrorHandling.Report.ProcessErrorNotifyProducer |
This Boolean parameter indicates whether (if true) the Consumer (application/party) of a User Message matching this PMode should be notified when an error occurs in the Receiving MSH, during processing of the received User message. |
DeliveryFailureNotifyProducer |
maps to PMode[1].ErrorHandling.Report.DeliveryFailuresNotifyProducer |
When sending a message with this reliability requirement (Submit
invocation), one of the two following outcomes shall occur: |
AsyncNotification |
maps to PMode[1].LegConfigurations.LegConfiguration.AsyncNotification |
This optional attribute indicates how the Core should notify the plugins: sync or async. If the attribute is present then it overrides other configurations, ensuring the notifications are sent asynchronously notifications when true or synchronously when false. This can be used, for example, if the message should not be accepted unless there is business validation from the plugins (sync notification). |
Legs |
- |
Container. |
Leg |
- |
Because messages in the same MEP may be subject to different requirements - e.g. the reliability, security and error reporting of a response may not be the same as for a request – the PMode will be divided into legs. Each user message label in an ebMS MEP is associated with a PMode leg. Each PMode leg has a full set of parameters for the six categories above (except for General Parameters), even though in many cases parameters will have the same value across the MEP legs. Signal messages that implement transport channel bindings (such as PullRequest) are also controlled by the same categories of parameters, except for BusinessInfo group. |
Process |
5.3.4. Uploading New Configuration
Upload the PMode file
To update the PMode configuration and/or Truststore:
-
Connect to the Administration Console using the administrator’s credentials. By default, credentials are:
-
User:
admin; -
Password: to obtain the password, look for the phrase “Default password for user admin is” in the logs of http://localhost:_8080_/domibus.
Note-
In case of a cluster environment, the PMode configuration is replicated automatically on all the nodes.
-
It is recommended to change the passwords for the default users. See admintools .
-
-
|
Important
|
Duplicate parameters/entities are not allowed in PMode. XSD validation is used to find the duplicate entities. |

-
Click on the PMode menu:
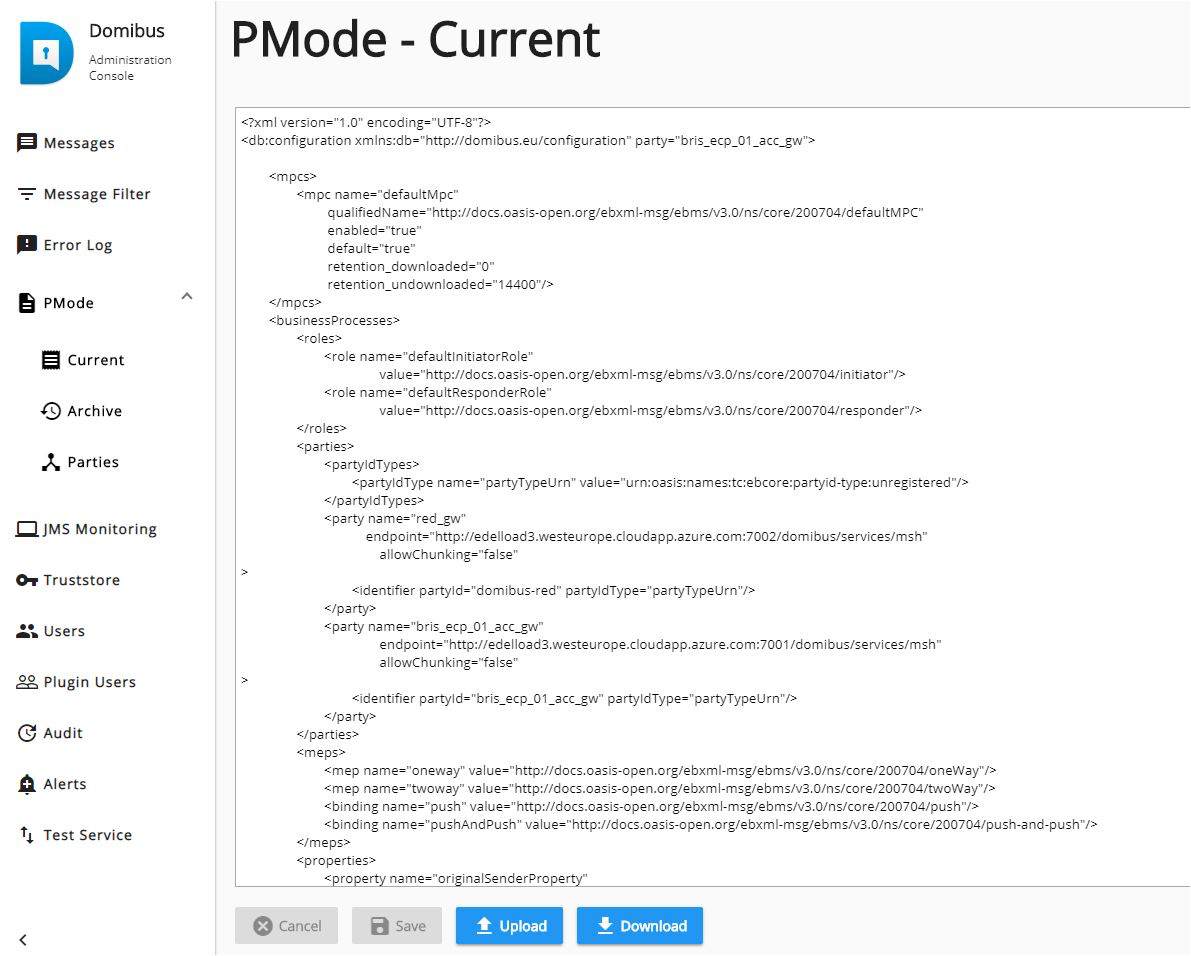
-
Press the Upload button:
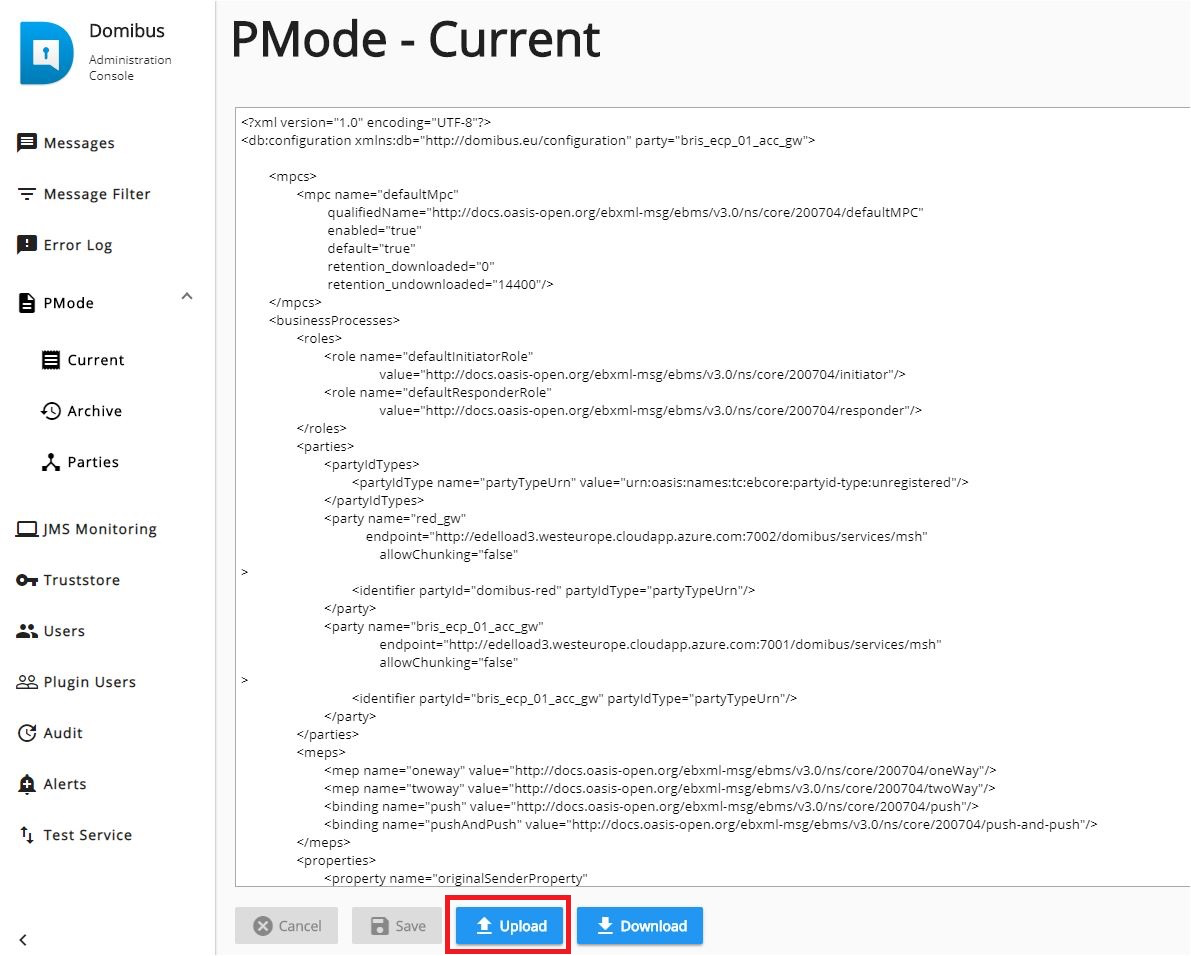
-
Press the Choose File button, and navigate to the PMode file, select it and click on the Open button (or equivalent) in the standard dialog box:
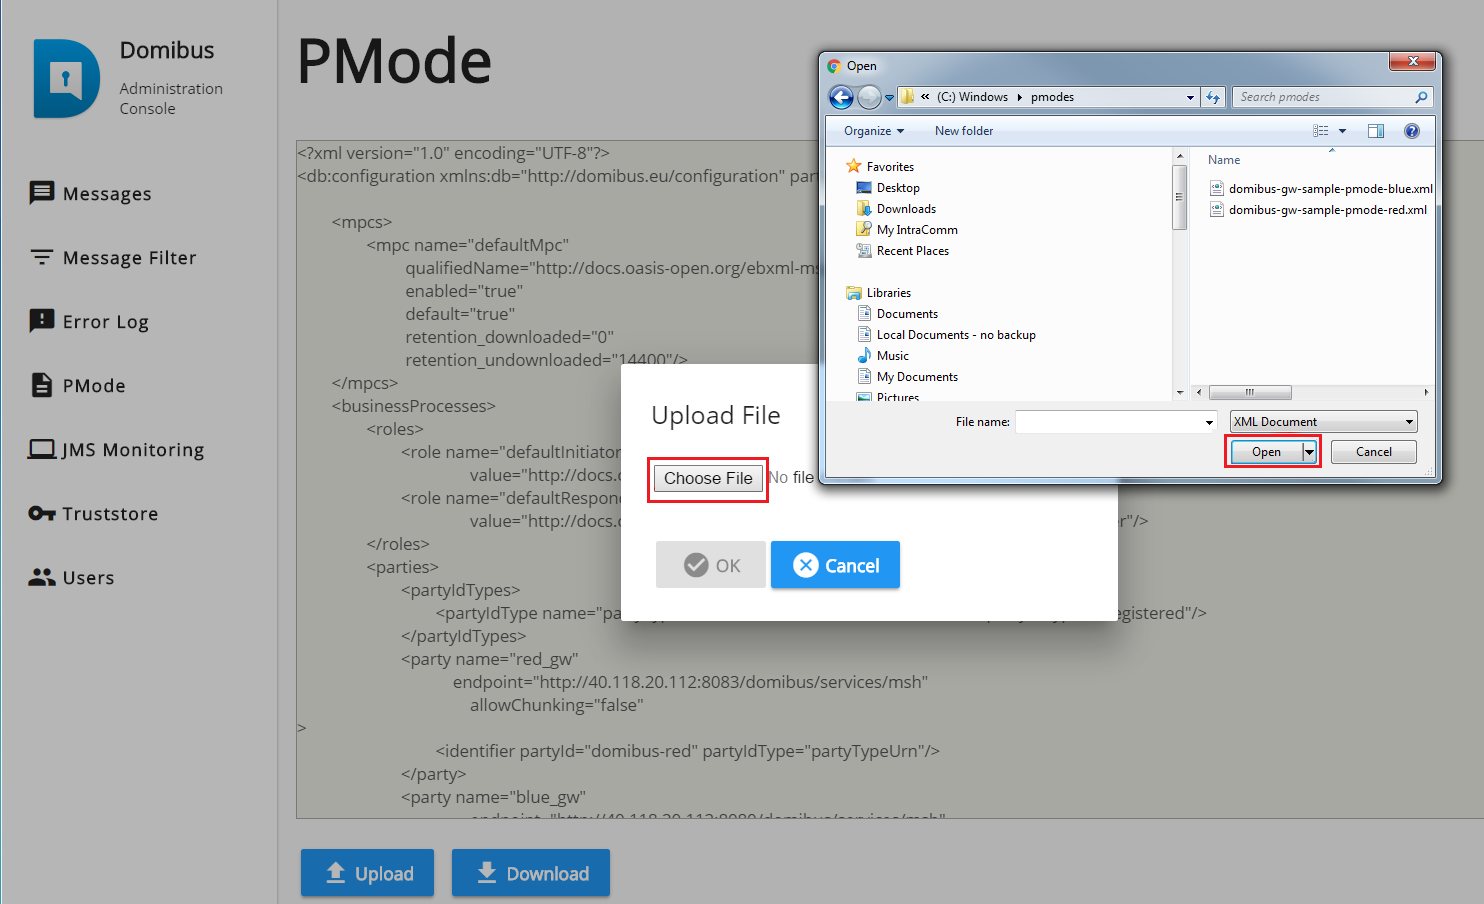
-
Once the file has been selected, click "OK" to upload the PMode xml file:
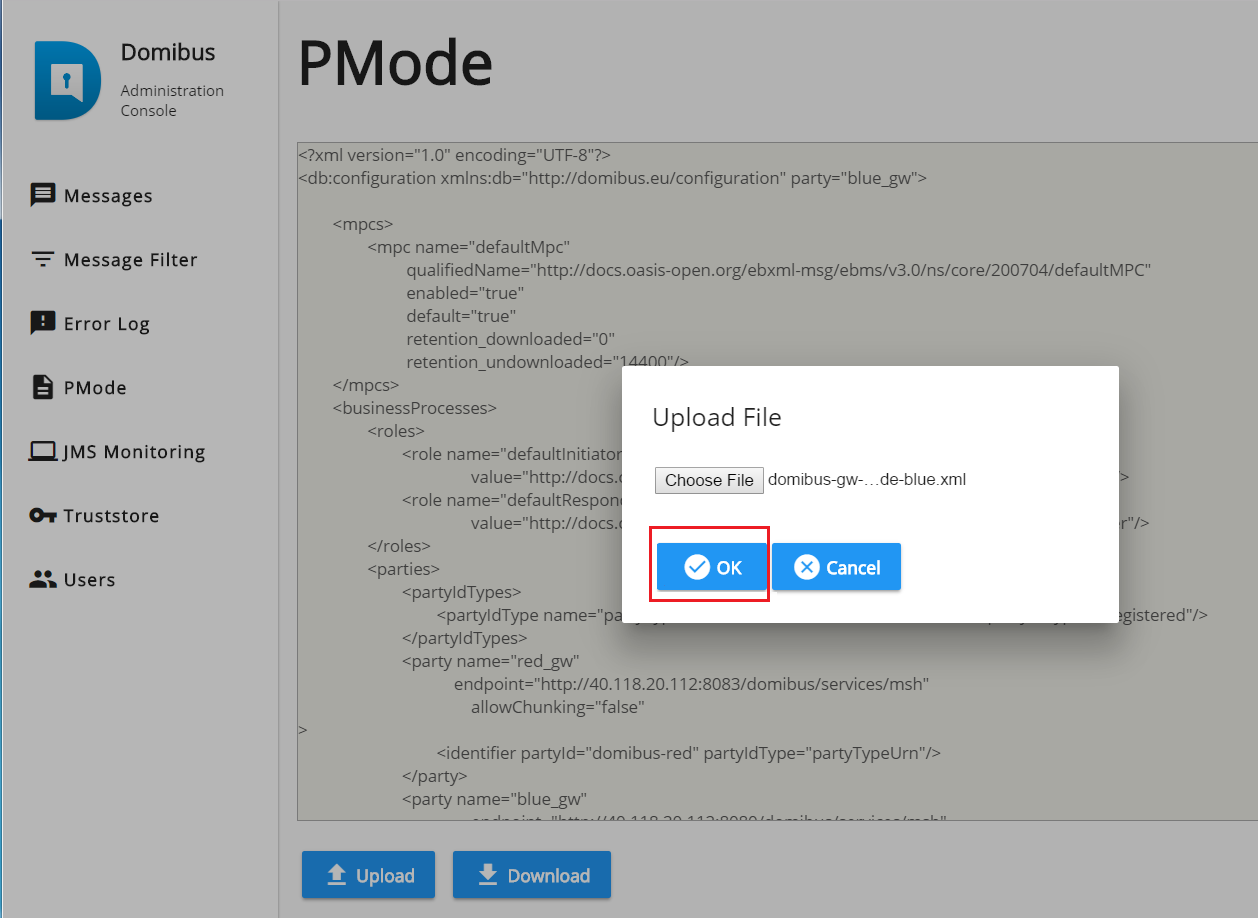
|
Note
|
Every time a PMode is updated, the truststore is also reloaded. |
Upload the Truststore
-
Select the "Truststore" menu and press the Upload button:
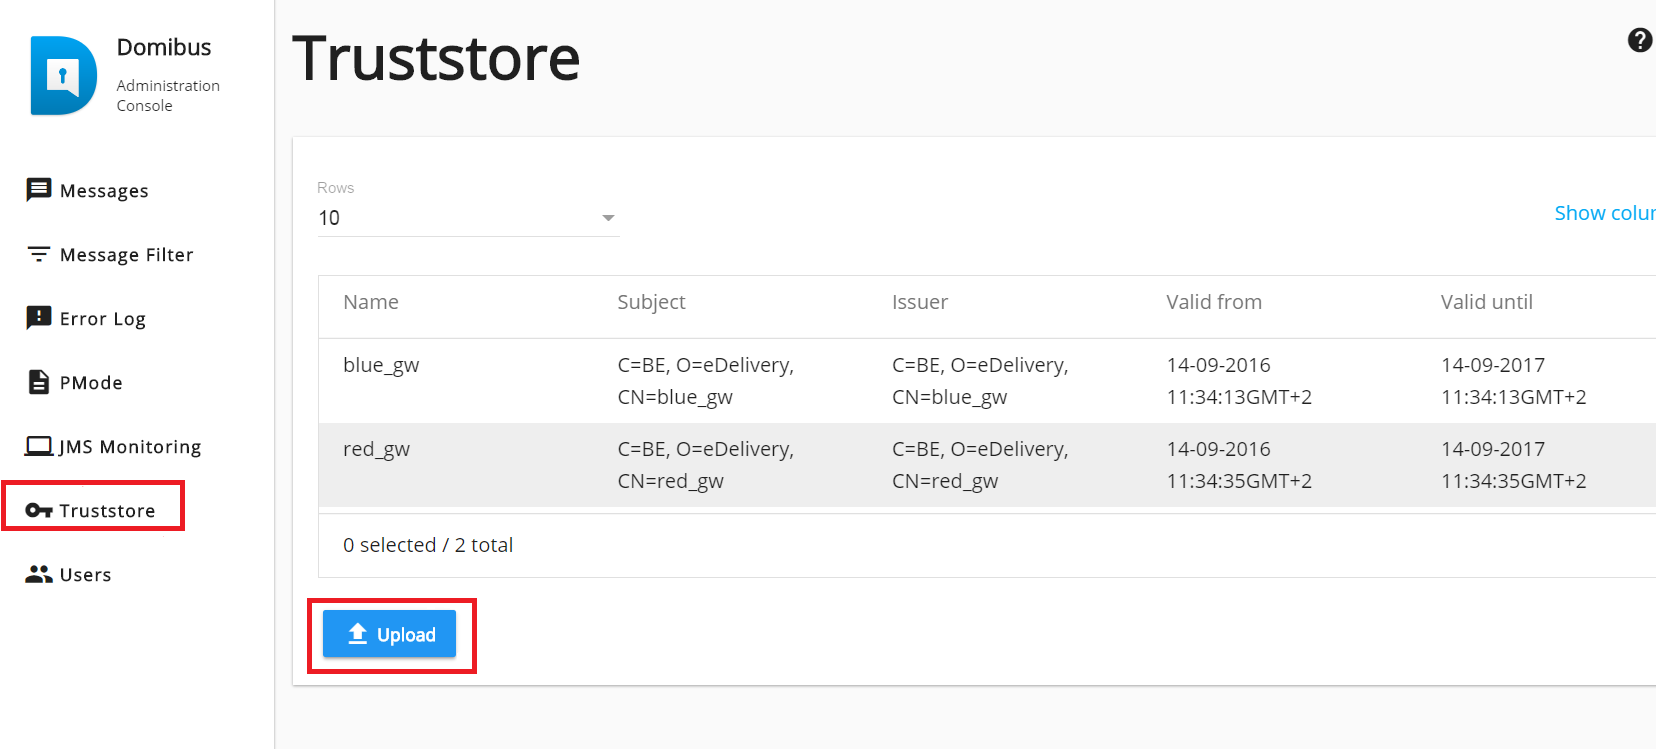
-
Navigate to the Truststore and select it by clicking on the Open button (or equivalent) of the standard file open dialog:
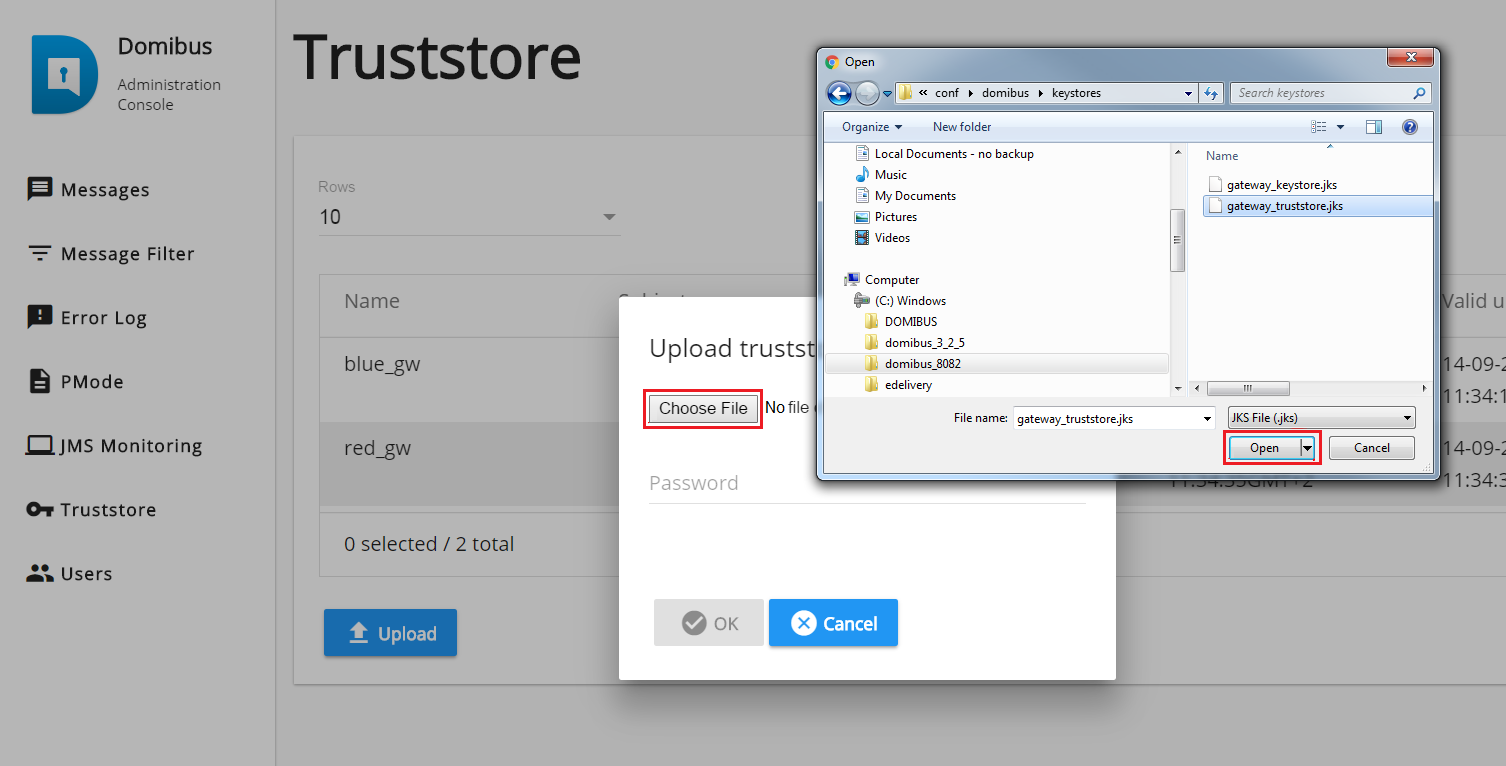
-
Once the file has been selected, enter the keystore password and click on the OK button to activate the new truststore jks file:
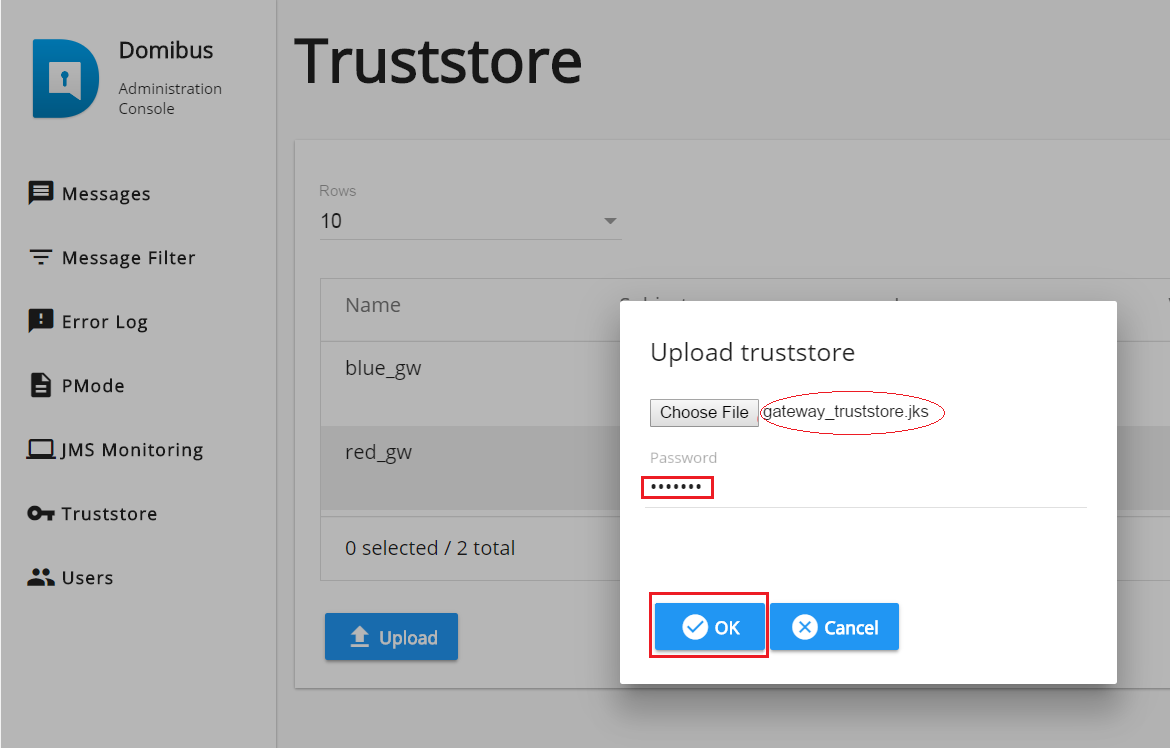
5.3.5. Message properties validation
While exchanging AS4 messages using PMode configuration, a user could define Message Properties as in the example below:
<ns:UserMessage>
….
<ns:MessageProperties>
<ns:Property
name="originalSender">urn:oasis:names:tc:ebcore:partyid-type:unregistered:C1</ns:Property>
<ns:Property
name="finalRecipient">urn:oasis:names:tc:ebcore:partyid-type:unregistered:C4</ns:Property>
</ns:MessageProperties>
…
</ns:UserMessage>
Domibus has a limitation of 1024 characters for the value of a Message
Property. If this value is exceeded, an EbMS3Exception is thrown on both
sending (C2) and receiving (C3) side and the message is not
submitted/accepted.
<properties>
<property name="originalSenderProperty"
key="originalSender"
datatype="string"
required="true"/>
<property name="finalRecipientProperty"
key="finalRecipient"
datatype="string"
required="true"/>
<propertySet name="eDeliveryPropertySet">
<propertyRef property="finalRecipientProperty"/>
<propertyRef property="originalSenderProperty"/>
</propertySet>
</properties>5.4. Two-way MEP Scenario
The Two-Way MEP governs the exchange of two User Messages in opposite directions, the first one being the request, and the second one being the response. The response must reference the request using eb:RefToMessageId.
A two-way scenario is presented below, including the PMode configuration for all 3 possible bindings for two-way exchanges:
-
PushAndPush
-
PushAndPull
-
PullAndPush
The scenario is the following:´
-
blue_gwwants to place an order tored_gwand expects a response fromred_gw. -
blue_gwhas theUserMessagerequest that needs to be exchanged with thered_gw, andred_gwhas theUserMessageresponse that needs to be exchanged withblue_gw.
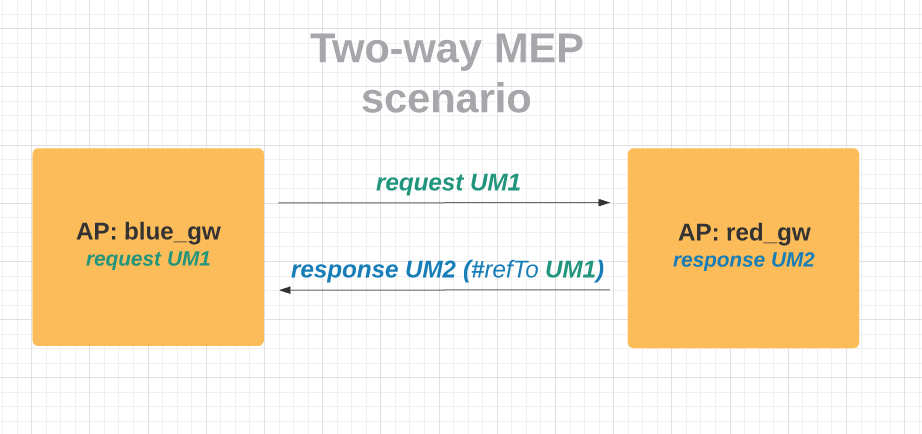
The processes described below simulate these three possible bindings for Two-Way mep.
Two legs are used:
-
leg1for the exchange of the request UM1 -
leg2for the exchange of response UM2. -
The legs are reused in all three bindings.
<legConfiguration name="leg1"
service="serviceA"
action="action1"
defaultMpc="mpcA"
reliability="AS4Reliability"
security="eDeliveryAS4Policy"
receptionAwareness="receptionAwareness"
propertySet="eDeliveryPropertySet"
payloadProfile="MessageProfile"
errorHandling="demoErrorHandling"
compressPayloads="true"/>
<legConfiguration name="leg2"
service="serviceA"
action="action2"
defaultMpc="mpcA"
reliability="AS4Reliability"
security="eDeliveryAS4Policy"
receptionAwareness="receptionAwareness"
propertySet="eDeliveryPropertySet"
payloadProfile="MessageProfile"
errorHandling="demoErrorHandling"
compressPayloads="false"/>5.4.1. PushAndPush binding
-
pushLeg1: blue_gw pushes the request UM1 on leg1 -
pushLeg2: red_gw pushes the response UM2 on leg2. RequiresRefToMessageId: UM1
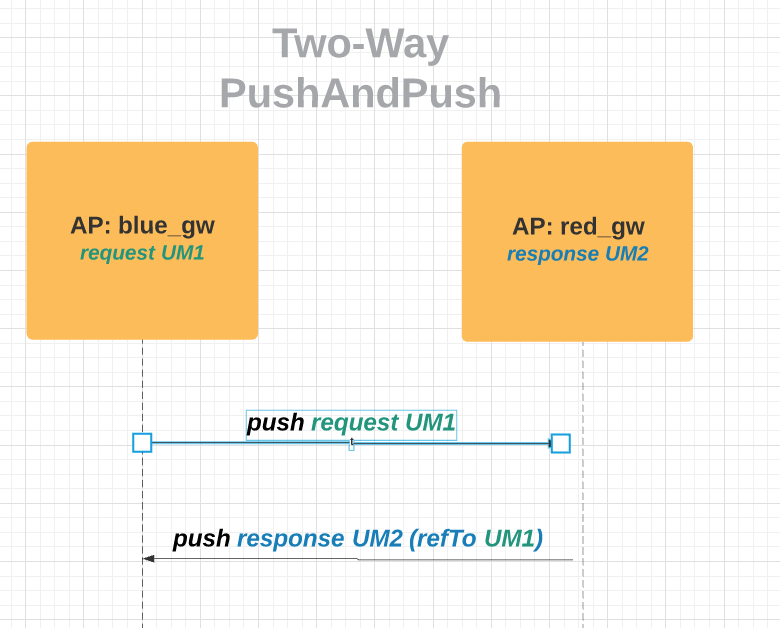
PMode configuration:
<process name="pushLeg1"
mep="oneway"
binding="push"
initiatorRole="defaultInitiatorRole"
responderRole="defaultResponderRole">
<initiatorParties>
<initiatorParty name="blue_gw"/>
</initiatorParties>
<responderParties>
<responderParty name="red_gw"/>
</responderParties>
<legs>
<leg name="leg1"/>
</legs>
</process>
<process name="pushLeg2"
mep="oneway"
binding="push"
initiatorRole=" defaultResponderRole "
responderRole="defaultInitiatorRole">
<initiatorParties>
<initiatorParty name="red_gw"/>
</initiatorParties>
<responderParties>
<responderParty name="blue_gw"/>
</responderParties>
<legs>
<leg name="leg2"/>
</legs>
</process>5.4.2. PushAndPull binding
-
pushLeg1: blue_gw pushes the request UM1 on leg1 -
pullLeg2: blue_gw pulls the response UM2 on leg2. RequiresRefToMessageId: UM1.

PMode configuration:
<process name="pushLeg1"
mep="oneway"
binding="push"
initiatorRole="defaultInitiatorRole"
responderRole="defaultResponderRole">
<initiatorParties>
<initiatorParty name="blue_gw"/>
</initiatorParties>
<responderParties>
<responderParty name="red_gw"/>
</responderParties>
<legs>
<leg name="leg1"/>
</legs>
</process>
<process name="pullLeg2"
mep="oneway"
binding="pull"
initiatorRole="defaultResponderRole"
responderRole="defaultInitiatorRole">
<initiatorParties>
<initiatorParty name="blue_gw"/>
</initiatorParties>
<responderParties>
<responderParty name="red_gw"/>
</responderParties>
<legs>
<leg name="leg2"/>
</legs>
</process>5.4.3. PullAndPush binding
-
pullLeg1: red_gw pulls the request UM1 on leg1 -
pushLeg2: red_gw pushes the response UM2 on leg2. RequiresRefToMessageId: UM1.
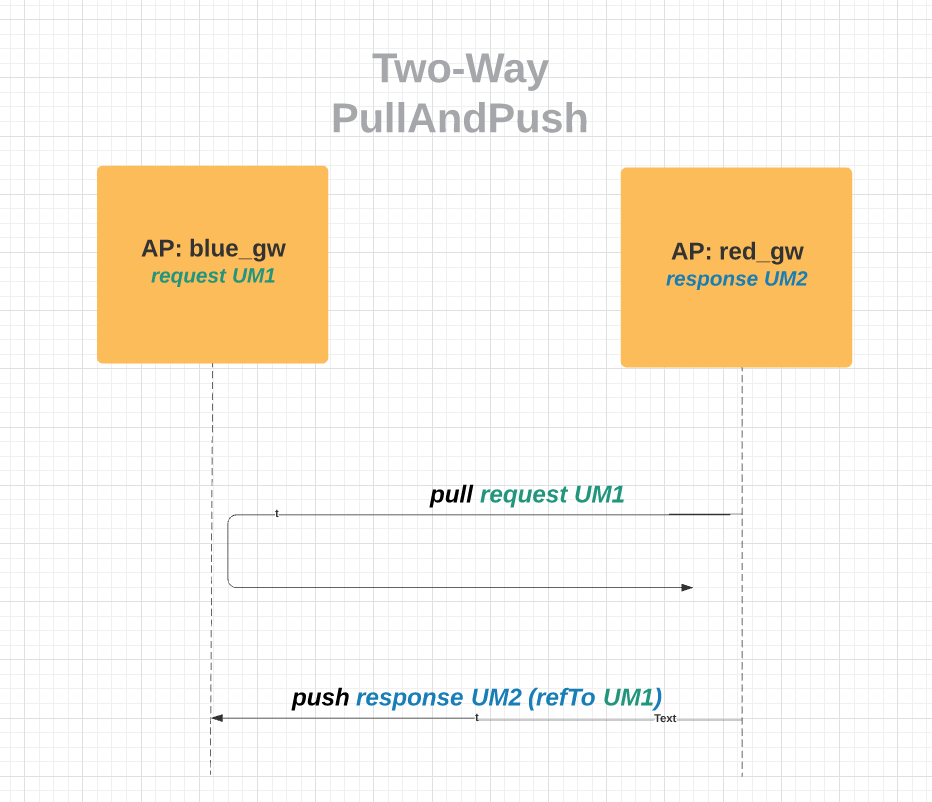
<process name="pullLeg1"
mep="oneway"
binding="pull"
initiatorRole="defaultInitiatorRole"
responderRole="defaultResponderRole">
<initiatorParties>
<initiatorParty name="red_gw"/>
</initiatorParties>
<responderParties>
<responderParty name="blue_gw"/>
</responderParties>
<legs>
<leg name="leg1"/>
</legs>
</process>
<process name="pushLeg2"
mep="oneway"
binding="push"
initiatorRole="defaultInitiatorRole"
responderRole="defaultResponderRole">
<initiatorParties>
<initiatorParty name="red_gw"/>
</initiatorParties>
<responderParties>
<responderParty name="blue_gw"/>
</responderParties>
<legs>
<leg name="leg2"/>
</legs>
</process>5.5. Special Scenario: Sender and Receiver are the same
In this special scenario, the Sender Access Point acts also as the Receiver Access Point. Multiple backends can exchange messages via the same Access Point using the same or different plugins.
5.5.1. PMode Configuration
A party (e.g. blue_gw) which is Sender and Receiver must be defined in
both the <initiatorParties> and <responderParties> sections as shown
below:
…..
<initiatorParties>
<initiatorParty name="blue_gw"/>
</initiatorParties>
<responderParties>
<responderParty name="blue_gw"/>
</responderParties>
…..5.5.2. Message structure
A message that is sent to the same Access Point will have to contain the same party ID in both From and To sections. Below there is an example of a message sent using the Default WS Plugin:
<ns:UserMessage>
…
<ns:PartyInfo>
<ns:From>
<ns:PartyId
type="urn:oasis:names:tc:ebcore:partyid-type:unregistered">domibus-blue</ns:PartyId>
<ns:Role>
http://docs.oasis-open.org/ebxml-msg/ebms/v3.0/ns/core/200704/initiator%3c/ns:Role[http://docs.oasis-open.org/ebxml-msg/ebms/v3.0/ns/core/200704/initiator
</ns:Role]>
</ns:From>
<ns:To>
<ns:Partyd
type="urn:oasis:names:tc:ebcore:partyid-type:unregistered">domibus-blue
</ns:PartyId>
<ns:Role>
http://docs.oasis-open.org/ebxmlmsg/ebms/v3.0/ns/core/200704/responder
</ns:Role>
</ns:To>
</ns:PartyInfo>
….5.5.3. Message ID convention
Due to some limitations related to the uniqueness of the message
identifier, a convention has been defined in this scenario. The message
ID used for the received message is derived from the message ID used for
the sent message with the following rule: the suffix _1 is added
to the sent message ID.
Example:
-
Sent message ID is
ae15851e-78fb-4b51-aac8-333c08c450d6@domibus -
Received message ID is
ae15851e-78fb-4b51-aac8-333c08c450d6@domibus_1
|
Note
|
The self-sending feature is meant to be used only for sanity tests. We discourage users to use self-sending in Production environments. |
5.6. Large files support
Domibus supports transfers between Access Points of files up to 2 GB using Java 8. In order to compute the message signature, Domibus loads the whole message into memory using a byte array. In Java, byte arrays can hold a maximum of 2 GB hence the Domibus limitation of 2 GB.
In order to optimize the sending of such large files, HTTP chunking is activated by default in the connection with the receiver Access Points. As chunked encoding is useful when sending larger amounts of data but decreases the performance on smaller amounts, Domibus uses a threshold to activate the chunking when appropriate only.
The following properties are used to configure chunking:
domibus.dispatcher.allowChunking and`domibus.dispatcher.chunkingThreshold`.
|
See Also
|
For more information about the above mentioned properties, see Domibus Properties. |
5.6.1. Split and Join
Support for large files bigger than 2 GB is supported using the Split and Join feature. It provides a mechanism for allowing a Sending MSH to split a large MIME-enveloped SOAP message, referred to as the source message, into a set of smaller MIME-enveloped SOAP messages, referred to as fragment messages, which MUST be joined at the Receiving MSH side. The resulting target message is an identical copy of the source message. The feature also supports compression.
The Split and Join feature is implemented according to the ebMS3 Part 2 “Large Message Splitting and Joining” [EBMS3P2], profiled and adjusted for use with eDelivery AS4.
Split and Join is currently supported in Domibus only in Tomcat in combination with the File System Plugin.
However custom plugins can use the Plugin API to send and receive messages using Split and Join. There are specific constraints, such as including long running operations in a JTA transaction which need to be taken into account.
The Split and Join feature is only supported for push mode, not for pull mode.
In order to activate the usage of Split and Join the leg configuration used by Domibus must have a splitting attribute configured as shown below:
...
<splittingConfigurations>
<splitting name="default"
fragmentSize="500"
compression="true"
joinInterval="1440"/>
</splittingConfigurations>
<legConfigurations>
<!--
Please add the attribute "splitting"(pointing to a splitting configuration)
to a specific leg in case you want to activate splitAndJoin feature
-->
<legConfiguration name="pushTestcase1tc1Action"
service="testService1"
action="tc1Action"
splitting="default"/>
</legConfigurations>
...Split and Join is used to send large files and therefore in order to handle this type of files, Domibus uses the file system to store the result of the intermediary operations needed to split and join the files. Therefore Domibus needs up to 4 times the size of payload in file disk space.
If a payloadProfile attribute is set for the legConfiguration used for
Split & Join, the maxSize attribute of this profile should have the
value increased from maxSize=”” to maxSize=”2147483647” to
maxSize="9223372036854775807” otherwise Domibus is not able to send
payloads over 2Gb.
5.7. eArchiving
The amount of data that will be exported by Domibus can be quite large. Therefore, Domibus will export the data to be archived in a shared file system.
Domibus will use an exporting mechanism, which can be configured in the Domibus property file, to continuously export data in batches in a preconfigured directory. The frequency of the export and the size of each batch can be configured according to the business needs See ☞ Sanitizer Export.
On demand, there will be a possibility to re-export a previously exported batch using a REST API.
After each successful batch export, Domibus will notify the eArchiving client that new data can be archived. The eArchiving client will read the exported batch data from the file system. Afterward it will notify Domibus about the outcome of the archived batch, whether it has been successful or not.
5.7.1. Continuous export
The continuous export is a Domibus mechanism that can be configured to
periodically export messages into a shared folder using a specific
archival export format.
See Sanitizer Export.
Only the messages that reached the final state and were not previously exported by the continuous export procedure will be exported.
The continuous export will be configured to export messages starting from a specific date in the past. This will also allow the possibility to restart the periodic continuous export from a specific past date. This scenario could occur when there was a general issue in the export mechanism and the process must be reinitialized. By default, the continuous export start date is 01/01/1970, meaning that it will consider all messages. If this value is changed to a more recent date, all the messages older than this date will not be exported and therefore not deleted by the retention policy mechanism (See ☞ Retention Policy).
The continuous export start date advances even if all the messages from
a specific period are not in a final state and are not exported. In such
scenario, a fallback mechanism called Sanitizer export will pick up the
remaining messages. Domibus will check periodically if the continuous
export start date does not advance within a specified amount of time
configured in Domibus properties file.
A Domibus alert will be send in such cases
(See ☞ Alerts) and a manual action must be taken to investigate why the old messages did not reach a final state.
As Domibus is handling messages reliably, it is possible for messages to
be in a non-final state while recovering a failure to be sent. In this
situation, the normal process of archiving will not select such
messages. It will be possible to configure Domibus to filter the
messages taking into account for archiving by setting a property in
Domibus properties (either describing the default time retry timeout of
Domibus, or defining the MPCs of the PMode). Those values are rounded at
the hour mark.
For example, for a runtime at 15h12:
-
if
domibus.earchive.batch.retry.timeout=5, the archiving job will not consider messages sent after 15h00. -
if
domibus.earchive.batch.retry.timeout=30, the archiving job will not consider messages sent after 14h00.
The continuous export only looks forward, any issue with failed or expired export batches will have to be dealt with using the REST-API manual exports.
Domibus notifies the eArchiving client using a callback method via a REST endpoint when a batch export is completed or failed (See ☞ Notification from the Archiving Client regarding batch archiving). The eArchiving client can start processing the batch after it has received the signal. In case Domibus fails to deliver a notification to the eArchiving client, it will re-attempt to deliver the notification later until the maximum number of attempts is reached. The maximum number of attempts and the delay time between the notifications will be configured in the Domibus properties file. If Domibus fails to notify the eArchiving client even after the maximum number of attempts is reached, it will send an alert (See ☞ Alerts) and a manual action must be taken.
The continuous export will export messages in batches having a maximum number of messages. The batch maximum number of messages is configured statically in the Domibus properties file. This means that changing the batch maximum number of messages requires a Domibus restart. Domibus might export empty batches which will assert that there are no messages eligible for export during a specific timespan.
5.7.2. Sanitizer Export
The Sanitizer Export is a mechanism which exports messages which were not exported by the Continuous Export. It has been created to optimize the performance of the Sanitizer Export job.
The Continuous Export start date advances, for performance reasons, in case it encounters messages which are not in final state. The Sanitizer Export catches and exports the messages that are skipped by the Continuous Export mechanism.
If this sanitizer job finds a non-final message, an alert is sent.
If the start date of the continuous job is stopped, an alert is sent.
5.7.3. Exported Data
Domibus exports only messages that are not yet archived and that are in a final state: RECEIVED, DELETED, DOWNLOADED or ACKNOWLEDGED. Payloads are decompressed before being exported.
Messages will be exported in batches. For each exported batch, Domibus creates in a preconfigured shared file system a directory named based on an UUID. The structure of the batch is using EARK SIP format as illustrated below:
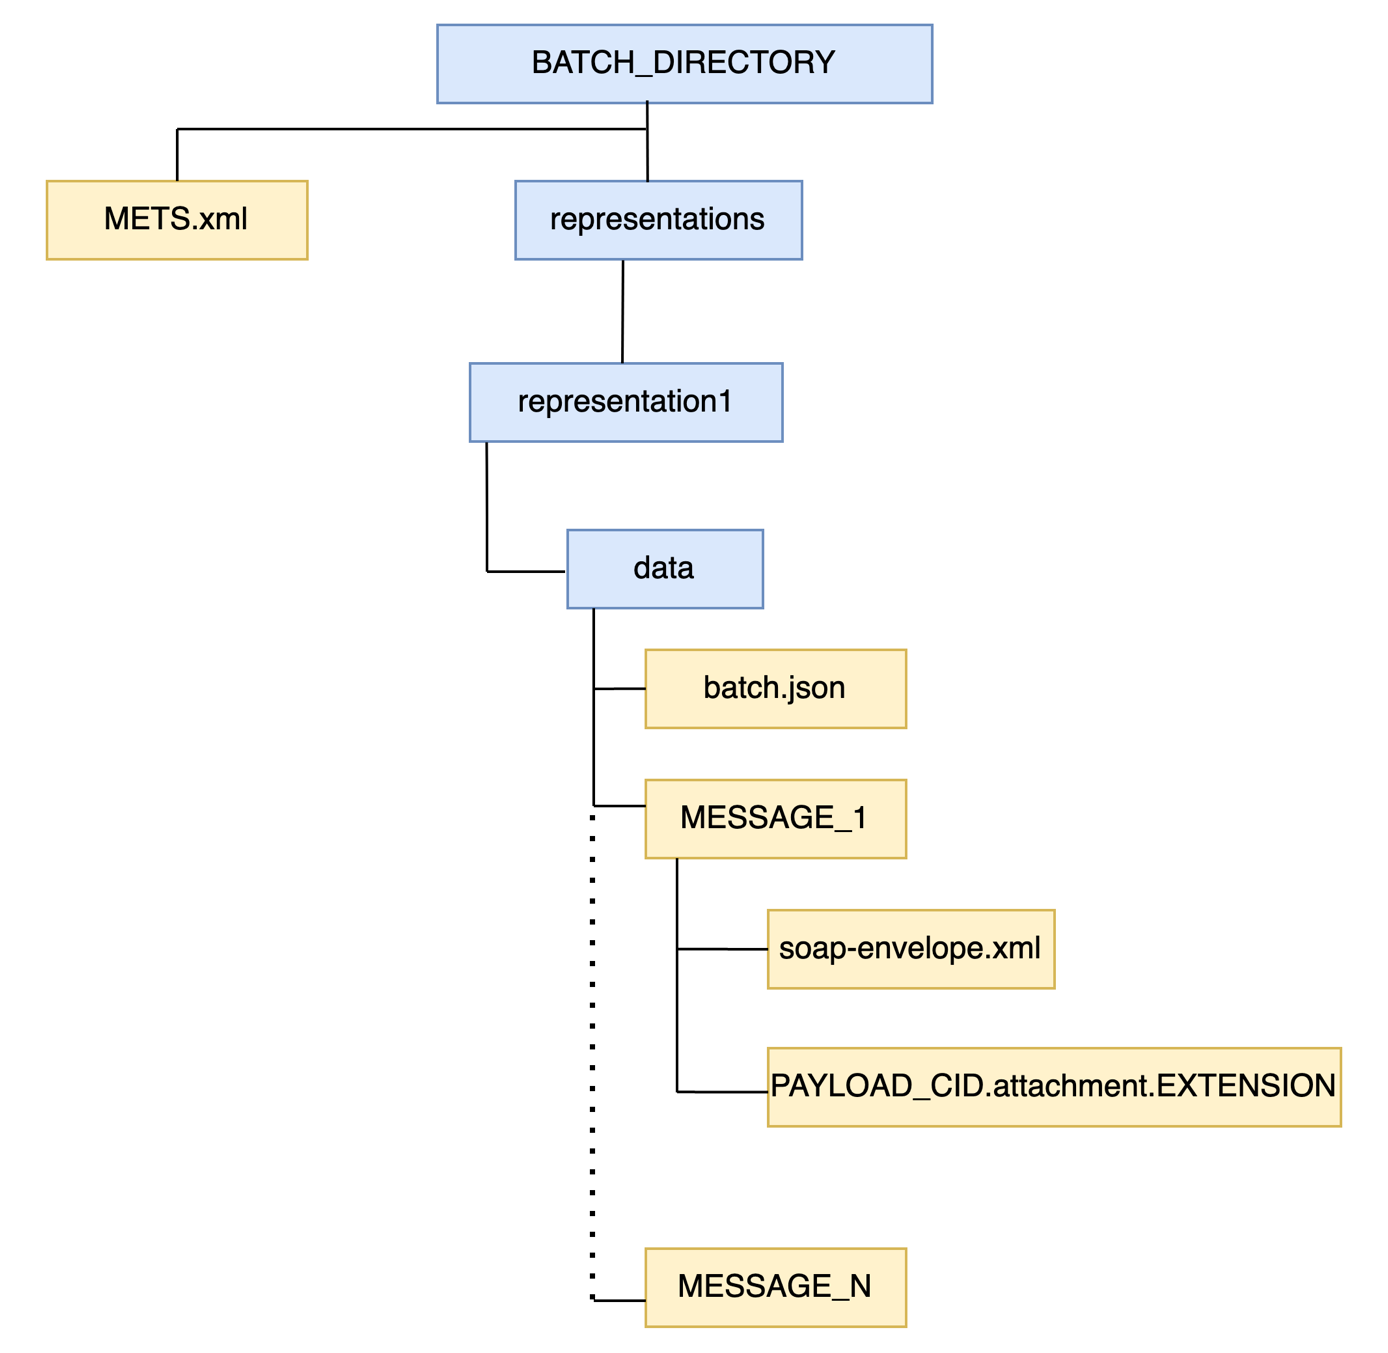
Where:
- BATCH_DIRECTORY
-
The directory in which Domibus exports messages contained in the batch. This directory is named based on a UUID.
METS.XML-
The batch manifest file. It contains:
-
a list of all the exported files and their checksum for all the exported messages
-
the batch id
-
Below is an example of a METS.xml file for a batch with id
a46ab3d0-c710-4d73-b58d-e93e30b53a80. Please note that the example given
below is not valid against the schema and it presents the most relevant
elements of the METS.xml document.
The usage of the RODA library will be strongly considered to produce a
correct METS.xml file. The EARK version 1 will be used.
|
Note
|
The METS.xml file does not contain the batch.json checksum. This
is to avoid circular dependency with the the batch.json file which
already contains the checksum of the METS.xml file.
|
<?xml version="1.0" encoding="utf-8" standalone="yes"?>
<mets
xmlns:xsi="http://www.w3.org/2001/XMLSchema-instance"
xmlns="http://www.loc.gov/METS/"
xmlns:xlink="http://www.w3.org/1999/xlink"
OBJID="a46ab3d0-c710-4d73-b58d-e93e30b53a80" TYPE="ERMS"
xlink:CONTENTTYPESPECIFICATION="SMURFERMS"
PROFILE="http://www.dasboard.eu/specifications/sip/v03/METS.xml"
xsi:schemaLocation="http://www.loc.gov/METS/ schemas/mets.xsd"
LABEL="root level METS file for an IP">
<metsHdr CREATEDATE="2017-01-31T13:07:22.6970809+02:00"
RECORDSTATUS="NEW"
LASTMODDATE="2017-01-31T13:07:22.6970809+02:00">
<agent ROLE="CREATOR" TYPE="OTHER" OTHERTYPE="SOFTWARE">
<name>Domibus</name>
</agent>
<!-- Batch Id -->
<metsDocumentID>a46ab3d0-c710-4d73-b58d-e93e30b53a80</metsDocumentID>
</metsHdr>
<fileSec ID="e2a80c69-1eb4-4c2a-a029-5d77bf53d325">
<fileGrp ID="e4d9422e-4c26-493b-929b-580198c34055" USE="Files root">
<fileGrp ID="b6f4b954-9bd4-4179-93d3-37732b90923d" USE="data">
<file ID="fec0430c-9152-4662-86fe-f9e78dad9baf"
MIMETYPE="application/octet-stream"
CREATED="2017-01-31T13:07:22.7470810+02:00"
<FLocat LOCTYPE="URL" xlink:type="simple"
xlink:href="file:data/batch.json"/>
</file>
</fileGrp>
<!-- message 1 files -->
<!-- The message 1 files are grouped in a fileGrp with an ID that uses
the AS4 UserMessage ID -->
<fileGrp ID="9a0c6088-70ac-43b1-ab57-2f9d1f0204b7" USE="data">
<file ID="aec0430c-9152-4662-86fe-f9e78dad9baf" MIMETYPE="text/xml"
SIZE="11717"
CREATED="2017-01-31T13:07:22.7470810+02:00"
CHECKSUM="0d71382407d6a13af515761a6e1abd0e8b0784dab73e1a52427aaa9dbc4f73a9"
CHECKSUMTYPE="SHA-256">
<FLocat LOCTYPE="URL" xlink:type="simple"
xlink:href="file:data/9a0c6088-70ac-43b1-ab57-2f9d1f0204b7/soap-envelope.xml"/>
</file>
<file ID="bec0430c-9152-4662-86fe-f9e78dad9baf" MIMETYPE="text/xml"
SIZE="12717"
CREATED="2017-01-31T13:07:22.7470810+02:00"
CHECKSUM="1d71382407d6a13af515761a6e1abd0e8b0784dab73e1a52427aaa9dbc4f73a9"
CHECKSUMTYPE="SHA-256">
<FLocat LOCTYPE="URL" xlink:type="simple"
xlink:href="file:data/9a0c6088-70ac-43b1-ab57-2f9d1f0204b7/message.attachment.xml"/>
</file>
<file ID="cec0430c-9152-4662-86fe-f9e78dad9baf"
MIMETYPE="application/pdf" SIZE="42717"
CREATED="2017-01-31T13:07:22.7470810+02:00"
CHECKSUM="2d71382407d6a13af515761a6e1abd0e8b0784dab73e1a52427aaa9dbc4f73a9"
CHECKSUMTYPE="SHA-256">
<FLocat LOCTYPE="URL" xlink:type="simple"
xlink:href="file:data/9a0c6088-70ac-43b1-ab57-2f9d1f0204b7/invoice.attachment.pdf"/>
</file>
</fileGrp>
<!-- message n files -->
<fileGrp ID="0a0c6088-70ac-43b1-ab57-2f9d1f0204b7" USE="data">
<!-- message n files -->
</fileGrp>
</mets>- BATCH.JSON
-
A JSON file containing metadata related to the batch such as:
-
The version of data format exported.
-
Batch ID.
-
The request ID that triggered the creation of the batch. For a manual request, multiple batches can be created following a request export. For a continuous export the request ID is always empty.
-
Request type: continuous or manualThe status of the batch export: success.
-
Error code of the error in case of failure. The error codes will be defined at a later stage.
-
Error description of the error in case of failure.
-
A timestamp of the batch export.
-
The time period of the messages included in the batch: message start date and message end date. Adding the period in the batch.json might introduce a performance penalty. This will be further analysed during the implementation and in case it is degrading the performance, the message start date and message end date could be removed.
-
A checksum of the batch manifest
METS.xmlfile. -
The list of exported message IDs.
-
batch.json file:{
"version" : "1",
"batchIid": "9a0c6088-70ac-43b1-ab57-2f9d1f0204b7",
"requestTtype": "continuous",
"status": "failed",
"errorCode": "DOM_001",
"errorDescription": "Failed to export batch",
"timestamp": "2021-06-25T12:00:00Z",
"messageStartId": "2021-01-25T12:00:00Z",
"messageEndId": "2021-01-26T12:00:00Z",
"manifestChecksum":
"sha256:01ba4719c80b6fe911b091a7c05124b64eeece964e09c058ef8f9805daca546b",
"messages": [
"123c6088-70ac-43b1-ab57-2f9d1f0204b7",
"567c6088-70ac-43b1-ab57-2f9d1f0204b7"
]
}- MESSAGE_1 … MESSAGE_N
-
-
The directory in which Domibus exports the files of a
UserMessage. The directory is named after the exported message ID and it contains the following files: -
soap-envelope.xml-
Contains the Soap Envelope as it was exchanged between C2 and C3
-
All the message payloads. Each payload is named based the payload CID from the AS4 message. The extension is derived based on the payload mime type.
-
-
|
Note
|
The payloads exported in the batches will be decompressed by Domibus in case they are stored internally as compressed. |
- Example
-
For a payload with CID value
messageand the mime type text/xml, the payload file is namedmessage.attachment.xml.-
The payloads will be exported as they were exchanged between C2 and C3.
-
Example of the structure of folder for a batch with ID e4bdeb9a-1c1a-4f50-9f8b-bf96133c095 containing one exported
message with ID 9a0c6088-70ac-43b1-ab57-2f9d1f0204b7 which has two payloads with CID message and invoice:
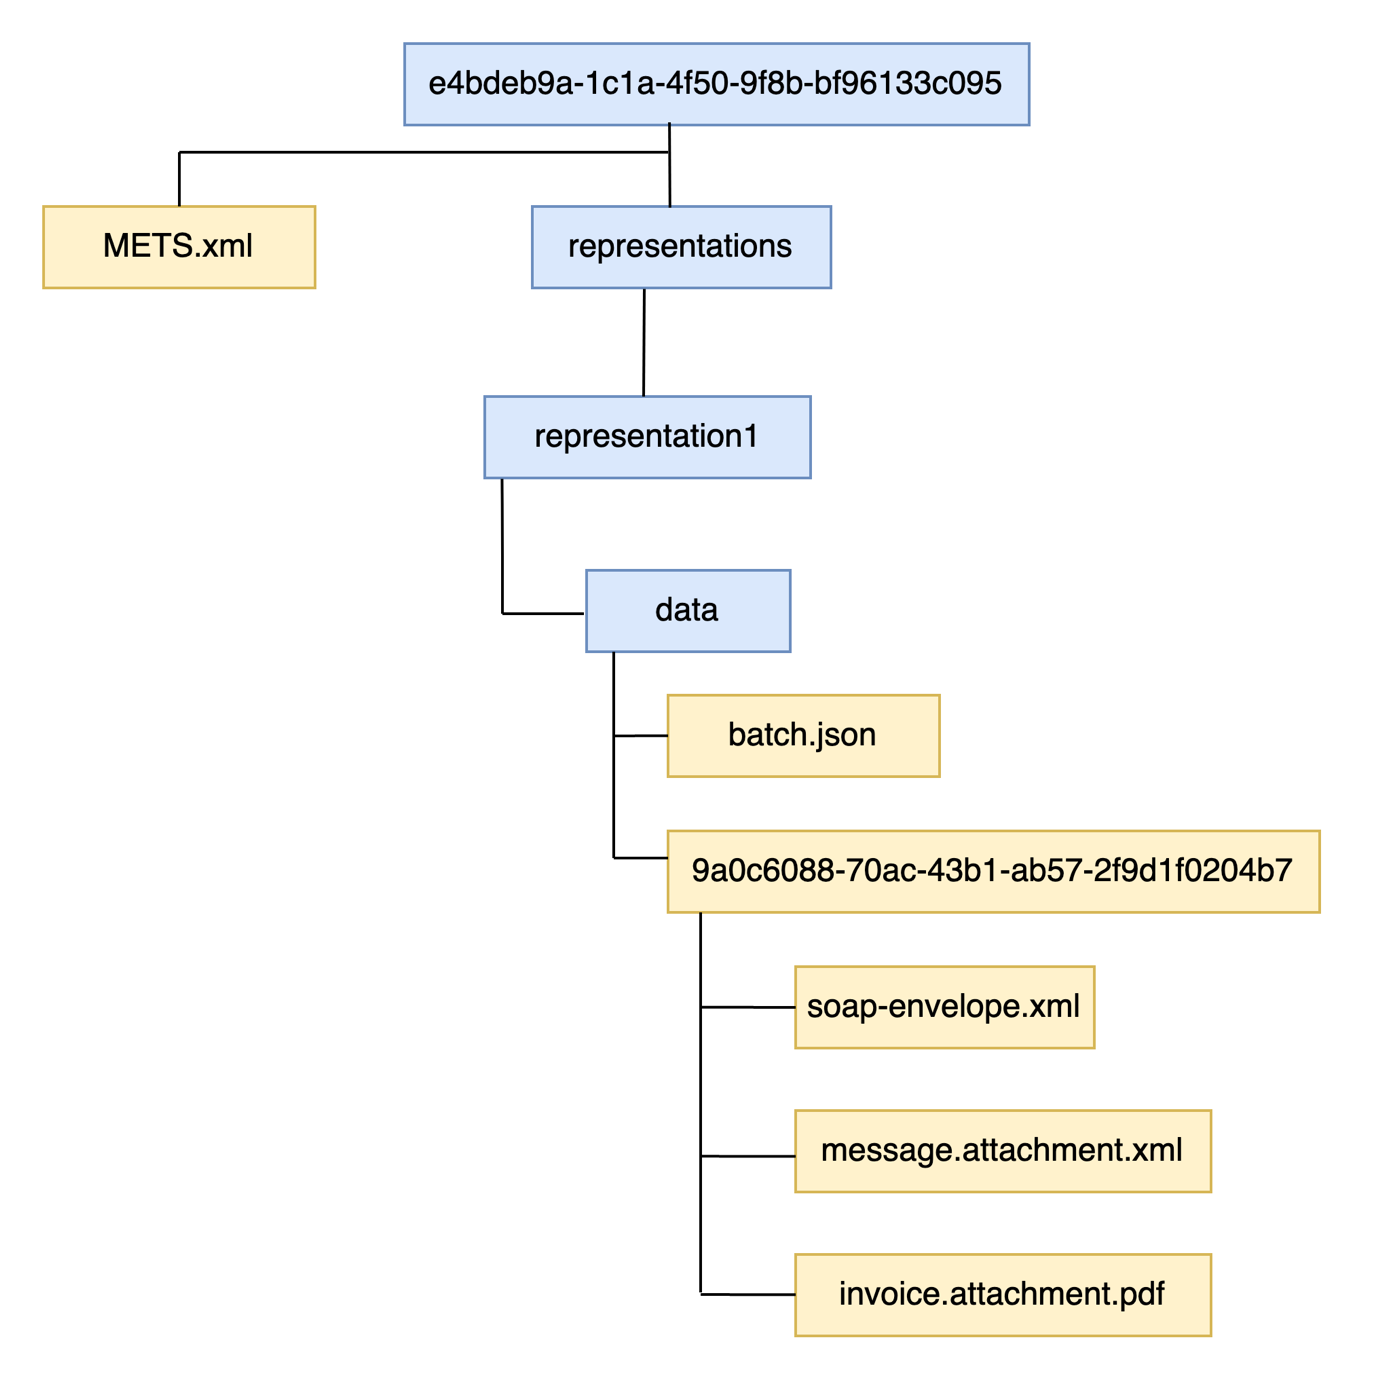
5.7.4. eArchive stuck batches worker
This worker detects any batch in the EArchiveBatchStatus.STARTED or EArchiveBatchStatus.QUEUED states older than N minutes.
Where N is what is set in domibus.earchive.stuck.ignore.recent.minutes.
These eArchiving batches are to be re-exported.
This means they are set to the EArchiveBatchStatus.FAILED status and new batches are created with:
-
REEXPORTED= TRUE -
ORIGINAL_BATCH_ID= <batchId>, where <batchId> is the id of the selected batch.
5.7.5. Audit
Relevant actions related to the archiving mechanism will be audited in the Domibus log files. Examples of relevant actions:
-
Archiving client requests a manual export
-
A batch is exported: the content of the complete batch.json file will be logged.
-
Notifications sent from Domibus to the eArchiving client and vice-versa
Domibus audits the following events in the logs:
(Code: Text template)
* BUS-083: Enqueue continuous batch [\{}].
* BUS-084: Archiving client requests a manual (re-)export for batch[\{}].
* BUS-085: A batch [\{}] is exported to file path: \{}!
* BUS-086: Export Notification for batch [\{}] is sent from Domibus to the eArchiving client!
* BUS-087: Received Archive Notification for batch: [\{}] with message: [\{}] from the eArchiving client to Domibus!
* BUS-088: Received Archive Failed notification for batch: [\{}] with message: [\{}] from the eArchiving client to Domibus!#
* BUS-089: Export failed batch: [\{}]. Error message: [\{}]!
* BUS-090: Batch: [\{}] with first [\{}] and last message: [\{}] is Archived.5.7.6. Retention Policy
When an archiving client is integrated and configured, the Domibus retention policy will consider a message for deletion only if the archival client has successfully archived it. This is the case even if the message is expired according to the retention policy configuration from the PMode.
Domibus will define a retention policy for the exported batches. The retention policy value will be configured in the Domibus property file, and it will have a default value of 1 month. If a batch is not archived during this time, it is considered as expired and it will be eligible for deletion.
A batch can also be eligible for deletion if the archiving client notifies Domibus that it has successfully archived it or it has failed to archive it. A failed batch can always be re-exported on demand using the REST API. See ☞ eArchiving Interface.
|
See Also
|
|
5.7.7. eArchiving Interface
The integration between Domibus and the archiving client will be done using REST APIs and a shared file system for exporting batch data.
In this section we will describe in detail the REST API that must be implemented by each system.
The Open API document for eArchiveClient is part of the Domibus distribution artifacts (see eDelivery AS4 Profile).
Security
|
Important
|
From a security perspective, it is recommended that the communication between Domibus and the archiving client is performed over HTTPS. |
The Domibus REST API is protected with basic authentication. The Domibus Admin Guide will contain an example of an HTTP request using basic authentication once it will be updated to cover the eArchiving feature.
A Plugin User must be created upfront in the Domibus Administration Console and used by the archiving client which MUST supply the basic authentication headers on each Domibus REST API call.
Domibus will be able to call the callback archiving REST API interface with or without basic authentication headers. This will be configured statically in the Domibus property file.
Domibus will expose the following REST API to be used by an archiving client.
|
See Also
|
See eArchiving Interface for the description of the REST responses' fields. |
Domibus API
GET Batch by Batch ID
This REST endpoint will fetch any batch from any status given its batch ID.
HTTP method: GET
-
Parameters:
-
batchId: ID of the batchcurl -X 'GET' 'http://172.70.1.5:8080/domibus/ext/archive/batches?batchId=3950092f-5805-11ec-8197-9c5c8ec0f1ad' \ -H 'accept: application/json'
-
-
Response:
-
HTTP 200 status with body:
{ "batchId": "3950092f-5805-11ec-8197-9c5c8ec0f1ad", "requestType": "CONTINUOUS", "status": "EXPORTED", "errorCode": null, "errorDescription": null, "enqueuedTimestamp": "2021-12-08T09:00:00.000+0000", "messageStartDate": 21120609, "messageEndDate": 21120609, "manifestChecksum": "sha256:939c282837187d32196a80070b33901ee4f77db41de46fbb2c12449f74b29de6", "messages": [] } -
List batch export requests that are queued (continuous and manual)
-
This REST endpoint will export the list of batches that are queued to be processed asynchronously by Domibus. It can be used for monitoring purposes.
HTTP method: GET
-
Parameters:
-
lastCountRequests: return last N enqueued batch export requests - if this parameter is given all others filters are ignored. -
requestTypes: return batches for given batch types (Values:CONTINUOUS, MANUAL) -
startDate: start day-time of batches enqueued -
endDate: end day-time of batches enqueued -
pageStart: the offset from which the message IDs export will start -
pageSize: maximum number of records in the pagecurl -X 'GET' 'http://172.70.1.5:8080/domibus/ext/archive/batches/queued?requestType=CONTINUOUS&startDate=2021-12-06T00%3A00%3A00Z&endDate=2021-12-07T00%3A00%3A00Z&pageStart=0&pageSize=100' \ -H 'accept: application/json'
-
-
Response example:
{ "filter": { "lastCountRequests": 0, "requestTypes": [ "CONTINUOUS" ], "startDate": "2021-12-06T00:00:00Z", "endDate": "2021-12-07T00:00:00Z" }, "pagination": { "pageStart": 0, "pageSize": 100, "total": 1 }, "queuedBatches": [ { "batchId": "9a0c6088-70ac-43b1-ab57-2f9d1f0204b7", "requestType": "CONTINUOUS", "enqueuedTimestamp": "2021-12-07T11:36:21.726Z", (1) "messageStartDate": 21120100, "messageEndDate": 21120700, "messages": ["123c6088-70ac-43b1-ab57-2f9d1f0204b7", "567c6088-70ac-43b1-ab57-2f9d1f0204b7"] } ] }-
enqueuedTimestampis the timestamp when Domibus adds the batch to the queue.
-
GET messageIds Exported in a Batch
This REST endpoint provides the message IDs exported in a batch. All message IDs are exported if the limit and start parameters are not provided.
HTTP method: GET
Parameters:
-
batchId: batch ID of the message ids,
-
pageStart: the offset from which the message IDs export will start
-
pageSize: maximum number of records in the pageRequest example
curl –X 'GET' \ +
http://172.70.1.5:8080/domibus/ext/archive/batches/exported/123c6088-70ac-43b1-ab57-2f9d1f0204b7/messages?pageStart=0&pageSize=100'
\ +
-H 'accept: application/json'-
Response (example):
{ "batchId": "123c6088-70ac-43b1-ab57-2f9d1f0204b7", "pagination": \{ "pageStart": 0, "pageSize": 5, "total": 1236 (1) }, "messages": [ "123c6088-70ac-43b1-ab57-2f9d1f0204b7", "567c6088-70ac-43b1-ab57-2f9d1f0204b7","143c6088-70ac-43b1-ab57-2f9d1f0204b7", "153c6088-70ac-43b1-ab57-2f9d1f0204b7", "163c6088-70ac-43b1-ab57-2f9d1f0204b7" ] }Where:
-
totalis the total number of message IDs contained in the batch.
-
GET Exported Batches History
This REST endpoint provides a history of exported batches with status success, failed or expired. It allows the archiving client to validate if it has archived all exported batches.
HTTP method: GET
-
Parameters:
-
messageStartDate: start date and hour of the exported messages in the batch yyMMddHH -
messageEndDate: end date of the exported messages included in the batch -
statuses: filter by list of batch statues -
includeReExportedBatches: batch re-export status (true/false; includes batches for which a re-export has been requested using the REST endpoint) -
pageStart: the offset/page from which the message IDs export will start. List is sorted by batch request date -
pageSize: maximum number of records in the pageRequest example:curl -X 'GET' \ 'http://172.70.1.5:8080/domibus/ext/archive/batches/exported?messageStartDate=21100100&messageEndDate=21123100&statuses=EXPORTED&reExport=false&pageStart=0&pageSize=100' \ -H 'accept: application/json' \
-
-
Response (example):
{
"pagination": {
"pageStart": 0,
"pageSize": 100,
"total": 10
},
"filter": {
"messageStartDate": 21100100,
"messageEndDate": 21123100,
"statuses": [
"EXPORTED"
],
"includeReExportedBatches": false
},
"exportedBatches": [
{
"batchId": "9a0c6088-70ac-43b1-ab57-2f9d1f0204b7",
"requestType": "CONTINUOUS",
"status": "EXPORTED",
"enqueuedTimestamp": "2021-12-07T12:20:20Z",
"messageStartDate": 21100100,
"messageEndDate": 21100102,
"manifestChecksum": "sha256:01ba4719c80b6fe911b091a7c05124b64eeece964e09c058ef8f9805daca546b",
"messages": [
"123c6088-70ac-43b1-ab57-2f9d1f0204b7",
"567c6088-70ac-43b1-ab57-2f9d1f0204b7"
]
}
]
}GET Unarchived Messages
Get messages which were not archived within a specific period.
This REST endpoint can be used to check if all AS4 messages received or sent within a specific period were archived.
The response will contain the list of the message IDs which were not archived during the specified period.
Sample REST Call
-
HTTP method: GET
-
Parameters:
-
messageStartDate: Message start date of the period to be checked -
messageEndDate: Message end date of the period to be checked. -
pageStart: The offset/page of the result list. -
pageSize: Maximum number of returned records/page size.´
REQUEST:
curl -X 'GET' \
'http://172.70.1.5:8080/domibus/ext/archive/messages/not-archived?messageStartDate=2021-10-01T00%3A00%3A00Z&messageEndDate=2021-12-31T00%3A00%3A00Z&pageStart=0&pageSize=100'
\
-H 'accept: application/json' \RESPONSE:
{
"pagination": {
"pageStart": 0,
"pageSize": 100,
"total": 5 (1)
},
"messages": [
[
"123c6088-70ac-43b1-ab57-2f9d1f0204b7",
"567c6088-70ac-43b1-ab57-2f9d1f0204b7",
"143c6088-70ac-43b1-ab57-2f9d1f0204b7",
"153c6088-70ac-43b1-ab57-2f9d1f0204b7",
"163c6088-70ac-43b1-ab57-2f9d1f0204b7"
]
]
}-
Where
totalis the total number of message IDs contained in the batch.
GET Continuous Export’s Current Start Date
This REST endpoint will expose the continuous export mechanism current start date.
Sample REST Call
-
HTTP method: GET
-
Parameters: none
REQUEST
curl -X 'GET' \
'http://172.70.1.5:8080/domibus/ext/archive/continuous-mechanism/start-date'
\
-H 'accept: application/json' \RESPONSE:
21120100GET Sanity Export’s Current Start Date
This REST endpoint will expose the sanity export mechanism current start date.
Sample REST Call
-
HTTP method: GET
-
Parameters: none
REQUEST:
curl -X 'GET' \
'http://172.70.1.5:8080/domibus/ext/archive/sanity-mechanism/start-date[http://172.70.1.5:8080/domibus/ext/archive/sanity-mechanism/start-date[http://172.70.1.5:8080/domibus/ext/archive/sanity-mechanism/start-datehttp://172.70.1.5:8080/domibus/ext/archive/sanity-mechanism/start-date]]'
\
-H 'accept: application/json' \RESPONSE:
21120100(PUT) Request to Export a Batch by Batch ID
This REST endpoint will export a new batch with a new batch ID containing the same messages that were already exported in a batch identified by the batch ID provided as a parameter. The batch ID identifying the previously exported batch will not be automatically deleted or modified in the database or on the disk storage. The retention mechanism can potentially delete it later (See ☞ Notification of Expired Batch Deletion).
This endpoint can be used in cases where the export or archival of a batch has failed or it expired as well as for other unexpected situations.
The request contains a batch ID that has been extracted, for instance, from the history of batch requests (See ☞ History of Exported Batches).
HTTP method: PUT
-
Parameters:
batch id -
Request (example):
curl -X 'PUT' \
'http://172.70.1.5:8080/domibus/ext/archive/batches/9a0c6088-70ac-43b1-ab57-2f9d1f0204b7/export'
\
-H 'accept: application/json'-
Response (example):
{
"batchId": "9a0c6088-70ac-43b1-ab57-2f9d1f0204b7",
"status": " EXPORTED",
"timestamp": "2021-06-25T12:00:00Z"
}-
Response (example with error) :
{
"batchId": "9a0c6088-70ac-43b1-ab57-2f9d1f0204b7",
"status": "ERROR",
"message": "Failed to request a manual export",
"timestamp": "2021-06-25T12:00:00Z"
}(PUT) Notification from the eArchiving Client
Notification from the archiving client that it has successfully archived or failed to archive a specific batch: This REST endpoint will be used by the archiving client to confirm that a batch was archived successfully or that it failed to archive it. The request contains the batch identifier which allows Domibus to identify all messages in the batch to mark them as archived and eligible for purging.
|
Note
|
For performance reasons, Domibus will asynchronously mark the batch messages as archived. |
And so this REST endpoint only confirms to the client that it has acknowledged the notification and it does not mean that the batch messages are already marked as archived.
Sample REST Call
-
HTTP method: PUT
-
Parameters:
-
batchId: batch id -
status: sets final batch status:-
ARCHIVED– batch was successfully archived, -
ARCHIVE_FAILED: client failed to archive exported batch
-
-
message: set message – reason for failed batch
-
-
Request:
curl -X 'PUT' \
'http://172.70.1.5:8080/domibus/ext/archive/batches/exported/9a0c6088-70ac-43b1-ab57-2f9d1f0204b7/close?status=ARCHIVED'
\
-H 'accept: application/json'-
Response:
{
"batchId": "9a0c6088-70ac-43b1-ab57-2f9d1f0204b7",
"status": "ARCHIVED"
}(PUT) Set Continuous Export’s Current Start Date
This REST endpoint forces the continuous archiving process to start at a given date provided by the user. All messages older than this date will be consider for archiving if they are not already archived, not deleted and in a final state.
Sample REST Call
-
HTTP method: PUT
-
Parameters:
-
MessageStartDate:Start date and hour. The value is 8 digit number with formatyyMMddHH!
-
REQUEST:
curl -X 'PUT' \
'http://172.70.1.5:8080/domibus/ext/archive/continuous-mechanism/start-date?messageStartDate=21100100'(PUT) Set Sanity Export’s Current Start Date
This REST endpoint forces the sanity archiving process to start at a given date provided by the user. All messages older than this date will be consider for archiving if they are not already archived, not deleted and in a final state.
Sample REST Call
-
HTTP method: PUT
-
Parameters:
-
MessageStartDate: Start date and hour. The value is 8 digit number with formatyyMMddHH!
-
REQUEST:
curl -X 'PUT' \
'http://172.70.1.5:8080/domibus/ext/archive/sanity-mechanism/start-date?messageStartDate=21100100'
\eArchiving Client API
Retry Configuration
Notifications to the eArchiving client are retried in case of failure/unavailability.
The property domibus.earchive.notification.timeout is used to set the timeout to:
- Connection Request Timeout
-
Timeout when requesting a connection from the connection manager.
- Connect Timeout
-
Timeout when the server is down/ unavailable/ wrong URL/ DNS error.
- Socket Timeout
-
Timeout when packages take too long to reach in the exchange.
This mechanism is done with a jms queue DomibusEArchiveNotificationQueue (jms/domibus.internal.earchive.notification.queue)
by default the configuration is:
-
maximumRedeliveries: 6 times -
redeliveryDelay: 1800000 milliseconds -
concurrency: 1-1 (domibus.earchive.notification.queue.concurrency)
In case of failure, the messages is redirected to the queue DomibusEArchiveNotificationDLQ
(jms/queue/DomibusEArchiveNotificationDLQ).
(PUT) Receive Exported Batch Notification
Receive notification when a batch has been exported in the shared folder.
Domibus notifies the archiving client when a batch has been exported in the shared folder. The notification is performed for a successful and for a failed export.
Sample REST Call
REQUEST:
-
REST endpoint example:/domibus/archive/batches/\{batch_id:.+}/export-notification
-
HTTP method: PUT
REQUEST:
{
"batchId": "e7c99242-5362-11ec-b6f6-0242ac460105",
"requestType": "CONTINUOUS",
"status": "FAILED",
"timestamp": "2021-12-02T11:28:00Z",
"messageStartDate": 21100100,
"messageEndDate": 21100102,
"messages": [
"ea69b73d-4f74-11ec-9039-0242ac460105@domibus.eu",
"eabbf5f0-4f74-11ec-9039-0242ac460105@domibus.eu",
"eafaaca3-4f74-11ec-9039-0242ac460105@domibus.eu",
"eb38ee26-4f74-11ec-9039-0242ac460105@domibus.eu",
"eb744979-4f74-11ec-9039-0242ac460105@domibus.eu"
],
"errorCode": "BUS-089",
"errorDescription": "Export failed batch: [e7c99242-5362-11ec-b6f6-0242ac460105]. Error message: Can not read payload!"
}{
"batch_id": "9a0c6088-70ac-43b1-ab57-2f9d1f0204b7",
"request_type": "continuous",
"status": "failed",
"error_code": "DOM_001",
"error_description": "Failed to export batch",
"timestamp": "2021-06-25T12:00:00Z",
"message_start_date": "2021-01-25T12:00:00Z",
"message_end_date": "2021-01-26T12:00:00Z",
"messages": [
"123c6088-70ac-43b1-ab57-2f9d1f0204b7",
"567c6088-70ac-43b1-ab57-2f9d1f0204b7"
]
}RESPONSE: Empty response with HTTP 200 status.
(PUT) Receive Deleted Expired Batch Notification
Domibus notifies the archiving client when it deletes an expired batch.
|
See Also
|
|
REQUEST:
-
REST endpoint example: /domibus/archive/batches/\{batch_id:.+}/stale-notification
-
HTTP method: PUT
REQUEST:
{
"batch_id": "9a0c6088-70ac-43b1-ab57-2f9d1f0204b7",
"request_type": "continuous",
"status": "success",
"timestamp": "2021-06-25T12:00:00Z",
"message_start_date": "2021-01-25T12:00:00Z",
"message_end_date": "2021-01-26T12:00:00Z",
"messages": [
"123c6088-70ac-43b1-ab57-2f9d1f0204b7",
"567c6088-70ac-43b1-ab57-2f9d1f0204b7"
]
}RESPONSE:
Empty response with HTTP 200 status.
5.8. Database Partitioning
Partitioning allows tables, indexes, and index-organized tables to be subdivided into smaller pieces, enabling these database objects to be managed and accessed at a finer level of granularity.
Domibus may be configured to use partitions on Oracle database. It uses interval partitions by range for the main table and partitions by reference for the other tables.
Domibus partitions are created based on the format of the primary key and the granularity is of one hour.
Date and hour prefixed key format: YMMDDHH<10digits_increment>
Example:
-
220329130000000001where:-
22032913is the datehour prefix and -
0000000001is the 10 digits sequence increment.
-
5.8.1. Configure partitions – Oracle
-
Open a command line session, log in and execute the following commands:
sqlplus sys as sysdba /* Password should be the one assigned during the Oracle installation */ -
Once logged in Oracle:
GRANT CREATE JOB TO <edelivery_user>;
CONNECT <edelivery_user> (1)
SHOW USER; /* Should return: <edelivery_user>. */
@oracle-<x.y.z>-partitioning.ddl (2)

EXIT
Where:
-
<edelivery_user>stands for the actual user’s username. -
Should return:
<edelivery_user>. -
x.y.zis 5.1.8 and DDL/SQL scripts must be run with the@sign from the location of the scripts.
When run, the partitioning SQL script:
-
Creates partitions: Domibus uses Oracle’s interval partitioning. It is used to automatically to create partitions with a specified interval. It uses interval partitions
-
by range for the main table
TB_USER_MESSAGEand partitions -
by reference for the other child tables.
Partitioning by Reference allows a child table to inherit the partitioning of its parent table (via a foreign key).
This ensures that both tables remain partitioned consistently.
-
-
The Oracle procedure
PARTITION_TB_USER_MESSAGEcreates partitions forTB_USER_MESSAGEtable. By default, it creates a partition with nameP1970. This partition is always kept so the referencing to other child table is possible.

-
Indexes in partitioned tables can be either
LOCALorGLOBAL.
Local indexes are partitioned in the same way as the underlying table and, in this index, each partition has its own index segment. This is for improved partitioned query performance. The partitioning alters SQL scripts, and ensures the child inherits partitions from the parent table.
When a message is send in Domibus using partitioned database, a new partition with a name starting with SYS_ is created in the TB_USER_MESSAGE table.
|
Note
|
Partitioning is not yet implemented for MySql. |
5.8.2. Partition Maintenance Guidelines
For optimal maintenance regarding your partitioning, have the following in mind:
- Partition Limitations
-
Oracle imposes a physical limit of 1,048,575 partitions for any table type. For a fresh Domibus installation, this equates to 1,048,573 available slots, each assigned an interval of one hour. When a table is interval-partitioned, it is automatically pre-allocated the maximum possible number of slots. This occurs regardless of the partitioning key format used in Domibus.
- Partition Growth & Data Retention
-
Unless partitions are explicitly dropped (see Data Retention with Partitions), the maximum slot limit is reached in approximately 1.5 years.
- Resetting Interval Boundaries
-
To reset the interval’s boundaries, execute the following SQL commands:
sql
ALTER TABLE tb_user_message SET INTERVAL ();
ALTER TABLE tb_user_message SET INTERVAL (10000000000);
- Execution Considerations
-
If the system is under a high load, execution of these commands may timeout. To ensure successful execution, it is recommended to retry in a less loaded environment.
5.8.3. Data retention with partitions
With partitions, a new retention mechanism is in place for Domibus. It is possible to configure Domibus to delete messages by dropping an entire partition, once all messages on a specific partition have expired.
On conf/domibus/domibus.properties, following property is set:
domibus.retentionWorker.deletion.strategy= PARTITIONSThe retention mechanism is guided by the retention values configured in the PMode. It computes the maximum retention period for all messages (received, downloaded, sent or failed) and only verifies partitions that are beyond this maximum value. This increases the chances that each partition is only verified once before being dropped.
Once all messages on a partition have expired, partition is dropped (all messages are deleted at once).
There is a direct dependency between the archiving mechanism and the retention mechanism. When archiving is enabled, retention will not delete messages unless they were previously archived. For one partition, the retention mechanism checks that all messages are both expired and archived before droping the partition.
5.8.4. Partitions alerts
Following the logic described in $13.2- Data retention with partitions, all messages on a partition that is verified for expiration should already be in the final state. If some messages are not in the final state, an alert is triggered. The frequency of the alert may be configured in conf/domibus/domibus.properties and by default is 1 (one alert per day).
#Frequency in days between alerts
domibus.alert.partition.expiration.frequency_days=1
5.9. Non repudiation
In order to guarantee non-repudiation, the sending Access Point (C2) stores the full SignalMessage, including the MessageInfo, the Receipt (that contains the NonRepudiationInformation for each part) and the signature of the receipt by the receiver Access Point (C3).
This will guarantee that the receiver Access Point (C3) cannot deny having received a message from the sender Access Point (C2) during the sending process. However, if the initial sender (C1) wants to be sure that the final recipient (C4) cannot deny having received a specific content inside this message, then the sender must be able to show the specific content that was used to produce the receiver Access Point (C3) signature.
Domibus, as a sending Access Point (C2), keeps track of the metadata of the sent messages but does not store the actual message payloads. Therefore it is recommended that the initial sender (C1) stores the message payloads safely for the time needed to guarantee non-repudiation of the sent messages.
In order to guarantee non-repudiation, the receiving Access Point (C3) stores the full UserMessage and the associated signature of the sender (C2).
This will guarantee that the sender Access Point (C2) cannot deny having sent a message to the receiver during the sending process. However, if the final recipient (C4) wants to be sure that the sender cannot deny having sent a specific content inside this message, then the final recipient (C4) must be able to show the specific content that was used to produce the sender Access Point signature (C2).
Domibus, as a receiving Access Point (C3), keeps track of the metadata of the received messages and will store the message payloads, only for the (limited) duration configured in the retention period (specified in the PMode). Therefore it is recommended that the final recipient (C4) either stores the message payloads safely or aligns the retention period on the receiving Access Point (C3) with the time needed to guarantee non-repudiation of the received messages.
5.10. TLS Configuration
5.10.1. TLS Configuration
Transport Layer Security in Domibus
In addition to the message level security, Domibus may be configured to exchange messages using TLS (HTTPS). The use of TLS is mandatory according to the eDelivery AS4 profile. However, you can choose to configure it in the Access Point itself or delegate it to another appropriate network component.
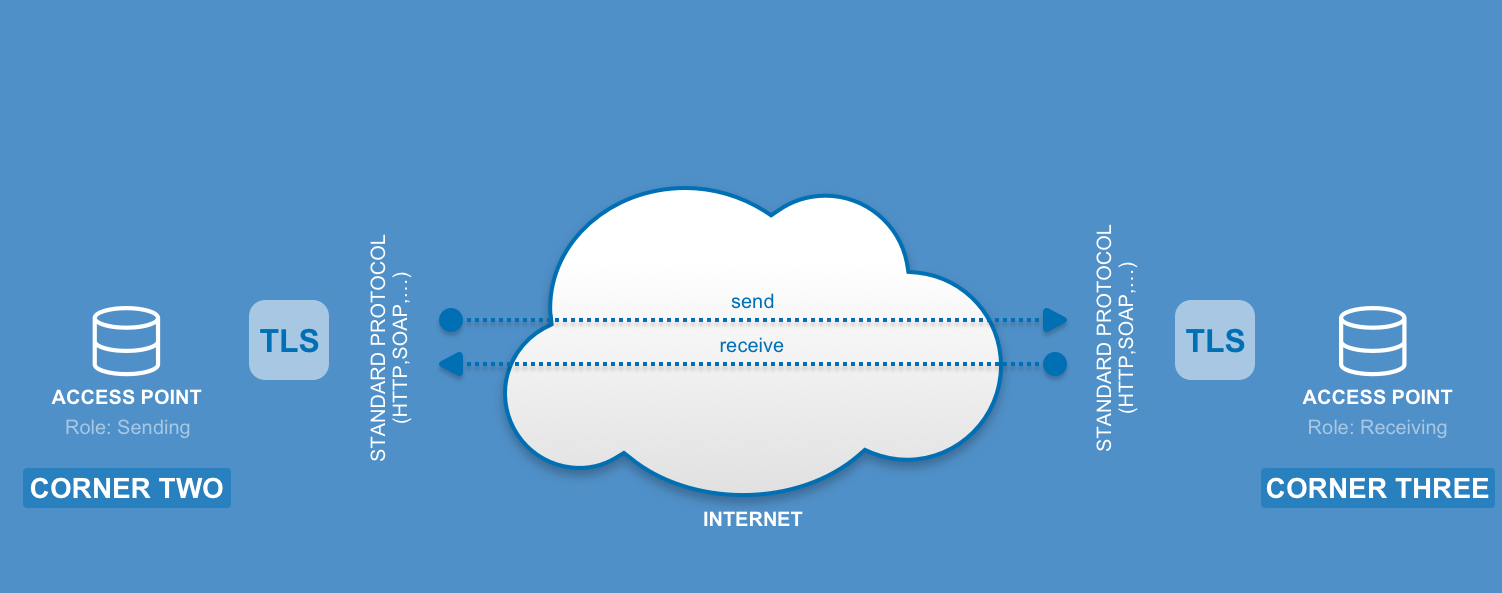
Client Side Configuration
The implementation of the Domibus MSH is based on the CXF framework. According to CXF documentation, when using an HTTPS URL, CXF will, by default, use the certs and keystores that are part of the JDK. For many HTTPs applications, that is enough and no configuration is necessary. However, when using custom client certificates or self-signed server certificates or similar, you may need to specifically configure in the keystores and trust managers and such to establish the SSL connection.
Apache provides full description of all possible configuration of the tlsClientParameters, see http://cxf.apache.org/docs/client-http-transport-including-ssl-support.html%23ClientHTTPTransport(includingSSLsupport)-ConfiguringSSLSupport.
In Domibus, the TLS configuration is read from the file
<edelivery_path>/conf/domibus/clientauthentication.xml and it is
used as fallback when Domibus is configured in multi tenancy mode.
In multi tenancy mode, the file name is prefixed by the domain name and
it is located in the
<edelivery_path>/conf/domibus/domains/domain_name (f.i.:
domain_name_clientauthentication.xml).
(QUESTION, what is f.i.)
Below example presents two possible configurations, One-Way SSL and Two-Way SSL:
clientauthentication.xml)<http-conf:tlsClientParameters
disableCNCheck="true"
secureSocketProtocol="TLSv1.2"
xmlns:http-conf="http://cxf.apache.org/transports/http/configuration"
xmlns:security="http://cxf.apache.org/configuration/security">
<security:trustManagers>
<security:keyStore
type="JKS"
password="_your_trustore_password_"
file="$\{domibus.config.location}/keystores/_your_trustore_ssl_.jks"/>
</security:trustManagers>
</http-conf:tlsClientParameters>In One-Way SSL, the sender validates the signature of the receiver using
the public certificate of the receiver, provided in your_trustore_ssl.jks.
clientauthentication.xml)<http-conf:tlsClientParameters
disableCNCheck="true"
secureSocketProtocol="TLSv1.2"
xmlns:http-conf="http://cxf.apache.org/transports/http/configuration"
xmlns:security="http://cxf.apache.org/configuration/security">
<security:trustManagers>
<security:keyStore
type="JKS"
password="_your_trustore_password_"
file="$\{domibus.config.location}/keystores/_your_trustore_ssl_.jks"/>
</security:trustManagers>
<security:keyManagers keyPassword="_your_keystore_password_">
<security:keyStore
type="JKS"
password="_your_keystore_password_"
file="$\{domibus.config.location}/keystores/_your_keystore_ssl_.jks"/>
</security:keyManagers>
</http-conf:tlsClientParameters>In Two-Way SSL, both the sender and the receiver sign the request and validate the trust of the other party. In addition to the public certificate of the receiver (your_trustore_ssl.jks), the private certificate of the sender is also configured (your_keystore_ssl.jks).
|
Note
|
TLSv1.2 is mandatory for eDelivery AS4 Profile. |
When self-signed certificates are used, the CN check must be disabled:
disableCNCheck="true".
The attribute disableCNCheck specifies whether JSSE should omit
checking if the host name specified in the URL matches the host name
specified in the Common Name (CN) of the server certificate. The
attribute is "false" by default and must not be set to "true" during
production use.
Server side configuration
Tomcat 9.x
In Server.xml, add a new connector with the SSLEnabled attribute set
to TRUE:
<Connector SSLEnabled="true"
     protocol="org.apache.coyote.http11.Http11NioProtocol"
     port="8443" maxThreads="200"
     scheme="https" secure="true"
    keystoreFile="$\{domibus.config.location}/keystores/_your_keystore_ssl_.jks"
    keystorePass="_your_keystore_password_"
     clientAuth="false" sslProtocol="TLS" />
The keystore jks location and password must be specified, otherwise the default ones will be taken into account.
TLS version can also be specified.
The above connector has clientAuth="false", which means that only the
server has to authenticate itself (One Way SSL). To configure "Two Way
SSL", which is optional in the eDelivery AS4 Profile, set
clientAuth="true" in Server.xml and provide the location of the
your_truststore_ssl.jks file so that the server can verify the client:
<Connector SSLEnabled="true"
    protocol="org.apache.coyote.http11.Http11NioProtocol"
    port="_8443_"
    maxThreads="_200_"
    scheme="https"
    secure="true"
    keystoreFile="$\{domibus.config.location}/keystores/_your_keystore_ssl_.jks"
    keystorePass="_your_keystore_password_"
    truststoreFile="$\{domibus.config.location}/keystores/_your_truststore_ssl_.jks"
    truststorePass="_your_trustore_password_"
    clientAuth="true"
    sslProtocol="TLS" />
WebLogic
-
Specify the use of SSL on default port 7002:
Go to menu:Servers[ server_name > Configuration > General] then click on btn:[Client Cert Proxy Enabled]:

-
Add keystore and truststore:
Go to Servers select Server Name Configuration Keystores and SSL tabs and use Custom Identity and Custom Trust then set keystore and truststore jks.
Disable basic authentication at WebLogic level:
By default WebLogic performs its own basic authentication checks before passing the request to Domibus. As we want basic authentication to be performed by Domibus, we need to disable it at the application server level.
To do so, in DOMAIN_HOME/config/config.xml add the following highlighted section:
<security-configuration>
    <enforce-valid-basic-auth-credentials>false</enforce-valid-basic-auth-credentials>
</security-configuration>
WildFly
The keystore JKS (e.g: bluek.jks) location and password must be specified in the standalone-full.xml file as follows.
In this setup only the server has to authenticate itself (One Way SSL).
<security-realms>
    <security-realm name="ApplicationRealm">
        <server-identities>
            <ssl>
                <keystore
                    path="../../conf/domibus/keystores/bluek.jks"
                    relative-to="jboss.server.config.dir"
                    keystore-password="test123"
                    alias="blue_gw"
                    key-password="test123"/>
            </ssl>
        </server-identities>
        <authentication>
            <local default-user="$local" allowed-users="*" skip-group-loading="true"/>
            <properties path="application-users.properties" relative-to="jboss.server.config.dir"/>
        </authentication>
        <authorization>
            <properties path="application-roles.properties" relative-to="jboss.server.config.dir"/>
        </authorization>
    </security-realm>
</security-realms>-
add https-listener to default-server:
<server name="default-server">
    <http-listener name="default"
        socket-binding="http"
        redirect-socket="https"
        enable-http2="true"/>
    <https-listener name="https"
        socket-binding="https"
        security-realm="ApplicationRealm"
        enable-http2="true"/>
    <host name="default-host" alias="localhost">
        <location name="/" handler="welcome-content"/>
        <filter-ref name="server-header"/>
        <filter-ref name="x-powered-by-header"/>
        <http-invoker security-realm="ApplicationRealm"/>
    </host>
</server>
To configure "Two Way SSL", which is optional in the eDelivery AS4
Profile, add the following details to the standalone-full.xml file and
provide the location of the your_truststore_ssl.jks file (e.g.
g_truststore.jks) so that the server can verify the client:
<security-realms>
    <security-realm name="ApplicationRealm">
            <server-identities>
                <ssl>
                    <keystore path="../../conf/domibus/keystores/bluek.jks"
                        relative-to="jboss.server.config.dir"
                        keystore-password="test123"
                        alias="blue_gw" key-password="test123"/>
                </ssl>
            </server-identities>
            <authentication>
                <local default-user="$local" allowed-users="*" skip-group-loading="true"/>
                <properties path="application-users.properties" relative-to="jboss.server.config.dir"/>
                <truststore
                    path="../conf/domibus/keystores/g_truststore.jks"
                    relative-to="jboss.server.base.dir"
                    keystore-password="test123" />
            </authentication>
            <authorization>
                <properties path="application-roles.properties" relative-to="jboss.server.config.dir"/>
            </authorization>
        </security-realm>
</security-realms>
Configure Basic and Certificates authentication in SoapUI
Go to File Preferences HTTP Settings and check the option Adds authentication information to outgoing requests:
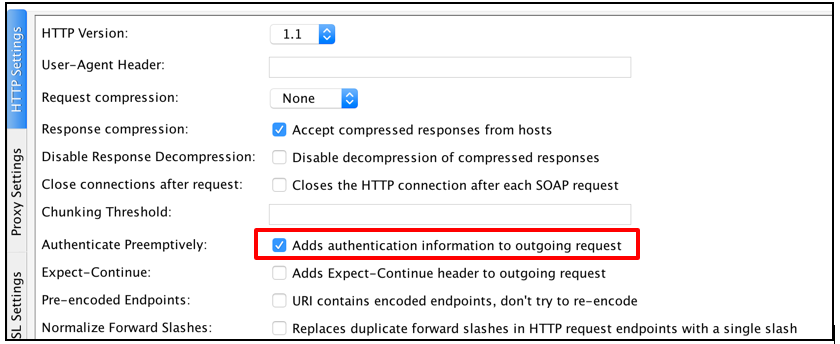
Go to File Preferences SSL Settings, add the KeyStore and KeyStore Password and check the option requires client authentication:
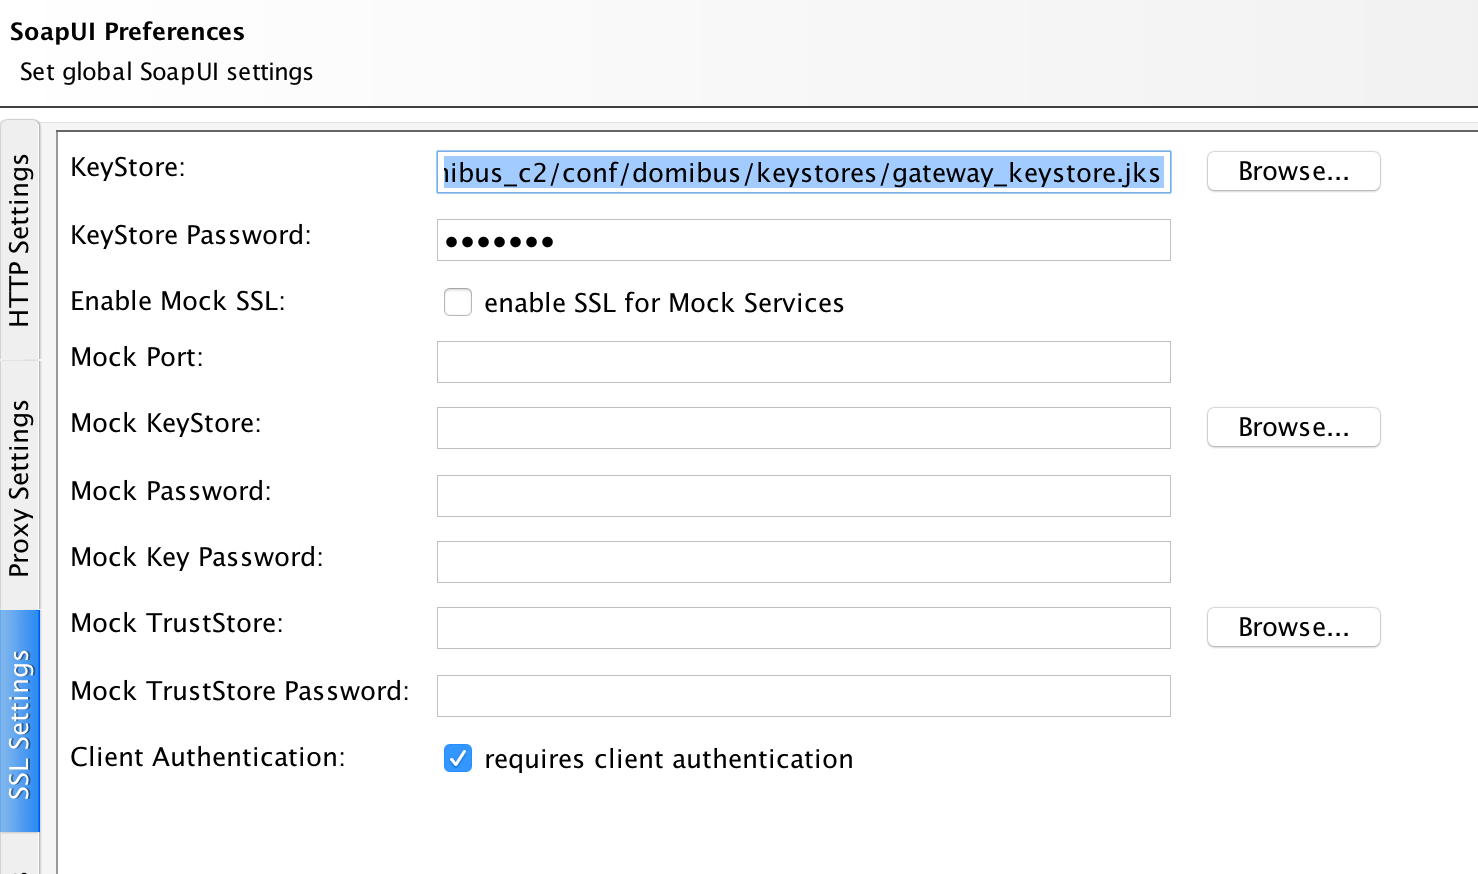
To allow Basic Authentication, select the Auth tab, click Add New
Authorization and select Basic. Enter user and password (e.g. Username =
admin; for the password, look in the logs for the phrase: “Default
password for user admin is”):
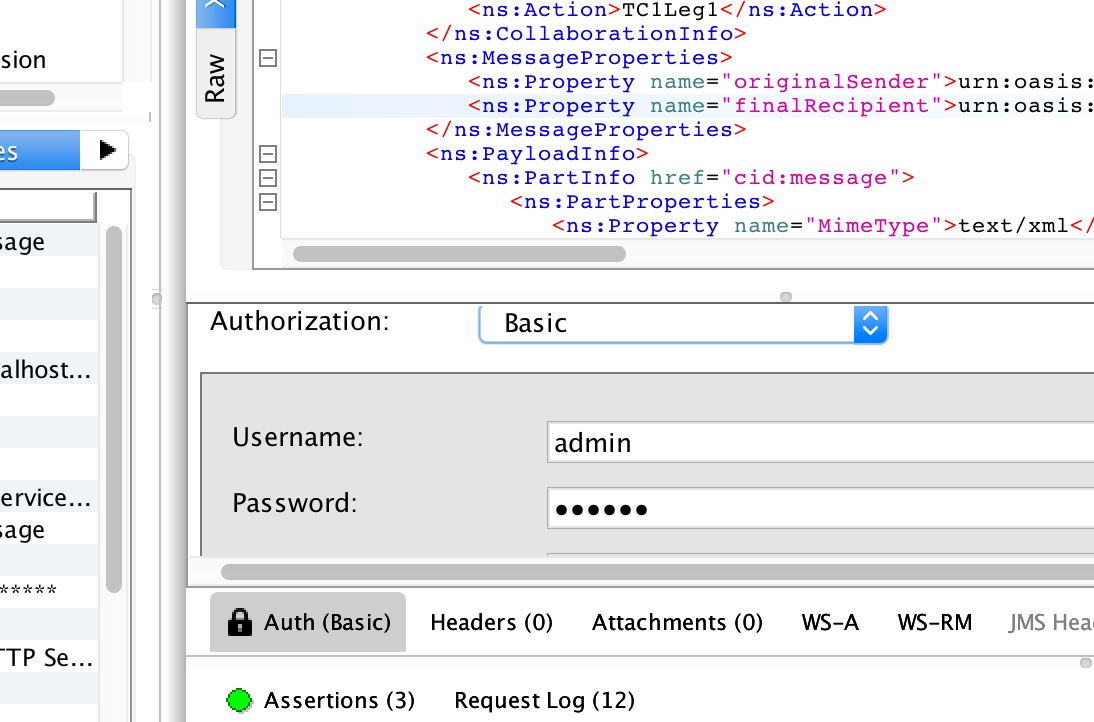
PMode update
If you enable HTTPS, then your PMode Configuration Manager needs to make sure that all other endpoint PModes are modified accordingly.
With the SSL connector configured as above, the MSH endpoint is now:
https://your_domibus_host:8443/domibus/services/msh.
After the updates, upload the PModes via the Admin Console:
<party
    name="party_id_name1"
    endpoint="https:// party_id_name1_hostname:8443/domibus/services/msh"/>
5.11. Dynamic Discovery of unknown participants
5.11.1. Overview
In a dynamic discovery setup, the sender and/or the receiver parties and their capabilities are not configured in advance.
The sending Access Point will dynamically retrieve the necessary information for setting up an interoperability process from the Service Metadata Publisher (SMP). The SMP stores the interoperability metadata which is a set of information about the recipient or end entity (its identifier, supported business documents and processes) and AP (metadata which includes technical configuration information about the receiving endpoint, such as the transport protocol and its address).
The receiving AP registers its metadata in the SMP and configures the PMode to be able to accept messages from trusted senders that are not previously configured in the PMode. The receiving AP will have to configure one process in its PMode for each SMP entry.
|
Note
|
The sender does not have to be registered in the SMP and the receiver merely extracts its identifier from the received message. |
The mapping between the PMode process and the SMP entry is defined for PEPPOL and OASIS.
|
See Also
|
For more information on how to configure Domibus AP to use Dynamic Discovery, see: |
5.11.2. Domibus configuration for PEPPOL
To enable the integration with the SMP/SML components, Domibus requires
some changes in the domibus.properties configuration file which include:
-
Adding the following properties to enable the usage of the PEPPOL dynamic discovery client:
domibus.dynamicdiscovery.client.specification=PEPPOL -
Setting the dynamic discovery client to use certificates to access the SMP. These certificates are different in TEST and PRODUCTION environments, therefore we need to specify the Mode used by the dynamic discovery client by setting the following property:
domibus.dynamicdiscovery.peppolclient.mode=TEST -
Setting the
domibus.smlzoneproperty.
5.11.3. PMode configuration for PEPPOL
Sender PMode
|
Important
|
In a dynamic discovery process, the receiver of the messages is not
known beforehand and therefore the PMode.Responder parameter should not be set.
|
The dynamic discovery process must include a leg which maps the
configured entry (action, service and service type,
see ☞ Message Format in PEPPOL) of
the Receiver in the SMP.
The security policy to be used in the leg is the policy that embeds the Binary Security Token into the security header:
security="eDeliveryAS4Policy_BST"
Sample Sender PMODE configuration extract
<services>
    <service name="testService1"
        value="urn:www.cenbii.eu:profile:bii05:ver2.0"
        type="cenbii-procid-ubl"/>
</services>
<actions>
    <action name="tc1Action"
            value=" busdox-docid-qns::urn:oasis:names:specification:ubl:schema:xsd:CreditNote-2::CreditNote##urn:www.cenbii...."/>
</actions>
<securities>
    <security name="eDeliveryAS4Policy_BST"
        policy="eDeliveryAS4Policy_BST.xml"
        signatureMethod="RSA_SHA256"/>
</securities>
<legConfigurations>
    <legConfiguration name="pushTestcase1tc1Action"
        service="testService1"
        action="tc1Action"
        defaultMpc="defaultMpc"
        reliability="AS4Reliability"
        security="eDeliveryAS4Policy_BST"
        receptionAwareness="receptionAwareness"
        propertySet="eDeliveryPropertySet"
        payloadProfile="MessageProfile"
        errorHandling="demoErrorHandling"
        compressPayloads="true"/>
</legConfigurations>
<process name="tc1Process"
    agreement="agreementEmpty"
    mep="oneway"
    inding="push"
    initiatorRole="defaultInitiatorRole"
    responderRole="defaultResponderRole">
    <initiatorParties>
        <initiatorParty name="senderalias"/>
    </initiatorParties>
    <!-- no responderParties element -->
    <legs>
        <leg name="pushTestcase1tc1Action"/>
    </legs>
</process>|
See Also
|
Receiver PMode
Dynamic discovery configuration of the receiver is similar to the configuration of the sender, except that the roles are swapped: the sender of the messages is not known beforehand.
|
Important
|
As a consequence the PMode.Initiator parameter should not be set.
|
<process name="tc1Process"
    agreement="agreementEmpty"
    mep="oneway"
    inding="push"
    initiatorRole="defaultInitiatorRole"
    responderRole="defaultResponderRole">
    <responderParties>
        <responderParty name="receiveralias"/>
    </responderParties>
    <!-- no initiatorParties element -->
    <legs>
        <leg name="pushTestcase1tc1Action"/>
    </legs>
</process>
Sender and Receiver PMode
Dynamic discovery configuration when the Access Point acts as both sender and receiver would look like these following lines:
<services>
    <service name="testService1"
    value="urn:www.cenbii.eu:profile:bii05:ver2.0"
    type="cenbii-procid-ubl"/>
</services>
<actions>
    <action name="tc1Action"
        value=" busdox-docid-qns::urn:oasis:names:specification:ubl:schema:xsd:CreditNote-2::CreditNote##urn:www.cenbii...."/>
</actions>
<securities>
    <security name="eDeliveryAS4Policy_BST"
        policy="eDeliveryAS4Policy_BST.xml"
        signatureMethod="RSA_SHA256"/>
</securities>
<legConfigurations>
    <legConfiguration name="pushTestcase1tc1Action"
        service="testService1"
        action="tc1Action"
        defaultMpc="defaultMpc"
        reliability="AS4Reliability"
        security="eDeliveryAS4Policy_BST"
        receptionAwareness="receptionAwareness"
        propertySet="eDeliveryPropertySet"
        payloadProfile="MessageProfile"
        errorHandling="demoErrorHandling"
        compressPayloads="true"/>
</legConfigurations>
<process name="tc1Process"
    agreement="agreementEmpty"
    mep="oneway"
    inding="push"
    initiatorRole="defaultInitiatorRole"
    responderRole="defaultResponderRole">
    <initiatorParties>
        <initiatorParty name="senderalias"/>
    </initiatorParties>
    <!-- no responderParties element -->
    <legs>
        <leg name="pushTestcase1tc1Action"/>
    </legs>
</process>
<process name="tc2Process"
    agreement="agreementEmpty"
    mep="oneway"
    inding="push"
    initiatorRole="defaultInitiatorRole"
    responderRole="defaultResponderRole">
    <responderParties>
        <responderParty name="receiveralias"/>
    </responderParties>
    <!-- no initiatorParties element -->
    <legs>
        <leg name="pushTestcase1tc1Action"/>
    </legs>
</process>
5.11.4. Policy and certificates for PEPPOL
The receiver must include the certificate of the trusted authority(ies) in its truststore. It will only accept messages that were signed with certificates issued by the trusted authority(ies).
|
See Also
|
For more information, see Usage of certificates in PEPPOL and OASIS. |
5.11.5. Message format for PEPPOL
When dynamic discovery is used, the "to" field should not be statically configured in the PMode (the "to" field may even be omitted in the message). The lookup is performed by C2 based on the finalRecipient message property.
|
Note
|
In Peppol, the service@type has a fixed value
while the service@value is made of ProcessIdentifier@Scheme::ProcessIdentifier.
|
finalRecipient for dynamic discovery:<ns:UserMessage>
<ns:PartyInfo>
<ns:From>
<ns:PartyId
type="urn:fdc:peppol.eu:2017:identifiers:ap">senderalias</ns:PartyId>
<ns:Role>
http://docs.oasis-open.org/ebxml-msg/ebms/v3.0/ns/core/200704/initiator</ns:Role>
</ns:From>
<ns:To>
</ns:To>
</ns:PartyInfo>
<ns:CollaborationInfo>
<ns:Service
type="cenbii-procid-ubl">urn:www.cenbii.eu:profile:bii05:ver2.0</ns:Service>
<ns:Action>
busdox-docid-qns::urn:oasis:names:specification:ubl:schema:xsd:CreditNote-2::CreditNote##urn:www.cenbii.eu:transaction:biitrns014:ver2.0:extended:urn:www.pepp.eu:bis:peppol5a:ver2.0::2.1</ns:Action>
</ns:CollaborationInfo>
<ns:MessageProperties>
<ns:Property
name="originalSender">urn:oasis:names:tc:ebcore:partyid-type:unregistered:C1</ns:Property>
<ns:Property
name="finalRecipient"
type="iso6523-actorid-upis">0007:9340033829test1</ns:Property>
</ns:MessageProperties>
</ns:UserMessage>5.11.6. SMP entry
The following table describes the mapping between the PMode static configuration and the dynamic SMP records structure:
| SMP Endpoint registration record | PMode attributes |
|---|---|
ServiceMetadata/ServiceInformation/ProcessIdentifier |
PMode[1].BusinessInfo.Service |
ServiceMetadata/ServiceInformation/DocumentIdentifier |
Pmode[1].BusinessInfo.Action |
ServiceInformation/Processlist/Process/ServiceEndpointList/Endpoint/EndpointReference/Address |
Pmode[].Protocol.Address |
The Service Metadata Record also provides the receiving end certificate. This certificate can be used to encrypt the message to be sent to the receiver. The certificate provides also the name of the Access Point for this PMode by using the Certificate CNAME as the Party identifier. Dynamically discovered parties will have the same Party Identifier and Party Name.
5.11.7. Domibus configuration for OASIS
To enable the integration with the SMP/SML components, Domibus requires
some changes in the domibus.properties configuration file:
-
Add the following properties to enable the usage of the OASIS dynamic discovery client:
domibus.dynamicdiscovery.client.specification"> OASISNotethis property is not mandatory as it defaults to the above value. -
Set the property
domibus.smlzone, e.g.ehealth.acc.edelivery.tech.ec.europa.eu
5.11.8. PMode configuration for OASIS
Sender PMode
In a dynamic discovery process, the receiver of the messages is not known beforehand and therefore the PMode.Responder parameter SHOULD NOT be set.
The dynamic discovery process must include a leg which maps the configured entry (action, service and service type, see Message Format for PEPPOL) of the Receiver in the SMP.
The security policy to be used in the leg is the policy that embeds the Binary Security Token into the security header (see Security Policies):
security="eDeliveryAS4Policy_BST"
-
Sample Sender PMODE configuration extract:
<services>
    <service
            name="testService1"
            value="urn:www.cenbii.eu:profile:bii05:ver2.0"
            type="cenbii-procid-ubl"/>
    </services>
    <actions>
        <action name="tc1Action"
            value="'your-schema-name'::urn:oasis:names:specification:ubl:schema:xsd:CreditNote-2::CreditNote##urn:www.cenbii...."/>
    </actions>
    <securities>
        <security name="eDeliveryAS4Policy_BST"
                policy="eDeliveryAS4Policy_BST.xml"
                signatureMethod="RSA_SHA256"/>
    </securities>
    <legConfigurations>
        <legConfiguration name="pushTestcase1tc1Action"
            service="testService1"
            action="tc1Action"
            defaultMpc="defaultMpc"
            reliability="AS4Reliability"
            security="eDeliveryAS4Policy_BST"
            receptionAwareness="receptionAwareness"
            propertySet="eDeliveryPropertySet"
            payloadProfile="MessageProfile"
            errorHandling="demoErrorHandling"
            compressPayloads="true"/>
    </legConfigurations>
    <process name="tc1Process"
        agreement="agreementEmpty"
        mep="oneway"
        inding="push"
        initiatorRole="defaultInitiatorRole"
        responderRole="defaultResponderRole">
    <initiatorParties>
        <initiatorParty name="senderalias"/>
    </initiatorParties>
    <!-- no responderParties element -->
    <legs>
        <leg name="pushTestcase1tc1Action"/>
    </legs>
</process>|
Note
|
Schema name should be added to action value. E.g: *ehealth-actorid-qns::urn:oasis:names:specification:ubl:schema:xsd:CreditNote-2::CreditNote##urn:www.cenbii…*_ |
Receiver PMode
The dynamic discovery configuration of the receiver is similar to the configuration of the sender, except that the roles are swapped: the sender of the messages is not known beforehand. As a consequence, the PMode.Initiator parameter SHOULD NOT be set.
<process name="tc1Process"
    agreement="agreementEmpty"
    mep="oneway"
    inding="push"
    initiatorRole="defaultInitiatorRole"
    responderRole="defaultResponderRole">
    <responderParties>
        <responderParty name="receiveralias"/>
    </responderParties>
    <!-- no initiatorParties element -->
    <legs>
        <leg name="pushTestcase1tc1Action"/>
    </legs>
</process>
5.11.9. Policy and certificates for OASIS
The receiver must include the certificate of the trusted authority(ies) in its truststore. It will only accept messages that were signed with certificates issued by the trusted authority(ies).
The sender truststore must include the SMP public certificate. This certificate is used by the AP to validate the identity of the used SMP.
|
See Also
|
For more information, see Usage of certificates in PEPPOL and OASIS. |
5.11.10. Message format for OASIS
When dynamic discovery is used, the "to" field should not be statically configured in the PMode (the "to" field may even be omitted in the message). The lookup is performed by C2 based on the finalRecipient message property.
Example of message using the finalRecipient for dynamic discovery:
<ns:UserMessage>
    <ns:PartyInfo>
        <ns:From>
            <ns:PartyId
                type="urn:oasis:names:tc:ebcore:partyid-type:unregistered">senderalias
            </ns:PartyId>
            <ns:Role>
                http://docs.oasis-open.org/ebxml-msg/ebms/v3.0/ns/core/200704/initiator
            </ns:Role>
        </ns:From>
        <ns:To>
        </ns:To>
    </ns:PartyInfo>
    <ns:CollaborationInfo>
        <ns:Service
            type="cenbii-procid-ubl">urn:www.cenbii.eu:profile:bii05:ver2.0</ns:Service>
        <ns:Action>your_schema_name::urn:oasis:names:specification:ubl:schema:xsd:CreditNote-2::CreditNote##urn:www.cenbii.eu:transaction:biitrns014:ver2.0:extended:urn:www.peppol.eu:bis:peppol5a:ver2.0::2.1</ns:Action>
    </ns:CollaborationInfo>
    <ns:MessageProperties>
        <ns:Property
            name="originalSender">urn:oasis:names:tc:ebcore:partyid-type:unregistered:C1</ns:Property>
        <ns:Property name="finalRecipient" type="iso6523-actorid-upis">0007:9340033829test1</ns:Property>
    </ns:MessageProperties>
</ns:UserMessage>
5.12. Message pulling
5.12.1. Setup
In order to configure message pulling, the process section should be
configured with mep set to oneway and binding set to pull as shown
in the following example:
<process name="tc1Process"
    agreement="agreementEmpty"
    mep="oneway"
    binding="pull"
    initiatorRole="defaultInitiatorRole"
    responderRole="defaultResponderRole">
    <initiatorParties>
        <initiatorParty name="initiatoralias"/>
    </initiatorParties >
    <responderParties>
        <responderParty name="receiveralias"/>
    </responderParties>
    <!-- no initiatorParties element -->
    <legs>
        <leg name="pushTestcase1tc1Action"/>
    </legs>
</process>
In the case of a pull process, the initiatorParties section contains
the party that initiate the pull request. The responderParties section
contains the parties that can be pulled from.
In domibus.properties configuration file, adapt the following properties
to your needs. Note that domibus.msh.pull.cron and domibus.pull.queue.concurrency are mandatory.
#Cron expression used for configuring the message puller scheduling.
#domibus.msh.pull.cron=0 0 0/1 * * ?

# Number of threads used to parallelize the pull requests.
#domibus.pull.queue.concurency=1-1

# Number of threads used to parallelize the pull receipts.
#domibus.pull.receipt.queue.concurrency=1-1

#Number or requests executed every cron cycle
#domibus.pull.request.send.per.job.cycle=1

#Time in second for the system to recover its full pull capacity when
job schedule is one execution per second.
#If configured to 0, no incremental frequency is executed and the pull
pace is executed at its maximum.
#domibus.pull.request.frequency.recovery.time=0

#Number of connection failure before the system decrease the pull
pace.
#domibus.pull.request.frequency.error.count=10

#Pull Retry Worker execution interval as a cron expression
#domibus.pull.retry.cron=0/10 * * * * ?
If high frequency pulling is used (job configured every second), it is
possible to configure the system to lower the pulling frequency in case
the counterpart access point is unavalailable. Per default if the other
access point returns errors 10 times in a row
(domibus.pull.request.frequency.error.count) the number of pull requests
per job cycle will fall to 1 per mpc. As from the moment, the
counterpart access point is responding again, Domibus will take the
amount of seconds configured within the
domibus.pull.request.frequency.recovery.time property to recover the
pulling pace configured within the
domibus.pull.request.send.per.job.cycle property.
Per default, domibus.pull.request.frequency.recovery.time=0 which means that the throttling mechanism is off.
The following properties are used for dynamic pulling and are recommended to be used only with a custom authorization extension:
#Allow dynamic initiator on pull requests - 0 or multiple initiators are
allowed in the PMode process
#domibus.pull.dynamic.initiator=false

#Allow multiple legs configured on the same pull process (with the same
security policy)
#domibus.pull.multiple_legs=false

#Force message into READY_TO_PULL when mpc attribute is present
#domibus.pull.force_by_mpc=true

#Mpc initiator separator. This is used when the mpc provides information
on the initiator: baseMpc/SEPARATOR/partyName

#domibus.pull.mpc_initiator_separator=PID
5.12.2. Configuration restriction
A correctly configured one-way pull process should only contain one party configured in the initiatorParties section.
Different legConfiguration with the same defaultMpc (highlighted in red in the following configuration) should not be configured in the same pull process or across different pull processes.
If those restrictions are not respected, the message will not be exchanged and a warning message will detail the configuration problem.
<legConfiguration name="pushTestcase1tc2Action"
    service="testService1"
    action="tc2Action"
    defaultMpc="*defaultMpc*"
    reliability="AS4Reliability"
    security="eDeliveryAs4Policy"
    receptionAwareness="receptionAwareness"
    propertySet="eDeliveryPropertySet"
    payloadProfile="MessageProfile"
    errorHandling="demoErrorHandling"
    compressPayloads="true"/>
5.13. Multitenancy
Domibus supports multiple tenant domains configured in one Domibus instance. This means that each tenant domain has its own configuration (PMode, keystore, truststore and Domibus properties, etc). These multiple configurations allow one Domibus instance to process messages from multiple tenant domains simultaneously.
The global properties are located in the domibus.properties file,
located in the root folder, along with the general logback.xml file,
plugins and domains folders:
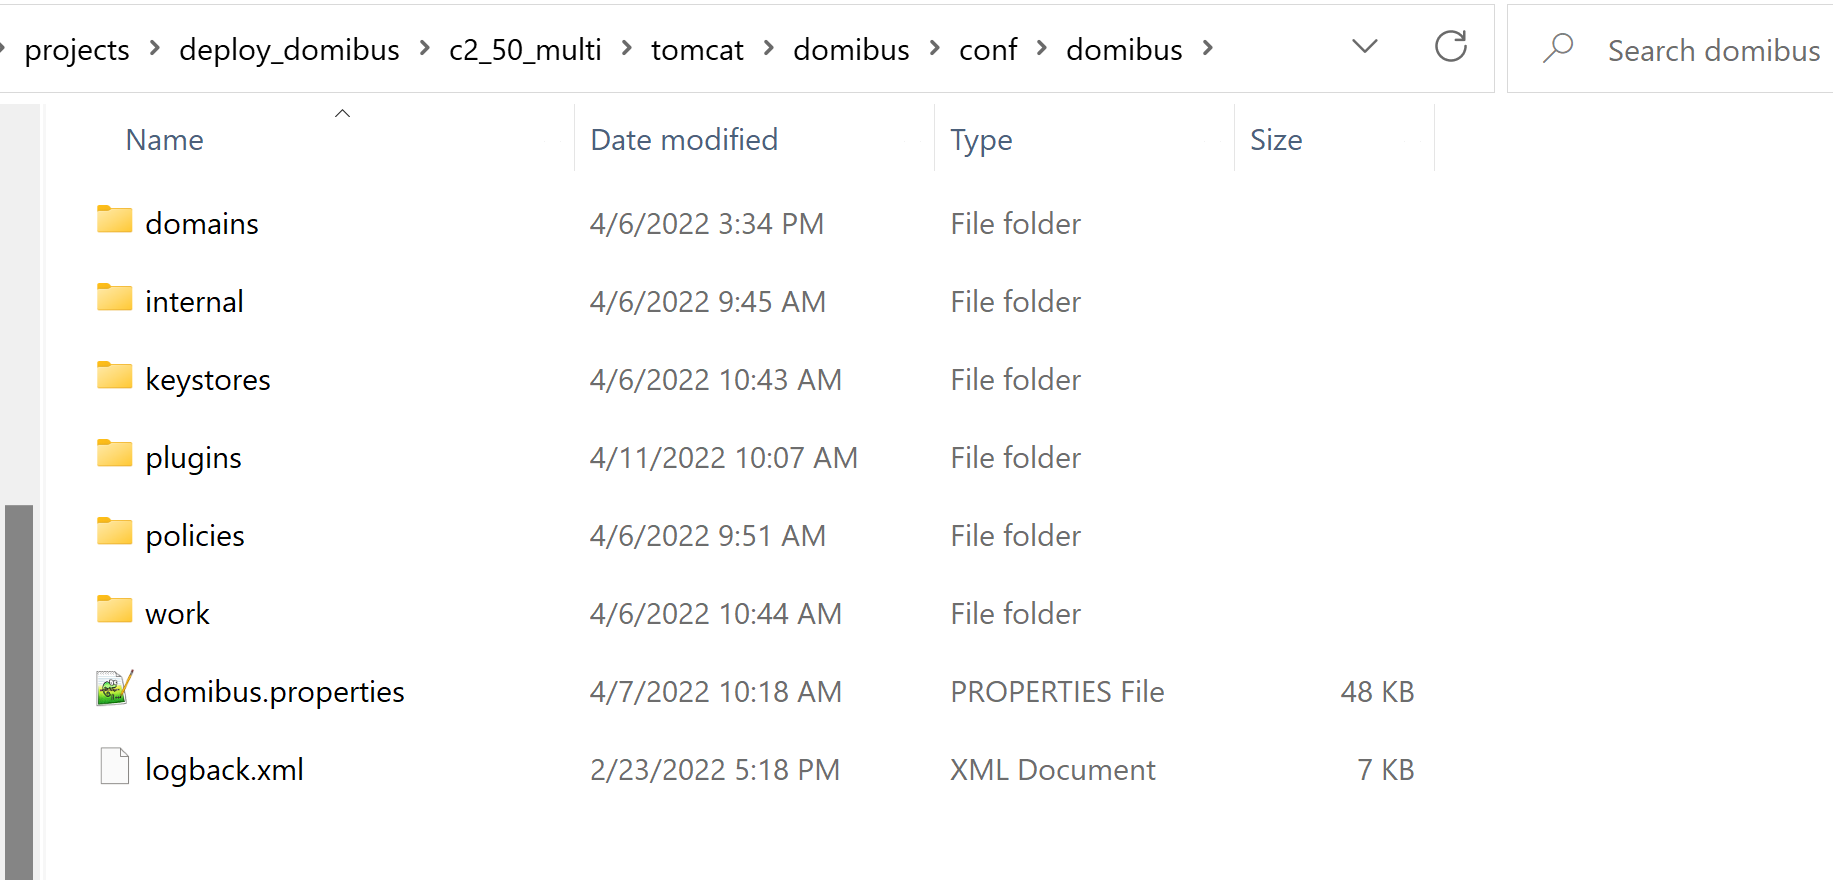
In the root folder there is also a folder called "domains", where the
domain specific artefacts are located. The domain-specific artefacts are
grouped in domain-specific folders like: <edelivery_path>/conf/domibus/domains/domain_name/
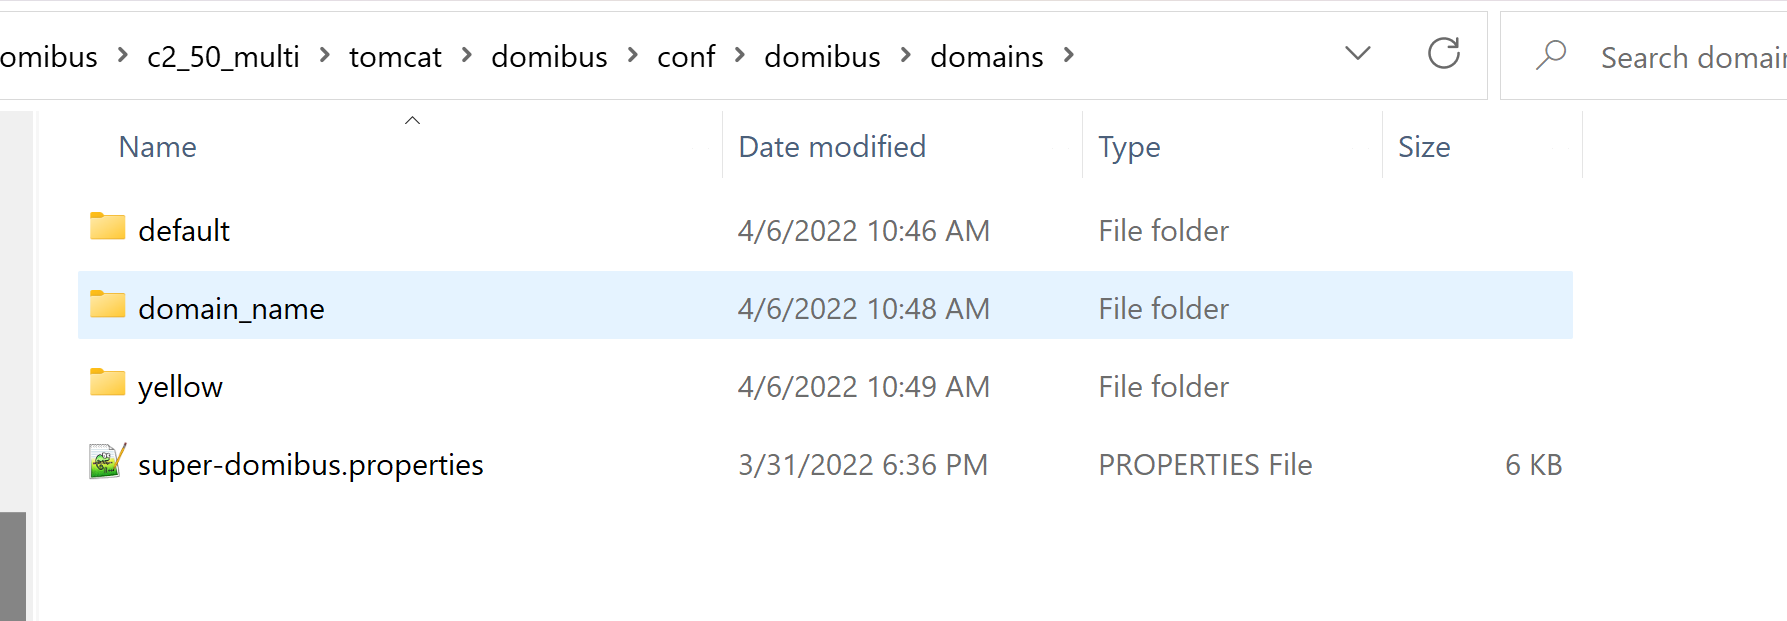
Inside each domain-specific folder you can find a:
-
keystoresfolder that contains the Domibus keystore, truststore and TLS truststore, -
clientauthentication.xmlfile prefixed with the domain name with the description of the TLS TrustStore, -
logback.xmlfile prefixed with the domain name and -
domibus.propertiesfile, also prefixed with the domain name.
Domibus uses a Schema per tenant strategy to implement Multitenancy, meaning that the data associated to a tenant domain will be saved in a database schema dedicated to that specific domain.
In case of plugins, the structure follows the same logic: the global
properties files are located in the <edelivery_path>/conf/domibus/plugins/config/ folder:
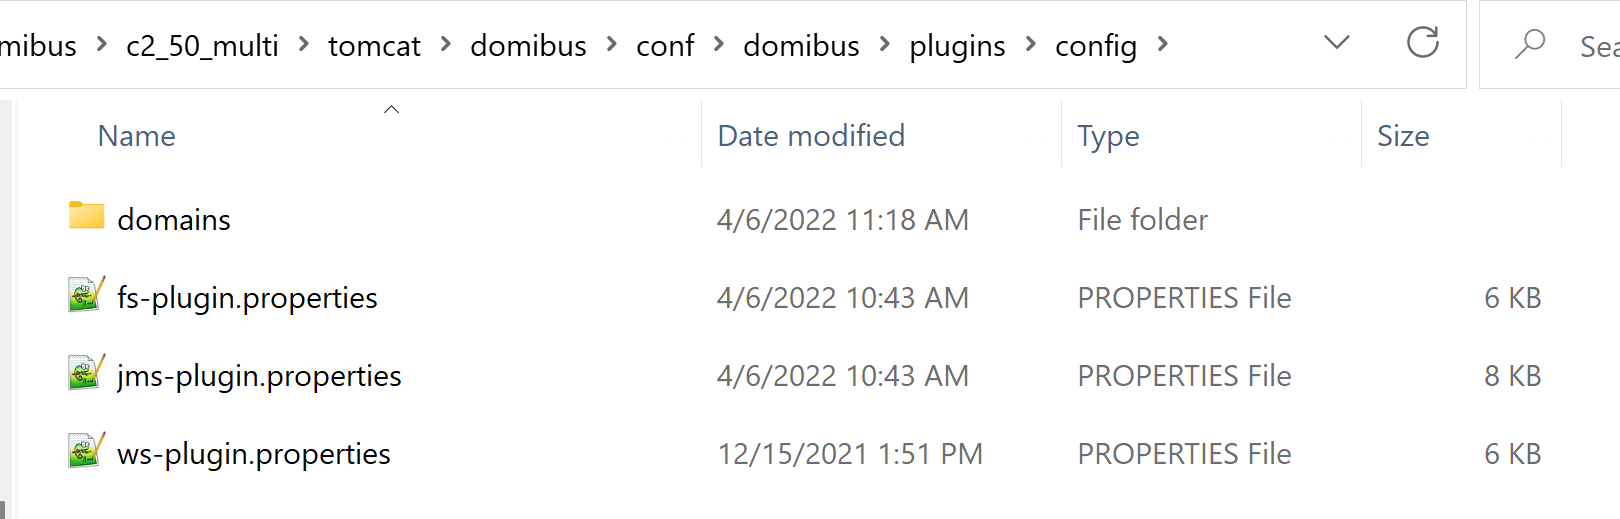
while the domain specific properties are located under the “domains” folder, in files prefixed with the domain name as below:

5.13.1. Configuration
By default, Multitenancy is not activated. In order to activate
Multitenancy, the following property that defines the database general
schema needs to be configured in domibus.properties.
For Weblogic, this step can only be done after changing the Schema username and password as described in ☞ Weblogic and Wildly Multitenancy Configuration:
domibus.database.general.schema=general_schema
Where general_schema is the database schema in which the association
between users and domains is stored. The general_schema is not
associated to any domain.
Database general schema
Configure the MySQL or Oracle datasource as indicated in Pre-Configured Single Server Deployment.
The general_schema needs to be initialized using the distributed database
script mysql-5.1.8-multitenancy.ddl for MySQL or oracle-5.1.8-multitenancy.ddl for Oracle.
Find below the steps needed to create the general_schema for MySQL and Oracle.
MySQL
-
Unzip
domibus-msh-distribution-5.1.8-sql-scripts.zipinto<edelivery_path>/sql-scripts -
Open a command prompt and navigate to this directory:
<edelivery_path>/sql-scripts. -
Execute the following MySQL commands at the command prompt:
mysql -h localhost -u <root_user> --password=<root_password> -e \
DROP SCHEMA IF EXISTS <general_schema>;
CREATE SCHEMA <general_schema>;
ALTER DATABASE <general_schema> charset=utf8mb4 collate=utf8mb4_bin;
CREATE USER <edelivery_user>@localhost IDENTIFIED BY 'edelivery_password';
GRANT ALL ON <general_schema>.* TO <edelivery_use>@localhost;
mysql -h localhost -u <root_user> --password=<root_password> -e \
GRANT <xa_recover_admin> ON *.* TO <edelivery_user>@localhost;The above script creates:
-
a schema,
<general_schema> -
a user,
<edelivery_user>, with all the privileges in the<general_schema>.
|
Note
|
The edelivery_user creation can be skipped if the user already exists.
You need to make sure the user edelivery_user is granted full rights in all schemas
used for all the domains.
|
mysql -h localhost -u <edelivery_user> --password=<edelivery_password> \
<general_schema> < mysql-<x.y.z>-multi-tenancy.ddl (1)
mysql -h localhost -u <edelivery_user> --password=<edelivery_password> \
<general_schema> < mysql-<x.y.z>-multi-tenancy-data.ddl (2)
Where:
-
<edelivery_user>and<edelivery_password>are your system’s relevant user and password. -
x.y.zstands for the Domibus version (5.1.8).
The command above creates the required objects in <general_schema>.
Oracle
-
Unzip
domibus-msh-distribution-5.1.8-sql-scripts.zipin<edelivery_path>/sql-scripts -
Open a command prompt and navigate to the following directory:
<edelivery_path>/sql-scripts -
Execute the following commands at the command prompt:
sqlplus sys as sysdba (1)Where:
-
The password should be the one assigned during the Oracle installation.
Once logged in Oracle:
CREATE USER <edelivery_general_user> IDENTIFIED BY <edelivery_general_password> (1)
DEFAULT TABLESPACE <tablespace>
QUOTA UNLIMITED ON <tablespace>;
GRANT CREATE SESSION TO <edelivery_general_user>;
GRANT CREATE TABLE TO <edelivery_general_user>;
GRANT CREATE SEQUENCE TO <edelivery_general_user>;
GRANT CREATE JOB TO <edelivery_general_user>;
GRANT EXECUTE ON DBMS_XA TO <edelivery_general_user>;
GRANT SELECT ON PENDING_TRANS$ TO <edelivery_general_user>;
GRANT SELECT ON DBA_2PC_PENDING TO <edelivery_general_user>;
GRANT SELECT ON DBA_PENDING_TRANSACTIONS TO <edelivery_general_user>;
CONNECT <edelivery_general_user>
SHOW USER; /* Should return: <edelivery_general_user>. */
@oracle-<x.y.z>-multi-tenancy-data.ddl
EXIT
Where:
-
Values represented as
<token>, are placeholders for the corresponding values in your environment or Domibus installation scenario.-
<edelivery_general_user>and<edelivery_general_password>correspond to the username and password of the corresponding user in your environment. -
<tablespace>is created and assigned by your DBA. For local/test installations just replace it with users tablespace. The quota can be limited to a specific size. -
DDL/SQL scripts must be run with the
@sign from the location of the scripts. -
<x.y.z>stands for the Domibus version (5.1.8).
-
Creating new tenant domains
A new tenant domain can be created by adding a domain specific
configuration file under the <edelivery_path>/conf/domibus/domains
directory. The domain configuration file name must start with the new
tenant domain name (domain_name) using the following convention:
domain_name-domibus.properties
The tenant domain_name value is case-sensitive. It is a 50-character
sequence of Unicode letters, digits or underscores characters. It must
start with a letter and the subsequent characters may be letters, digits
or underscore characters.
Each tenant domain uses its own dedicated schema which is configured in the domain configuration file and has its own keystore, Truststore configured.
All artefacts pertaining to a domain are located within its directory (keystores, TLS configuration file, properties file, logback, etc.).
It is also possible to add or remove a domain dynamically, without stopping the Domibus, using the Domains page of the admin console:
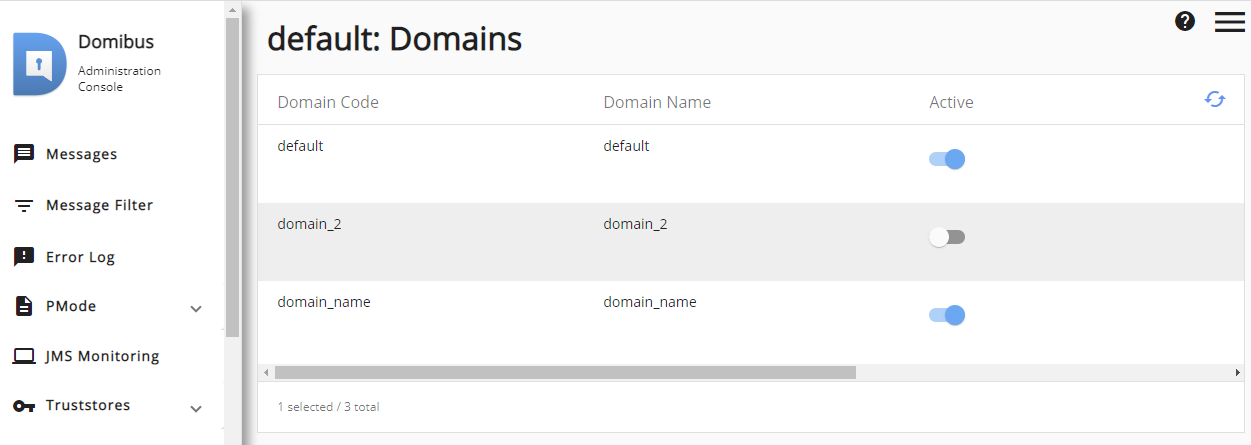
Please keep in mind that prior to adding a domain at runtime, you must create a folder for it in the “domains folder and add the needed artefacts into the folder, like properties file, keystores, etc. Once done, you must click on the Refresh button so that the new domain appears in the list as shown above. To activate or de-activate a domain, please use the button under Active. To add a domain at runtime, this domain should be active in the Domains section of the admin Console.
The tenant domain database schema, including the default domain, must be
initialized using the distributed database script mysql-5.1.8.ddl or oracle-5.1.8.ddl.
For more on how to execute these scripts, go to Database Configuration.
The database user used to connect to the general_schema schema must
have the necessary privileges to access the database schemas for all the
configured tenant domains.
Follow the steps in the next section, for each database type.
MySQL
-
Execute the MySQL commands below at the command prompt.
If the user
edelivery_general_useris the one having rights on general schema for a particular domain schema, just run:mysql -h localhost -u <root_user> --password=<root_password> -e \ "GRANT ALL ON <domain_schema>.* TO <edelivery_general_user>@localhost;" -
Repeat this command for all the other domains, including the default domain.
Oracle
-
Extract
domibus-msh-distribution-5.1.8-sql-scripts.zipinto<edelivery_path>/sql-scripts. -
Open a command prompt and navigate to this directory:
<edelivery_path>/sql-scripts. -
Open a command line session, log in and execute the following commands to connect to current domain schema:
sqlplus <domain_user>/<domain_password>@host:port/service.
Once logged in Oracle:
@oracle-<x.y.z>-multi-tenancy-rights.sql (1)Where:
-
<x.y.z>stands for Domibus version number, 5.1.8.
Before running this script, edit it and just replace domain_schema and
general_schema values with the desired values. Repeat this command for
each domain of the Multitenancy installation, including the default
domain.
This script needs to be run after completing a migration of domain Domibus schema (new objects - table, view, sequence – could be added in current domain schema).
Once Multitenancy is activated and with no other additional
configuration, Domibus will use the tenant domain named default for
the incoming and outgoing messages. The tenant domain default is
configured in default-domibus.properties.
|
See Also
|
For more information on how Multitenancy is implemented in Domibus, see Domibus Software Architecture Document. |
Tomcat
The Domibus database in Tomcat is configured in the domibus.properties
file.
Running Domibus in Multitenancy mode requires that some related database properties are adapted as shown in the example below.
|
Note
|
when using Tomcat with Multitenancy, the user
should tweak the number of threads defined in the variable
domibus.taskExecutor.threadCount, depending on its configuration. See also, Domibus Properties Reference Guide |
domibus.database.general.schema=general_schema
# General schema.
# Mandatory only if Domibus is configured in multitenancy mode.
#
#domibus.database.general.schema=general_schema

# Domibus schema. If Domibus is configured in multi-tenancy mode this
# property is used to define the schema for the default domain.

# Comment the property below, if Domibus is configured in
# single-tenancy mode with Oracle database.
#
domibus.database.schema=domibus

# Non-XA Datasource
# MySQL
# Connector/J 8.0.x
#
#domibus.datasource.driverClassName=com.mysql.cj.jdbc.Driver
#domibus.datasource.url=jdbc:mysql://$\{domibus.database.serverName}:$\{domibus.database.port}/$\{domibus.database.schema}?useSSL=false&useLegacyDatetimeCode=false&serverTimezone=UTC

# Oracle
#
#domibus.datasource.driverClassName=oracle.jdbc.OracleDriver
#domibus.datasource.url=jdbc:oracle:thin:@$\{domibus.database.serverName}:$\{domibus.database.port}/XE
#domibus.datasource.user=edelivery
#domibus.datasource.password=edelivery
Configuring domain-specific properties
Within the tenant domain_name-domibus.properties file, the domain_name
field must be replaced by the actual name of the tenant domain as shown
in the following sample of the dom50-domibus.properties example, where
dom50 is the domain name created:
# Title shown in the Tab of Admin Console
dom50.domibus.UI.title.name=windowTitle

# Name of the domain
dom50.domain.title=domainTitle

# Number of console login attempt before the user is deactivated (default 5)
dom50.domibus.console.login.maximum.attempt=5

# Time in seconds for a suspended user to be reactivated.
# (1 hour per default if property is not set, if 0 the user will not be reactivated)
dom50.domibus.console.login.suspension.time=3600

# Max rows for CSV export
dom50.domibus.ui.csv.max.rows=10000# Location of the keystore
dom50.domibus.security.keystore.location=$\{domibus.config.location}/keystores/dom1_keystore.jks
# Type of the used keystore
dom50.domibus.security.keystore.type=jks
# Password used to load the keystore
dom50.domibus.security.keystore.password=test123
# Private key
# Alias from the keystore of the private key
dom50.domibus.security.key.private.alias=blue_gwWebLogic and WildFly
Most of the database configuration for WebLogic and WildFly is done in
the application server. The datasources configured in the application
server need to be configured with the user and password that has access
to the general_schema schema and to all the domain schemas. At runtime
the database schema will be changed based on the current domain.
WebLogic specific configuration
Activate the Multitenancy by configuring the following property in
domibus.properties:
domibus.database.general.schema=general_schema
Disable basic authentication at the WebLogic level by setting the
following property in DOMAIN_HOME/config/config.xml (End of the
<security-configuration> tag):
<enforce-valid-basic-auth-credentials>false</enforce-valid-basic-auth-credentials><security-configuration>
<node-manager-password-encrypted>\{AES}hFKbHz7XZ19urplEtWmafYeUm9mr2yXEwyNC9ZpqJHY=</node-manager-password-encrypted>
<enforce-valid-basic-auth-credentials>false</enforce-valid-basic-auth-credentials>
</security-configuration>|
Note
|
Weblogic might not start properly if the property
|
5.13.2. PMode
In multitenant mode, each domain has its own PMode file, including the default domain.
When you are logged in as a superuser, you can select the
current domain from the dropdown found in the top right corner.
|
See Also
|
For instructions on how to upload the specific PMode file for each domain, see Uploading New Configuration. |
When C2 wants to send messages to a C3 running in Multitenancy mode, the endpoint URL of C3 configured in the C2 PMode can contain the domain name at the end, configured as an HTTP parameter to indicate the domain that will receive the message.
Example:
Let us suppose that C3 exposes the MSH endpoint under the URL: http://localhost:8080/domibus/service/msh. If C2 wants to send messages to C3 to the domain DIGIT, it will call the following MSH C3 endpoint URL:
In case C2 does not specify the domain in the endpoint URL, the message will be sent to the C3 default domain.
5.13.3. Tenant domain Properties
The properties listed in the table below are used to configure a domain.
Some of them must be set here with a specific value for the tenant
domain while for most it is not mandatory as they can fall back to the
corresponding properties defined in domibus.properties. All the
properties defined in a tenant domain property file (e.g.
domain_name.-domibus.properties) need to be prefixed by the domain
name and override the properties from the domibus.properties file.
Example:
-
If the domain name is digit, the property file
digit-domibus.propertiesis used to configure that domain. -
Defining a property named
digit.domibus.msh.messageid.suffixoverrides thedomibus.msh.messageid.suffixproperty defined in thedomibus.propertiesfile.
For each domain, including the default domain, set the properties found
in Keystore/Truststore section and also set the domain_name.domibus.database.schema property.
| Domain Configuration Property | If not defined defaults + to domibus.properties |
|---|---|
|
no |
|
yes |
|
yes |
|
yes |
|
yes |
|
yes |
|
yes |
|
yes |
|
yes |
|
yes |
|
yes |
|
yes |
|
yes |
|
yes |
|
yes |
|
yes |
|
yes |
|
yes |
|
yes |
|
yes |
|
yes |
|
yes |
|
yes |
|
yes |
|
yes |
|
yes |
|
yes |
|
no |
|
no |
|
yes |
|
no |
|
no |
Accepted characters are: !\"#$%&\'()*+,-./0123456789:;<=>?@ABCDEFGHIJKLMNOPQRSTUVWXYZ[\\]^_`abcdefghijklmnopqrstuvwxyz\{|}~
Please note that |
- |
|
- |
!\"#$%&\'()*+,-./0123456789:;<=>?@ABCDEFGHIJKLMNOPQRSTUVWXYZ[\\]^_`abcdefghijklmnopqrstuvwxyz\{|}~
Please note that |
- |
|
no |
|
no |
!\"#$%&\'()*+,-./0123456789:;<=>?@ABCDEFGHIJKLMNOPQRSTUVWXYZ[\\]^_`abcdefghijklmnopqrstuvwxyz\{|}~
Please note that |
- |
|
yes |
|
yes |
|
yes |
|
yes |
|
yes |
|
yes |
|
yes |
|
yes |
|
yes |
|
yes |
|
- |
|
- |
|
|
|
|
|
TRUE |
|
FALSE |
|
|
|
|
|
|
|
|
|
|
|
TRUE |
|
SEND_FAILURE |
|
HIGH |
|
Message status change |
|
TRUE |
|
LOW |
|
Login failure |
|
TRUE |
|
HIGH |
|
WHEN_BLOCKED |
|
Account disabled |
|
TRUE |
|
|
|
HIGH |
|
Certificate imminent expiration |
|
TRUE |
|
|
|
|
|
HIGH |
|
Certificate expired |
|
yes |
|
yes |
|
|
|
|
|
yes |
|
yes |
|
yes |
|
yes |
|
Note
|
A tenant domain property is mandatory to be defined if it does not
default to domain.properties.
|
5.13.4. Super Properties
The properties that are specific to super users (ROLE_AP_ADMIN) are
defined in a separate file called super-domibus.properties, a file
that can be found along with the others. These properties are related to
password policy and alert configuration for super users.
5.13.5. Logging
Domibus generates logs in three log files when running in non Multitenancy mode:
-
domibus.log -
domibus-business.log -
domibus-security.log
These are configured in the logback.xml file.
|
See Also
|
For more about information, see Logging. |
In Multitenancy mode, the following is expected:
- Main files
-
domibus.log,business.logandsecurity.logdo not contain any domain specific logging information, only general logging information. - Per domain files
-
such as
domain1-domibus.log,domain1-business.loganddomain1-security.logwill contain logging entries only for the specific domaindomain1. - For each domain
-
it is mandatory to add a
domain logback.xmlfile. Including the default one.ImportantIf this file is missing, the logging information may be lost for that domain.
When running in Multitenancy mode, the Domibus log configuration file logback.xml has to be modified as followed:
-
Uncomment all the sections marked like this the one below:
<!-- multitenancy: uncomment this <filter class="eu.domibus.logging.DomibusLoggerDomainFilter"> <domain></domain> <OnMismatch>DENY</OnMismatch> </filter> --> -
Edit the file to include the log configuration for each domain.
This is necessary to segregate the log statements per tenant domain, each tenant domain having its own set of the 3 logs files mentioned above:<!-- multitenancy: start include domains config files here --> <!--<include optional="true" file="$\{catalina.home}/conf/domibus/domain_name-logback.xml"/>--> <!-- multitenancy: end include domains config files here --> -
Add a domain config file for the default domain.
To configure the logs per domain, follow the steps below:
-
Customize the
domain_name-logback.xmlfile distributed in each server configuration archive. -
Rename the
domain_name-logback.xmlfile according to the domain name. E.g. if the domain name isdomain1, the file should be renamed todomain1-logback.xml. -
Adapt the value of the
domainNamevariable defined in the domain logback configuration file.
The value should correspond to the name of the configured domain.<included> <property name="domainName" value="domain1" scope="local" />
-
-
Include the domain configuration file into the main
logback.xmlfile:<configuration> <!-- start include domains config files here --> <include optional="true" file="$\{catalina.home}/conf/domibus/<domain1>-logback.xml"/> -
To add some particular logging information per domain, include a configuration section in the domain’s specific logback file as seen in the example below.
Example, a domain nameddomain1<!-- Editing a file named domain1-logback.xml per this example --> <!-- To add the section below --> <logger name="${domainName}.eu.domibus.somepackage” level="DEBUG" additivity="false"> (1) <appender-ref ref="${domainName}-file"/> (2) <appender-ref ref="stdout"/> (3) </logger>Where:
-
eu.domibus.somepackageis the name of the package for setting DEBUG level. -
${domainName}-fileis the appender ofdomain1. -
This line is optional and it prints the DEBUG info on the server console.
NoteThis mechanism applies only to eu.domibusloggers. Loggers from third-party libraries cannot be configured independently per tenant, these are added to the mainlogback.xmlfile with the settings that apply to all tenants.
5.13.6. Users
In Multitenancy mode there is a new user, super, with role
ROLE_AP_ADMIN which has the privileges to access all the available
domains. The default password for the super user is written in the
logs as “Default password for super user is”.
The first time a new tenant domain is created, the super user creates
a new user in the Domibus Administration Console with role ROLE_ADMIN
associated to the newly created domain.
All normal users (ROLE_ADMIN, ROLE_USER) can be associated to only one domain.
More details on how to create users can be found in the help page of the Users page.
Afterwards the super user sends the credentials to the domain admin user. The domain admin logs into the Domibus Administration Console using the received credentials and has to change its password in the Users page. The domain admin has only access to his domain and he has the privileges to create only new users that are associated to his domain.
|
Note
|
Please note that user names need to be unique amongst existing tenant domains. |
5.13.7. Plugins
When running in Multitenancy mode, the plugins security is activated by
default, no matter if the property domibus.auth.unsecureLoginAllowed
in the domibus.properties files is set to true or not. This is needed
to identify the request performed by the user and associate it to
a specific tenant domain. As a result, every request sent to Domibus
needs to be authenticated.
|
Important
|
The default JMS Plugin requires the creation of additional JMS queues. |
|
See Also
|
For more information on which queues need to be created see the JMS Plugin Interface. |
|
See Also
|
For more information on how Multitenancy is implemented in Domibus, see Domibus Software Architecture Document. |
Plugin Users
In Multitenancy mode, a plugin must use a configured plugin user associated to a specific tenant domain to authenticate every request sent to Domibus. The management of the plugin users is implemented in the Plugin Users page of Domibus Administration Console. For more about how to manage the plugin user see, Plugin Users.
The Default JMS Plugin and the Default FS Plugin implement only authentication mechanism. The two previously mentioned plugins must use any configured plugin user to send requests to Domibus, no matter the role: ROLE_ADMIN or ROLE_USER. The request will be sent to the domain associated to the plugin user used for authentication.
The Default WS Plugin implements authentication and authorization mechanism.
For authentication the Default WS Plugin must use a configured plugin user to send requests to Domibus, the configuration being the same as for the Default JMS Plugin and the Default FS Plugin.
|
See Also
|
Authorization Implementation
For more about how the authorization is implemented in the default WS Plugin Plugin Management and Plugin Development. |
|
Note
|
Usernames need to be unique across existing tenant domains. |
5.13.8. Switching from non Multitenancy to Multitenancy mode
When switching an existing installation of Domibus to Multitenancy mode, you need to perform the instructions described in Multitenancy Configuration.
After the switch to Multitenancy mode is finished, the schema that was previously used in non Multitenancy mode will be used by a specific tenant domain. Additionally the super user must select the migrated tenant domain in Domibus Administration console and re-create the existing users present in the Users and Plugin Users. This step is required because in Multitenancy mode there is an automatic synchronization of domain users into the general schema.
|
See Also
|
For more information on how Multitenancy is implemented in Domibus, see Domibus Software Architecture Document. |
5.14. Alerts
5.14.1. Description
The purpose of the alert feature is to use different available media to notify the Domibus administrator in case of unusual behaviour. Those notifications are presented to the Domibus administrator under the form of configurable alerts. The alerts can be browsed in the Domibus Admin Console in the Alerts section and can be sent by email.
Currently, only email notification channel is available, but other communication media will be added in future releases.
Three topics are available for monitoring:
-
Message status change
-
Authentication issues
-
Certificate expiration.
5.14.2. Main configuration
The properties, described below, can be configured in the
domibus.properties configuration file.
By default, alerts are disabled. To activate alerts, set the following property to TRUE:
.Alert management
# Enable/disable the entire alert module.
# Pay attention to the fact that if the module is activated, all properties
# Under the mandatory section should be configured.
domibus.alert.active=true
If you activate the Alerts module, you need to configure the SMTP server. To configure SMTP, the following properties are mandatory:
# SMTP server url for sending alert
domibus.alert.sender.smtp.url=

# SMTP server port
domibus.alert.sender.smtp.port=

# SMTP server user
domibus.alert.sender.smtp.user=

# SMTP server user password
domibus.alert.sender.smtp.password=

# Alert sender email
domibus.alert.sender.email=

# Alert email receiver.
domibus.alert.receiver.email=
The following properties are already preconfigured with default values and therefore are not mandatory to be configured:
#The following properties can stay commented if no modifications to the default values are needed.
# CRON configuration for cleaning alerts
#domibus.alert.cleaner.cron=0 0 0/1 * * ?

# Alerts lifetime in days of before cleaning
#domibus.alert.cleaner.alert.lifetime=20

# Concurrency to process the alerts
#domibus.alert.queue.concurrency=1

# Frequency of failed alerts retry
#domibus.alert.retry.cron=0 0/1 * * * ?

# Elapsed time in minute between alert retry
#domibus.alert.retry.time=1

# Number of retry for failed alerts
#domibus.alert.retry.max_attempts=2
By default, Domibus checks every hour for expired alerts. The default lifetime for an alert is 20 days after which the alert is deleted from the system.
The concurrency property allows processing multiple alerts in parallel. Alerts can be configured with a retry in case of dispatch failure.
By default Domibus will wait one minute between two alert dispatch attempts, and it will retry twice.
5.14.3. Multitenancy
In Multitenancy mode, the four SMTP properties should be configured in
the main domibus.properties. Indeed only one SMTP server can be
configured for all the tenants.
On the other hand, the sender and receiver properties must be configured in each domain configuration file.
Multitenancy also introduces the existence of a super user.
Authentication alerts can be configured for it. Some specific global
properties have been created for the super user. The following
properties are documented with their default value. They can be
overwritten in domibus.properties file:
# Cron configuration for cleaning alerts.
#domibus.alert.super.cleaner.cron=0 0 0/1 * * ?

# Lifetime in days of alerts before cleaning.
#domibus.alert.super.cleaner.alert.lifetime=20

# Enable/disable the entire alert module.
#domibus.alert.super.active=true

# Allow to disable alert mail sending.
#domibus.alert.super.mail.sending.active=false

# Frequency of failed alerts retry.
#domibus.alert.super.retry.cron=0 0/1 * * * ?

# Elapsed time in minutes between alert retry.
#domibus.alert.super.retry.time=1

# Maximum number of attempts for failed alerts
#domibus.alert.super.retry.max_attempts=2
5.14.4. Message status change alerts
Domibus is able to track Message status changes. All status changes can
be tracked but it is advised not to track the status of frequently
changing statuses (e.g.: From SEND_ENQUEUED to ACKNOWLEDGE) to avoid
being spammed.
Each alert topic (Message status change, authentication and certificate expiration) can be activated or deactivated independently from each other. Pay attention that, in order for the alert feature to work, the main alert module must always be activated (see 20.2 Main configuration).
By default, message status change alerts are not activated. In order to activate them, the following property should be set to true:
#enable/disable the messaging alert module.
domibus.alert.msg.communication_failure.active=true
The following properties are already preconfigured with default values and therefore are not mandatory to be configured:
# Message status change that should be notified by the messaging alert
# module. Comma-separated.
domibus.alert.msg.communication_failure.states=SEND_FAILURE

#Alert levels corresponding to message status defined in previous
# property(domibus.alert.msg.communication_failure.states) .
# Should be (HIGH, MEDIUM or LOW)
domibus.alert.msg.communication_failure.level=HIGH

# Messaging alert module mail subject.
domibus.alert.msg.communication_failure.mail.subject=Message status change
By default, Domibus will only track message status change to SEND_FAILURE. The level of the alert that will be triggered is HIGH. The last property allows configuring the subject of the mail sent.
If there is a need to track another message status change, a comma-separated list can be configured:
`domibus.alert.msg.communication_failure.states=SEND_FAILURE,ACKNOWLEDGED`If there is a need to set an alert level per status change it can also be done with a comma-separated list:
domibus.alert.msg.communication_failure.level=HIGH,LOWIn the example above, the alert level for each of the tracked changes (see, previous example:
* SEND_FAILURE status is set to have a high level of alert, while the
* ACKNOWLEDGED status is set to have a low level of alert.
5.14.5. Authentication Alerts
Domibus is able to track admin console login failure and user account disabling. The login failure alert will occur for each unsuccessful attempt. Note that if the username encoded is unknown to the system, no alert will be created. Only known user with invalid password will be tracked. The account disabled alert will occur either because the user did too many invalid login attempts or because an administrator disabled the account.
By default, login failure alerts are not activated. In order to activate them, the following property should be set to true:
# Enable/disable the login failure alert of the authentication module
domibus.alert.user.login_failure.active=true
The following properties are already preconfigured with default values and therefore are not mandatory to configure: (QUESTION: how are they set if they are commented?)
# Alert level for login failure.
#domibus.alert.user.login_failure.level=LOW

#Login failure mail subject.
#domibus.alert.user.login_failure.mail.subject=Login failure
By default,
-
The alert level for a login failure is low.
-
The
domibus.alert.user.login_failure.mail.subjectproperty allows configuring the subject of the mail sent.
Account disabled alerts are not activated. In order to activate them, the following property should be set to true:
# Enable/disable the account disable alert of the authentication module.
domibus.alert.user.account_disabled.active=true
The following properties are already preconfigured with default values and therefore are not mandatory to configure:
#Alert level for account disabled.
#domibus.alert.user.account_disabled.level=HIGH

#When should the account disabled alert be triggered.
# 2 possible values:
# AT_LOGON: An alert will be triggered each time a user tries to login to a disabled account.
# WHEN_BLOCKED: An alert will be triggered once when the account got disabled.
#domibus.alert.user.account_disabled.moment=WHEN_BLOCKED

#Account disabled mail subject.
#domibus.alert.user.account_disabled.subject=Account disabled
By default, the alert level for an account disabled is high. The next property specifies when an account_disabled alert should be triggered. It can be only at disabling time or at every new login attempt after the account has been disabled. The default value WHEN_BLOCKED will therefore create only one alert when the account is disabled.
The last property allows configuring the subject of the mail sent.
Multitenancy
The following super user authentication alerts properties are documented with their default value.
They can be overwritten in the
domibus.properties file:
#Enable/disable the login failure alert of the authentication module.
#domibus.alert.super.user.login_failure.active=true

#Alert level for login failure.
#domibus.alert.super.user.login_failure.level=LOW

#Login failure mail subject.
#domibus.alert.super.user.login_failure.mail.subject=Super user login failure

#Enable/disable the account disable alert of the authentication module.
#domibus.alert.super.user.account_disabled.active=true

#Alert level for account disabled.
#domibus.alert.super.user.account_disabled.level=HIGH

#When should the account disabled alert be triggered.
# 2 possible values:
# AT_LOGON: An alert will be triggered each time a user tries to login to a disabled account.
# WHEN_BLOCKED: An alert will be triggered once when the account got disabled.
#domibus.alert.super.user.account_disabled.moment=WHEN_BLOCKED

#Account disabled mail subject.
#domibus.alert.super.user.account_disabled.subject=Super user account disabled
All that was mentioned earlier about console users is also true for the plugin users. There is an identical set of configuration properties for them:
# Enable/disable the login failure alert of the authentication module
#domibus.alert.plugin.user.login_failure.active=true

# Alert level for login failure.
#domibus.alert.plugin.user.login_failure.level=LOW

# Login failure mail subject.
#domibus.alert.plugin.user.login_failure.mail.subject=Login failure

# Enable/disable the account disable alert of the authentication module
#domibus.alert.plugin.user.account_disabled.active=true

# Alert level for account disabled.
#domibus.alert.plugin.user.account_disabled.level=HIGH

# When should the account disabled alert be triggered
# 2 possible values:
# AT_LOGON: An alert will be triggered each time a user tries to login to a disabled account
# WHEN_BLOCKED: An alert will be triggered once when the account got disabled.
#domibus.alert.plugin.user.account_disabled.moment=WHEN_BLOCKED

# Account disabled mail subject
#domibus.alert.plugin.user.account_disabled.subject=Account disabled

# Account disabled mail subject
#domibus.alert.super.user.account_disabled.subject=Super user account disabled
5.14.6. User Password alerts
Domibus is able to track user password expiration and imminent expiration. Obviously the user password expired alert occurs when a user password expires. The number of days the alert should be triggered after the expiration is configurable. The imminent expiration alert occurs for some time before the user password expiration. The number of days the alert should be triggered before expiration is configurable. The alert frequency for both trackers can be configured.
By default, imminent user password expiration alerts are not activated. In order to activate them, the following property should be set to true:
# Enable/disable the imminent password expiration alert
#domibus.alert.password.imminent_expiration.active=true
The following properties are already preconfigured with default values and therefore are not mandatory to configure:
# Number of days before expiration as for how long before expiration
# the system should send alerts
#domibus.alert.password.imminent_expiration.delay_days=15

# Frequency in days between alerts
#domibus.alert.password.imminent_expiration.frequency_days=3

# Password imminent expiration alert level
#domibus.alert.password.imminent_expiration.level=LOW

# Password imminent expiration mail subject
#domibus.alert.password.imminent_expiration.mail.subject=Password imminent expiration
By default, Domibus will send user password imminent expiration alerts 15 days before the expiration. It will send alerts at a pace of one alert every 3 days. The level of the alert will be LOW. The last property allows configuring the subject of the mail sent.
By default, user password expired alerts are not activated. In order to activate them, the following property should be set to true:
# Enable/disable the certificate expired alert of certificate scanner module
domibus.alert.password.expired.active=true
The following properties are already preconfigured with default values and therefore are not mandatory to configure:
# Number of days after expiration as for how long the system should send alerts.
#domibus.alert.password.expired.delay_days=30

# Frequency in days between alerts
#domibus.alert.password.expired.frequency_days=5

# Password expiration alert level
#domibus.alert.password.expired.level=LOW

# Password expiration mail subject
#domibus.alert.password.expired.mail.subject=Password expired
By default, Domibus will send user password expired alerts during 30 days after the expiration. It will send alerts at a pace of one alert every 5 days. The level of the alert will be LOW. The last property allows configuring the subject of the mail sent.
5.14.7. Plugin User Password alerts
Everything that was explained above about the console users alerts is also true for the plugin users. Their corresponding properties are listed below:
# Enable/disable the imminent password expiration alert
#domibus.alert.plugin_password.imminent_expiration.active=true

# Number of days before expiration as for how long before
# expiration the system should send alerts
#domibus.alert.plugin_password.imminent_expiration.delay_days=15

# Frequency in days between alerts
#domibus.alert.plugin_password.imminent_expiration.frequency_days=3

#Password imminent expiration alert level.
#domibus.alert.plugin_password.imminent_expiration.level=LOW

#Password imminent expiration mail subject.
#domibus.alert.plugin_password.imminent_expiration.mail.subject=Password imminent expiration

#Enable/disable the imminent password expiration alert
#domibus.alert.plugin_password.expired.active=true

#Number of days after expiration as for how long
# the system should send alerts.
#domibus.alert.plugin_password.expired.delay_days=30

#Frequency in days between alerts.
#domibus.alert.plugin_password.expired.frequency_days=5

#Password expiration alert level.
#domibus.alert.plugin_password.expired.level=LOW

#Password expiration mail subject.
#domibus.alert.plugin_password.expired.mail.subject=Password expired
5.14.8. Certificate scanner alerts
Domibus is able to track certificate expiration and imminent expiration. Obviously the certificate expired alert occurs when a certificate expires. The number of days the alert should be triggered after the expiration is configurable. The imminent expiration alert occurs for some time before the certificate expiration. The number of days the alert should be triggered before expiration is configurable. The alert frequency for both trackers can be configured.
By default, imminent certificate expiration alerts are not activated. In order to activate them, the following property should be set to true:
#Enable/disable the imminent certificate expiration alert of certificate scanner module.
domibus.alert.cert.imminent_expiration.active=true
The following properties are already preconfigured with default values and therefore are not mandatory to configure:
# Number of days before revocation as from when
# the system should start sending alerts
#domibus.alert.cert.imminent_expiration.delay_days=61

# Frequency in days between alerts
#domibus.alert.cert.imminent_expiration.frequency_days=14

# Certificate imminent expiration alert level
#domibus.alert.cert.imminent_expiration.level=HIGH

# Certificate imminent expiration mail subject
#domibus.alert.cert.imminent_expiration.mail.subject=Certificate imminent expiration
By default, Domibus will send certificate imminent expiration alerts 61 days before the expiration. It will send alerts at a pace of one alert every 14 days. The level of the alert will be HIGH. The last property allows configuring the subject of the mail sent.
By default, certificate expired alerts are not activated. In order to activate them, the following property should be set to true:
# Enable/disable the certificate expired alert of certificate scanner module
domibus.alert.cert.expired.active=true
The following properties are already preconfigured with default values and therefore are not mandatory to configure:
# Frequency in days between alerts
#domibus.alert.cert.expired.frequency_days=7

# How long(in days) after the revocation should the system
# trigger alert for the expired certificate
#domibus.alert.cert.expired.duration_days=92

# Certificate expired alert level
#domibus.alert.cert.expired.level=HIGH

# Certificate expired mail subject
#domibus.alert.cert.expired.mail.subject=Certificate expired
By default, Domibus will send certificate expired alerts during 92 days after the expiration. It will send alerts at a pace of one alert every 7 days. The level of the alert will be HIGH. The last property allows configuring the subject of the mail sent.
5.14.9. Configuration example
Example: domibus.properties
Below is shown only the section relevant to the alerts configuration in
the domibus.properties configuration file, when the SMTP server is
running in the same host as domibus (localhost):
# Enable/disable the entire alert module.
# Pay attention to the fact that if the module is activated,
# all properties under the mandatory section should be configured.
domibus.alert.active=true

# Allow to disable alert mail sending
domibus.alert.mail.sending.active=true
domibus.alert.mail.smtp.starttls.enable=false
domibus.alert.mail.smtp.auth=false
#domibus.alert.mail.smtp.timeout=10000# SMTP server url for sending alert
domibus.alert.sender.smtp.url=localhost
# SMTP server port
domibus.alert.sender.smtp.port=25
# SMTP server user
#domibus.alert.sender.smtp.user=
# SMTP server user password
#domibus.alert.sender.smtp.password=
#Alert sender email
domibus.alert.sender.email=sender@exemple.com
#Alert email receiver
domibus.alert.receiver.email=mcb@gmail.com# The following properties can stay commented
# if no modifications to the default values are needed.
# CRON configuration for cleaning alerts.
domibus.alert.cleaner.cron=0 0/1 * * * ?
# Lifetime in days of alerts before cleaning
domibus.alert.cleaner.alert.lifetime=1
# Concurrency to process the alerts
#domibus.alert.queue.concurrency=1
# Frequency of failed alerts retry.
#domibus.alert.retry.cron=0 0/1 * * * ?
# Elapsed time in minutes between alert retry.
#domibus.alert.retry.time=1
# Maximum number of attempts for failed alerts
#domibus.alert.retry.max_attempts=2# Enable/disable the messaging alert module
#domibus.alert.msg.communication_failure.active=true
# Message status change that should be notified by
# the messaging alert module. Comma-separated.
domibus.alert.msg.communication_failure.states=SEND_FAILURE,WAITING_FOR_RETRY
# Alert levels corresponding to message status defined
# in previous property(domibus.alert.msg.communication_failure.states).
# Should be (HIGH, MEDIUM OR LOW)
#domibus.alert.msg.communication_failure.level=HIGH
# Messaging alert module mail subject
domibus.alert.msg.communication_failure.mail.subject=Message status change MCB# Enable/disable the login failure alert of the authentication module
domibus.alert.user.login_failure.active=true
# Alert level for login failure
#domibus.alert.user.login_failure.level=LOW
#Login failure mail subject
domibus.alert.user.login_failure.mail.subject=Login failure MCB
#Enable/disable the account disable alert of the authentication module
#domibus.alert.user.account_disabled.active=true
# Alert level for account disabled
#domibus.alert.user.account_disabled.level=HIGH
# When should the account disabled alert be triggered.
# 2 possible values:
# AT_LOGON: An alert will be triggered each time a user tries to login to a disabled account.
# WHEN_BLOCKED: An alert will be triggered once when the account got disabled.
domibus.alert.user.account_disabled.moment=WHEN_BLOCKED,AT_LOGON
# Account disabled mail subject
domibus.alert.user.account_disabled.subject=Account disabled MCB# Enable/disable the imminent certificate expiration alert
# of certificate scanner module
domibus.alert.cert.imminent_expiration.active=false
# Number of days before revocation as from when
# the system should start sending alerts
domibus.alert.cert.imminent_expiration.delay_days=20000
# Frequency in days between alerts
#domibus.alert.cert.imminent_expiration.frequency_days=14
# Certificate imminent expiration alert level
#domibus.alert.cert.imminent_expiration.level=HIGH
#Certificate imminent expiration mail subject
domibus.alert.cert.imminent_expiration.mail.subject=Certificate imminent expiration MCB
#Enable/disable the certificate expired alert
# of certificate scanner module
domibus.alert.cert.expired.active=false
# Frequency in days between alerts
#domibus.alert.cert.expired.frequency_days=7
# How long(in days) after the revocation should
# the system trigger alert for the expired certificate
#domibus.alert.cert.expired.duration_days=90
# Certificate expired alert level
#domibus.alert.cert.expired.level=HIGH
# Certificate expired mail subject
domibus.alert.cert.expired.mail.subject=Certificate expired MCBBelow is shown only the section relevant to the alerts configuration in the dom50-domibus.properties configuration file, where dom50 is the name of a domain:
domibus.properties# Proxy settings
# Pull Retry Worker execution interval as a cron expression
dom50.domibus.pull.retry.cron=0/10 * * * * ?
# Alert management
# Enable/disable the entire alert module.
# Pay attention to the fact that if
# the module is activated, all properties
# under the mandatory section should be configured.
dom50.domibus.alert.active=true
# Allow to disable alert mail sending
dom50.domibus.alert.mail.sending.active=true
# Mandatory configuration start (if domibus.alert.mail.sending.active=true)
# Alert sender email
dom50.domibus.alert.sender.email=mcb@gmail.com
# Alert email receiver
dom50.domibus.alert.receiver.email=mcb@gmail.com
# Mandatory configuration end
# The following properties can stay commented if
# no modifications to the default values are needed5.15. DSS extension configuration
5.15.1. Overview
Domibus now offers the possibility to perform incoming messages certificate chain validation with the DSS library instead of the truststore. In order to achieve chain validation with DSS, Domibus security policy should be configured with a PKI path (see the file “eDeliveryAS4Policy_BST_PKIP.xml” in the distribution).
When PKI path is used, the full chain of certificates that contains the signing and its trust certificates is embedded in the security header of the SOAP message.
Domibus DSS extension will download and use per default the European list of trusted lists (LOTL).
Dominus can verify the trust anchor of any certificate chain having a certificate authority present within the LOTL.
The DSS extension also permits to configure custom trusted lists with additional certificate authorities.
DSS generates a validation report with different constraints and status. The DSS extension allows configuring the relevant constraints for the validation.
5.15.2. Installation
Enable Unlimited Strength Jurisdiction Policy
-
Before Java 8 Update 151
For Java 8 Update 144 and earlier, you need to install the Java Cryptography Extension (JCE) Unlimited Strength Jurisdiction Policy files:
The Unlimited Strength Jurisdiction Policy is included but not used by default. To enable it, you need to edit thejava.securityfile in$JAVA_HOME/jre/lib/security(for JDK) or$JAVA_HOME/lib/security(for JRE). Uncomment (or include) the following line:
crypto.policy=unlimited
Download and install DSS extension
For this step, you will have to use the following resources (see Downloading Resources):
-
domibus-msh-distribution-5.1.8-authentication-dss-extension.zip
Unzip the artefact and copy the extensions directory under \{domibus.config.location}.
Configure proxy
In order to refresh the EU LOTL, DSS needs to connect to the Internet. No white list can be configured at the proxy level, as changes in EU LOTL are dynamic. Therefore the DSS extension needs dynamic Internet access.
If a proxy is required, please configure the following properties within
\{domibus.config.location}/extensions/config/authentication-dss-extension.properties:
# The https proxy host to use
#domibus.authentication.dss.proxy.https.host=

# The https proxy port to use
#domibus.authentication.dss.proxy.https.port=

# The https proxy user to use
#domibus.authentication.dss.proxy.https.user=

# The https proxy password to use
#domibus.authentication.dss.proxy.https.password=

# The https proxy excluded hosts. Allows multiple urls (separator ',',';' or ' ')
#domibus.authentication.dss.proxy.https.excludedHosts=

# The http proxy host to use
#domibus.authentication.dss.proxy.http.host=

# The http proxy port to use
#domibus.authentication.dss.proxy.http.port=

# The http proxy user to use
#domibus.authentication.dss.proxy.http.user=

# The http proxy password to use
#domibus.authentication.dss.proxy.http.password=

# The http proxy excluded hosts. Allows multiple urls (separator ',', ';' or ' ')
#domibus.authentication.dss.proxy.http.excludedHosts=|
Note
|
If the proxy server needs TLS authentication,
please add the CA certificate of the proxy server in the java cacert or
in the dss-tls-truststore described below.
|
DSS extension truststores
The DSS extension uses truststores for two reasons:
-
Store TLS certificates of servers containing the trusted lists to download.
-
Store public certificates to verify the xml signature of the trusted lists.
Separate truststores are used for xml signature verification and tls. The Dss extension distribution is provided with two truststores:
dss-tls-truststore.p12
Any extra TLS certificate (not present in the java cacert) needed to download custom or official trusted lists should be installed in the dss-tls-truststore.
ojkeystore.p12
The EU LOTL downloaded by DSS is signed, and to verify the
signature, a truststore containing public certificates located at
https://eur-lex.europa.eu/legal-content/EN/TXT/?uri=uriserv:OJ.C_.2019.276.01.0001.01.ENG
needs to be configured. Those certificates are packaged in the ojkeystore.
In case LOTL signing certificates need to be upgraded, please copy them
from above url and add them to the ojkeystore.p12.
Please note, that if the DSS extension is configured with custom trusted lists, a third truststore should be configured to check the custom trusted list signature.
Configure LOTL truststore
-
Please copy
truststore\ojkeystore.p12to\{domibus.config.location}/keystoresdirectory. -
Please copy
truststore\dss-tls-truststore.p12to\{domibus.config.location}/keystoresdirectory and add any required TLS certificate to it.
Configure custom trusted list
If a certificate chain with a CA not present in the LOTL needs to be used, DSS offers the possibility to configure custom trusted list. Please refer to the DSS documentation.
If a custom trusted list is required, please configure the following
properties within \{domibus.config.location}/extensions/config/authentication-dss-extension.properties:
# Following properties should be used to add custom trusted list.
# Custom trusted list url
# domibus.authentication.dss.custom.trusted.lists.list1.url=

# Path of the keystore containing the certificate used to sign the custom trusted list
#domibus.authentication.dss.custom.trusted.list.keystore.path=

# The Keystore type
#domibus.authentication.dss.custom.trusted.list.keystore.type=

# The Keystore password
#domibus.authentication.dss.custom.trusted.list.keystore.password=
If multiple custom trusted lists are needed, please add the new url and increment the list number.For example:
# Custom trusted list url
#domibus.authentication.dss.custom.trusted.lists.list2.url=
As for EU LOTL, custom trusted lists are signed and DSS will verify the signature of the custom trusted lists before using it.
Please use
domibus.authentication.dss.custom.trusted.list.keystore.path/type/password
to configure a truststore containing the certificate needed to verify
the custom trusted list signature. The recommendation is to add the
custom trusted list truststore under \{domibus.config.location}/keystores.
Configure PMode policy
To perform certificate validation, the DSS extension expects to find the
full signing certificate chain within the incoming AS4 message. To do
so, Domibus should be configured with a security policy configured with
WssX509PkiPathV1Token11 as described in the WS-SecurityPolicy
document.
|
Note
|
At startup, DSS generates stacktraces due to 2 old certificates which are wrongly encoded. |
To avoid the exceptions, please configure your logger for the `eu.europa.esig.dss.tsl.service.TSLParser ` class accordingly.
Dss extension activation
In order to activate the DSS extension, please configure the following property:
domibus.extension.iam.authentication.identifier=DSS_AUTHENTICATION_SPIfound in the \{domibus.config.location}/domibus.properties file.
5.15.3. DSS extension properties
| Configuration Property | Default value | Purpose |
|---|---|---|
|
PKCS12 |
Type of keystore containing the public certificate needed to validate the trusted list. |
domibus.authentication.dss.official.journal.content.keystore.path |
|
Path of the keystore containing the public certificate needed to validate the trusted list. |
domibus.authentication.dss.official.journal.content.keystore.password |
dss-password |
Password of the keystore containing the public certificate needed to validate the trusted list. |
domibus.authentication.dss.current.official.journal.url |
https://eur-lex.europa.eu/legal-content/EN/TXT/?uri=uriserv:OJ.C_.2019.276.01.0001.01.ENG |
URL: Official Journal URL where the EU trusted certificates are listed. |
domibus.authentication.dss.current.lotl.url |
Official EU URL of the list of trusted lists. |
|
domibus.authentication.dss.lotl.country.code |
EU |
List of trusted list main code. |
domibus.authentication.dss.lotl.root.scheme.info.uri |
https://ec.europa.eu/information_society/policy/esignature/trusted-list/tl.html |
Schema used to verify the OJ validity. |
domibus.authentication.dss.cache.path |
|
Path where trusted lists are cached. |
domibus.authentication.dss.refresh.cron |
0 0 0/3 * * ? |
Cron expression used to schedule DSS trusted list refresh. Default is every 3h. |
domibus.authentication.dss.full.tls.refresh |
false |
If this property is true, the TL refresh job will force delete on all Trusted lists and download them again. |
domibus.authentication.dss.constraints.constraint1.name |
|
Name of the first constraint that will be validated against the DSS validation report. |
domibus.authentication.dss.constraints.constraint1.status |
OK |
Constraint status needed to validate the certificate. |
domibus.authentication.dss.constraints.constraint2.name |
Empty value, giving the possibility to make a second DSS constraint validation. |
|
domibus.authentication.dss.constraints.constraint2.status |
Constraint status needed to validate the certificate. |
|
domibus.authentication.dss.constraint1.name |
|
Name of
the second constraint that will be validated against the DSS validation
report. |
domibus.authentication.dss.constraint1.status |
OK |
Constraint status needed to validate the certificate. |
domibus.authentication.dss.enable.custom.trusted.list.for.multitenant |
false |
In multi-tenant configuration, custom DSS trusted lists are shared by all tenants. Therefore they are deactivated by default. |
domibus.authentication.dss.exception.on.missing.revocation.data |
false |
Trigger an exception when no revocation data is accessible. |
domibus.authentication.dss.check.revocation.for.untrusted.chains |
false |
Execute revocation check when anchor cannot be found. |
domibus.authentication.dss.custom.trusted.lists.list1.url= |
Following properties should be used to add the first custom trusted list URL. |
|
domibus.authentication.dss.custom.trusted.lists.list1.url |
Following properties should be used to add the second custom trusted list URL. |
|
domibus.authentication.dss.custom.trusted.lists.list3.url |
Following properties should be used to add the third custom trusted list URL. |
|
domibus.authentication.dss.custom.trusted.lists.list3.code |
Following properties should be used to add the third custom trusted list code. |
|
domibus.authentication.dss.custom.trusted.lists.list2.code |
Following properties should be used to add the second custom trusted list code. |
|
domibus.authentication.dss.custom.trusted.list.keystore.path |
Path of the keystore containing the certificate used to sign the custom trusted list. |
|
domibus.authentication.dss.custom.trusted.list.keystore.type |
The custom trusted list Keystore type. |
|
domibus.authentication.dss.custom.trusted.list.keystore.password |
The custom trusted list Keystore password. |
|
domibus.authentication.dss.proxy.https.host |
The HTTPS proxy host to use. |
|
domibus.authentication.dss.proxy.https.port |
The HTTPS proxy user to use. |
|
domibus.authentication.dss.proxy.https.user |
The HTTPS proxy password to use. |
|
domibus.authentication.dss.proxy.https.excludedHosts |
The HTTPS proxy excluded hosts. Allows multiple URL’s (separator ',', ';' or ' '). |
|
domibus.authentication.dss.proxy.http.host |
The http proxy host to use. |
|
domibus.authentication.dss.proxy.http.port |
The http proxy port to use. |
|
domibus.authentication.dss.proxy.http.user |
The http proxy user to use. |
|
domibus.authentication.dss.proxy.http.password |
The http proxy password to use. |
|
domibus.authentication.dss.proxy.http.excludedHosts |
The http proxy excluded hosts. Allows multiple URL’s (separator ',', ';' or ' '). |
|
domibus.authentication.dss.cache.name |
dss-cache |
Name of the ehcache configured for DSS. |
domibus.dss.ssl.trust.store.path |
|
TLS truststore for dss dataloader. Should contain all the TLS certificates needed to download the EU LOTL and Custom trusted lists. |
domibus.dss.ssl.trust.store.password |
dss-tls |
TLS truststore password for dss data loader |
domibus.dss.ssl.trust.store.type |
JKS |
TLS truststore type dss data loader. |
domibus.dss.perform.crl.check |
False |
Perform crl check within dss. False by default as it is performed by domibus. |
domibus.dss.data.loader.socket.timeout |
3000 |
Domibus data loader socket timeout in milliseconds. |
domibus.dss.data.loader.connection.timeout |
3000 |
Domibus data loader connection time out in milliseconds. |
5.16. Setting Logging levels at runtime
5.16.1. Description
Admin and Super admin users can change the Logging levels at runtime for the Domibus application using the Admin Console Logging menu:
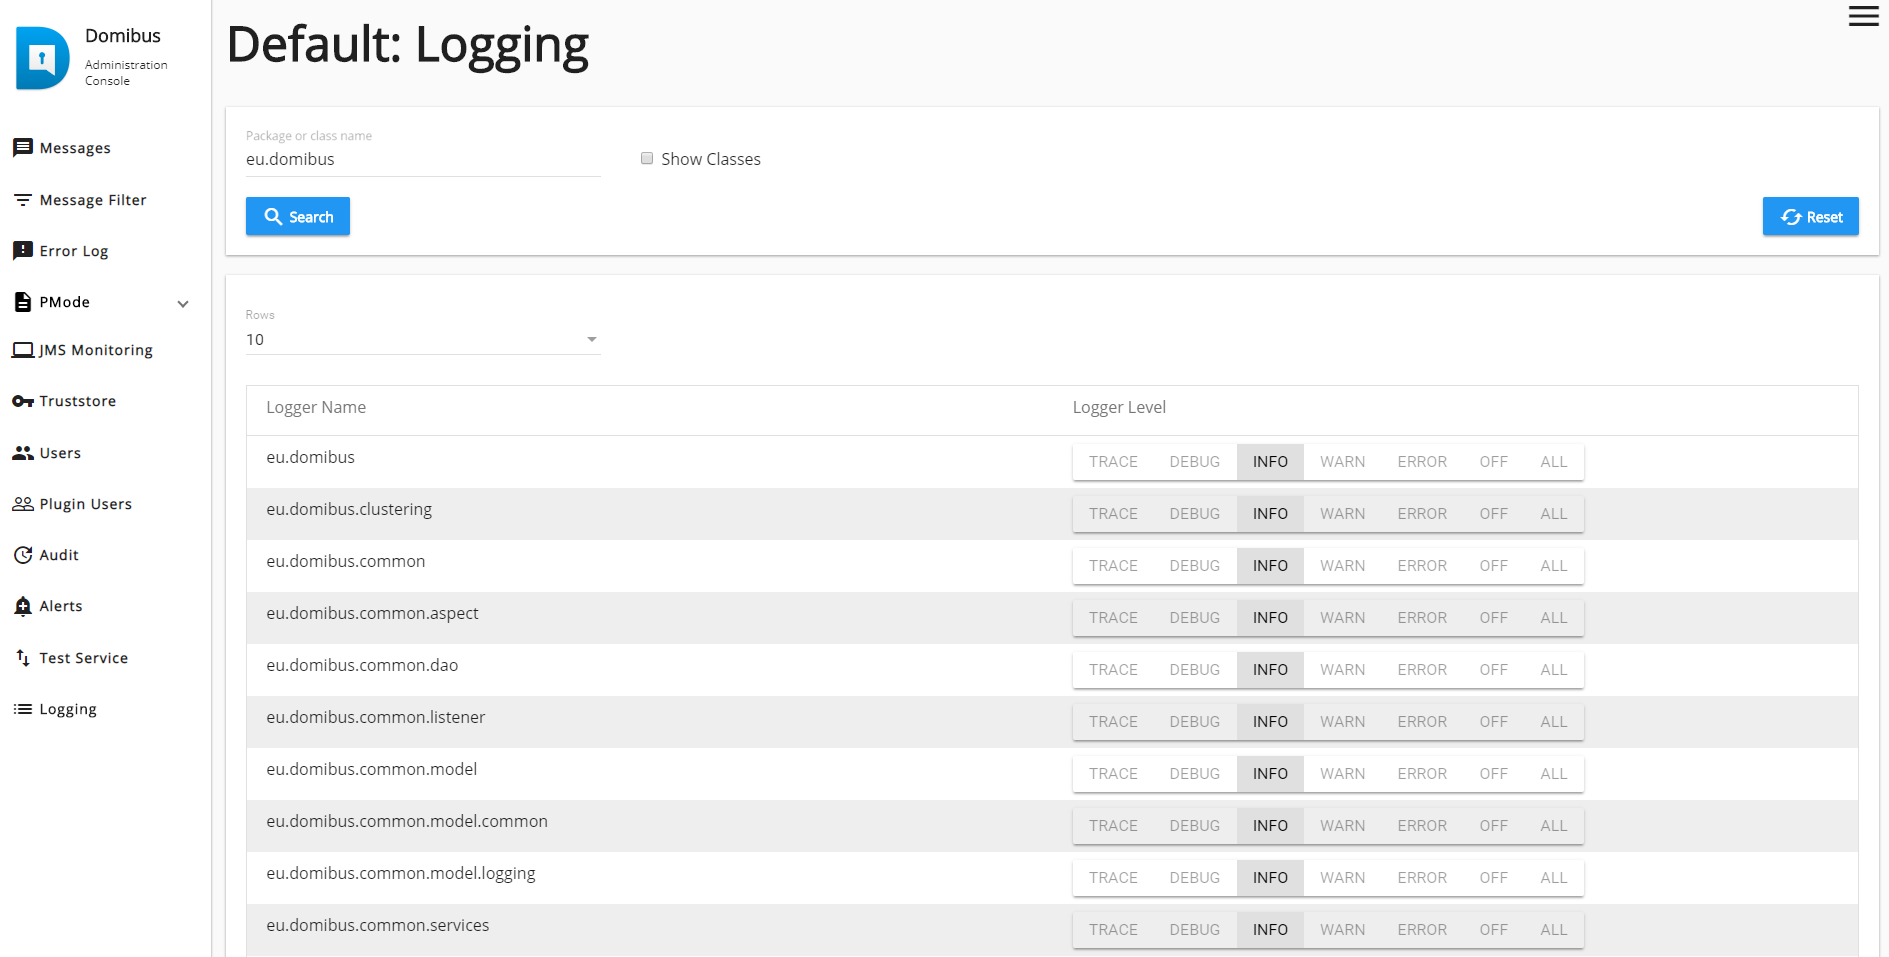
-
A Search box where the user could freely enter the name of the package of classes desired to set the logging level. By default this is populated with ‘eu.domibus’ value.
|
Note
|
Wildcards are not accepted like ‘domi*’ are not recognised. Users must enter the full description of the item to be searched (e.g:‘domibus’ or ‘apache’) |
-
A Show classes check box allows level setting for each package. See the next picture
-
A Reset button will reset all logging levels to the default values defined in logback.xml
-
Pagination controls to change the number of rows to be shown per page
|
Note
|
|

5.17. EU Login Integration
5.17.1. Description
Domibus is configured by default to use its own database for user authentication and authorization, as seen in previous chapters.
But Domibus could also be configured and installed to use EU Login for user authentication and authorization (even if this is not provided by default by EU Login).
|
Note
|
EU Login
EU Login is the European Commission’s central user authentication service. It allows authorised users to access a wide range of Commission resources, including websites, applications and services, using a single sign on based on (EC) email address, password, and if required, additional authenticating factors. Click here for more information on EU Login. More details can also be found on internal Confluence page by clicking the following link: https://webgate.ec.europa.eu/CITnet/confluence/pages/viewpage.action?pageId=24641907 |
Domibus with EU Login integration is available only for Weblogic server.
5.17.2. Installation and Configuration
Installation
For installation of Domibus with EU Login, please follow the steps below:
-
Create DB schemas as per previous chapters for a single tenancy or Multitenancy installation
-
Download domibus-msh-distribution-xyz-weblogic-ecas-configuration.zip and domibus-msh-distribution-xyz-weblogic-ecas-war.zip
-
Install and configure Domibus war and configuration files into Weblogic server – follow Weblogic guidelines as per previous chapters
-
Check that the
WebLog-sql-scripts.zipicserver has the latest compatible ECASIdentityAsserter installed:-
Go to the Weblogic Server console →
-
Security Realms → myrealm → Providers:

-
-
Configure ecas-config-domibus.xml file and install it in the classpath of Weblogic server.
An example of
ecas-config-domibus.xmlfile is as shown below:<client-config xmlns="https://www.cc.cec/cas/schemas/client-config/ecas/1.8" xmlns:cas="https://www.cc.cec/cas/schemas/client-config/cas/2.0"> <ecasBaseUrl>https://ecasa.cc.cec.eu.int:7002</ecasBaseUrl> <groups> <group>*</group> </groups> <acceptStrengths> <strength>STRONG</strength> <strength>STRONG_SMS</strength> <strength>CLIENT_CERT</strength> </acceptStrengths> <assuranceLevel>LOW</assuranceLevel> <!-- renew is false only for local in order to speedup the development--> <cas:renew>true</cas:renew> <requestingUserDetails>true</requestingUserDetails> </client-config>
For more details about steps d. and e., please refer to EU Login documentation in the Confluence pages provided above.
Configuration
When a user is authenticated against EU Login he or she has specific LDAP groups associated with him/her. These groups will be used for Domibus to map:
-
User roles: AP_ADMIN, ADMIN and USER
-
Default domain
The mapping of these groups is performed in domibus.properties which
needs to be changed accordingly. Look for the section related to EU
Login mappings and update it:
domibus.security.ext.auth.provider.group.prefix=DIGIT_DOMThis is the prefix of EU Login LDAP groups that Domibus will take into account.
domibus.security.ext.auth.provider.user.role.mappings=DIGIT_DOMRUSR=ROLE_USER;DIGIT_DOMRADM=ROLE_ADMIN;DIGIT_DOMRSADM=ROLE_AP_ADMIN;This property will map each EU Login LDAP group to a corresponding Domibus user role. If one user has more than one LDAP group/role associated, the role with the broader rights will be chosen.
domibus.security.ext.auth.provider.domain.mappings=DIGIT_DOMDDOMN1=domain1;This property will map an EU Login LDAP group to a Domibus domain: it is useful in a Multitenancy installation, as in single tenancy all users are mapped to Default domain.
If the current user has no roles/LDAP groups or domain associated, he/she could still authenticate but he or she will not have the privileges to use the Domibus console.
# All EU Login groups used by Domibus should have this prefix
domibus.security.ext.auth.provider.group.prefix=DIGIT_DOM

# Pairs of strings separated by semicolons to map Domibus user roles
# to EU Login LDAP groups, the format is
LDAP_GROUP_USER=ROLE_USER;LDAP_GROUP_ADMIN=ROLE_ADMIN;LDAP_GROUP_AP_ADMIN=ROLE_AP_ADMIN;

# Last semicolon is mandatory
domibus.security.ext.auth.provider.user.role.mappings=DIGIT_DOMRUSR=ROLE_USER;DIGIT_DOMRADM=ROLE_ADMIN;DIGIT_DOMRSADM=ROLE_AP_ADMIN;

# Pairs of strings separated by semicolons to map Domibus domain codes
# to EU Login LDAP groups the format is LDAP_GROUP_DOMAIN1=domain1;LDAP_GROUP_DOMAIN2=domain2;
# last semicolon is mandatory
domibus.security.ext.auth.provider.domain.mappings=DIGIT_DOMDDOMN1=domain1;
5.17.3. Domibus UI changes
Access to the Domibus user interface is performed using EU Login.
This means when users access Domibus via the http://server:port/domibus URL, they are redirected to the EU Login page where they need to fill in the username and password. (QUESTION they EU Login crßedentials) After successfully entering their credentials, users are provided access to the Domibus application.
Non-super-administrator users that can manage multiple domains will see a domain dropdown allowing them to switch between all available domains with that role.
The user’s username appears on the right-hand corner on the Domibus Admin console but some options might be disabled or unavailable (greyed out), such as:
-
Change Password (from top right menu): as the password change is managed by the EU Login.
-
Users (from left menu): adding or editing existing users will not be possible.
5.18. Domibus statistics
Dropwizard library has been added to Domibus allowing administrators to monitor Domibus with JVM and custom metrics.
5.18.1. Metrics type
JVM metrics
A set of gauges for JVM memory usage, including stats on heap vs. non-heap memory, plus GC-specific memory pools.
Memory metrics can be added or removed by modifying the following domibus property:
#Activate drop wizard memory metrics
domibus.metrics.monitor.memory=true
Contains a set of gauges for the counts and elapsed times of garbage collections.
Garbage collector metrics can be added or removed by modifying the following domibus property:
#Activate drop wizard gc metrics
domibus.metrics.monitor.gc=true
Thread metrics can be added or removed by modifying the following domibus property:
#Activate drop wizard cached threads metrics
domibus.metrics.monitor.cached.threads=true
Custom metrics
Custom metrics to monitor messages exchange are also available for the following flows:
-
Incoming UserMessage
-
Incoming UserMessage receipt
-
Incoming PullRequest
-
Incoming PullRequest receipt
-
Outgoing UserMessage
-
Outgoing PullRequest
-
Outgoing PullRequest receipt
Each of them will have a Dropwizard counter and timer metrics configuration. Please refer to Dropwizard documentation:
JMS Queues count metrics
This metrics will monitor the count of JMS queues.
In order to enable it, please set the following Domibus property to TRUE:
#Activate drop wizard JMS Queues metrics
domibus.metrics.monitor.jms.queues=true
The following property will establish the interval (in seconds) upon which the JMS count are recalculated:
# How long (in seconds) the JMS count will be cached
# defaults to 0 - the count isn't cached
domibus.metrics.monitor.jms.queues.refresh.period=0
The last property to set: by default only DLQ queue count is shown. Set to false to add metrics for all JMS queues:
# show counts only for DLQ queue
domibus.metrics.monitor.jms.queues.show.dlq.only=true
5.18.2. Metrics access
Log file
In order to log the metrics under the statistics.log file, please set the following property to true (default):
#Enable sl4j reporter for dropwizard metrics.
domibus.metrics.sl4j.reporter.enable=true
In case of upgrade, please follow the upgrade procedure to add the
relevant appender and logger within the logback.xml file.
Servlet
Statistics can also be visualized within the browser under the following URL:
<server url>/domibus/metrics.
Metrics can be gauges, counters or timers.
Gauges
The size of the resources such as the JMS queues. If the property
domibus.metrics.monitor.jms.queues.show.dlq.only is true, then only the
queues whose names contain the string DLQ will be considered. Otherwise
all destinations will be shown, except the ones listed in
eu.domibus.core.jms.JMSManagerImpl#SKIP_QUEUE_NAMES.
|
Note
|
In a cluster environment, only the queues that belong the the current node will be monitored. We recommend checking the metrics on each managed server to get a full picture. |
The gauges refresh interval is configured by the property
domibus.metrics.monitor.jms.queues.refresh.period, when this property is set to
0, the queues will be assessed for each request.
Counters
With this metric, you can count how many threads are currently executing
a given method that was annotated with eu.domibus.core.metrics.Counter.
When dealing with two outgoing messages at the same
time, during the processing the counter
eu.domibus.core.ebms3.sender.MessageSenderListener.onMessage.counter
is 2 and once the processing is done, the count is 0.
Timers
Timer implementation uses dropwizard timer that measures the methods annotated with eu.domibus.core.metrics.Timer. Besides statistics about the duration of the execution of such methods, it also counts how many times it was executed.
The following counters and timers are currently defined:
| Class | Name | Description of what it counts or what it times |
|---|---|---|
|
deleteMessages |
Deleting a batch of Receipt messages |
|
deleteMessages |
Deleting a batch of Signal messages |
|
deleteMessages |
Deleting a batch of Signal Message Raw entries |
|
deleteMessages |
Deleting a batch of User Messages |
|
deleteMessages |
Deleting a batch of User Message Raw entries |
|
deleteMessages.deleteAttemptsByMessageIds |
Deleting a batch of Message Attempt entries |
|
deleteMessages. |
Deleting a batch of Error Log entries |
|
deleteMessages. |
Deleting a batch of Message Acknowledgements |
|
deleteMessages.deleteMessageLogs |
Deleting a batch of Signal Message Log entries |
|
deleteMessages.deleteMessageLogs |
Deleting a batch of User Message Log entries |
|
dispatch |
Dispatching a SOAP message to the end point |
|
dropPartition |
Dropping of a partition |
|
earchive_cleanStoredBatches |
Cleaning the E-archiving storage for a domain |
|
earchive_createBatch |
Running the E-archive batch for a domain and type |
|
earchive_createDataFile |
Writing an E-archive data file |
|
earchive_getArchivingFiles |
Getting the archiving files for an entity id |
|
earchive_process_1_batch |
Running an E-archive batch for a batch id and entity id |
|
earchive1_getEArchiveBatch |
Running an E-archive batch for a batch entity id |
|
earchive2_createEArkSipStructure |
Creating an E-archive structure for a batch of user messages |
|
earchive24_getBatchFileJson |
Writing an E-archive batch JSON file |
|
earchive3_executeBatchIsExported |
Exporting an E-archive batch |
|
findEndpointUrl |
Searching for a final recipient endpoint |
|
findPotentialExpiredPartitions |
Searching for potentially expired Oracle partitions |
|
generateReceipt |
Generating a receipt for an incoming SOAP message |
|
handleIncomingMessage |
Handling an incoming valid message |
|
incoming_pull_request |
Handling an incoming pull request |
|
incoming_pull_request_receipt |
Handling an incoming pull request receipt |
|
incoming_user_message |
Handling an incoming user message |
|
incoming_user_message_receipt |
Handling an incoming user message receipt |
|
logMessage |
Logging a SOAP message |
|
notifyMessageReceived |
Sending a backend notification for message received |
|
notifyMessageReceivedFailure |
Sending a backend notification for message receive failure |
|
notifyMessageResponseSent |
Sending a backend notification for message receive failure |
|
notifyOfMessageStatusChange |
Sending a backend notification for message receive failure |
|
notifyOfSendSuccess |
Sending a notification of status change for a user message |
|
notifyPluginSendSuccess |
Sending a notification for a successful sending of a user message |
|
onMessage |
Processing an outgoing message |
|
onMessage |
Sending a plugin notification about processing a message |
|
onMessage.deleteMessages |
Deleting messages |
|
outgoing_pull_receipt |
Sending a pull receipt for a pulled message |
|
outgoing_pull_request |
Processing a pull request |
|
outgoing_user_message |
Validating and sending a user message |
|
persistReceivedMessage |
Validating and persisting a received message |
|
persistSentMessage |
Persists a sent user message and user message log |
|
processMessage |
Validating and processing a message |
|
retention_deleteExpiredMessages |
Deleting and archiving expired messages based on the retention policy |
|
retention_deleteExpiredMessages |
Dropping a partition with no ongoing messages based on the retention policy |
|
scheduleSending |
Sending user messages to the appropriate MSH JMS queue |
|
sendMessageToQueue_map1 |
Sending a user message of type MAP_MESSAGE to the internal JMS queue |
|
sendMessageToQueue_map2 |
Sending a user message of type MAP_MESSAGE to the internal JMS queue |
|
sendMessageToQueue_text |
Sending a user message of type TEXT_MESSAGE to the internal JMS queue |
|
sendUserMessage |
Validating and sending an AS4 message to C3 |
|
storeMessage |
Storing a received message or scheduling the storing of a message to be sent |
|
storePayloads |
Storing the payloads of a message |
|
submissionValidate |
Validating the properties of a submission |
|
submit |
Validating and submitting a message |
|
validate |
Validating the properties of a user message |
Jmx
To access the metrics via jmx, please set the following property to true:
# Enable jmx reporter for dropwizard metrics. The following warning:
# We do not recommend that you try to gather metrics from your production environment.
# JMX’s RPC API is fragile.
# For development purposes and browsing, though, it can be very useful.
domibus.metrics.jmx.reporter.enable=false.
5.19. Payload Encryption
Data at rest is not encrypted by default in Domibus. This means that the payloads are stored in C2 exactly as they were received from C1. The same for payloads received from C2 and stored in C3.
The payloads stored in C2 and C3 are not accessible to third parties. Nevertheless, it is a good practice to encrypt the payloads to increase the security level.
Data at rest encryption can be activated using the property
domibus.payload.encryption.active=true. Once activated, Domibus
encrypts the payloads stored in C2 and C3 using symmetric encryption
with AES/GCM/NoPadding algorithm. Domibus generates the symmetric key
used to encrypt payloads the first time the payload encryption is
activated. The generated symmetric key is stored in the Domibus
database. A symmetric key is generated for each domain in case of
multitenancy.
Encrypting data at rest is transparent for C1/C4, so if C4 downloads a message from C3, it will receive the payloads un-encrypted as they were sent by C1.
5.20. Message Prioritization
5.20.1. Introduction
When Domibus C2 receives concurrently from C1 a lot of UserMessages to
be sent, it cannot keep the pace of sending UserMessages to C3.
Consequently, JMS messages start accumulating in the SendMessageQueue.
As the JMS messages from the SendMessageQueue are processed in a
random order, for some UserMessages there might be a big delay between
the time C1 submits a message to C2 for sending and the actual sending
of the UserMessage from C2 to C3.
Moreover, in some use cases there is a need to assign a high priority to
some UserMessages. Due to their urgency, these high priority messages
must be sent as soon as possible regardless of when they have been
submitted to C2.
5.20.2. Solution overview
Domibus assigns a priority to each UserMessage based on service and
action when the message is submitted by C1. All UserMessages are
scheduled for sending using the existing SendMessageQueue.
There are two options for processing messages from the
SendMessageQueue:
-
Using the underlying JMS infrastructure if it supports message priority on a message queue.
-
Using dedicated JMS listeners (with a specific concurrency) for each configured message priority that consumes only JMS messages having the configured priority using a JMS selector. This solution can also take advantage on the JMS infrastructure support for message priority.
5.20.3. Solution detail
Domibus C2 assigns a priority to each UserMessage it receives from C1
to implement message prioritization. The UserMessage priority is
determined based on the service and action values of the UserMessage.
The priority varies from 1 to 9, 1 for low priority messages and 9 for
high priority messages.
For instance, for the following service and action values from the
UserMessage:
<eb:CollaborationInfo>
<eb:Service type="tc1">bdx:noprocess</eb:Service>
<eb:Action>TC1Leg1</eb:Action>
</eb:CollaborationInfo>
In order to assign a priority to the above UserMessage a priority rule
name must be defined first in domibus.properties configuration file.
For instance, one can define a priority rule named medium:
domibus.dispatcher.priority.medium=Medium priority messagesOnce the rule name is defined, other properties, like service, action, priority and concurrency can be also defined using the rule name. As we will see in the next sections the concurrency property is optional. For instance:
domibus.dispatcher.priority.medium.service= bdx:noprocess
domibus.dispatcher.priority.medium.action= TC1Leg1, TC1Leg2, TC1Leg3
domibus.dispatcher.priority.medium.value=5
domibus.dispatcher.priority.medium.concurrency=10-15
The action property configured for a specific rule supports a list of action values separated by comma. The action property will match if any of the list of actions will match. In the example above we have configured for instance three actions values separated by commas.
When a UserMessage having a service/action combination is matching a
service/action combination configured for a priority rule, the priority
configured for the matching rule will be assigned to the UserMessage.
It is not mandatory to configure both service and action for a priority rule. Only the service or only the action can be configured, in which case the priority will match if the service or the action configured will match.
|
Note
|
service/action combinations configured for routing rules must be unique. |
After the priority of the UserMessage has been determined, C2
schedules the UserMessage for sending it to C3. This is performed by
sending a JMS message to the SendMessageQueue containing the message
id of the message to be sent and the message priority using
JMSPriority header. For the example above the priority assigned to the
message will be 5.
Once the priority has been determined for each UserMessage/JMSMessage,
there are two options for processing messages from the
SendMessageQueue:
Using the underlying JMS infrastructure
This solution can be used if the underlying JMS infrastructure supports
message priority on a message queue. Such infrastructure will guarantee
the priority delivery of high priority messages using the JMSPriority
header value. This approach is suited when there are low to medium
number of high priority messages processed by the system.
In this case there is only one JMS listener that is consuming JMS
messages from the SendMessageQueue. This JMS listener is the default
listener that is used by Domibus to process all JMS messages from the
SendMessageQueue, regardless if message prioritization is used. The
default JMS listener can be configured in domibus.properties in the
Dispatcher section.
Please find below an example about how to configure a rule for medium
priority messages, the concurrency property is not used:
domibus.dispatcher.priority.medium.service= bdx:noprocess
domibus.dispatcher.priority.medium.action= TC1Leg1, TC1Leg2, TC1Leg3
domibus.dispatcher.priority.medium.value=5
In case the SendMessageQueue is flooded with high priority messages
only the high priority messages will be consumed (most of JMS brokers
will try to deliver high priority messages first), leaving the lower
priority messages in the queue potentially for long periods of time (in
extreme cases even days). For this specific case, the solution from the
next section is more suited.
Using dedicated JMS listeners (with a specific concurrency) for each configured message priority
This approach is suited in case a finer level of granularity is desired to JMS message consumption or for tackling the case mentioned above when high priority messages are flooding the system. In this scenario we have a quality of service which gives a chance to lower priority messages to be consumed.
In this scenario, dedicated JMS listeners (with specific concurrency) consume only the JMS messages with a specific priority given by the JMSPriority header. This is performed using a JMS selector filtering messages for each configured message priority. This solution can also take advantage o the JMS infrastructure support for message priority.
At start up Domibus reads all the priority rules configured in
domibus.properties. For each configured priority rule with a defined
concurrency property, Domibus creates programmatically a JMS listener
with a specific JMS selector listening to the SendMessageQueue.
Please find below an example about how to configure a rule for medium priority messages with a JMS selector, the concurrency property is mandatory:
domibus.dispatcher.priority.medium.service= bdx:noprocess
domibus.dispatcher.priority.medium.action= TC1Leg1, TC1Leg2, TC1Leg3
domibus.dispatcher.priority.medium.value=5
domibus.dispatcher.priority.medium.concurrency=10-15
Multiple JMS listeners are listening the SendMessageQueue using a JMS
selector that takes into account the message priority. JMS listeners
that are processing messages with high priority can have a higher
concurrency assigned, meaning multiple threads are assigned to process
concurrently high priority messages. This way high priority messages can
be processed faster than messages with lower priority.
UserMessages not matching any priority rule will be scheduled on the
same SendMessageQueue and handled by a default JMS listener configured
with a specific concurrency. This way it is not mandatory to define a
priority rule for all messages. The default JMS listener serves as a
catch all messages if they do not match any priority rule.
To understand the solution, the following example contains a configuration with 3 JMS listeners for handling messages with low, medium and high priority:
#low priority
domibus.dispatcher.priority.low=Low priority messages
domibus.dispatcher.priority.low.service= service1
domibus.dispatcher.priority.low.action= action2
domibus.dispatcher.priority.low.value= 1
domibus.dispatcher.priority.low.concurrency=2-5

#medium priority
domibus.dispatcher.priority.medium=Medium priority messages
domibus.dispatcher.priority.medium.service= service2
domibus.dispatcher.priority.medium.action= action2
domibus.dispatcher.priority.medium.value= 4
domibus.dispatcher.priority.medium.concurrency=10-15

#high priority
domibus.dispatcher.priority.medium=High priority messages
domibus.dispatcher.priority.medium.service= service3
domibus.dispatcher.priority.medium.action= action3
domibus.dispatcher.priority.high.value= 9
domibus.dispatcher.priority.medium.concurrency=30-50
#default priority for messages not matching any priority rule above
domibus.dispatcher.concurrency=5-20
5.21. SSL Offloading
In this section you will find more details about how to configure SSL offloading and when to actually use it. SSL offloading only makes sense in the context of dispatching Domibus messages to secure endpoints (i.e. a receiving PMode party having its URL configured using the “https:// scheme, instead of the “http://” one).
When dispatching to a secure endpoint, Domibus creates a secure SSL connection to the receiving party within the application. This is sometimes not desired, for example in the case when Domibus is running behind a forward SSL proxy installed as a DMZ proxy. The DMZ proxy may handle connection from applications other that Domibus, making it the central node responsible for relaying communication outside the trusted network it is serving. In this scenario, the DMZ proxy is usually configured for setting the SSL connections itself, having all the required configuration like truststores deployed in it. This is problematic, since the SSL connection cannot be initiated twice: the creation of the SSL connection needs to be offloaded from Domibus to the DMZ proxy.
5.21.1. Configuration
In the current setup, Domibus uses CXF to dispatch messages between its corners - named further below as C2 and C2. Internally, CXF uses java.net.URL for creating the connection between C2 and C3, with the possibility to use an optional HTTP/SOCKS proxy.
In the case the receiving party has a secure HTTPS endpoint, the java.net.URL is responsible for creating the SSL socket and starting the SSL handshake (see Fig. 9).
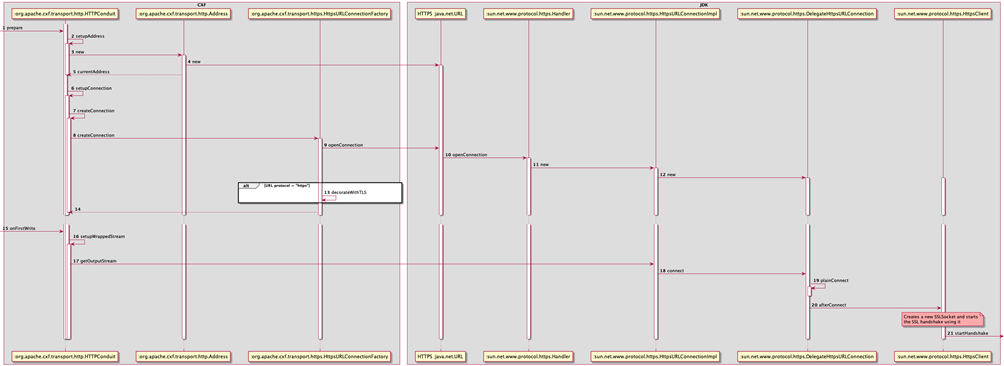
In order to offload the SSL to another application (e.g. SSL forward proxy), we need to prevent the SSL handshake to happen in Domibus, in the C2 initiating corner. A new domibus.connection.cxf.ssl.offload.enable Domibus property has been added to prevent this SSL handshake from happening within Domibus, even when the C3 endpoint uses an HTTPS URL.
When this parameter is set to true, Domibus will replace the default HTTPS URL with a URL created from the HTTP version of the endpoint address (see Fig. 10). This new URL will create a plain HTTP connection and will not trigger an SSL handshake anymore.
In order to allow the SSL forward proxy to identify the correct endpoint address, the protocol of the new HTTP URL is set back to HTTPS. The end result is that this HTTP URL will trigger a plain HTTP connection on the HTTPS endpoint address.
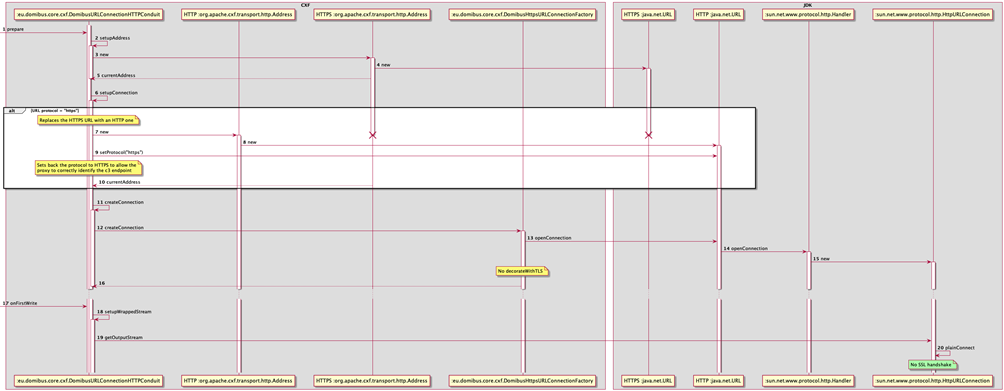
6. Administration Tools
6.1. Administration Console
Domibus administration console can be used by administrators and users to easily manage Domibus application.
The administration dashboard is reachable via the following URLs:
http://<your_server>:<your_port_number>/domibus (Tomcat, WildFly and Weblogic).
The admin console is made of several sections:
- Messages
-
in this page, the administrator can see the details of the messages and re-process them if required. The administrator can also navigate through the messages history and download specific messages if needed.
- Message Filter
-
in this page, the administrator can set defined filters and access them individually for edition directly in the list.
- Error Log
-
in this page, the administrator can view the list of application errors, make searches on error messages and filter them.
- PMode
-
in this page, the administrator can upload, download and edit the PMode file. The administrator can also edit the list of parties configured in the PMode and access them individually for modification purposes. The user has also access to a list of archived PMode content that the user can restore.
- JMS Monitoring
-
in this page, the administrator can monitor and manage the contents of the JMS queues.
- Truststores
-
in this section, the user can manage the truststores.
Under Domibus, the administrator can upload a new truststore to replace the current one. There is also a button to reload the keystore from the file system (using the same keystore properties).
Under TLS Truststore, the user can manage the trusted certificates of the TLS truststore.
- Users
-
On this page, the administrator can create and manage users including: grant access rights, change passwords, assign roles, etc.
- Plugin Users
-
On this page, the administrator can manage the plugin users: create, delete, edit, grant access rights and roles, etc.
- Audit
-
On this page, the administrator has an overview of changes performed in the PMode, Parties, Message Filter and Users pages.
- Alerts
-
This page displays the alerts generated by Domibus in case of unusual behaviour of the application. The alerts are configured by the administrator.
- Connection Monitoring
-
On this page the administrator can perform basic test of the communication configuration between two access points and see the status of these connections.
- Logging
-
This page displays the logging levels of various libraries and packages and to change their levels.
- Properties
-
This page displays the Domibus and external modules properties and their values and allows to change them.
- Domains
-
This page displays the existing domains in Multi tenancy configuration and allows to activate or de-activate them at runtime.
- Change Password
-
It is accessible from the hamburger menu found at the top-right corner of the screen. On this page the administrator can change his/her password if it is about to expire. This page is displayed also automatically, after the login, if the user has the default password.
6.1.1. Multitenancy
In Multitenancy mode, each tenant domain has its own set of configuration files: Keystore, Truststore, PMode, Domain properties, etc. Users are defined for each tenant domain.
The user named super with role ROLE_AP_ADMIN, has the privileges to access all the available domains.
When logged as super, you are able to select a specific tenant domain in the upper right part of the admin console in a drop-down list (default or dom50 domain in the example below):

6.2. Message Log
Domibus administration dashboard includes a message logging page that gives the administrator information related to sent messages, received messages and their status (Sent, Received, Failed, acknowledgeD, etc.):
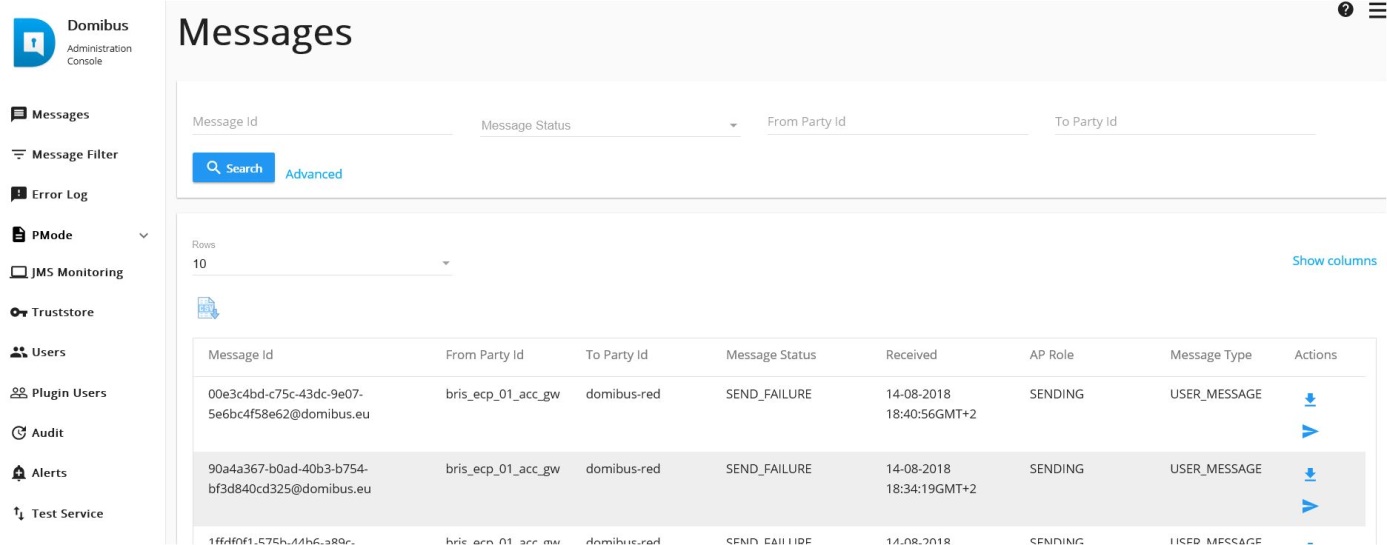
There is also support for downloading the non-repudiation XML receipts.
The following state machines illustrate the evolution of the processing of messages according to the encountered events:


6.3. Message Filtering
Domibus allows the routing of messages to different plugins, based on some messages attributes:
-
From: initial sender (C1)
-
To: final recipient (C4)
-
Action: defined as 'Leg' in the PMode
-
Service: as defined in the PMode
The following rules apply:
-
Domibus takes into account the ordered list of 'filters' to route all messages. The first filter matching the filter criteria will define the target plugin. The order of the plugin is therefore important in the routing process.
|
Note
|
|
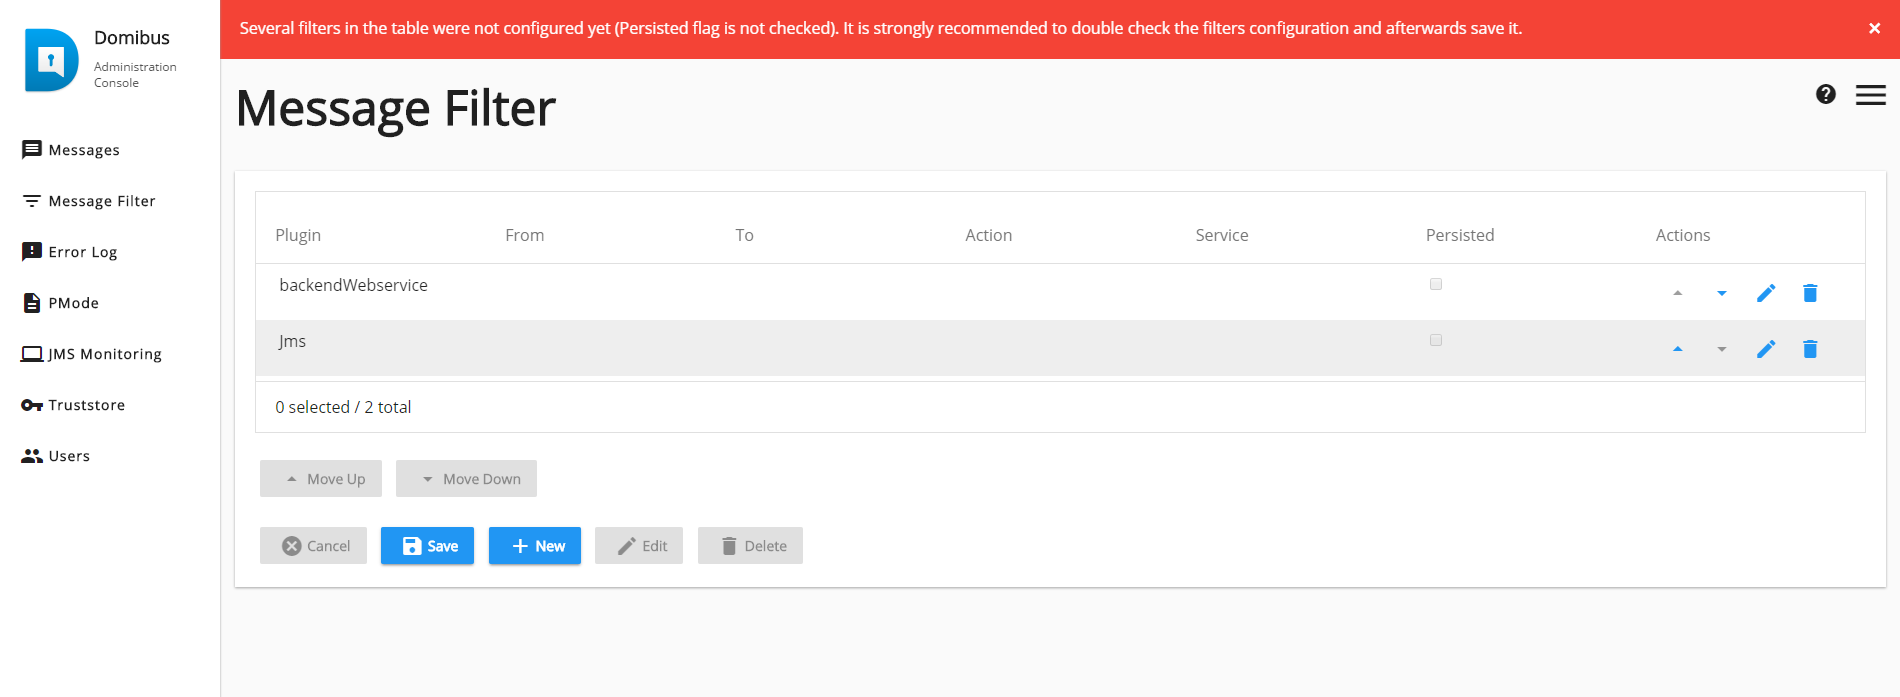
-
One plugin may be applied to multiple filters. This is done by the use of the 'OR' criteria. (cf. backendWebservice in the example below).
-
Multiple attributes could also be defined in one filter. This is done by the use of the 'AND' criteria. (cf. the first filter in the example below).
-
One filter may have no criteria, meaning that all messages (not matching previous filters) will be routed to the corresponding plugin automatically. As a result, subsequent filters will therefore not be considered for any incoming message. In the example below, the last filter routes all remaining messages to plugin 'backendWebservice'.
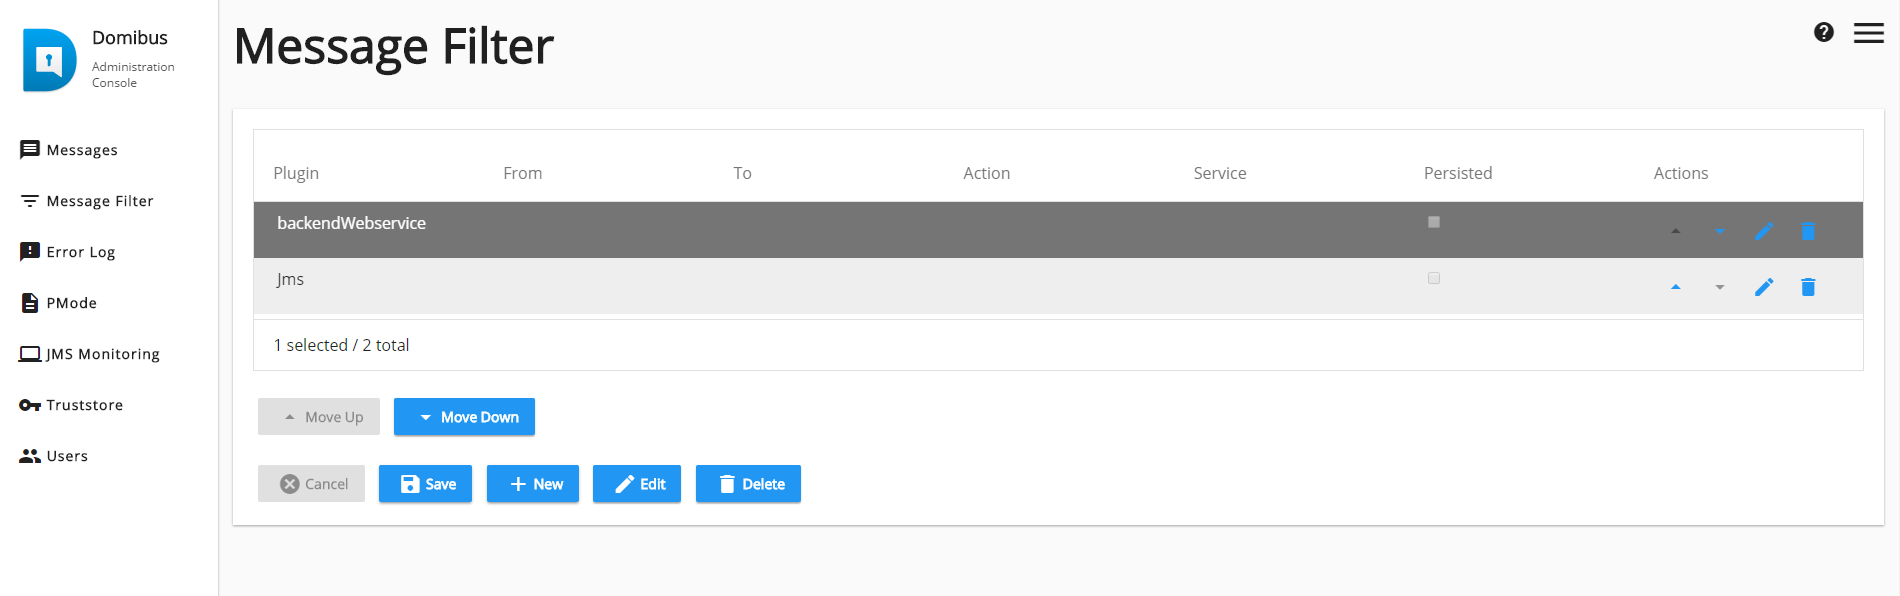
Use the New and Delete buttons to create or delete a filter.
As the order matters, move up and down actions allow placing each filter in the right order:
Cf. Move Up and Move Down buttons.
After some changes have been applied to the filters, the Cancel and Save buttons become active:
-
Press Cancel to cancel the changes
-
Press Save to save the changes and activate them immediately.
The console will ask the user to confirm the operation, before proceeding.
Example of message attributes used for routing and matching the first filter used in the example above:
-
Action:
TC1Leg1 -
Service:
bdx:noprocess:tc2 -
From:
domibus-blue:urn:oasis:names:tc:ebcore:partyid-type:unregistered -
To:
domibus-red:urn:oasis:names:tc:ebcore:partyid-type:unregistered
That information can be found in the incoming message received by Domibus (e.g. see below):
<ns:PartyInfo>
    <ns:From>
    <ns:PartyId
        type="urn:oasis:names:tc:ebcore:partyid-type:unregistered">domibus-blue</ns:PartyId>
    <ns:Role>http://docs.oasis-open.org/ebxml-msg/ebms/v3.0/ns/core/200704/initiator</ns:Role>
    </ns:From>
    <ns:To>
    <ns:PartyId
        type="urn:oasis:names:tc:ebcore:partyid-type:unregistered">domibus-red</ns:PartyId>
    <ns:Role>http://docs.oasis-open.org/ebxml-msg/ebms/v3.0/ns/core/200704/responder</ns:Role>
    </ns:To>
</ns:PartyInfo>
<ns:CollaborationInfo>
    <ns:Service type="tc1">bdx:noprocess</ns:Service>
    <ns:Action>TC1Leg1</ns:Action>
</ns:CollaborationInfo>
6.4. Application Logging
6.4.1. Domibus log files
Domibus has three log files listed below:
domibus.log-
this is the main log file log and contains both the security and business logs plus miscellaneous logs as debug information, logs from one of the framework used by the application, etc.
domibus-security.log-
this log file contains all the security related information. For example, you can find information about the clients who connect to the application. By default, the security information is included in domibus.log and this log is disabled
domibus-business.log-
this log file contains all the business related information. For example, when a message is sent or received, etc. By default, the business information is included in domibus.log and this log is disabled.
statistics.log-
includes information on the occurrence of different events (receive message, submit message, etc).
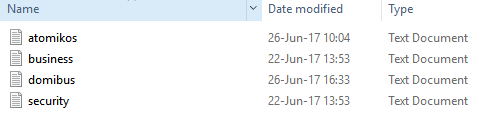
6.4.2. Logging properties
It is possible to modify the configuration of the logs by editing the logging properties file:
<edelivery_path>/conf/domibus/logback.xml
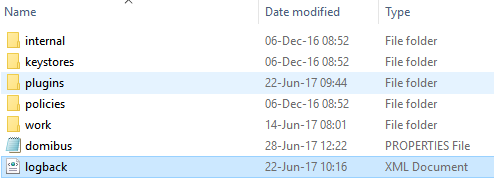
Async logging
It is possible to improve logging speed and reduce logging latency by
using async logging. An example is present in the logging properties file:
<edelivery_path>/conf/domibus/logback.xml.
-
Uncomment the part:
<!-- Async logging: uncomment this--> <!-- <appender name="DEFAULT-ASYNC-FILE" class="ch.qos.logback.classic.AsyncAppender">--> <!-- <queueSize>3000</queueSize>--> <!-- <discardingThreshold>0</discardingThreshold>--> <!-- <appender-ref ref="file" />--> <!-- </appender>--> -
Comment the line
<appender-ref ref="file"/> -
Uncomment the line:
<!-- <appender-ref ref="DEFAULT-ASYNC-FILE" /> --> -
The root logging should look like this:
<root level="WARN"> <appender-ref ref="DEFAULT-ASYNC-FILE" /> <appender-ref ref="stdout"/> </root> -
Restart the application server
6.4.3. Error Log page
To go to the error log page of the Domibus Admin Console, click on the Error log menu entry.
This option lists all the Message Transfers error logs and includes the ErrorSignalMessageId, ErrorDetail and Timestamp. You can sort messages by using the up or down arrow to search for a specific message.
6.5. PMode
In the Administration console you can view the content of the current PMode:

You can edit the content of your current PMode in the administration console and save the changes by clicking on Save or discard the changes by clicking on Cancel. You can upload a PMode file or download the current one.
Under Archive the history of the PMode changes is displayed:

Domibus keeps a snapshot of the PMode each time the PMode is modified. The user can restore a particular version and make it the current PMode by clicking on the restored button at the far right of the table.
Under Parties, the user can manage the parties in the PMode. Parties can be searched using filter criteria, they can be added, updated or deleted.

The PMode is updated and a new PMode snapshot is created when parties are added, updated or deleted.
6.6. Queue Monitoring
|
Note
|
To prevent the user from moving messages from any queue to any other queue:
|
Domibus uses the following JMS queues to handle the messages:
| Destination Type |
JNDI name | Comment/ Description |
|---|---|---|
Queue |
|
No redelivery because redelivery of MSH messages is handled via ebMS3/AS4. This queue is used for scheduling messages for sending via the MSH. |
Queue |
|
Notifications about received messages (by the MSH) that do not match any backend routing criteria will be sent to this queue. In production environment, this queue should be monitored in order to handle those messages manually. |
Topic |
|
This topic is used for sending commands to all nodes in a cluster. For example, it is used after a PMode was uploaded in order to notify all nodes to update their PMode cache (in case caching is enabled). |
Queue |
|
This queue is used for sending replies back to the sender of a message. Replies contain: a correlationId, ebMS3 messageId (if possible), error messages (if available). |
Queue |
|
Messages received by the MSH (that match the routing criteria for the JMS plugin) will be sent to this queue. |
Queue |
|
This queue is the entry point for messages to be sent by the sending MSH. |
Queue |
|
This queue is used to inform the receiver of a message that an error occurred during the processing of a received message. |
Queue |
|
This queue is used to inform the sender of a message that an error occurred during the processing of a message to be sent. |
Queue |
|
Used for sending notifications to the configured JMS plugin. |
Queue |
|
This queue is used to notify the configured plugin about the status of the message to be sent. |
Queue |
|
Used for sending notifications to the configured WS plugin. |
Queue |
|
This is the Dead Letter Queue of the application. The messages from other queues that reached the retry limit are redirected to this queue. |
|
Note
|
By setting a value to the optional attribute AsyncNotification in the LegConfiguration in the PMode we can override the way the Core sends notifications to the plugins, the notifications are sent asynchronously when the value is true or synchronously when false. If the attribute is not present then it is ignored. |
All these queues can be monitored and managed using the JMS Monitoring page, which is accessible from the JMS Monitoring menu of the administration console:

|
Warning
|
For Tomcat server, the maximum number of shown messages in the queue monitoring is defined by the ‘domibus.listPendingMessages.maxCount’ property. |
In the Source field, we have all the queues listed, along with the
number of messages pending in each queue:
If a queue is used internally by the application core, its name will start with [internal]. A regular expression is used to identify all the internal queues. The value for this regular expression can be adapted in the domibus.jms.internalQueue.expression property from the <edelivery_path>/conf/domibus/domibus.properties* file.
In the JMS Monitoring page the following operations can be performed:
-
Inspecting and filtering the messages from a queue based on the fields:
-
JMS type: the JMS header
-
Selector: in this field you can enter any JMS message properties with the correct expression to filter on it
NoteFor more information on the JMS message headers and the JMS message selector, please check the official documentation at https://docs.oracle.com/cd/E19798-01/821-1841/bnces/index.html.
-
-
Move a message:
-
Move the message from the DLQ to the original queue: Select the JMS message from the DLQ and press the Move icon (in RED marker):
-
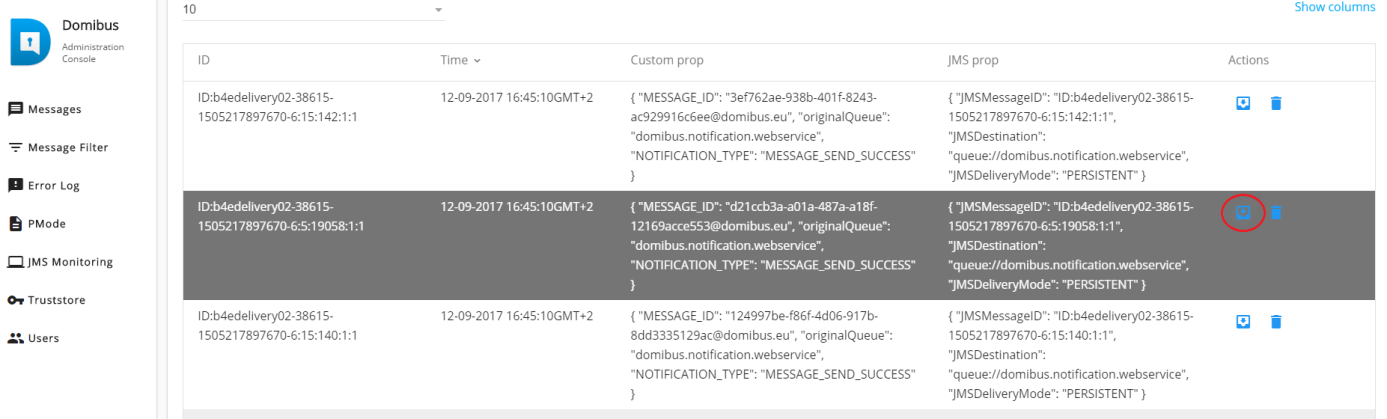
Select the original queue from the Destination dropdown list in the dialog box:
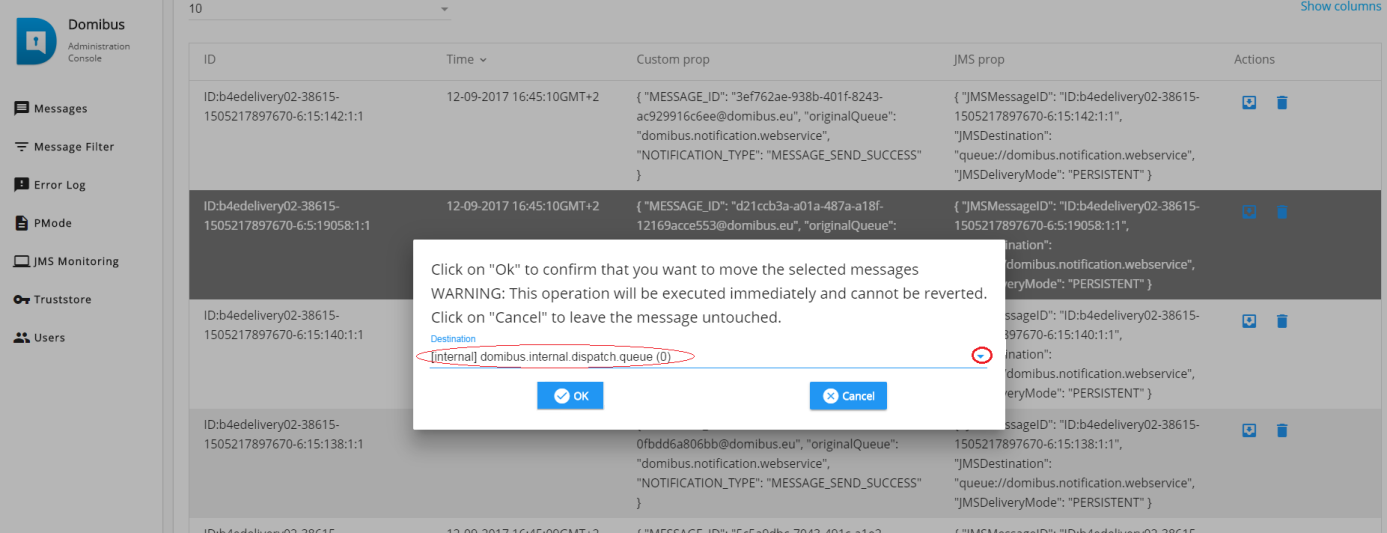
the original queue.
+ NOTE: the details of a message can be viewed by selecting it (double-clicking) from the message list:
+
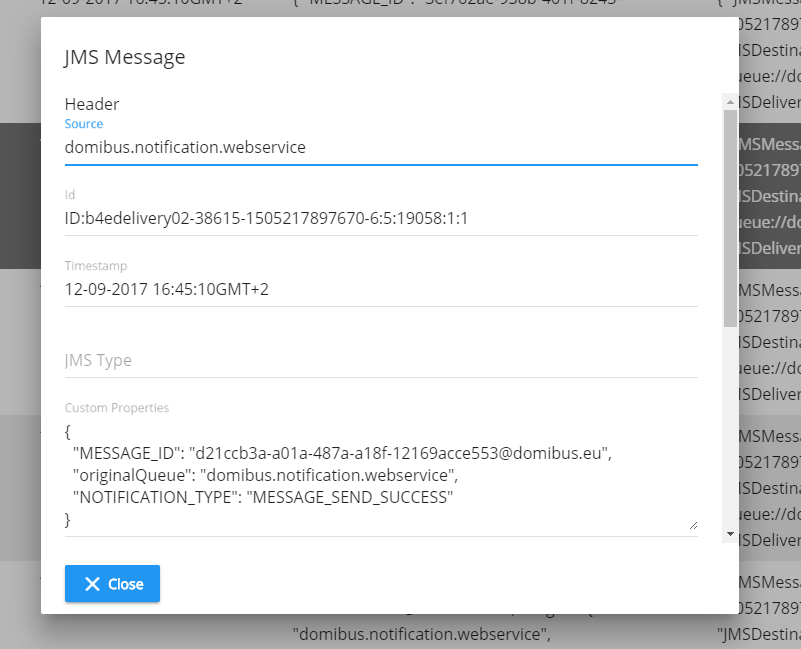
-
Click Close to exit the dialog box.
-
Move multiple messages from the DLQ to the original queue:
-
Select multiple JMS messages from the DLQ and press the Move icon button:
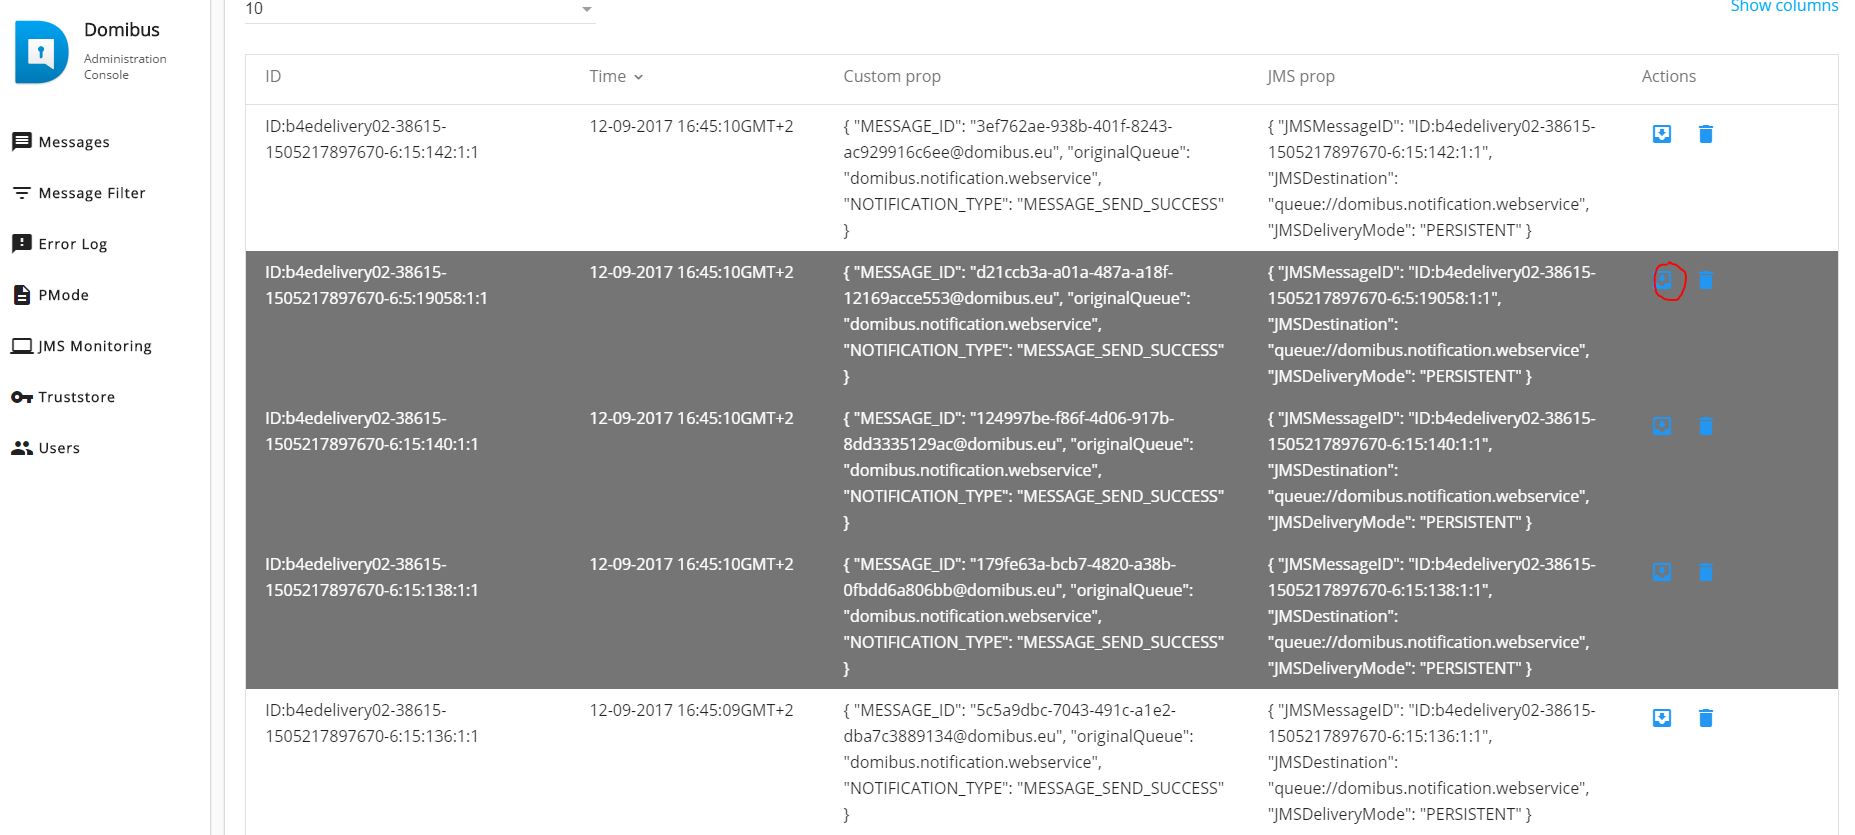
-
Select the original queue from the Destination dropdown list, and click Ok.
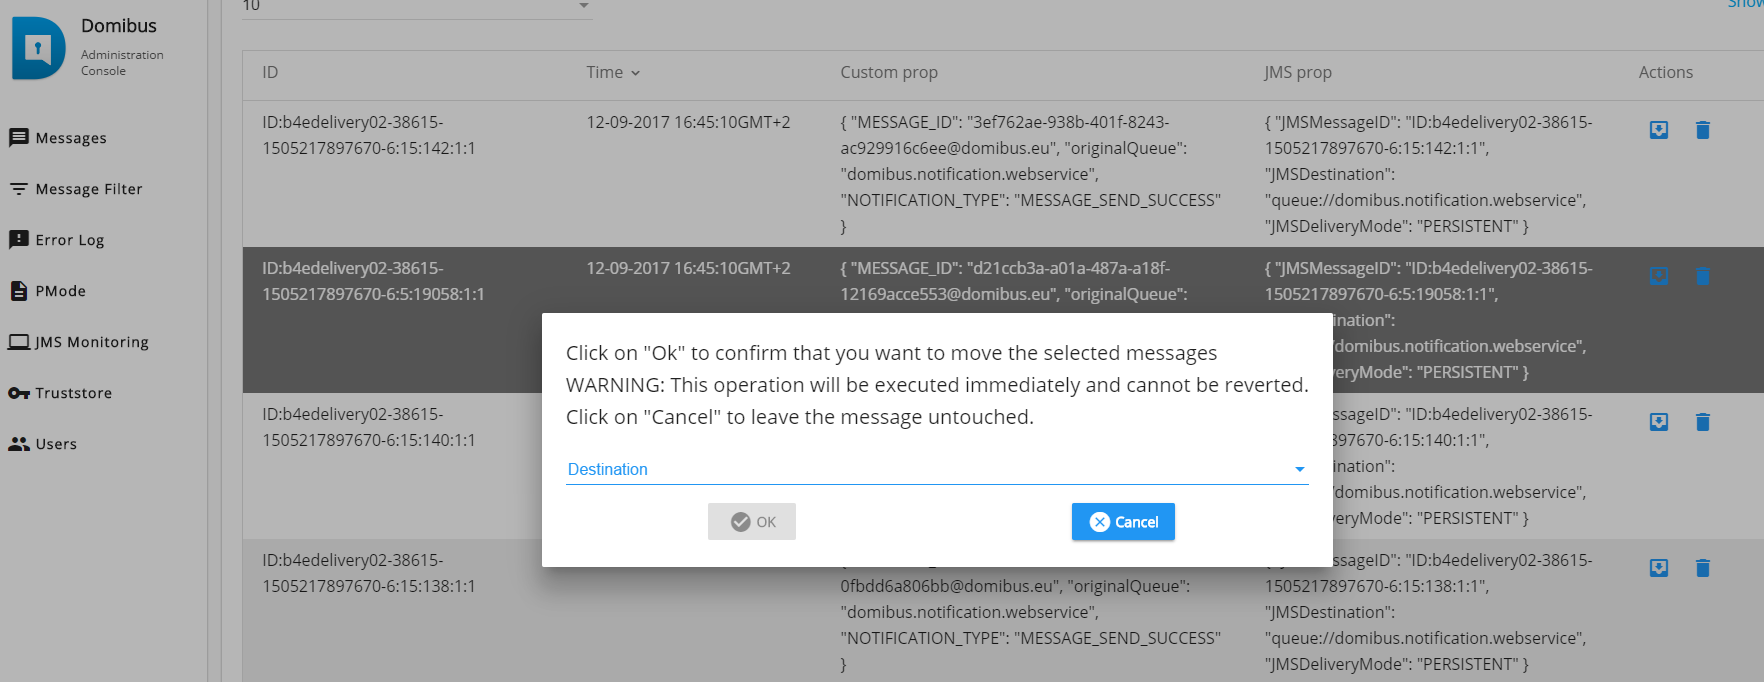
 Note
NotePlease make sure that all the selected messages came from the same source queue. Use the filtering capabilities to ensure this. -
Delete message(s): delete one or more messages from one queue:
-
Select one or several JMS messages from the source queue and press the Delete button:
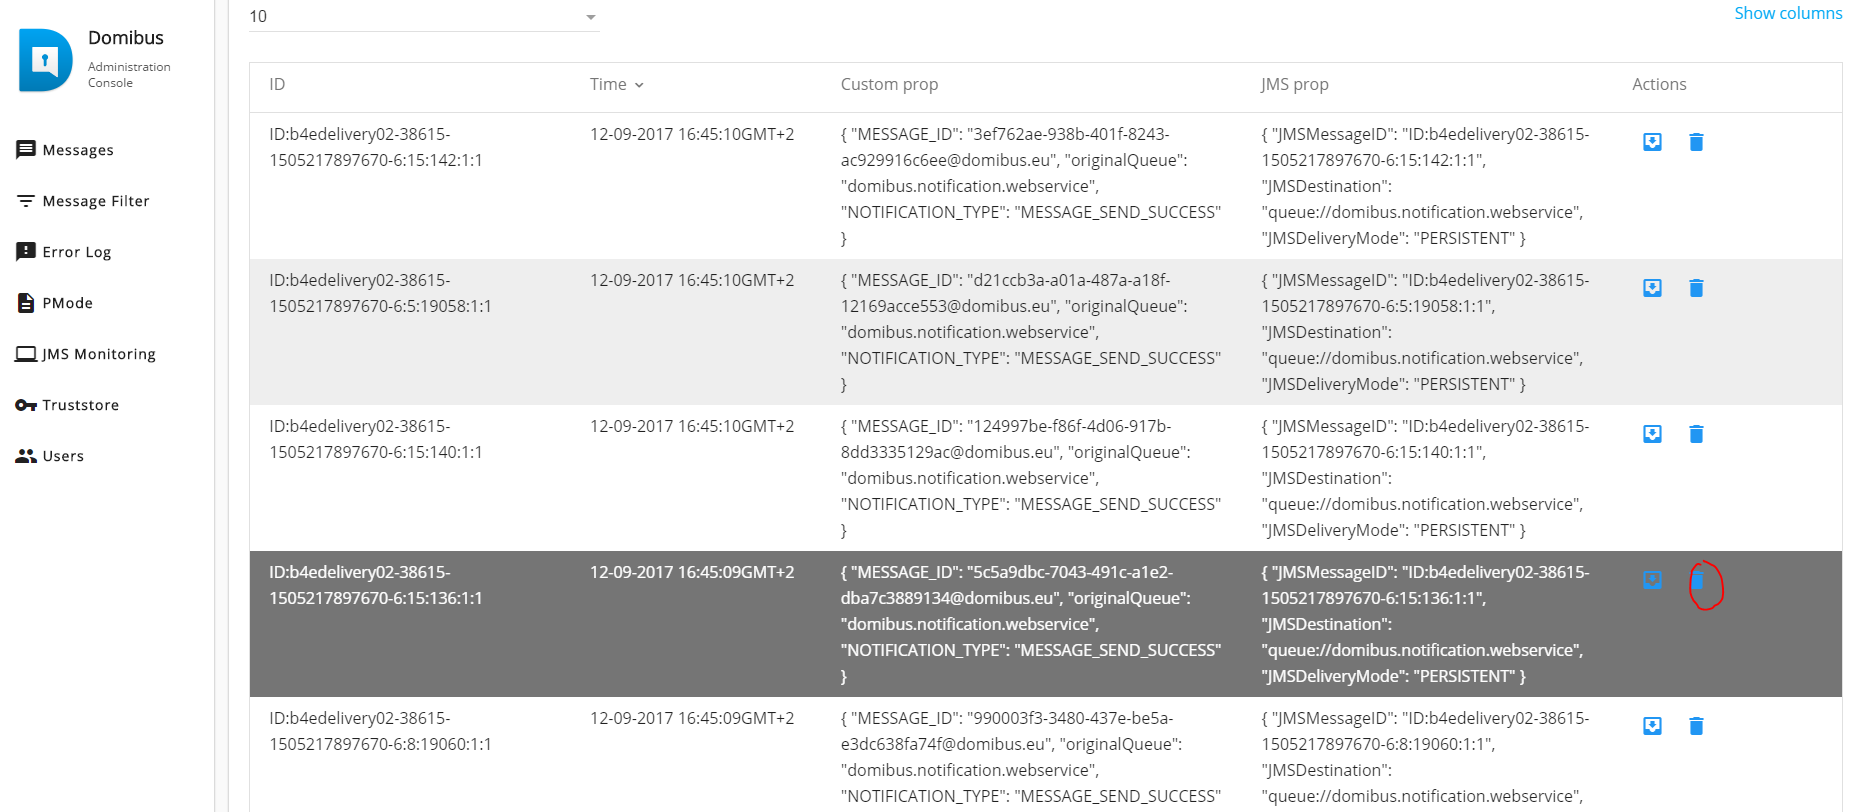
-
By clicking the Delete button, the selected messages are removed from the screen, but you still have to confirm your changes by clicking on the Save button. As long as you have not clicked on the Save button, your changes are not taken into account in the system.
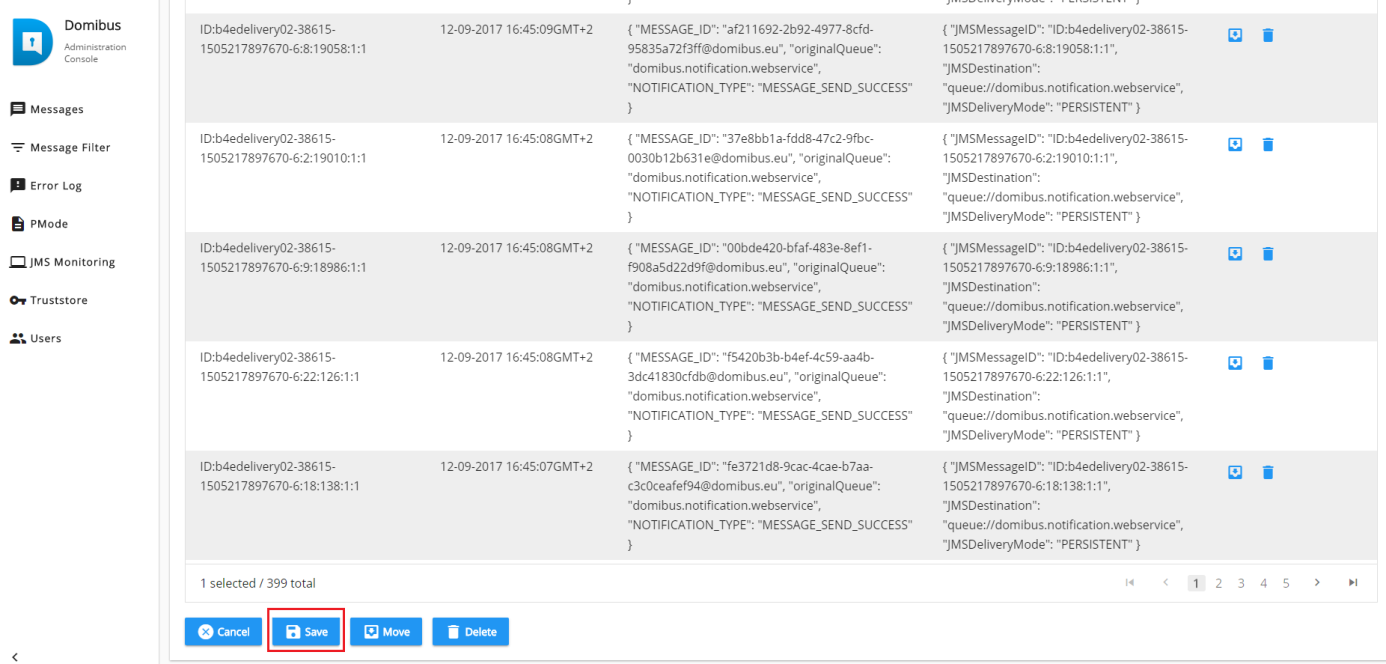
-
To cancel the changes you made, click on the Cancel button instead:
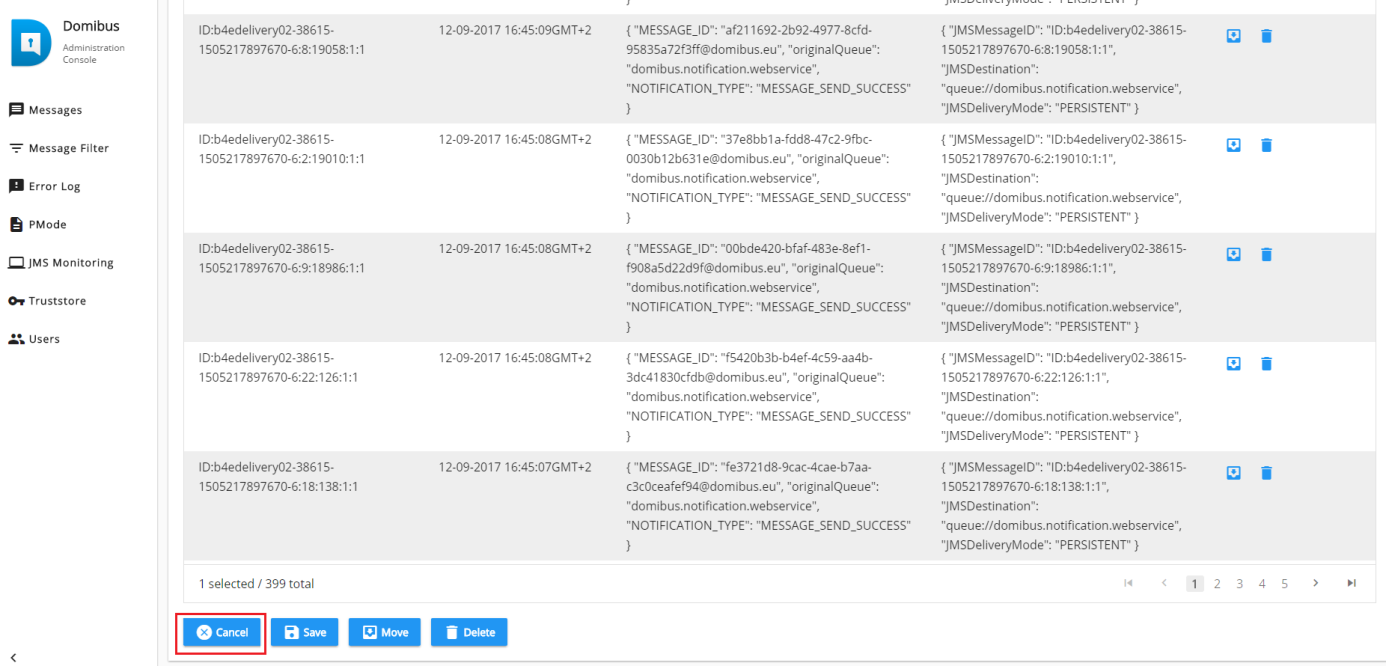
6.7. Configuration of the queues
Queues should be configured appropriately and according to the backend system needs and re-delivery policy.
6.7.1. Tomcat
Domibus uses ActiveMQ as JMS broker. The various queues are configured in the <edelivery_path>/conf/domibus/internal/activemq.xml* file.
Please see ActiveMQ redelivery policy and configure the parameters below if needed:
<redeliveryPlugin fallbackToDeadLetter="true" sendToDlqIfMaxRetriesExceeded="true">
<redeliveryPolicyMap>
<redeliveryPolicyMap>
<defaultEntry>
<!-- default policy-->
<redeliveryPolicy maximumRedeliveries="10" redeliveryDelay="300000"/>
</defaultEntry>
<redeliveryPolicyEntries>
<redeliveryPolicy queue="domibus.internal.dispatch.queue" maximumRedeliveries="0"/>
<redeliveryPolicy queue="domibus.internal.pull.queue" maximumRedeliveries="0"/>
</redeliveryPolicyEntries>
</redeliveryPolicyMap>
</redeliveryPolicyMap>
</redeliveryPlugin>Access to the JMS messaging subsystem is protected by a username and a password in clear text
defined in the domibus.properties file <edelivery_path>/conf/domibus/domibus.properties.
It is recommended to change the password for the default user:
-
activeMQ.username=domibus -
activeMQ.password=changeit
|
Note
|
The user activeMQ.username and the password activeMQ.password
defined in the domibus.properties file are referenced in the
authentication section of the activemq.xml file provided.
|
6.7.2. WebLogic
Please use the admin console of WebLogic to configure the re-delivery limit and delay if necessary.
6.7.3. WildFly
Please use the admin console of WildFly to configure the re-delivery limit and delay if necessary.
6.8. Truststores
In the Truststores section, you can manage the Domibus truststores and TLS truststores.
You can upload a new truststore to replace the current one and define its password.
When starting Domibus for the first time, the keystore and truststore pointed to by the corresponding properties are read from the disk and saved in the database for further use. On subsequent restarts, Domibus checks if truststores are present in the database and if it is the case, Domibus will use them.
To force the reading of the keystore from the disk (even if present in the database), there is a reload button on this page.
In the TLS Truststore screen, you can manage the trusted certificates of the TLS truststore. You can upload a new truststores to replace the current one and define its password, download it and also add/remove certificates to it.
When starting Domibus for the first time, the TLS truststore present in
the clientauthentication.xml file is read from the disk and saved in the
database for further use. On subsequent restarts, Domibus checks if it
is present in the database and, if it is the case, Domibus will use it.
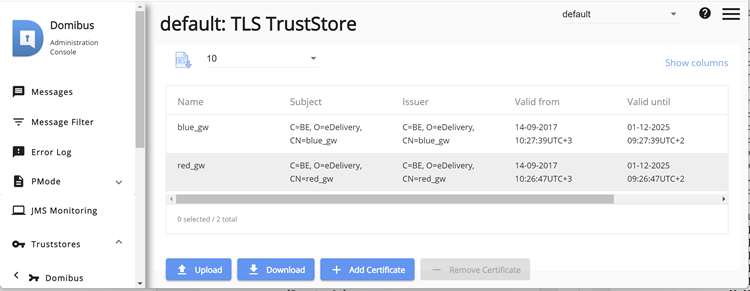
6.9. Users
6.9.1. Adding new users
New users can be added to the existing default users (admin and user) by clicking on New:
-
For each new user, you must enter a username, an email, a role and a password:
-
Click on OK:

-
Again, once the user has been created, do not forget to click on the Save button on the Users page to register your changes in the system:
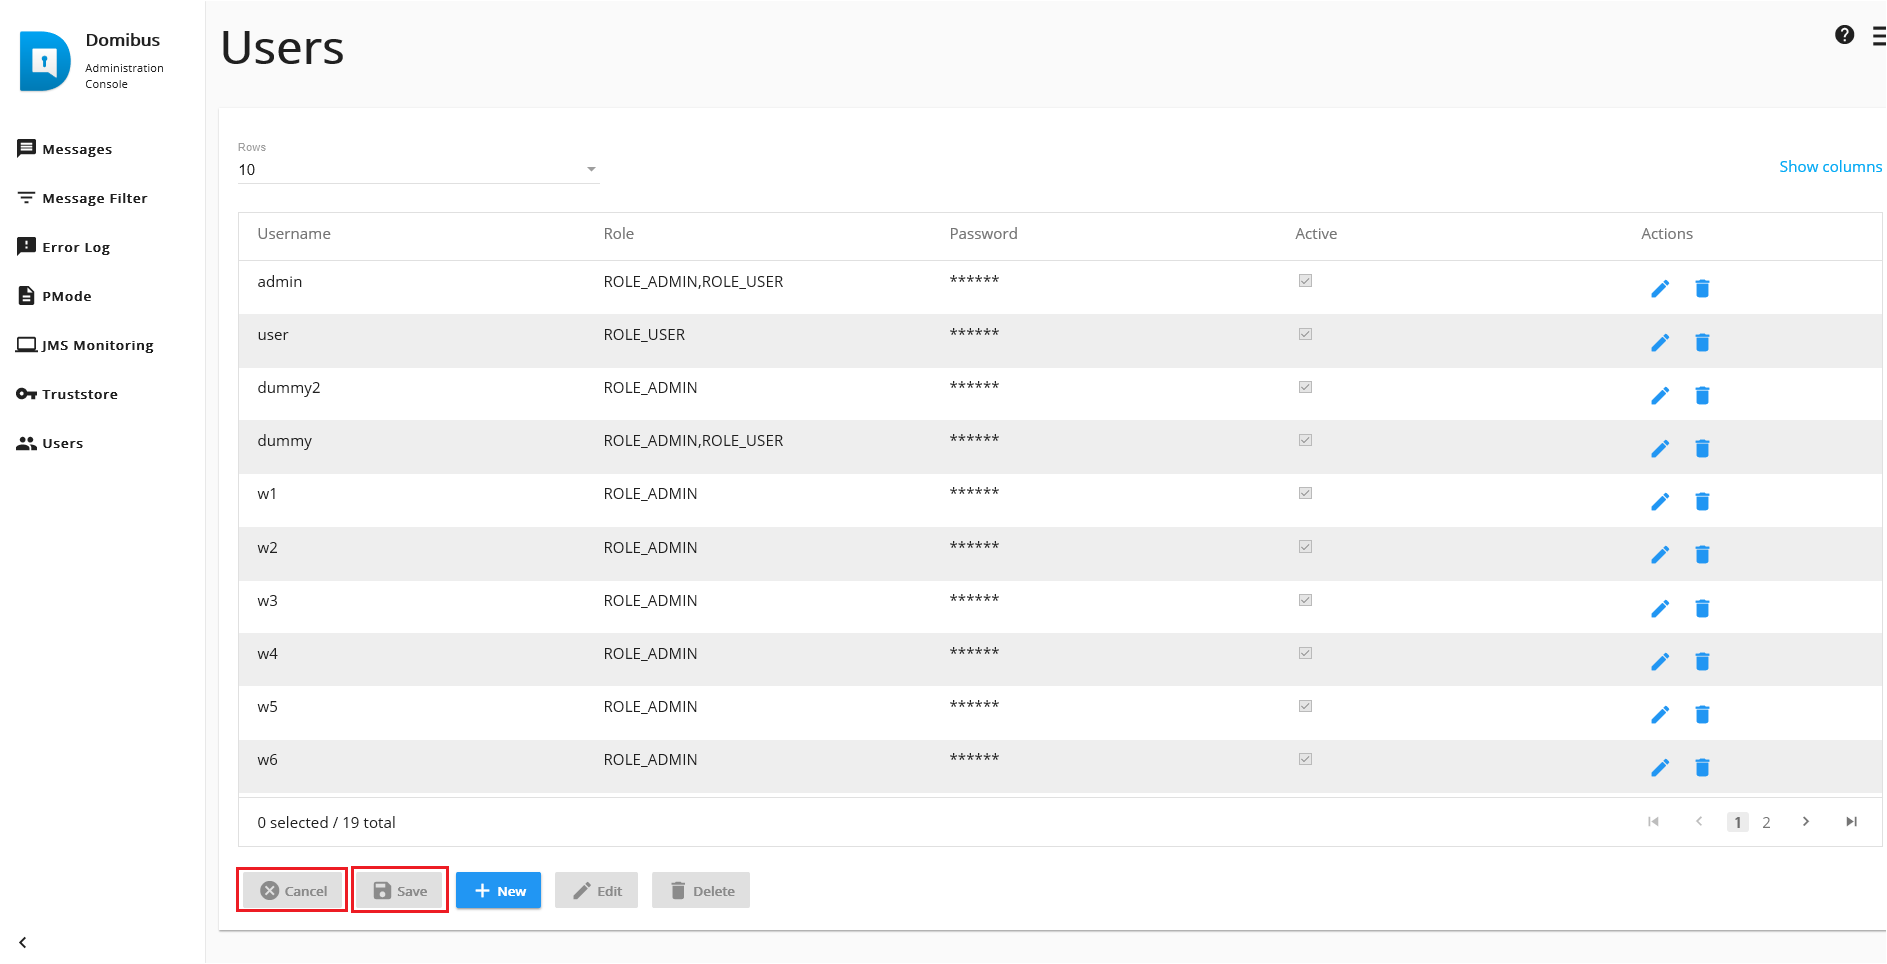
6.9.2. Changing passwords
All user passwords have an expiration period, configured in the domibus properties. Some days before expiring (also configured in properties), the user receives a warning after the login and also an alert. The new password cannot be one of the last 5 used passwords (the number can be configured). Also, the password must meet complexity rules configured in the properties. If it does not meet them, then an error message is displayed (can also be configured).
The passwords of the default users (admin, user and super users) automatically expire after 3 days. This period can be configured. Once logged-in with the default password, the system redirects the user to the Change Password page so that he/she can immediately change it. The default password check can be disabled from the properties.
-
In order to change the password for a user, navigate to the Users menu entry to obtain the list of configured users:
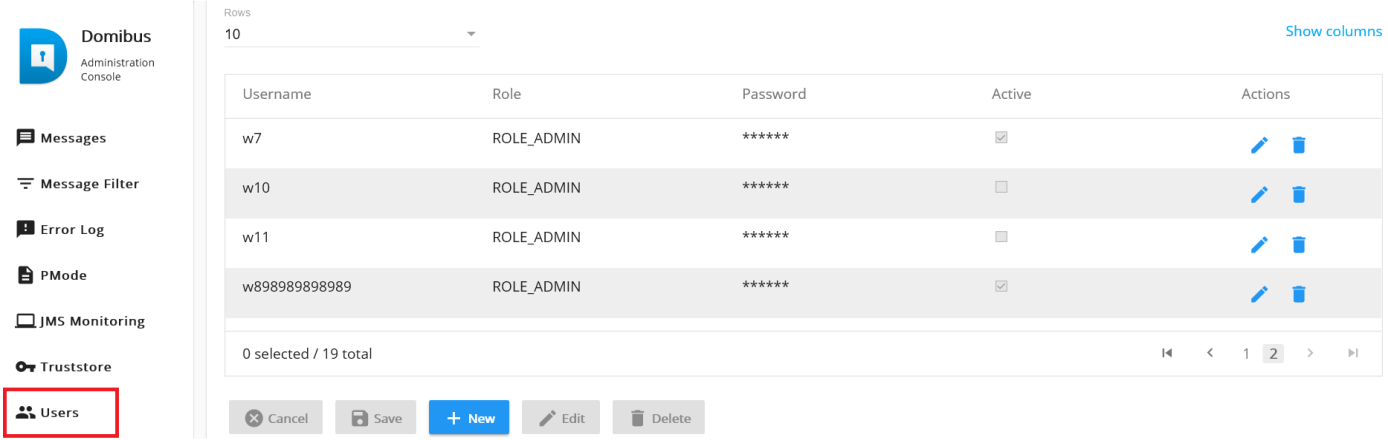
-
To edit the user details, click on the EDIT icon (in RED). DO NOT click on the BIN icon as this would DELETE the record.
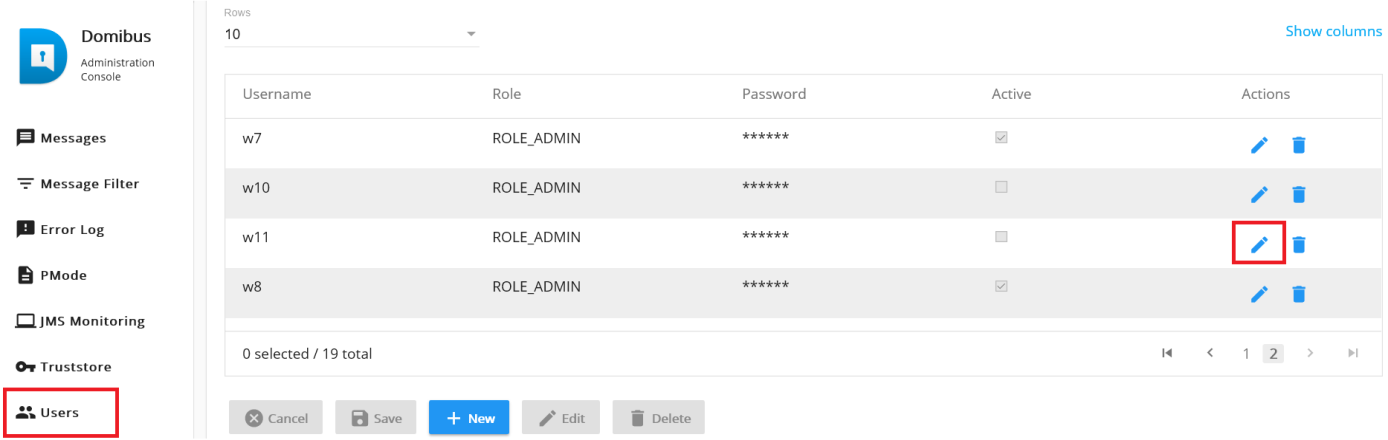
-
In the popup window, choose a new password using the rules shown:
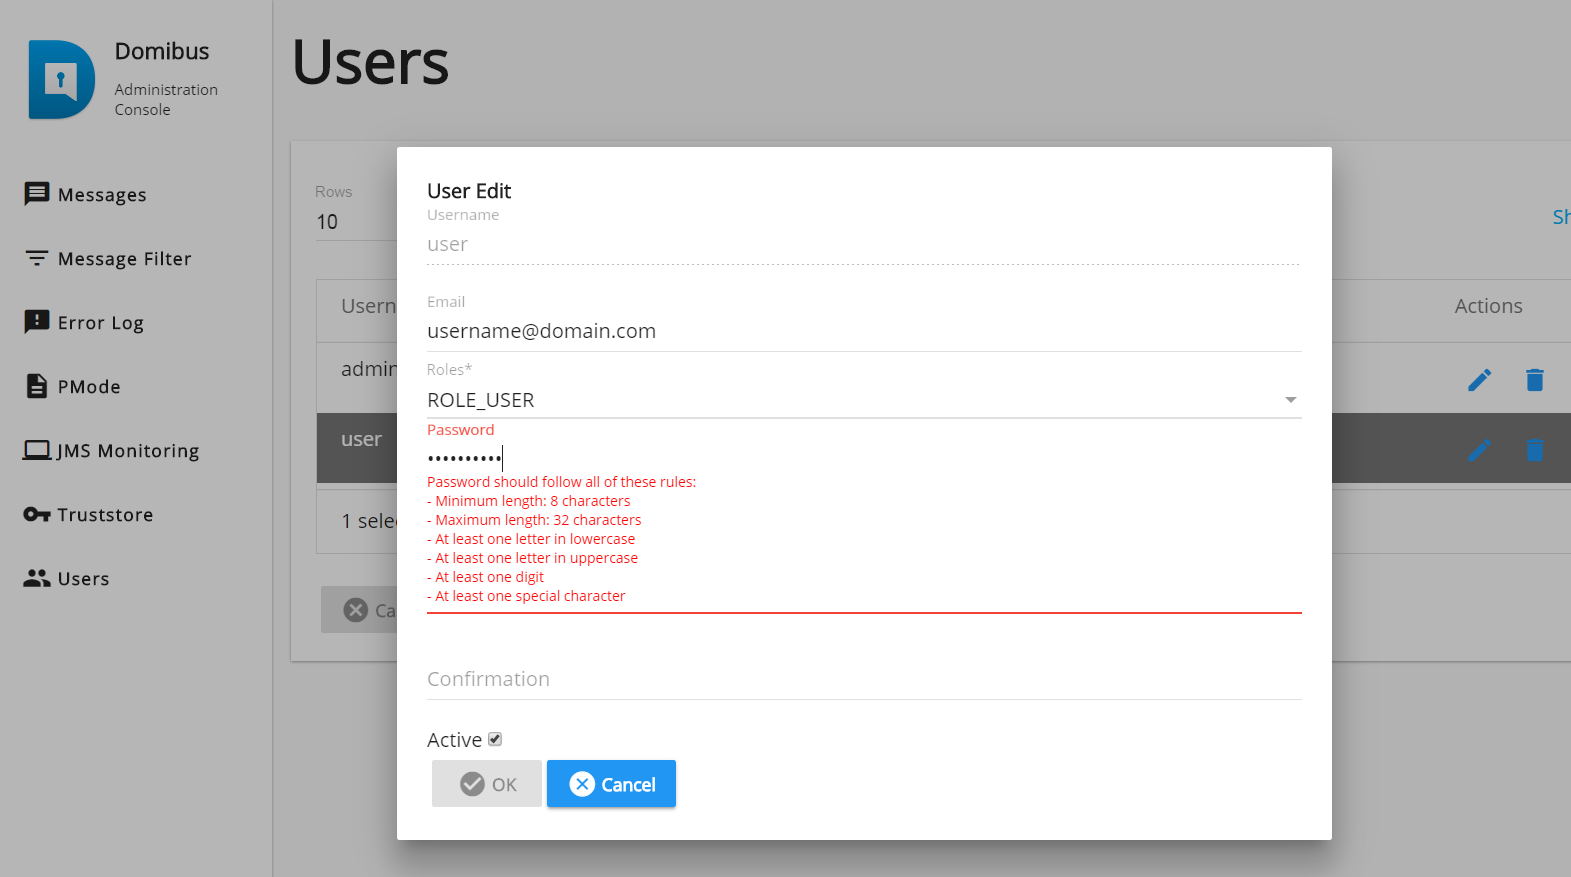
-
Confirm the password:
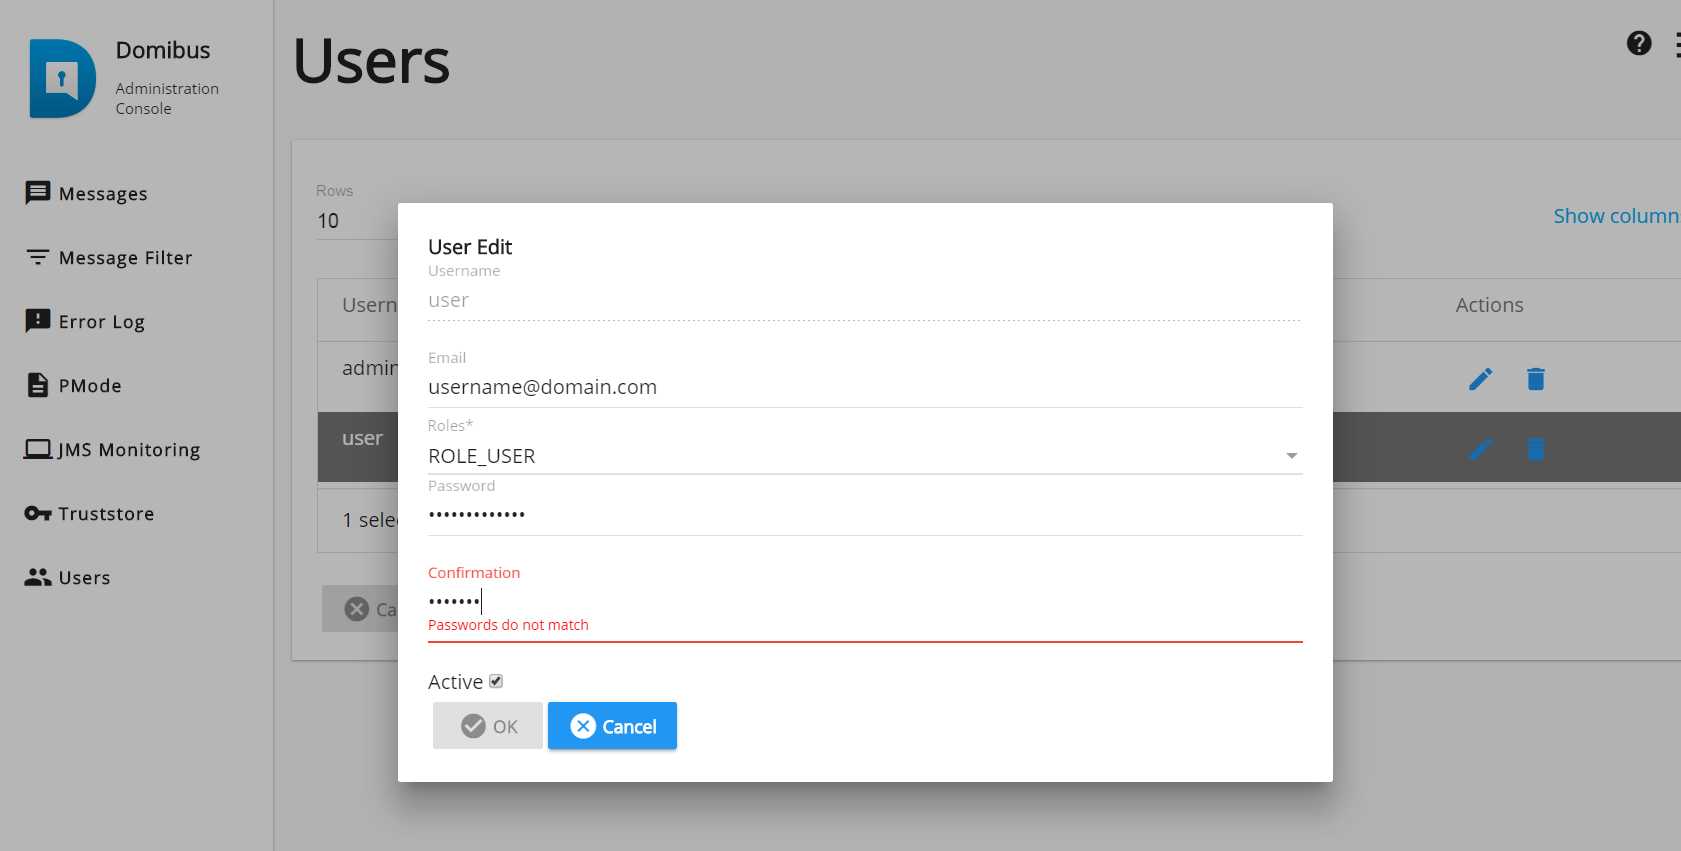
-
Click on OK:
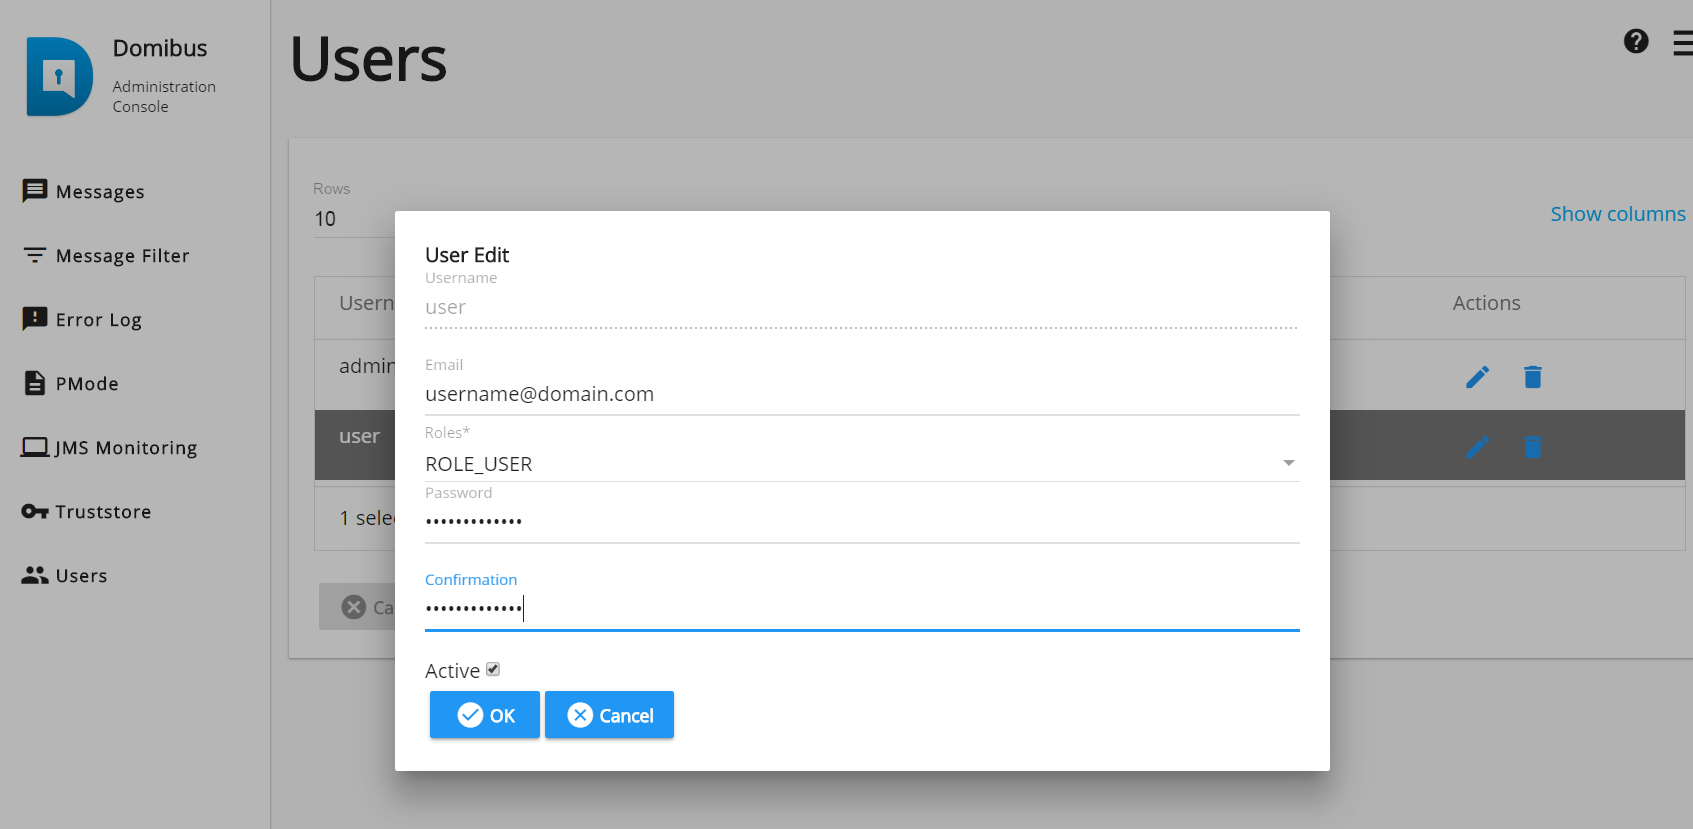
-
When done, either click on Save, to save the new password or Cancel to leave the password unchanged.
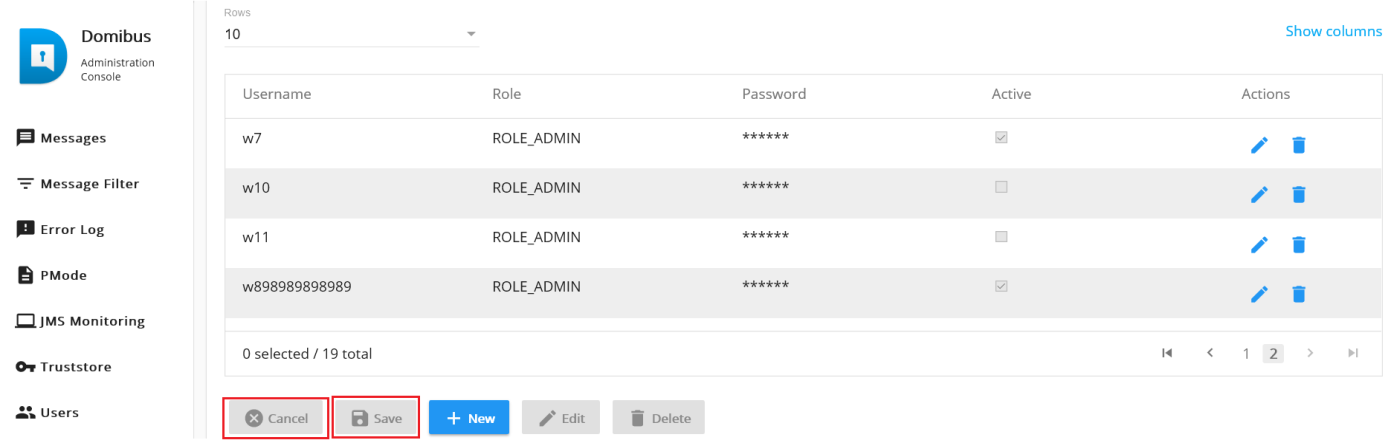
6.9.3. User Account Lockout Policy
A user account lockout policy has been implemented on Domibus Admin Console. By default, if a user tries to log to the Admin Console with a wrong password 5 times in a row, his account will be suspended (locked):
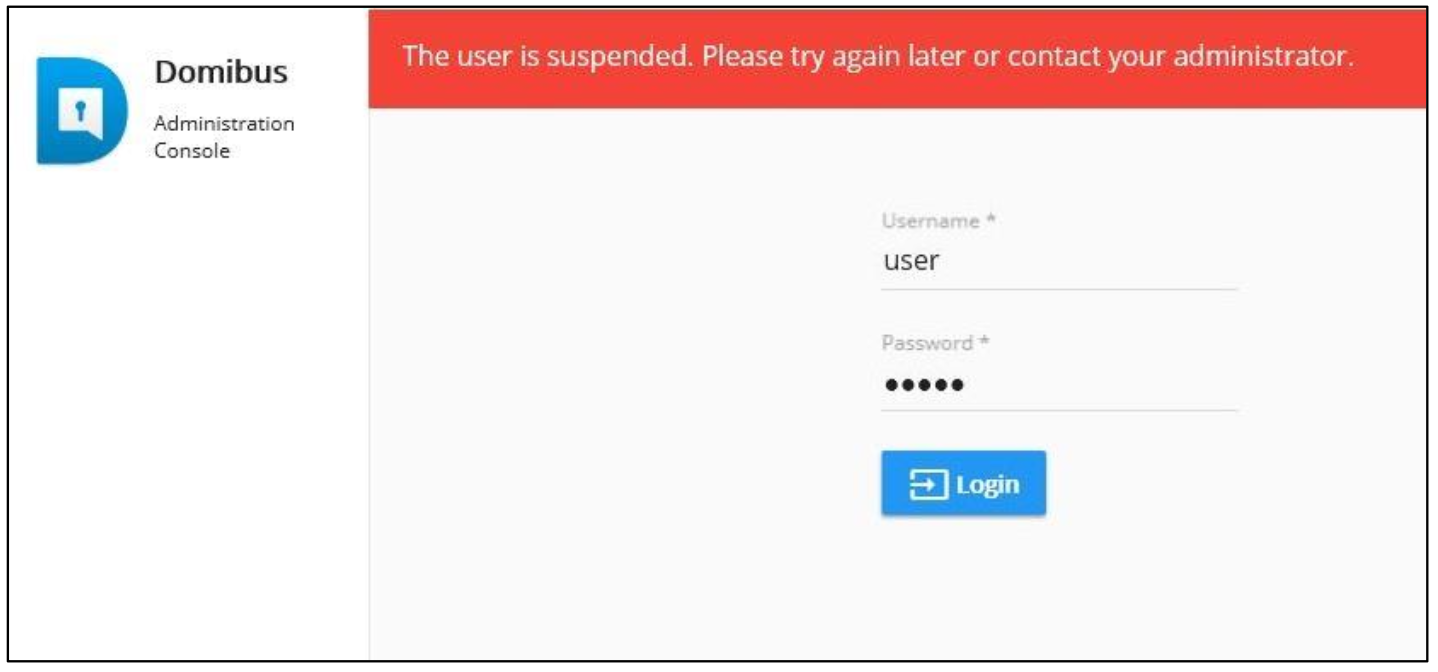
You can define in the domibus.properties file the number of failed attempts after which a user’s account will be locked.
See also, Domibus Properties.
By default, a user remains suspended during one hour before his account is automatically unlocked and the user can try to log again.
If the user wants his account to be unlocked without waiting the default one hour, he can ask his administrator to unlock the account. To unlock the account, the administrator must change the user’s status on the Admin Console from “Suspended” to “Active”.
Select the suspended user and click on “Edit”:
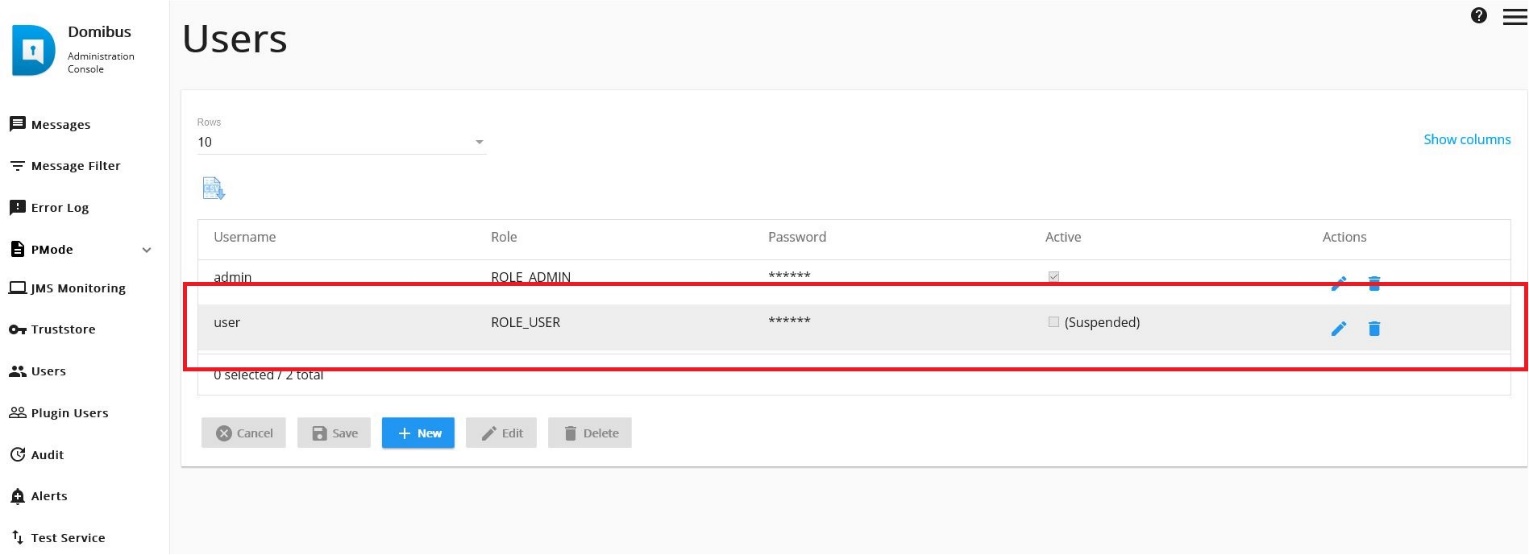
Re-activate the user (unlock it) by checking the “Active” status and confirming with OK:
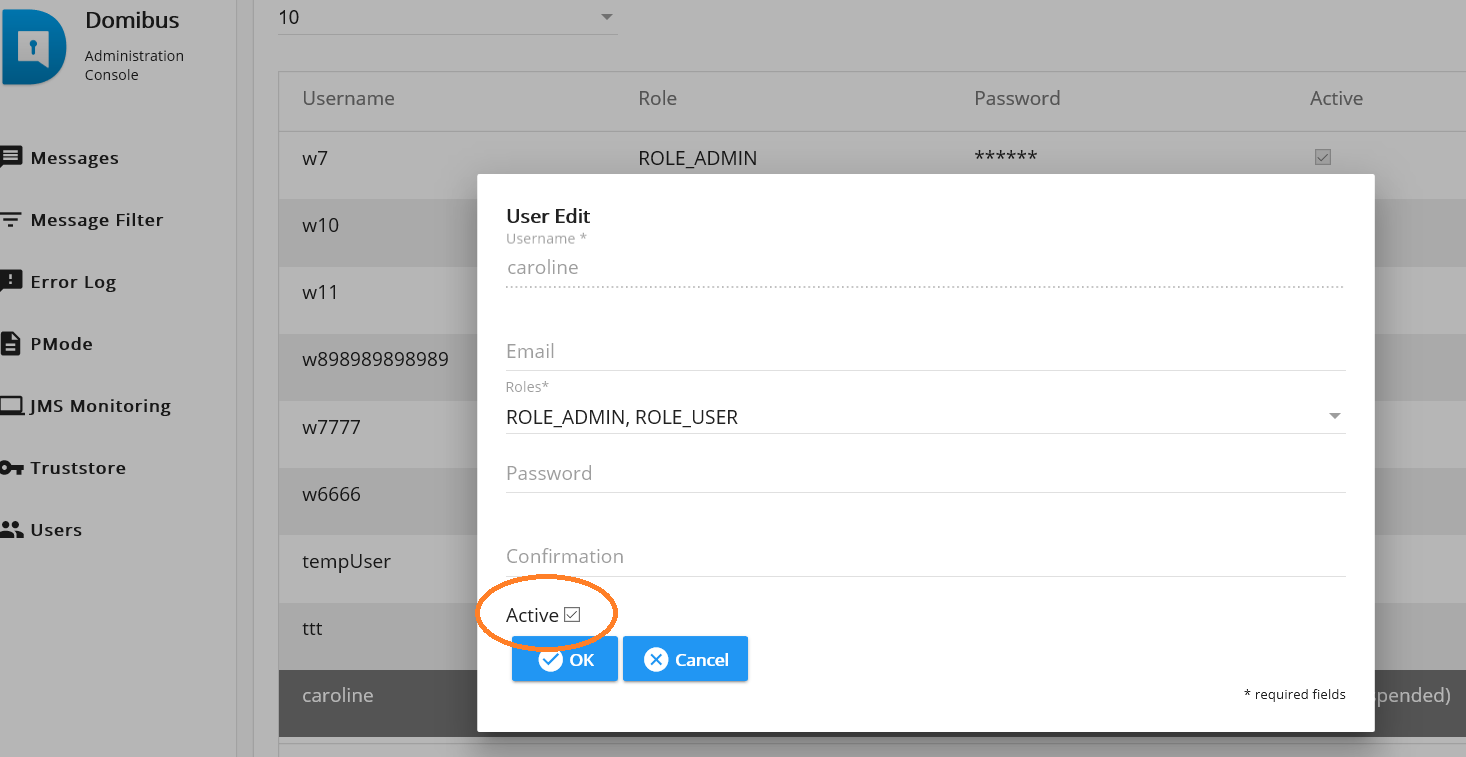
Do not forget to click on Save on the next window and then on Yes to confirm the change.
6.10. Plugin Users
In Multitenancy mode the plugins security is activated by default, no
matter if value configured in domibus.properties for the
domibus.auth.unsecureLoginAllowed property.
This is needed in order to identify the request performed by the user and associate it to a specific domain. As a result, every request sent to Domibus needs to be authenticated.
A plugin must use a configured plugin user associated to a specific domain in order to authenticate every request sent to Domibus. The management of the plugin users is implemented in the Plugin Users page:
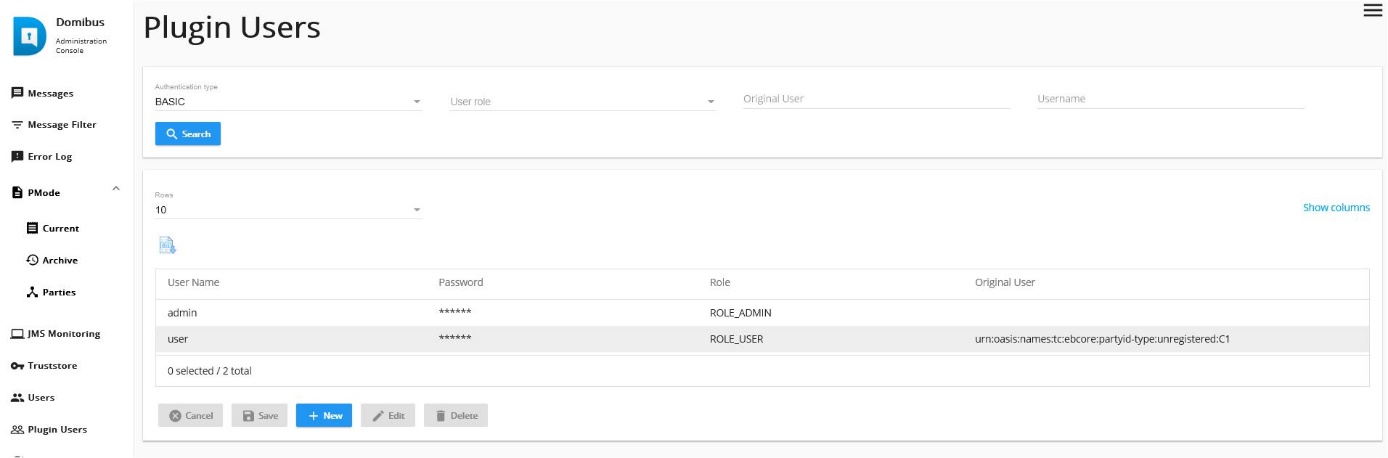
All plugin user passwords have an expiration period, configured in the domibus properties. The new password cannot be one of the last 5 used passwords (the number can be configured). Also, the password must meet complexity rules configured in the properties. If it does not meet them, then an error message is displayed (can also be configured).
The passwords of the default users expire in 1 day. This period can be configured.
The example below shows a plugin user that has been added:
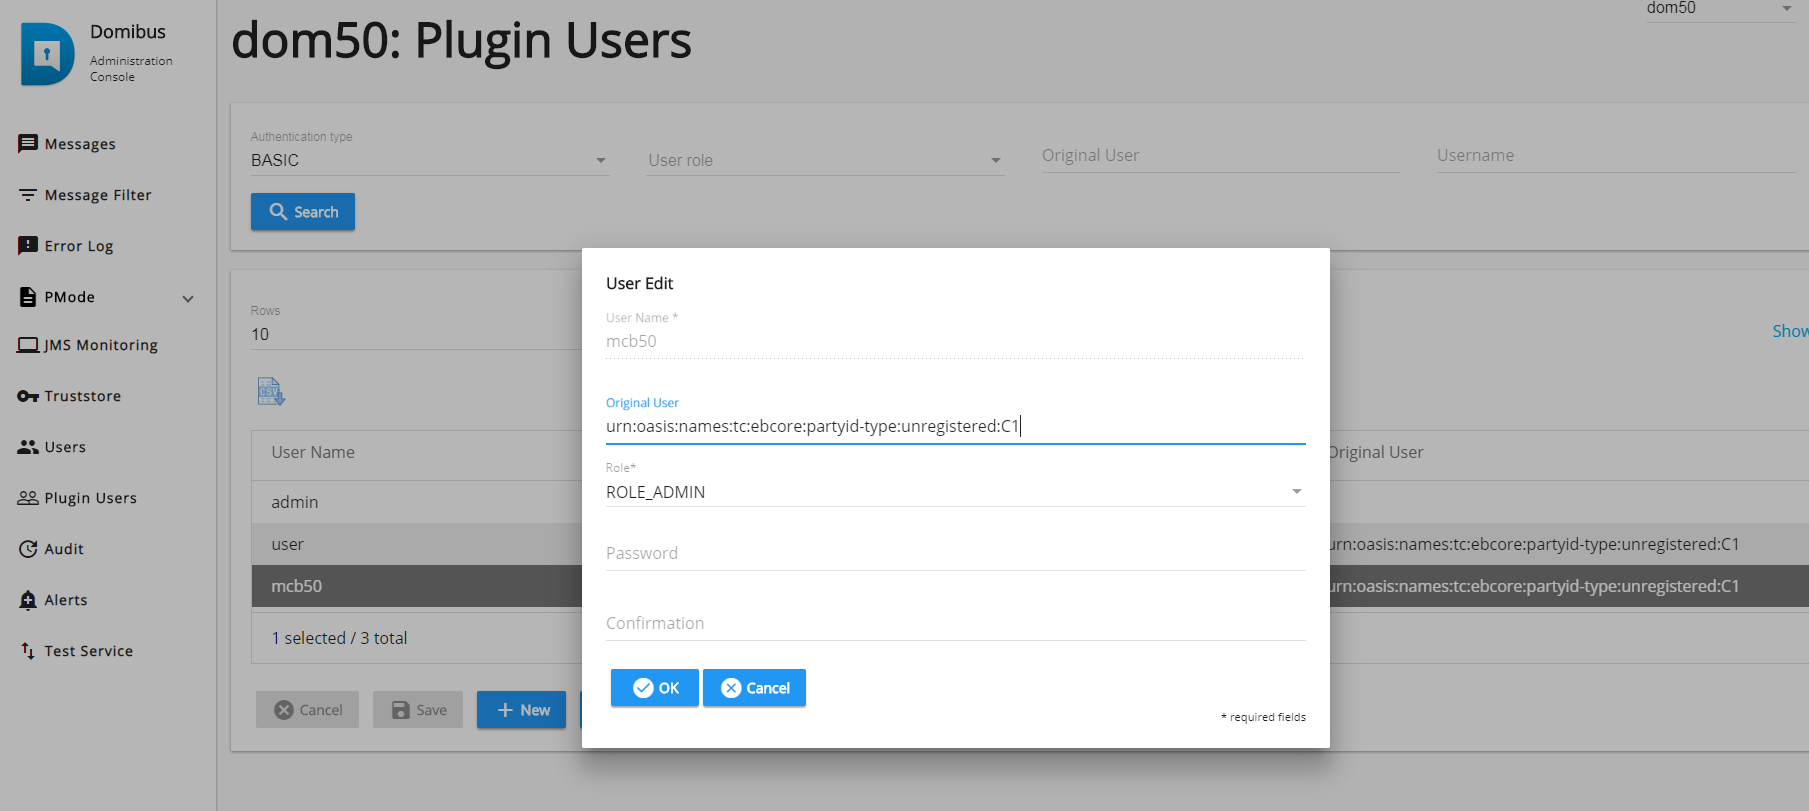
Note that the Original user ID can be obtained from the orginalSender Property in the SoapUI project as shown here:
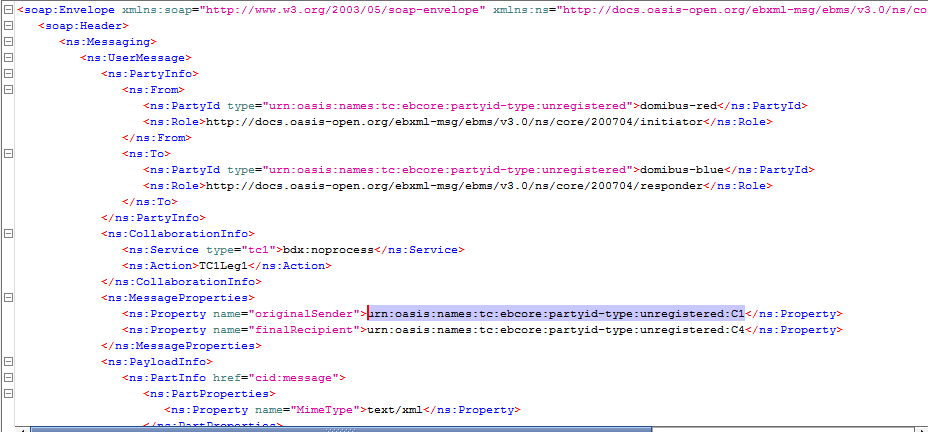
Do not forget to click on Save on the next window and then on Yes to confirm the change.
6.11. Audit
Audit support: Domibus keeps track of changes performed in the PMode, Parties, Message Filter and Users pages.
6.12. Alerts
Users can configure the alert feature as described in Alerts.
The purpose of the alert feature is to use different available media to notify the Domibus administrator in case of unusual behaviour. Currently alerts can be sent via mail.
The notification emails are sent to the destination recipient or recipients, configured in domibus properties. Also, for the alerts pertaining to the admin console users, the alerts are sent to the saved email address of the user to whom the notification is addressed.
There are three types of alerts that can be configured:
-
Message Status Change
-
Authentication Issues
-
Certificate expiration
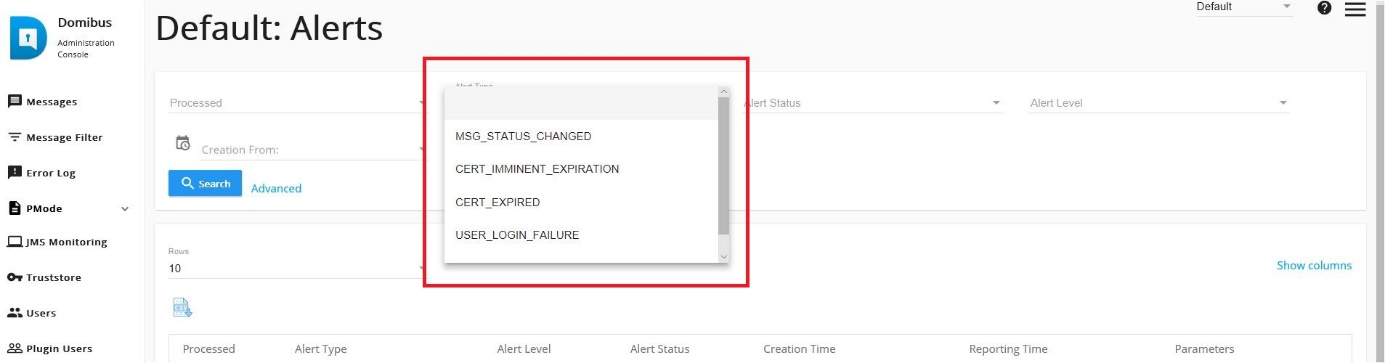
Example: If the CERT_IMMINENT_EXPIRATION alert is selected, the following screen is presented:

The generated alerts can be checked in the Alerts page of the Administration console.

6.13. Connection Monitoring
The Connection Monitoring section allows communication partners to perform a basic test of the communication configuration (including security at network, transport and message layer, and reliability) in any environment, including the production environment.
All parties that are defined in the Domibus properties are listed on the Connection Monitoring page of the Administration console, as shown below.
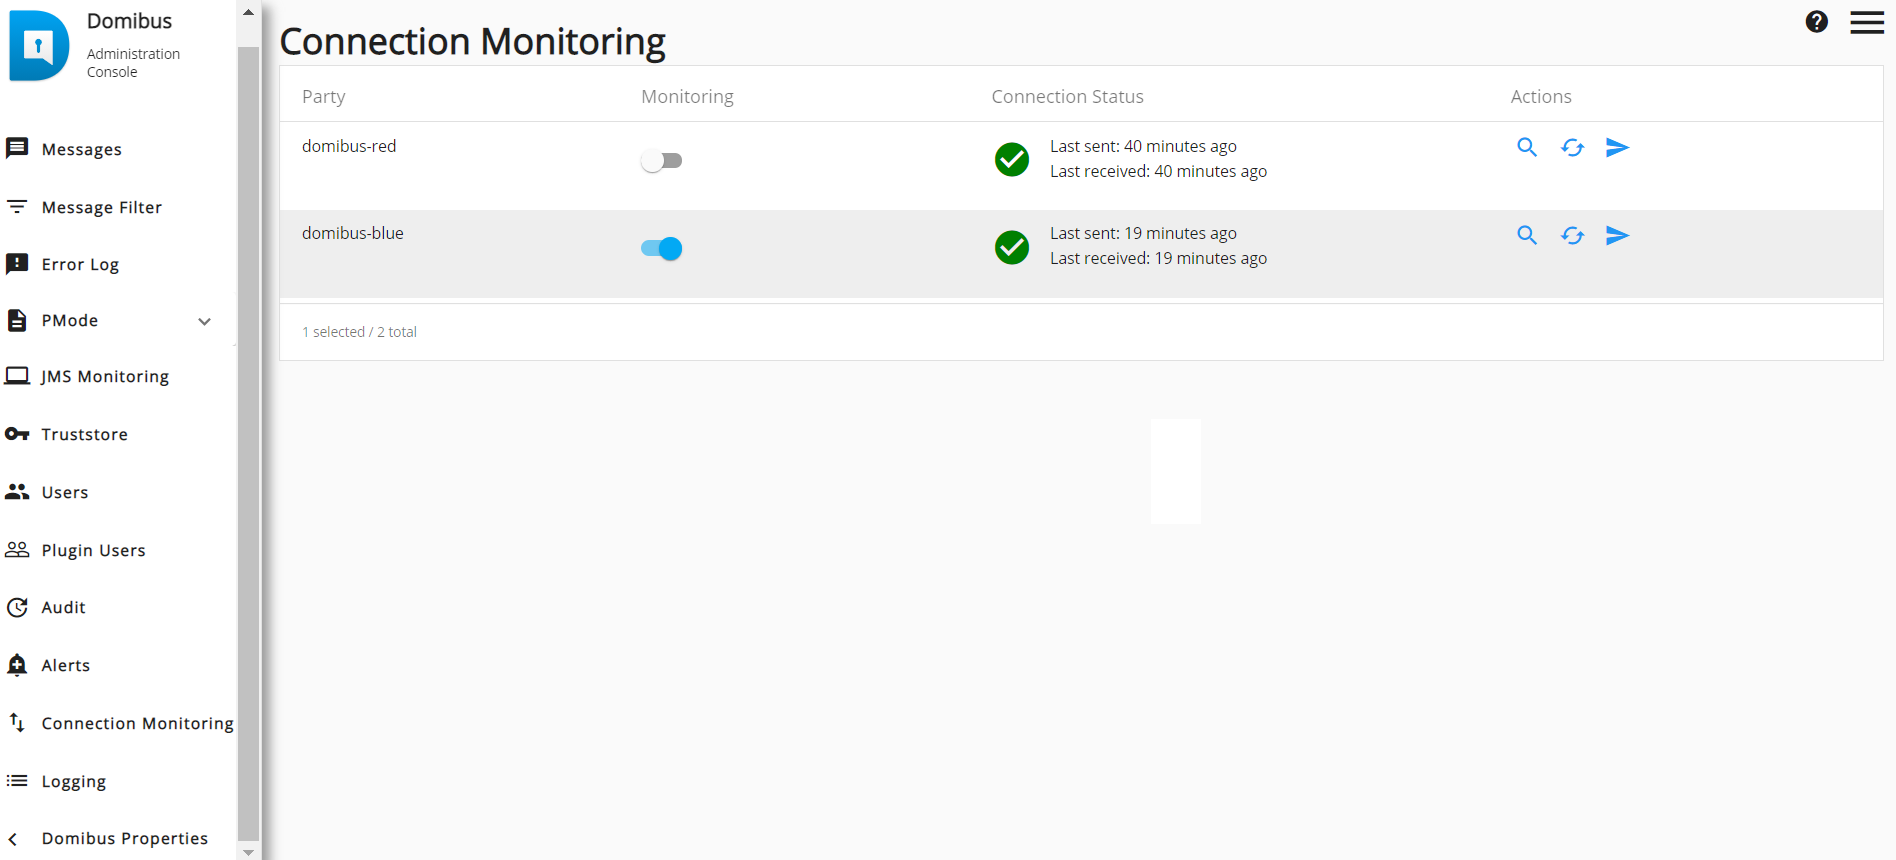
The user can activate or deactivate the monitoring feature by clicking on the Monitoring button of the desired party. Once activated, the monitoring service will send a test message on a frequency defined in the ‘domibus.monitoring.connection.cron’ property of the domibus.properties file.
The user can also activate or deactivate the monitoring of parties in the ‘domibus.monitoring.connection.party.enabled’ property of the domibus.properties file.
|
See Also
|
For a:
|

The user can manually trigger a test by clicking on the Arrow under Actions.
To see the details of the connection that was tested, the user can click on the magnifying glass under Actions:
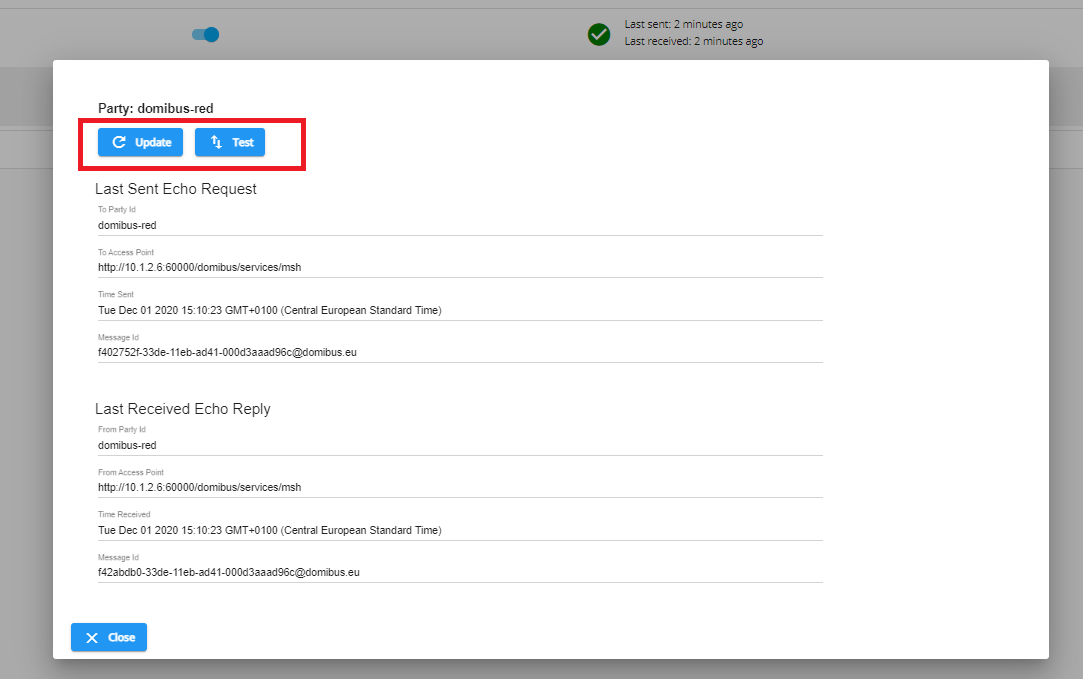
Clicking on Test will launch a connection test manually and clicking on Update will refresh the connection test information.
6.14. Logging
In the Logging section of the Administration Console, the list of all packages logging levels are displayed and can also be modified or reset.

6.15. Domains
In the Domains section of the Administration Console, the list of all available domains is displayed and you can activate or deactivate a domain at runtime.
6.16. Properties
For a full list of the domibus properties and their specification, see the Domibus Properties Reference Guide. Some of the displayed properties can be edited, others are read-only.
|
Note
|
When the Domibus server(s) is(are) restarted, the Domibus properties are reverted back and changes made via the Administration Console are lost. This feature is useful when a user wants to test a change in a Domibus property at runtime. |

To change a Domibus property, the user clicks in the Property Value field and edits it (if the property is read-only, the user will not be able to edit that field). Once done, the user clicks on the Save icon to save the changes.
To revert the changes, the user can click on the Back arrow next to
the Save icon: The back-arrow is only active while editing a specific
field, and only restores the property to the value it had at the moment
of starting editing, but not to the initial value in the
domibus.properties file.

7. Operational Guides
In this section you will find some recommendations about how to administer Domibus efficiently. The following topics are tackled: JMS Queue management, log management, capacity planning, database management and the monitoring of message life cycle.
7.1. JMS Queue Management
Domibus provides following out-of-the-box features to manage the JMS Queues used in Domibus (see also Queue Monitoring:
-
Inspecting and filtering the messages from a queue based on the contents of Source, Period, JMS Type or Selector
-
Move message from the DLQ (Dead Letter Queue) to the original Queue
-
Delete stuck or pending message(s) from Queues
It is recommended to monitor the Queue size and number of messages in the different Queues. If some messages are stuck in any of the Queue then alerts must be sent to the Domibus Administrator.
Please pay special attention to the dead letter queue (DLQ). Messages stuck in this queue is a signal that there is some issue in Domibus that needs to be analysed and an alert should be sent to the Domibus Administrator.
The ‘ListPendingMessages’ operation on WS Plugin browses the JMS queue. Max count is limited to destination MaxBrowsePageSize which can be changed via the ‘domibus.listPendingMessages.maxCount’ Domibus property.
If the received messages are not returned by the webservice listPendingMessages method, you should:
-
increase the value of the
domibus.listPendingMessages.maxCountproperty -
delete the messages from the domibus.notification.webservice queue with selector
NOTIFICATION_TYPE=MESSAGE_SEND_SUCCESSusing JMX tools: http://activemq.apache.org/how-can-i-monitor-activemq.html.
7.2. Log Management
Log Level
It is recommended that the log level is correctly set in all the environments:
-
The log level should be set to INFO/DEBUG in all the test environments for debugging purpose.
-
The log level should be set to ERROR/WARN in production environment (keeping log level to INFO in production environment will degrade the performance of Domibus).
Log Rotation and Archiving
It is recommended that log rotation and archiving logic is implemented.
Domibus provides by default log rotation, but Domibus administrator should manage Domibus archiving logic.
Log Monitoring
It is recommended to monitor continuously Domibus logs. It can be done using an automated script which looks for keywords like "ERROR", WARNING", etc. and reports all the errors and warnings to the Domibus administrator.
7.3. Capacity Planning
JVM Memory Management
Hereafter some recommendations:
-
the JVM memory parameters must first be tested in a test environment with the load expected in production
-
the JVM parameters i.e. heap size must be monitored with the help of automated scripts and any abnormal hikes in heap size must be reported to the administrator.
CPU, IO operations and Disk Space Monitoring
CPU, IO operations and disk space must be continuously monitored using automated scripts. Any abnormal hikes must be reported to Domibus administrator and further investigated.
7.4. Database Management
Database Monitoring
It is important to monitor the database size.
The Payload of the message is deleted from the sending Access Point. Only the metadata of the message stays in the table. The Payload from the receiving Access Point is deleted based on the retention policy defined in the PMode settings.
Domibus uses approximately 40 MB of table space to store the metadata of 1000 messages.
Database Archiving
Since the Database contains AS4 receipts that are used for non-repudiation purposes, they should be archived before purging the database.
The metadata of the database can be purged if it is no longer required.
Monitor Message Life Cycle
It is recommended to monitor the message status in the TB_MessageLog table. Automated scripts can be used to count different status in the table.
Please pay special attention to the following statuses:
- WAITING_FOR_RETRY
-
this means that there is some issue between C2 and C3 that must be resolved.
- SEND_FAILURE
-
this means that that there is some issue between C2 and C3 that must be resolved.
- SEND_ENQUEUED
-
this is part of the successful message life cycle, however abnormal increase in the count of messages with this status means that there is an issue. Further investigation is recommended.
7.5. Domibus Monitoring/Domibus IsAlive AP
Database Monitoring
Monitoring or IsAlive external service, checks the status of Domibus database, JMS Broker and Quartz Triggers using REST API.
Check Domibus DB, JMS Broker and Quartz Trigger isAlive
This REST endpoint will get the monitoring details of Domibus by checking its DB, JMS Broker and Quarter Trigger with or without the filters.
-
HTTP method: GET
-
http://localhost:8080/domibus/ext/monitoring/application/status
-
Response: HTTP 200 status with body:
{ "services":[ {"name":"Database", "status":"NORMAL" }, {"name":"JMSBroker", "status":"NORMAL" }, {"name":"QuartzTrigger", "status":"NORMAL", "quartzTriggerInfos":[] } ] }
DataBase Monitoring
Domibus checks the database connection by fetching the user details from the TB_USER table. If Domibus user details are successfully fetched from the database without any exception, API returns the DB status as NORMAL, otherwise the API returns the status as ERROR.
-
HTTP method: GET NORMAL
-
http://localhost:8080/domibus/ext/monitoring/application/status?filter=db
-
Response: HTTP 200 status with body:
{ "services":[ {"name":"Database", "status":"NORMAL"} ] }
JMS Monitoring
Domibus tries to get the number of JMS messages in the first queue that contains pull in the JMS Broker. If there is no exception, API returns the JMS Broker status as NORMAL, otherwise the API returns the status as ERROR.
-
HTTP method: GET
-
http://localhost:8080/domibus/ext/monitoring/application/status?filter=jmsBroker
-
Response: HTTP 200 status with body:
{ "services":[ {"name":"JMSBroker", "status":"NORMAL"} ] }
Quartz Trigger Monitoring
Domibus tries to get the Quartz triggers in BLOCKED or ERROR status. If there are no triggers in ERROR status or BLOCKED for longer than 10 minutes, the API returns the Quartz trigger status as NORMAL, otherwise the API returns the status as ERROR with the list of Quartz jobs in ERROR status.
-
HTTP method: GET
-
http://localhost:8080/domibus/ext/monitoring/application/status?filter=quartzTrigger
-
Response: HTTP 200 status with body:
{ "services":[ {"name":"QuartzTrigger", "status":"NORMAL", "quartzTriggerInfos":[] } ] } -
Response: HTTP 200 status with Triggers with blocked and error state:
{
"services": [
{
"name": "Quartz Trigger",
"status": "ERROR",
"quartzTriggerInfos": [
{
"jobName": "alertCleanerJob",
"domainName": "Default",
"triggerStatus": "BLOCKED"
},
{
"jobName": "errorLogCleanerJob",
"domainName": "Default",
"triggerStatus": "ERROR"
}
]
}
]
}More API details of these external services are present in Domibus REST Service Open API documentation which is part of the Domibus distribution artefacts (see eDelivery AS4 Profile).
7.6. Useful Resources
Usage of certificates in PEPPOL and OASIS
C2 |
C3 |
||
PEPPOL |
|||
|---|---|---|---|
Keystore |
Truststore |
Keystore |
Truststore |
Sender’s (issued by CA) |
Empty |
Receiver’s |
CA’s |
C2 signs the message with its private key |
C2 discover C3 public certificate from the SMP |
C3 signs the receipt with its private key |
The receiver trusts all senders whose certificates were issued by these CA’s |
OASIS |
|||
Keystore |
Truststore |
Keystore |
Truststore |
Sender’s (issued by CA) |
SMP’s |
Receiver’s |
CA’s |
C2 signs the message with its private key |
C2 discover C3
public certificate from the SMP |
C3 signs the receipt with its private key |
The receiver trusts all senders whose certificates were issued by these CA’s |
7.7. POM samples
Find Domibus latest production parent POM file (pom.xml) from the link below:
https://ec.europa.eu/digital-building-blocks/code/projects/EDELIVERY/repos/domibus/browse/pom.xml
It contains Domibus dependencies list.
|
8. Testing Guide
This content targets specifically the eDelivery’s Access Point sample implementation, Domibus, and provides user guidance on how to perform a set of basic checks on an installation. It is can be used, for example, by:
-
developers after updating Domibus;
-
testers as starting points for custom test cases.
-
Test environment setup and test tool configuration;
-
Test scenarios description and guidance on how to run them;
-
Instructions on how to check messages' status in the Administration console.
Applicable eDelivery terms and conditions are featured in the Master Service Arrangement page, available from the eDelivery digital web portal.
To help you with this guide check the eDelivery digital web portal for the:
-
Key terms definition in the Definitions page.
-
Key acronyms definition in the Glossary page.
8.1. Prerequisites
Here you can find how to set the test environment and configure the testing tool.
-
Install and configure two AS4 Access Points
This guide assumes that two AS4 Access Points, named here as blue and red are properly installed and configured as defined in the [quick_start] for Domibus latest release.
-
Download and install SoapUI
SoapUI is an open source test tool for Web Service testing. A free unrestricted version is available for download online and is sufficient to run the tests included in this package.The version we use to create tests is SoapUI 5.2.1.
-
Configure SoapUI
From SoapUI:
-
Create a new workspace: File→New Workspace
-
Load the project found in this package,
AS4-test-guide-soapui-project.xml: File→Import Project.In SoapUI’s navigator, left-click on the `AS4_test_guide`project and select Custom Properties from the Properties panel.
-
Set the
localUrlproperty with the IP address and port of the machine that is running the blue Access Point as value. -
Set the
remoteUrlproperty with the IP address and port of the machine that is running red Access Point as value.
-
Now the service endpoints in the test steps will automatically be created from these values and no further configuration is required.
-
The WSDL of the services were loaded when creating the test project and they are stored in the project file. If they need to be reloaded, ensure that a local Access Point is up and running, otherwise, the URL of the WSDL (e.g http://localhost:8080/domibus/services/wsplugin?wsdl) will not be accessible.
-
The MTOM option is already pre-configured in the test request properties that need it. Changing this value might result in failures when transmitting the binary content of the exchanged messages.
NoteMessage Transmission Optimization Mechanism, is a method to efficiently send binary data to and from Web Services.
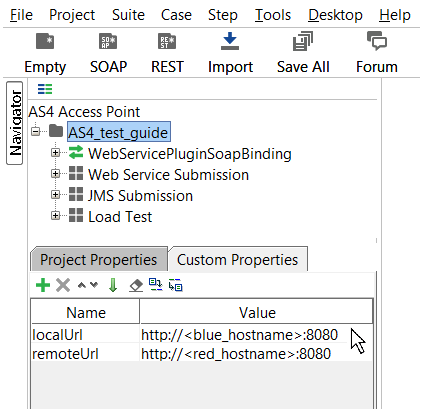
Figure 7. Custom Properties
|
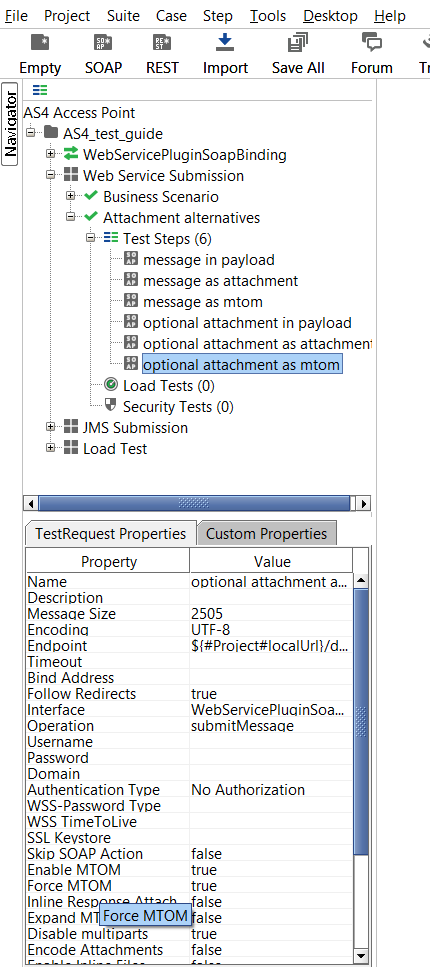
Figure 8. Test Request properties
|
-
The the current version of the SoapUI project’s default setup is enough to run the test case as it doesn’t additional authentication or authorization.
-
The default installation based on the Quick Start Guide allows users to send messages via the default Web Service plugin.
|
Important
|
To be able to test sending messages to the JMS plugin via the sample SoapUI project, the Apache ActiveMQ libraries need to be added to the lib folder of SoapUI. Be sure to restart SoapUI to make sure the new libraries are loaded. |
|
See Also
|
|
8.2. Test scenarios
In this section you can find a list of test scenarios and guidance on how to run them.
8.2.1. Web Service Submission
Business Scenario
In this scenario, the sending Access Point (party blue_gw with ID
domibus-blue) will first send a request to the receiving Access Point
(party red_gw with ID domibus-red).
Then, the receiving Access Point is being polled for new messages. When the new message has arrived, it will be downloaded from the receiving Access point.
Finally, the Access Points will switch roles and the receiving Access Point will send a response to the sending Access Point.
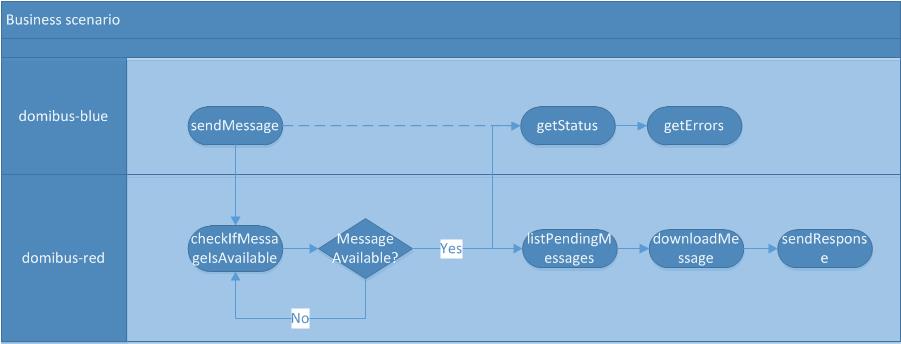
The detailed steps are listed below:
-
domibus-blue: the
sendMessagestep submits a message to the Web Service plugin of the Access Point that is located at localUrl.The message contains an XML message according to the sample PMode configuration files as defined in the Quick Start Guide (
businessContentPayload). ItsMimeTypemust be set totext/xml. ThebusinessContentAttachmentis optional and can contain any type of binary attachment.Regardless of the specific type of attachment used, its content type must be set to "application/octet-stream". In this specific test step, the Attachment is not present. To modify the Payload or Attachment, see Attachment Alternatives. The response from the Web Service plugin contains the message ID of the AS4 message that will be exchanged between the sending and receiving Access Points.
-
domibus-blue: In the background, the Access Point running at
localUrluses the message from step 1 as input to construct an AS4 message and send it to the Access Point that is running atremoteUrl. -
domibus-red: Steps
ParameterTransferandResponseParametersare used for storing theMessageIDparameters of the AS4 message.
This parameter will be used in subsequent steps for verifying that the message is correctly received and can be downloaded from the receiving Access Point. -
domibus-red: Steps
waitConditional,checkIfMessageIsAvailableandwaitUntilMessageArrivesare looping and waiting for the message to arrive at the receiving Access Point. -
domibus-red: In the background, the Access Point that is running at
remoteUrlwill receive the message that is sent in step 2. Upon reception, the message will be stored in the database of the Access Point. Afterwards, the message is available via thelistPendingMessagesandretrieveMessageWeb Service operations exposed by the Access Point. If theretrieveMessageoperation succeeds, the Access Point will delete the message from the database (assuming that the retention parameters are set according to the sample configuration from the [quick_start]). -
domibus-blue: Step
getStatuscalls thegetStatusWithAccessPointRoleoperation at the sending Access Point. If the message is correctly received and acknowledged by the receiving Access Point, the operation will return the valueACKNOWLEDGED. -
domibus-blue: Step
getMessageErrorscalls thegetMessageErrorsWithAccessPointRoleoperation at the sending Access Point. If the message is correctly received and acknowledged by the receiving Access Point, the operation will return a response where thegetMessageErrorsResponseelement is empty. -
domibus-red Step
downloadMessagesubmits a retrieve request to the Web Service plugin of the receiving Access Point that is located atremoteUrl. The input of the operation is the MessageID stored in step 3. The output of the operation is a response containing the contents of the message sent and additional information such as the message timestamp. -
domibus-red Step
sendResponse, submits a message to the Access Point that is located atlocalUrl. The message contains an XML message according to the sample PMode configuration files as defined in the Quick Start Guide (businessContentPayload). Its MimeType must be set to "text/xml". ThebusinessContentAttachmentis optional and can contain any type of binary attachment. Regardless of the specific type of attachment used, its content type must be set toapplication/octet-stream. In this specific test step, the Attachment is not present. To modify the Payload or Attachment, refer to Attachment alternatives.
The response from the Web Service plugin contains the message ID of the AS4 message that will be exchanged between the sending and receiving Access Points. -
domibus-red In the background, the Access Point running at
remoteUrlwill use the message from step 9 as input to construct an AS4 message and send it to the Access Point that is running atlocalUrl.To run this test scenario, open the Demo test case and click the green Play button. As each test step is executed, a green progress bar indicates the test’s steps successful completion.

Attachment alternatives
The sample PMode configuration files as defined in the Quick Start Guide define two payloads:
-
A mandatory
businessContentPayload(cid:message) for which the MimeType must be set totext/xml. -
An optional
businessContentAttachment(cid:attachment) for which the MimeType must be set toapplication/octet-stream.
The test case Attachment alternatives contains different test steps with alternative options for submitting a message to the default Web Service plugin.
-
Test step Message in payload contains an XML message which is
base64encoded inside the Soap Body of the request to the Web Service plugin. -
Test step Message as attachment contains an XML message which is added as an attachment in the request message of SoapUI. SoapUI will
base64encode the message and include it in the Soap Body of the request to the Web Service plugin. -
Test step Message as mtom contains an XML message which is added as an attachment in the request message of SoapUI. Since the TestRequest Properties "Enable MTOM" and "Force MTOM" are enabled, SoapUI will send the message as a multipart MIME message and include the XML in a separate MIME part of the request to the Web Service plugin.
-
Test step Optional attachment in payload adds an optional attachment in addition to the XML message. The attachment is base64 encoded inside the Soap Body of the request to the Web Service plugin.
-
Test step Optional attachment as attachment adds an optional attachment in addition to the XML message. The attachment is added as an attachment in the request message of SoapUI. SoapUI will base64 encode the message and include it in the Soap Body of the request to the Web Service plugin.
-
Test step Optional attachment as mtom adds an optional attachment in addition to the XML message. The attachment is added as an attachment in the request message of SoapUI. Since the TestRequest Properties Enable MTOM and Force MTOM are enabled SoapUI will send the message as a multipart MIME message and include the attachment in a separate MIME part of the request to the Web Service plugin.
To visualise the raw message that SoapUI sends, click on the tab Raw after submitting the message.
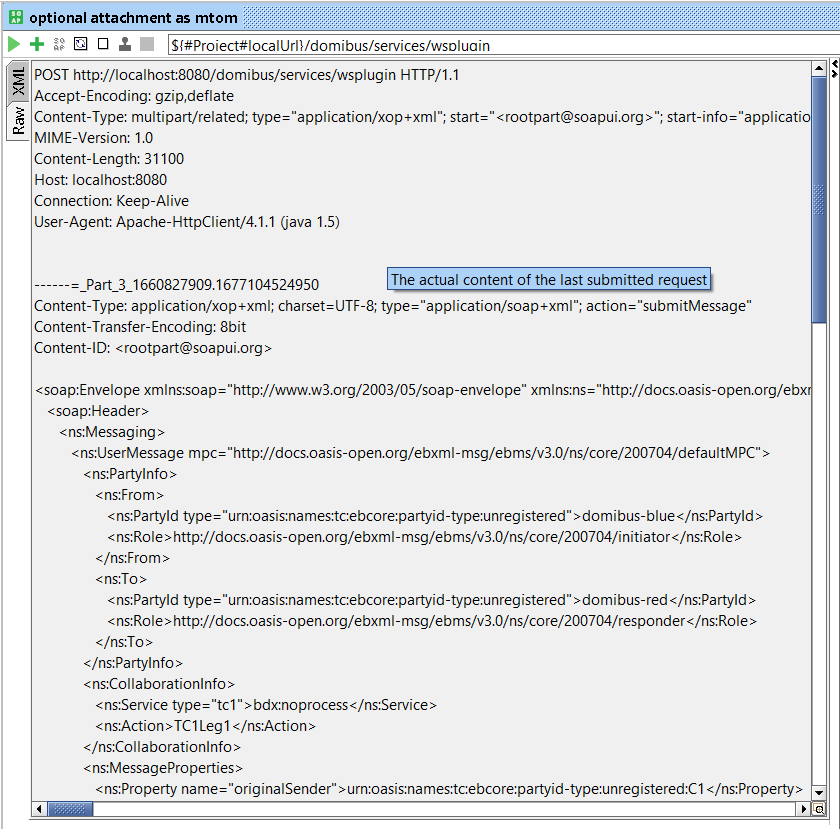
8.2.2. JMS Submission
The default JMS plugin provides an alternative way to submit messages to
a sending Access Point. Instead of performing a Web Service request,
users can post a message to a JMS queue on the sending Access Point.
The sending Access Point will read the message from its queue, construct an
AS4 message based on the JMS message and send it to the receiving Access
Point where it will be available for download.
The test step sendMessage in the JMS Scenario test suite contains a groovy script to post a message to the JMS queue of the sending Access Point. Currently, this code is only valid for Tomcat server deployment. In the future, we will provide a test suite that will also support WebLogic and WildFly servers.
The script assumes that the configuration of the sending Access Point is done according to the instructions in the [quick_start]. If custom settings are used, the variables in the script need to be updated.
Upon running the script, the message is posted to the JMS queue of the sending Access Point. If the script executes successfully, a log message "message sent" will be written to the script Log Output panel in SoapUI. Contrary to the Web Service plugin, the JMS plugin does not return the message ID that will be used for constructing the AS4 message which is sent to the receiving Access Point. However, optionally, the message ID can be set in the JMS message and in this case the sending Access Point will use this message ID (if it is not a duplicate message ID which has been used before).
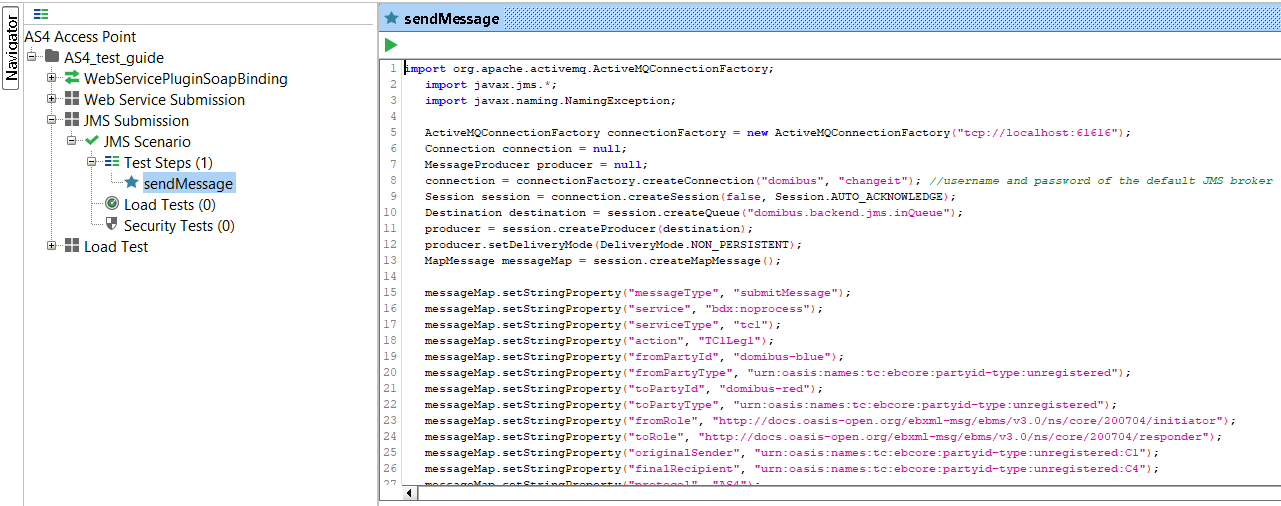
8.2.3. Load Test
The Web Service LoadTest will send several messages in parallel to the Web Service interface of the sending Access Point.
In the default configuration of the LoadTest, the same small message is being sent 100 times in 3 parallel threads using a simple load testing strategy. This LoadTest can be updated to send other or larger messages and to use different settings based on specific needs. To update the attachments of the load test, follow the guidelines described in Attachment alternatives.
The LoadTest will complete successfully if all the messages are
successfully submitted to the Web Service plugin of the Sending Access
point. However, this does not mean that all messages will be transferred
successfully between the sending and the receiving Access Points. The
latter can be verified in the message log of the Administration Console
of both the sending and receiving Access Points.

8.3. Verifying message status
verification of status for received or sent messages scan be performed in the administration console. Both administration consoles of the sending and receiving Access Point can be used for this purpose. Upon sending a message to the Web Service plugin, the synchronous response contains the message ID of the AS4 message that will be exchanged between the sending and receiving Access Points. This "messageID" can be used to verify the status of the message in the sending and receiving Access Points. Verifying received or sent messages status can be performed in the administration console. Both administration consoles of the sending and receiving Access Point can be used for this purpose. Upon sending a message to the Web Service plugin, the synchronous response contains the message ID of the AS4 message that will be exchanged between the sending and receiving Access Points. This "messageID" can be used to verify the status of the message in the sending and receiving Access Points.
Verifying received or sent messages status can be performed in the administration console.Both administration consoles of the sending and receiving Access Point can be used for this purpose. Upon sending a message to the Web Service plugin, the synchronous response contains the message ID of the AS4 message that will be exchanged between the sending and receiving Access Points. This "messageID" can be used to verify the status of the message in the sending and receiving Access Points.
The figure below shows that the message with ID
22cd3f12-29f3-11eb-a0a3-34f39a981a57@domibus.eu has the status ACKNOWLEDGED on the sending Access Point.
This indicates that the message has been received successfully received and acknowledged from
the receiving Access Point.
The same figure below shows that the message with ID
2633e90a-29f3-11eb-af7a-34f39a981a57@domibus.eu has the status RECEIVED on this Access Point.
It indicates that the message has been
successfully sent from the other Access Point to this Access Point.
The same figure below shows that the message with ID It indicates that the initially received message has been successfully downloaded from this Access Point (assuming that the retention time for downloaded messages has not yet expired for the message in question).

If a message cannot be sent because for example the other Access Point is not available, then the administration console on the sending Access
Point will indicate that the message is in state SEND_FAILURE once the number of SendAttempts has reached the value in SendAttemptsMax.
+
NOTE: With the current component configuration, the message sender submitMessage operation synchronously returned an HTTP 200 OK with the messageID).
In the figure above, the message with ID 36e89acc-29f2-11eb-a0a3-34f39a981a57@domibus.eu has the status SEND_FAILURE on the sending Access Point.
While the retrial policy is active and a message is being resent, its status will be WAITING_FOR_RETRY and the NextAttempt value will define the time when the next retry attempt will be made. In the figure
above, the message with ID 2faed2d5-29f3-11eb-a0a3-34f39a981a57@domibus.eu has the status WAITING_FOR_RETRY on the sending Access Point.
8.4. Multitenancy
Domibus supports multitenancy since the 4.0 release: on each access point, multiple domains can be configured with each domain having its own set of configuration files (Keystore, Truststore, PMode, Domain properties, etc.). This allows message exchange to be extended to domain level.
8.4.1. Configuration
By following Multitenancy the configuration instructions regarding the previously mentioned blue and red access points.
8.4.2. Update the soapUI project
Assuming the configurations mentioned in the previous section, consider the additional configurations:
AP Name |
Configured Domain Names |
|---|---|
blue |
|
red |
|
|
Note
|
Since plugin users are defined for each domain, authentication needs to be added in each request. |
Web Service Submission
For webservice submission, authentication needs to be added in each SOAP request test step.
-
Select Add New Authorization from the Authorization tab:
Adding new authorization.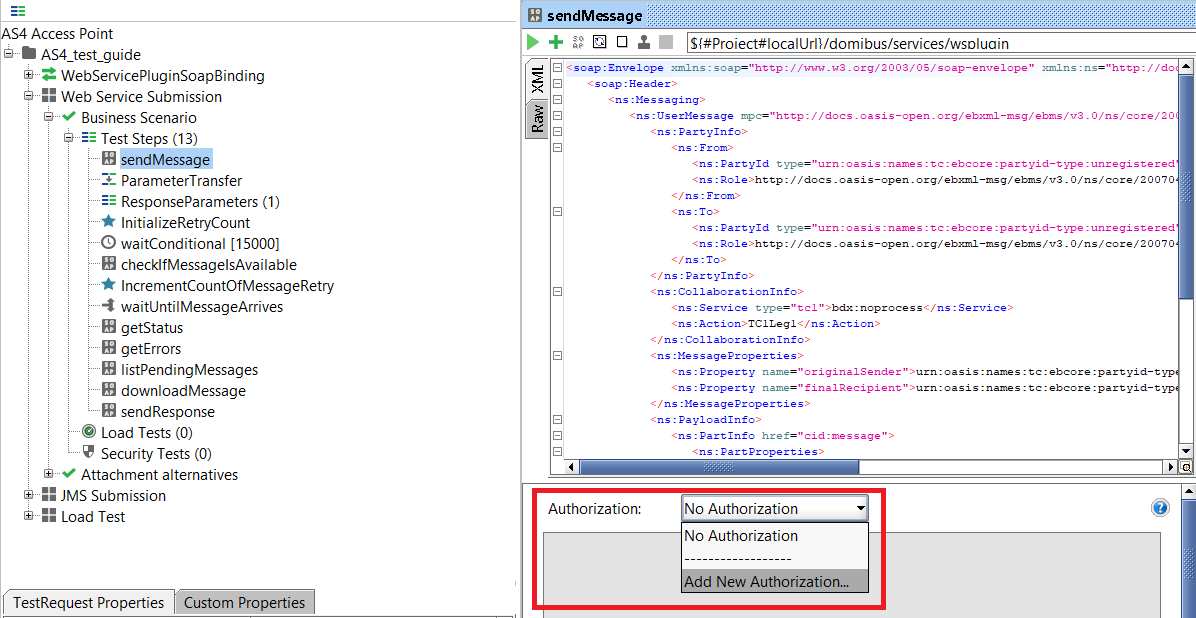
-
Select the Basic authorization option:
Selecting Basic authorization
-
Type the user and password linked to the targeted domain (sender side) and select the Authenticate pre-emptively option:
Authorization credentials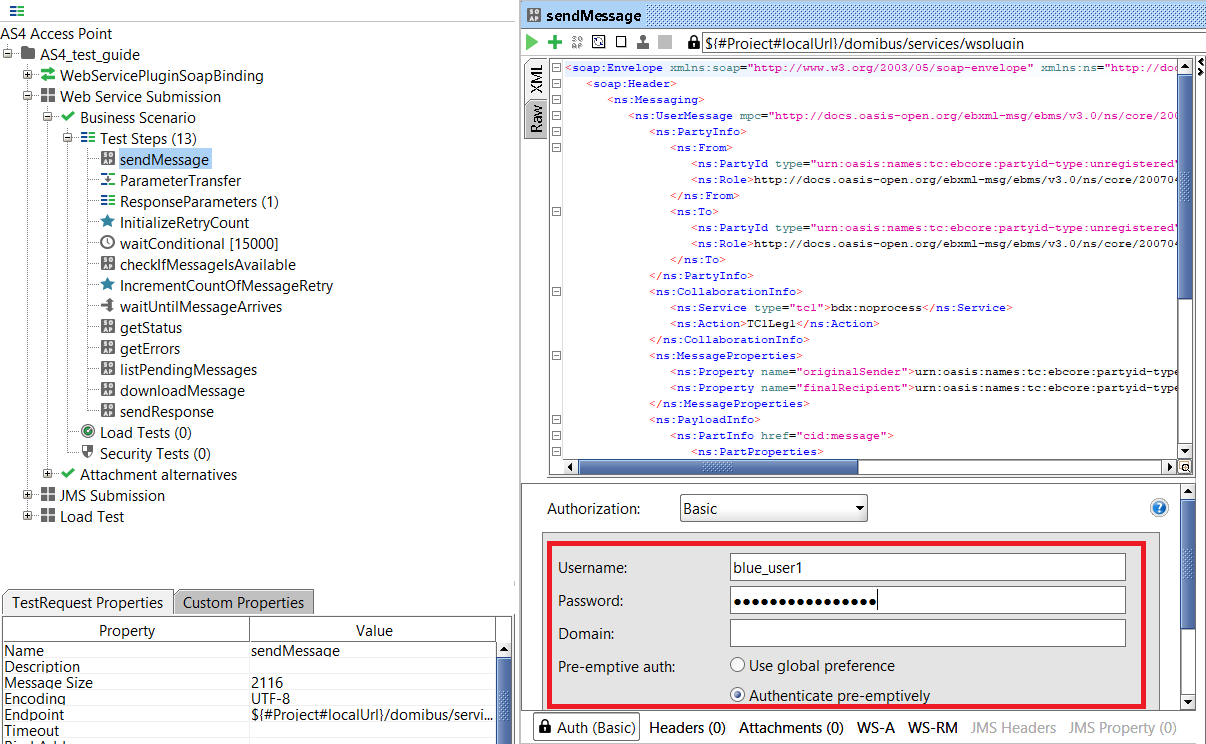
-
In this case, by authenticating with plugin user
blue_user1, the domainblue_domain1will be selected as sender of the message from theblueaccess point. -
Depending on the PMode configuration (see Domibus Configuration), the message will be received either by
red_domain1orred_domain2from theredaccess point.
-
JMS Submission
For JMS submission, authentication needs to be added via extra properties in the groovy test step:
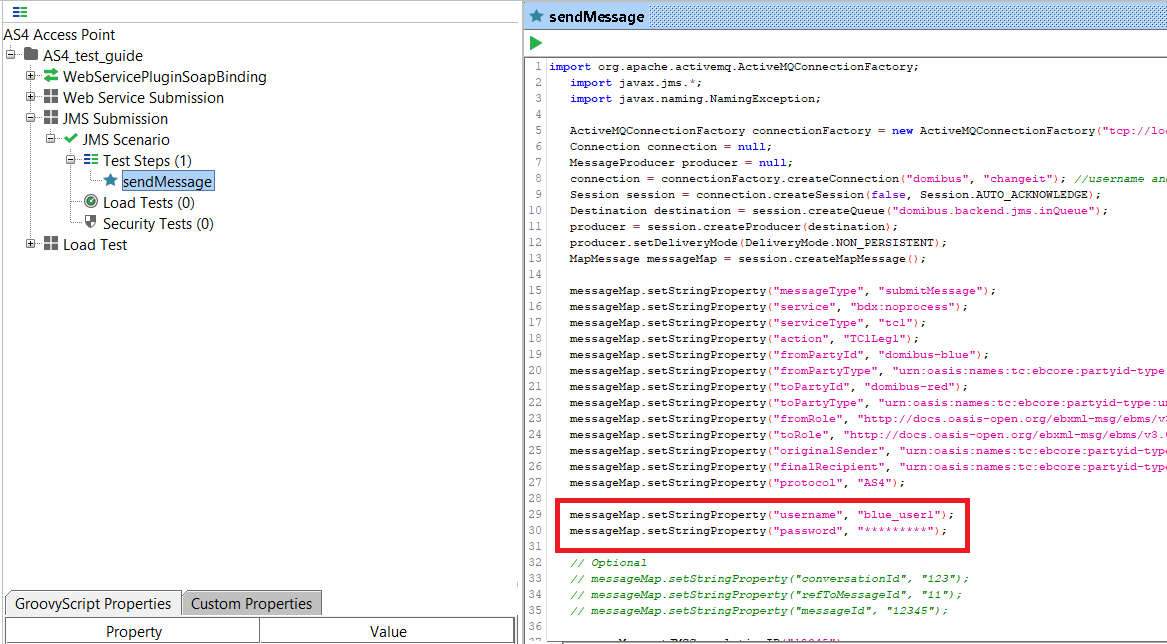
8.4.3. Checking the messages in the Admin console
Messages sent/received for each domain can only be viewed in the Admin console by users linked to the targeted domain (or by the admin of the access point).
User other than access point admin user
When connected to the admin console with a standard user (not an access
point admin user), the domain linked to that user is displayed in the
Messages page.
Only messages sent/received for that domain are displayed:
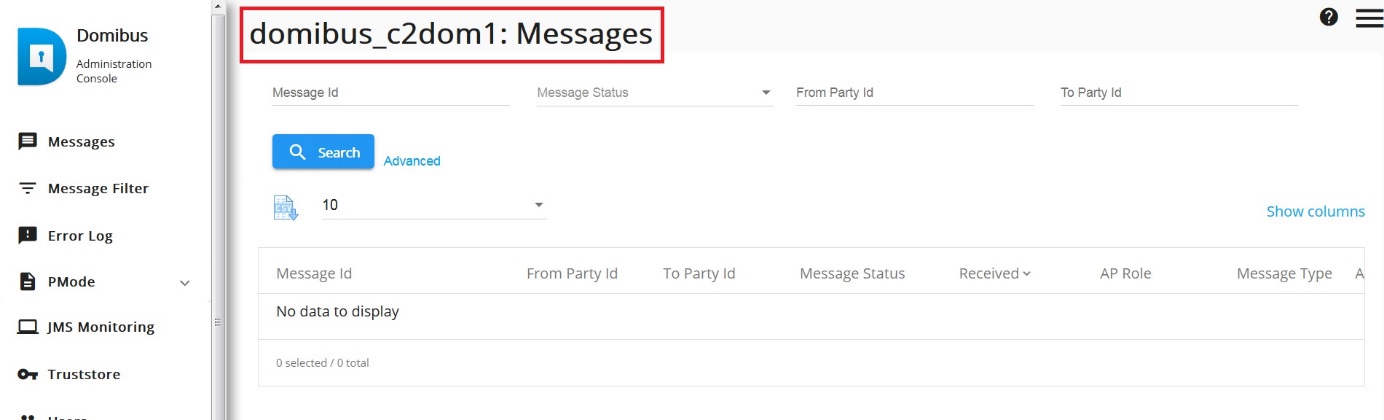
Access point admin user
When connected to the Admin console with an access point’s admin user, all messages from all domains can be viewed. Messages for each domain can be displayed by toggling between domains via the selection on the top right corner of the Admin console (see figure below).
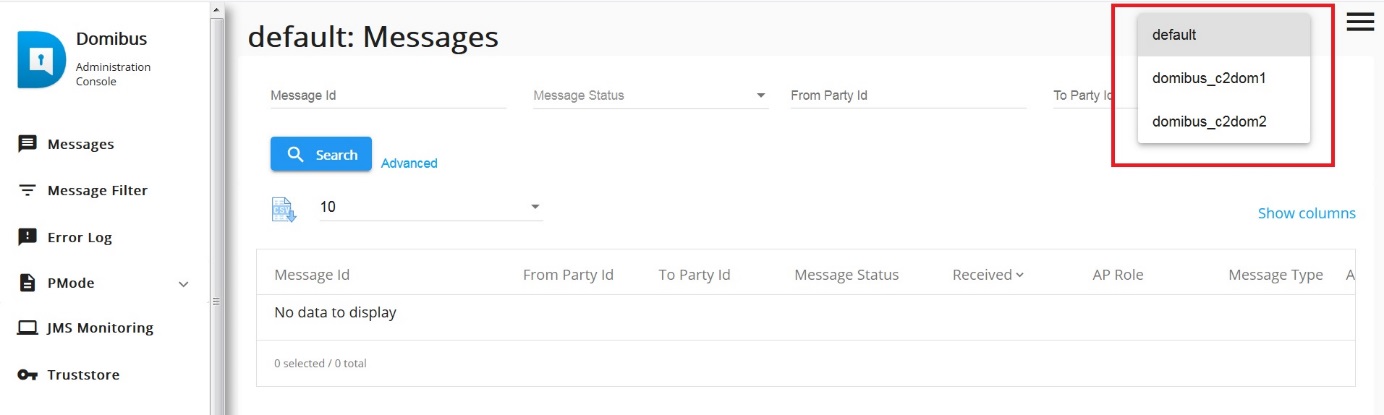
|
Plugins
9. Default Plugins
This section lists the different types of plugins and their registration process.
-
Domibus provides three default plugins: File System, WS and JMS.
Plugin resources
For the:
-
JMS plugin, get →
domibus-distribution-5.1.8-default-jms-plugin.zip -
WS plugin, get →
domibus-distribution-5.1.8-default-ws-plugin.zip -
File System plugin, get →
domibus-distribution-5.1.8-default-fs-plugin.zip
See 5.1.8 Release Page to download the plugins.
10. FS Plugin
The FS Plugin acts as an interface to the Access Point (Corner Two and Corner Three in the four-corner topology that will be explained later in this document) component of the eDelivery building block.
10.1. FS Plugin Interface
Here we outline the file system messages exchange as part of the default File System (FS) backend integration solution for the Domibus Access Point.
Here we covers the service interface of the Access Point from the perspective of the File System backend integration.
It includes information regarding the description of:
-
FS Plugin Configuration
-
Supported File Systems
-
Folders Structure
-
Send and Receive Workflow
Interface |
Description |
Version |
|---|---|---|
FS backend integration |
The FS Plugin |
3.x.y |
This specification addresses no more than the file system interface of the Access Point FS Plugin. All other aspects of its implementation are not covered by this document.
This document is aimed at Directorate Generals and Services of the European Commission, Member States (MS) and also companies of the private sector wanting to set up a connection between their backend system and the Access Point. In particular:
-
Architects will find it useful for determining how to best use the File System Plugin to create a fully-fledged solution and as a starting point for connecting a Back-Office system to the Access Point.
-
Analysts will find it useful to understand the File System Plugin that will enable them to have a holistic and detailed view of the operations and data involved in the use cases.
-
Developers will find it essential as a basis of their development concerning the File System Plugin interface.
-
Testers can use this document in order to test the interface by following the use cases described.
|
See Also
|
|
|
When sending files via a "lower-upper" String, e.g. "5-10", or a simple upper limit String, e.g. "10" (the lower limit will be 1 in this case)
fsplugin.password.encryption.properties
The FS Plugin configuration allows to define specific properties per domain (e.g., the messages location in the file system, the file actions, etc.). The domain properties have the following convention:
fsplugin.domains.<domain_identifier>.<property_name>=<value>-
<domain_identifier>: Represents the domain identifier e.g., DOMAIN1. -
<property_name>: The domain property name which is being defined or redefined from the general properties. -
<value>: represents the specific domain property value.
fsplugin.domains.DOMAIN1.messages.location=/home/domibus/fs_plugin_data/DOMAIN1This means that all messages belonging to DOMAIN1 will be stored in the appropriate file system location.
10.1.1. Functional Specification
In order to understand the Use Cases that will be described below it is important to explain the topology, i.e. the four – corner model.
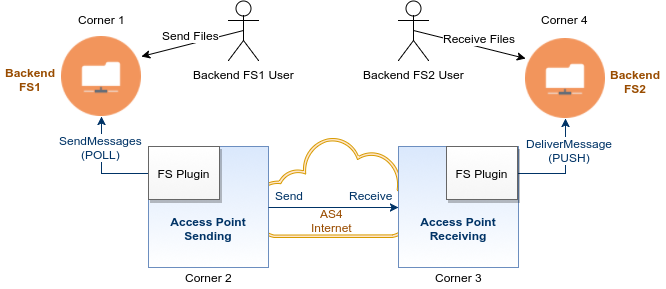
In this model we have the following elements:
-
Corner 1 (FS1): Backend FS1 is the file system that will be polled by the sending AP (Access Point) FS Plugin
-
Corner 2 (C2): Sending Access Point C2
-
Corner 3 (C3): Receiving Access Point C3
-
Corner 4 (C4): Backend C4 is the file system where the Access Point will save the received payloads
There are two backend adapters (i.e. corner one and corner four). Corner 1 sends messages do Corner 2 and Corner 4 receives messages from Corner 3. Corners 2 and 3 communicate with each other via the information contained in the PMode configuration files. The FS backend is described in this document, it provides the facility to send and receive messages as files in the backends file system.
The ICD specification provides both the provider (i.e. the implementer) of the services and their consumers with a complete specification of the following aspects:
-
Detailed use cases, which specifies the set of use cases available in the file system interface;
-
Interface Behavioural Specification, which specifies the expected sequence of steps when interacting with the file system interface;
Key definitions
- Purpose of the File System Plugin
-
The purpose of the File System Plugin is to allow the Backends (corner 1 and corner 4) to exchange messages as files simply using the file system interface without the need of accessing web services.
- Access Point
-
According to eDelivery, an Access Point is an implementation of the OpenPEPPOL AS2 Profile or the eDelivery AS4 Profile. The data exchange protocols of eDelivery are profiles, meaning that several options of the original technical specifications were narrowed down in order to increase consistency, interoperability and to simplify deployment. The profile of AS2 was developed by OpenPEPPOL6, and the profile of AS4 was developed by e-SENS in collaboration with several service providers while being implemented in the e-Justice domain by e-CODEX. An Access Point exposes two interfaces:
-
An interface to connect the Backend system with the Access Point. Typically, this interface is customisable as communication between Access Points and Backend systems may use any messaging or transport protocol.
-
A standard messaging interface between Access Points, this interface is configurable according to the options of the profiles supported by eDelivery. It is important to note that eDelivery standardises the communication only between the Access Points.
-
- eDelivery AS4 Profile
-
The eDelivery AS4 profile is an open technical specification for the secure and payload-agnostic exchange of data using Web Services. According to OASIS, the AS4 protocol is the modern successor of the AS2 protocol. AS4 itself is a profile of the ebXML Messaging Services (ebMS) v.3.0, a broader specification built on top of the SOAP with attachments specification.
Use case overview
| Actor | Description |
|---|---|
FS Plugin Admin |
Any participant with administrative rights to configure the FS Plugin behaviour and access to the backend file system. |
Backend FS1 User |
Any participant (human or system) sending file messages to a recipient Backend C4 and using the Sending AP C2 in that purpose via the FS Plugin. |
Backend FS2 User |
Any participant (human or system) downloading file messages from any sender Backend C1 and using the Receiving AP C3 in that purpose via the FS Plugin. |

| ID | UC | Short Description | System |
|---|---|---|---|
Configure the available properties for the FS Plugin file system access and behaviour |
Backend File System 1 |

| ID | UC | Short Description | System |
|---|---|---|---|
Access or connect to the file system interface (local or remote). This operation may require authentication if the file system is secured. For more information see section 3.2 - Supported File Systems. |
Backend File System 1 |
||
Configure the metadata.xml file in order to define the file messages submission properties (e.g., From PartyId, To PartyId). |
Backend File System 1 |
||
Drop the files in the backend file system OUT folder in order to trigger the sending process according to the existing metadata. The files are polled by the FS Plugin of C2. |
Backend File System 1 |
||
Check the sending process status listing the file name that will be updated according to the messageId and status. |
Backend File System 1 |

| ID | UC | Short Description | System |
|---|---|---|---|
Access or connect to the file system interface (local or remote). This operation may require authentication. |
Backend File System 2. |
||
Receive the sent files in the configured backend file system location. These file messages are PUSHED by the FS Plugin into the receiving backend file system. |
Backend File System 2 |
The Interface Functional Specification is described in the detailed uses cases using the given examples.
|
Important
|
Note that the Inputs and Outputs provided as examples for the uses cases are based on a specific PMode configuration. |
As defined in the AS4 Profile of ebMS 3.0, a processing mode – or PMode – is a collection of parameters defining how user messages are exchanged between a pair of Access Points with respect to Quality of Service, Transmission Mode and Error Handling. A PMode maps the recipient Access Point from the partyId, which represents the backend offices associated to this Access Point.
UC01 - Configure FS Plugin
Click to Open
- Brief description
-
The FS Plugin Admin configures the plugin behaviour by editing the fs-plugin.properties file.
- Actors
-
FS Plugin Admin
- Preconditions
-
-
The FS Plugin must be installed on the Access Point.
-
The system user (FS Plugin Admin) as read/write access to the fs-plugin.properties file.
-
- Basic flow event
-
-
The system user (FS Plugin Admin) edits the fs-plugin.properties file.
-
The system user (FS Plugin Admin) updates the existing properties according to the full specification of configuration options is listed in FS Plugin Configuration and section 3.2.
-
- Alternative flows
-
N/A
- Exception flows
-
-
2a. The system user (FS Plugin Admin) creates or updates a FS Plugin property with an invalid value.
-
2a1. The FS Plugin will decay the invalid configuration into the property default value as listed in FS Plugin Configuration.
-
- Post conditions
-
-
Successful conditions: The FS Plugin is successfully configured. After the Access Point restart, it is ready to exchange messages from the file system interface.
-
Failure conditions: The FS Plugin is not correctly configured and is not ready to properly send and receive files as AS4 messages.
-
UC02 - Access FS
Click to Open
- Brief description
-
To use the file system interface, the Backend FS1 User needs to access the Access Point - FS Plugin via the configured file system folder within a domain. This use case is realized by the Backend FS1 User by the navigating into the configured folder (locally or remotely). If the file system domain location is secured then the user must provide its credentials to connect.
For detailed information about Domains and Supported File Systems please see chapters 3.1.4, 3.1.5 and 3.2.
- Actors
-
Backend FS1 User
- Preconditions
-
-
The Backend FS1 User must have read/write access on its domain folder and subfolders.
-
- Basic flow event
-
-
The Backend FS1 User navigates into the configured outgoing/incoming folder. This can be done using a graphical explorer or via command line.
-
- Alternative flows
-
-
1a. If the folder is remote and secured by username and password then the credentials will be required and prompted in the first access.
-
1a1. The Backend FS1 User specifies his valid username and password.
-
- Exception flows
-
-
1a2. The Backend FS1 User specifies invalid credentials.
-
- Post conditions
-
-
Successful conditions: The Backend FS1 User accesses the contents of the filesystem folder.
-
Failure conditions: The Backend FS1 User cannot access the contents of the filesystem folder.
-
UC03 – Configure Metadata
Click to Open
- Brief description
-
The Backend FS1 User writes the metadata.xml file which contains the basis of the AS4 metadata that will be used by the FS Plugin to create the User Message (mapped to the Submission) that will be sent to Access Point. The metadata.xml file name is reserved by the FS Plugin and it needs to always be present as a child of the OUT folder or any sub-directory under the OUT folder.
The metadata file format is detailed in Section 3.3 and is available an example (example_metadata.xml) in the config/ directory.
- Actors
-
Backend FS1 User
- Preconditions
-
-
The Backend FS1 User must have read/write access on its domain folder and subfolders.
-
- Basic flow event
-
-
The Backend FS1 User navigates to the OUT folder or any of its sub-directories.
-
The Backend FS1 User creates the metadata.xml file based on a template (Cf.: 6.2 - metadata.xml example) in the outgoing folder.
-
The Backend FS1 User edits the metadata.xml file to specify the AS4 metadata, namely the UserMessage, according to the format detailed in section 3.3.
-
- Alternative flows
-
N/A
- Exception flows
-
-
2a. The Backend FS1 does not create the metadata.xml file in the outgoing folder.
-
3a. The Backend FS1 creates a metadata.xml file containing an invalid structure.
-
- Post conditions
-
Successful conditions: The metadata.xml is configured and prepared to define the UserMessage header in the FS Plugin AS4 messages.
Failure conditions: The metadata.xml is not properly configured and is not prepared to define the UserMessage header in the FS Plugin AS4 messages. Either because it does not exist or has an invalid structure.
UC04 – Send Files
Click to Open
- Brief description
-
This Use Case is triggered by the Backend FS1 User, by dropping a content file into the outgoing folder (C1) of one of the locations configured in fs-plugin.properties file. It is assumed that valid metadata has been configured via UC03 beforehand. This Use Case should result in an AS4 message delivery from C2 to C3.
On its own schedule, Domibus core eventually connects to the applicable destination gateway and delivers the message in conformance to the AS4 protocol.
For detailed information about the Send Files sequence see chapter 3.4.
- Actors
-
Backend FS1 User
- Preconditions
-
-
The FS Plugin is properly configured and activated in the Domibus Access Point.
-
The outgoing folder is prepared to send files as AS4 messages having the metadata.xml file properly created and configured.
-
- Basic flow event
-
-
The Backend FS1 User navigates into the outgoing folder of C1.
-
The Backend FS1 User drops one or more content files into the outgoing folder.
-
The FS Plugin (C2) continually polls the various configured locations for a list of existing files in the outgoing folders.
-
The FS Plugin (C2) creates as AS4 message for each content file and submits to Domibus core. If the content file (i.e file1.doc) is accompanied by a corresponding .lock file (i.e. file1.doc.lock), the content file is not touched. Once the content file starts being processed, the FS Plugin creates the corresponding. lock file.
-
The FS Plugin (C2) renames the submitted content file adding the AS4 message identifier. It also deletes the corresponding. lock file.
-
On its own schedule, Domibus core eventually connects to the applicable destination gateway and delivers the message in conformance to the AS4 protocol.
-
- Alternative flows
-
-
4a. The FS Plugin (C2) skips to create the AS4 message because metadata.xml file is missing.
-
4a1. The FS Plugin (C2) logs the skipped files warning that the metata.xml is missing.
-
- Exception flows
-
-
4b. The FS Plugin (C2) fails to create the AS4 message because metadata.xml file is invalid.
-
4b1. The FS Plugin (C2) logs the schema validation error.
-
4c. The FS Plugin (C2) fails to create the AS4 message because the content file can’t be accessed.
-
4c1. The FS Plugin (C2) logs the file access error.
-
4c2. The FS Plugin (C2) marks the current message transaction for rollback (and let Domibus retry in its next polling).
-
- Post conditions
-
-
Successful conditions: The content file is successfully submitted as an AS4 message and delivered from (C2) to (C3).
-
Failure conditions: The AS4 message is not successfully created and can’t be submitted to Domibus core (C2). Error details are logged.
-
UC05 – Check File Status
Click to Open
- Brief description
-
Backend FS1 User may periodically refresh his view of Backend FS1 so he gets an update on the status of files sent using UC04. The sending status is indicated by the names and locations of the various content files which the FS Plugin modifies according to the rules and states described in section 3.5 - Check File Status Sequence.
- Actors
-
Backend FS1 User
- Preconditions
-
-
The content file is successfully submitted to Domibus (C2) as an AS4 message.
-
- Basic flow event
-
-
The Backend FS1 User lists the existing files under the outgoing folder of C1 until the observed files are successfully or failed sent.
-
The FS Plugin (C2) renames the processed files according to the status change event for each message, see section 3.5 - Check File Status Sequence.
-
The FS Plugin (C2) receives a Send Success event and deletes or archives the processed file (according to the FS Plugin configuration).
-
- Alternative flows
-
-
3a. The FS Plugin (C2) receives a Send Failed event and deletes or archives the processed file (according to the FS Plugin configuration).
-
- Exception flows
-
-
2a. The FS Plugin (C2) cannot access and rename the processed file.
-
2a1. The FS Plugin (C2) logs the rename error.
-
3b. The FS Plugin (C2) cannot access and rename the successfully sent file.
-
3b1. The FS Plugin (C2) logs the rename error.
-
3a1. The FS Plugin (C2) cannot access and rename the failed sent file.
-
3a1b. The FS Plugin (C2) logs the rename error.
-
- Post conditions
-
-
Successful conditions: The content file is successfully submitted as an AS4 message and it is successfully deleted or archived.
-
Failure conditions: The content file name is not properly renamed according to the message status change events; the event is registered in the log files.
-
UC06 – Receive Files
Click to Open
- Brief description
-
Backend FS2 User initiates this Use Case by listing the files within the incoming folder of any domain configured for the FS Plugin on Backend FS2. Assuming files were successfully received and are present, the user may obtain any of them via regular file system operations.
For detailed information about the Receive Files sequence, see chapter 3.6.
- Actors
-
Backend FS2 User
- Preconditions
-
-
The content file is successfully sent from Access Point (C2) to (C3) as an AS4 message.
-
- Basic flow event
-
-
The FS Plugin downloads the received AS4 message from the Access Point (C3).
-
The FS Plugin resolves the destination domain from the AS4 metadata Service and Action values.
-
The FS Plugin creates the received AS4 message as a file in the resolved incoming folder of the Backend filesystem (C4).
-
The Backend FS2 User lists the received files under the incoming folder of C4.
-
- Alternative flows
-
N/A
- Exception flows
-
-
2a. If no domain is found to match the pair Service/Action, the main location is selected as the destination folder.
-
3a. The FS Plugin (C3) can’t access and create the received message as a file.
-
3a1. The FS Plugin (C3) logs the access error and marks the transaction for rollback. The deliver message operation will be retried by the receiving Access Point.
-
- Post conditions
-
-
Successful conditions: The content file is successfully received as an AS4 message.
-
Failure conditions: The fail message is logged by the FS Plugin.
-
10.1.2. Behavioural Specification
FS Plugin Configuration
The FS Plugin configuration is done in the fs-plugin.properties file.
Jump to topic:
Password Encryption
Passwords configured in fs-plugin.properties are stored by default in
clear text.
The FS Plugin can encrypt the configured passwords using symmetric
encryption with AES/GCM/NoPadding algorithm. In order to activate the
password encryption please set the property
fsplugin.password.encryption.active=true. Once activated all the
passwords configured under the property
fsplugin.password.encryption.properties will be encrypted.
For instance, the property domibus.security.keystore.password=test123
will be encrypted to fsplugin.authentication.password=ENC(4DTXnc9zUuYqB0P/q7RtRHpG9VJLs3E=).
Workers Scheduling
These properties define the FS Plugin workers scheduling.
| Property name | Default value | Description |
|---|---|---|
|
10000 |
The time interval (in milliseconds) used to poll the sending File System for new files. |
|
0/60 * * * * ? |
The CRON expression used to trigger the worker to purge the sent files that were archived. |
|
0/60 * * * * ? |
The CRON expression used to trigger the worker to purge the failed files that were archived. |
|
0/60 * * * * ? |
The CRON expression used to trigger the worker to purge the received files. |
General properties
The general properties described below can be overridden per domain according to the format described in Domain specific properties.
| Property name | Default value | Description |
|---|---|---|
|
/home/domibus/fs_plugin_data/MAIN |
The location of the folder that the plugin will use to manage the messages to be sent and received in case no domain expression matches. This location must be accessible to the Domibus instance. See section 3.2 - "Supported File Systems". |
|
delete |
The file action executed when the file is successfully sent: 'delete' to permanently remove the file or 'archive' to move it into the SENT folder. |
|
600 |
The expiration limit (expressed in seconds) used to purge the older files in the SENT folder. If the value is 0 or empty, the purge functionality is deactivated. |
|
delete |
The file action executed when the file is fails to send: 'delete' to permanently remove the file or 'archive' to move it into the FAILED folder. |
|
600 |
The expiration limit
(expressed in seconds) used to purge the older files in the FAILED
folder. If the value is 0 or empty, the purge functionality is
|
|
600 |
The expiration limit (expressed in seconds) used to purge the older files in the IN folder. If the value is 0 or empty, the purge functionality is deactivated. |
|
600 |
Expiration limit (expressed in seconds) used to delete lock files used to lock a data file while it is sent via FS Plugin. If the value is 0 or empty, the purge functionality is deactivated. |
|
(none) |
The user name to be used to authenticate on domains by default |
|
(none) |
The password used to authenticate on domains by default |
|
|
The payload identifier for messages processed on the default domain |
|
|
This queue is used by the plugin to send the files in parallel |
|
5-20 |
Specify queue concurrency limits |
|
2000 |
The delay (in milliseconds) to allow the writing process to finish writing. |
|
false |
Encrypts the configured passwords if activated. |
Domain specific properties
in which the domains will be evaluated. This property is not mandatory – domains without order definition will be resolved randomly after the ordered domains. The order is defined with numeric values greater than 0. E.g.: 1
| Property name | Default value | Description |
|---|---|---|
|
(none) |
Regular expression used to match the domain for the reception of messages. This regular expression will be evaluated against the Service and Action values from the incoming message separated by #. E.g.:DOMAIN1SampleService. |
|
(none) |
The location of
the folder that the plugin will use to manage the messages to be sent
and received in case no domain expression matches. This location must be
accessible to the Domibus instance. The domain locations must be
independent from each other and should not overlap. For more information
about the location format and values see section 3.2 - Supported File
Systems. E.g.: |
|
(none) |
The user used to access the domain location specified by property :
This value must be provided if the location access is secured at the file system level so that users from other domains cannot access its contents. In a secured File System, e.g.: SFTP, if the credentials are not provided, the FS Plugin will not be able to access it to perform the file messages exchange. For more information see section 3.2 - Supported File Systems. |
|
(none) |
The password used to access the domain location. This value must be provided if the location access is secured at the file system level. |
|
(none) |
Mandatory in Multitenancy mode. The user that submits messages to Domibus. It is used to associate the current user with a specific domain. |
|
(none) |
Mandatory in Multitenancy mode. The credentials of the user defined under the property username. |
|
cid:message |
The payload identifier for messages processed on a particular domain. |
f |
5-20 |
Specify queue concurrency limits on a particular domain when sending files via a "lower-upper" String, e.g. "5-10", or a simple upper limit String, e.g. "10" (the lower limit will be 1 in this case) |
|
2000 |
The delay (in milliseconds) on a particular domain to allow the writing process to finish writing. |
Domain resolution
In order to support multiple domains configurations, the domain resolution is done according to the values of the domain specific properties:
-
fsplugin.domains.<domain_id>.orderDefines the order in which the domains will be evaluated. -
fsplugin.domains.<domain_id>.messages.expressionRegular expression used to match the domain for the reception of messages. This regular expression will be evaluated against a concatenation of the Service and Action values from the incoming message using the character # as separator, for example:
BRISReceptionService#SendEmailAction
An expression per domain will define to which domain the message is intended for. As a convention for the PMode, it is recommended to prefix the Service with the identifier of the business domain.
fsplugin.domains.BRIS.messages.expression=BRISReceptionService
This regular expression means that all messages containing AS4 headers
where the Service is set to BRISReceptionService and having any Action
value will be mapped into the domain BRIS.
A sample match is BRISReceptionService#WelcomeAction.
|
Note
|
Java Regular Expression Syntax reference: https://docs.oracle.com/javase/8/docs/api/java/util/regex/Pattern.html. |
| Property name | Default value | Description |
|---|---|---|
|
(none) |
Integer defining the order |
Supported File Systems

The FS Plugin supports multiple file system types via Apache VFS. There are 4 file systems currently supported:
Click to Open
A local file system is simply a directory on the local physical system. The URI format is:
-
[file://]absolute-path
Where absolute-path is a valid absolute directory name on the local
platform. UNC names are supported under Windows.
This type of file system does not support authentication hence the domibus user needs read/write access to this directory.
-
file:///home/someuser/somedir -
file:///C:/Documents and Settings -
/home/someuser/somedir -
c:\program files\some dir -
c:/program files/some dir
Click to Open
A SMB/CIFS file system is a remote directory shared via Samba or Windows Share, with the following URI format:
-
smb://hostname[:port]/sharename[/relative-path]
Notice that a share name is mandatory.
This type of file system supports authentication via user and password domain properties. See FS Plugin Configuration.
-
smb://somehost/shareA -
smb://somehost/shareB/nesteddir -
smb://otherhost:445/shareC
Click to open
An SFTP file system is a remote directory shared via SFTP. Uses an URI of the following format:
sftp://hostname[:port][/relative-path]
The path is relative to whatever path the SFTP server has configured as base directory, usually the user’s home directory.
This type of file system supports authentication via user and password domain properties. See FS Plugin Configuration.
-
sftp://somehost/pub/downloads/
-
sftp://somehost:22/pub/downloads/
Click to open
An FTP file system is a remote directory shared via FTP. Accepts URIs of the following format:
-
ftp://hostname[:port][/relative-path]
The path is relative to whatever path the FTP server has configured as base directory, usually the user’s home directory.
This type of file system supports authentication via user and password domain properties. See FS Plugin Configuration. .Examples:
-
ftp://somehost/pub/downloads/
Due to incompatibilities between the current version of VFS and certain FTP servers on Linux (e.g.: vsftpd), using a relative path prevents some of the plugin’s functionality from working correctly. For that reason, in those cases an absolute path must be specified, e.g.:
-
ftp://somelinuxhost/home/someuser/pub/downloads/
Metadata format
Below is the metadata UserMessage schema.
Check an an example in metadata.xml Example.

| Name | Description |
|---|---|
UserMessage/mpc |
This OPTIONAL attribute occurs once and contains data about the Message Partition Channel (MPC). Max length:255 characters. MPCs allow for partitioning the flow of messages from a Sending MSH to a Receiving MSH into several flows that can be controlled separately and consumed differently. |
UserMessage/PartyInfo |
This REQUIRED element occurs once, and contains data about originating party and destination party. |
UserMessage/CollaborationInfo |
This REQUIRED element occurs once, and contains elements that facilitate collaboration between parties. |
UserMessage/MessageProperties |
This REQUIRED element occurs once, and contains message properties that are user-specific. These properties allow for more efficient monitoring, correlating, dispatching and validating functions (even if these are out of scope of ebMS specification) which would otherwise require payload access. |
Click to Open
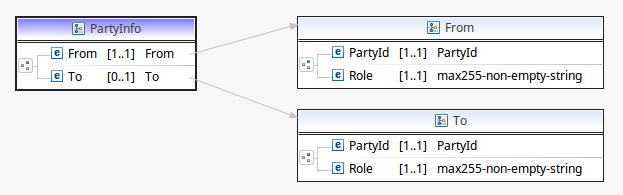
| Name | Description |
|---|---|
PartyInfo/From |
The REQUIRED element occurs once, and contains information describing the originating party. |
PartyInfo/From/PartyId@type |
The optional type attribute indicates the domain of names to which the string in the content of the PartyId element belongs. E.g.: |
PartyInfo/From/PartyId |
The REQUIRED PartyId element occurs one or more times. If it occurs multiple times, each instance MUST identify the same organization. E.g.: domibus-blue |
PartyInfo/From/Role |
The REQUIRED eb:Role element occurs once, and identifies the authorized role (fromAuthorizedRole or toAuthorizedRole) of the Party sending (when present as a child of the From element) or receiving (when present as a child of the To element) the message. |
PartyInfo/To |
The OPTIONAL element occurs once, and contains information describing the destination party. The element need not be provided by a sender if the sending Access Point (C2) is configured for Dynamic Discovery. |
PartyInfo/To/PartyId |
(Same as PartyInfo/From/PartyId). This OPTIONAL element need not be provided for C2 configured for Dynamic Discovery. |
PartyInfo/To/PartyId@type |
The optional type attribute indicates the domain of names to which the string in the content of the PartyId element belongs. E.g.: |
PartyInfo/To/Role |
(Same as PartyInfo/From/Role). This OPTIONAL element does not need to be provided for C2 configured for Dynamic Discovery. |
Click to Open

| Name | Description |
|---|---|
CollaborationInfo/AgreementRef |
This OPTIONAL element occurs at most once. The AgreementRef element is a string that identifies the entity or artifact governing the exchange of messages between the parties. |
CollaborationInfo/Service |
This REQUIRED element occurs once. It is a string identifying the service that acts on the message and it is specified by the designer of the service. It SHOULD identify a set of related business transactions. NOTE: “Business transactions” can be mapped into “Actions” in the AS4 context. or other message exchanges in the context of a business process or use case. E.g.: |
CollaborationInfo/Action |
This REQUIRED element occurs once. The element is a string identifying an operation or an activity within a Service that may support several of these. It SHOULD identify the different types of business transactions or other message exchanges in the context of an identified Service. E.g.: |
Click to Open

This required element occurs at most once, and contains message properties that are implementation specific. As parts of the header such properties allow for more efficient monitoring, correlating, dispatching and validating functions (even if these are out of scope of ebMS specification) which would otherwise require payload access.
These elements hold a set of name-value properties that will hold for instance the identifiers for the 'originalSender' and 'finalRecipient'.
| Name | Description |
|---|---|
Property |
Element is of These elements hold a set of name-value properties that will hold for instance the identifiers for the 'originalSender' and 'finalRecipient'. E.g.: C1 The property values have a max size of 1024 characters. If this size is exceeded, then an EbMS3Exception is thrown by the AP (Domibus) and the message is not sent. |
Property@name |
The value of this required attribute must be agreed upon between
partners. The property name has a max size of 255 characters. |
Property@type |
This optional attribute allows for resolution of conflicts between properties with the same name, and may also help with Property grouping, e.g. various elements of an address. |
metadata.xml Example
A sample file with this content, example_metadata.xml is also distributed in the config/ directory.
<?xml version="1.0" encoding="UTF-8" ?>
<UserMessage
xmlns="http://docs.oasis-open.org/ebxml-msg/ebms/v3.0/ns/core/200704/">
<PartyInfo>
<From>
<PartyId
type="urn:oasis:names:tc:ebcore:partyid-type:unregistered">
domibus-blue
</PartyId>
<Role>
http://docs.oasis-open.org/ebxml-msg/ebms/v3.0/ns/core/200704/initiator
</Role>
</From>
<!--Optional:-->
<To>
<PartyId
type="urn:oasis:names:tc:ebcore:partyid-type:unregistered">
domibus-red
</PartyId>
<Role>
http://docs.oasis-open.org/ebxml-msg/ebms/v3.0/ns/core/200704/responder
</Role>
</To>
</PartyInfo>
<CollaborationInfo>
<!--You may enter the following 4 items in any order-->
<!--Optional:-->
<!-- <AgreementRef type="">A1</AgreementRef> -->
<Service type="tc1">bdx:noprocess</Service>
<Action>TC1Leg1</Action>
</CollaborationInfo>
<MessageProperties>
<!--1 or more repetitions:-->
<!--originalSender and finalRecipient are mandatory-->
<Property
name="originalSender">
urn:oasis:names:tc:ebcore:partyid-type:unregistered:C1
</Property>
<Property
name="finalRecipient">
urn:oasis:names:tc:ebcore:partyid-type:unregistered:C4
</Property>
</MessageProperties>
</UserMessage>Send Files Sequence

The FS Plugin (C2) continually polls the various configured locations for a list of existing files in the outgoing folder and subfolders, multiple files can be found simultaneously in the same folder. It then filters that list by excluding metadata files, content files that have been processed previously (those which file name contains a message id) and files with .lock suffix to create a set of eligible content files. For each eligible content file, the plugin uses the metadata file named "metadata.xml" within the same directory than the considered content file.
For each content file, the plugin put a message to an internal queue – FSPluginSendQueue and the messages are consumed from JMS queue by several consumers – the numbers of these consumers could be changed in fs-plugin.properties , property:
-
fsplugin.send.queue.concurrency=5-20
The value could be changed as well per domain:
-
fsplugin.domains.DOMAIN1.send.queue.concurrency=5-20
The name of the queue could be changed in the property:
-
fsplugin.send.queue=domibus.fsplugin.send.queue
For each message in the JMS queue, the plugin then creates an AS4
message for each eligible file by retrieving information from metadata
file ( metadata.xml within the same directory) to populate the message
properties and adding the content file as AS4 payload. The MIME type for
the payload is derived from the content file’s extension (or file
content itself if the file has no extension) according to the supported
formats[multiblock footnote omitted]. This message is then submitted to
the Domibus core and the content file is renamed by adding the message
id to the original file name, as follow:
-
originalName_messageId.originalExtension
On its own schedule, Domibus core (C2) eventually connects to the applicable destination gateway (C3) to deliver the message.
Check File Status Sequence
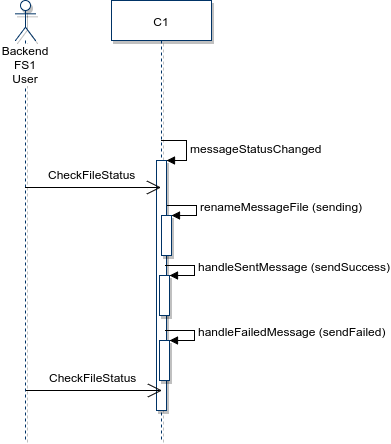
Every time the Domibus core delivers a message status change event to the FS Plugin, the plugin classifies it into one of three categories, according to the new status:
-
Sending events: set of events through which the message navigates while transfer is in progress.
-
Sent successfully events: set of final events into which messages ends after a successful transfer.
-
Sent failed events: final event into which messages ends after an unsuccessful transfer.
|
See Also
|
For more about available states and transitions, see WS Plugin Use Cases Details. |
SEND events
List of available Send Events:
-
READY_TO_SEND -
SEND_ENQUEUED -
SEND_IN_PROGRESS -
WAITING_FOR_RECEIPT -
WAITING_FOR_RETRY -
SEND_ATTEMPT_FAILED
Sending events result in a rename of the content file according to the rule:
-
originalName_messageId.ext.NEW_STATUS
Example:
-
message1_3c5558e4-7b6d-11e7-bb31-be2e44b06b34@domibus.eu.xml.READY_TO_SEND
Successful SEND events
Corresponding set of events:
-
ACKNOWLEDGED -
ACKNOWLEDGED_WITH_WARNING
When a message is sent successfully, the original content file is either
deleted or archived, according to the value configured in property
fsplugin.messages.sent.action or its domain-specific variation.
When archiving, the original file is moved from the OUT folder to the
SENT folder, while maintaining the same sub-folder hierarchy, for example:
<domain root>/OUT/subfolder1/subfolder2/file
is moved to:
<domain root>/SENT/subfolder1/subfolder2/file
When archiving, the file is also renamed according to the rule:
originalName_messageId.originalExtension
Example:
message1_3c5558e4-7b6d-11e7-bb31-be2e44b06b34@domibus.eu.xml
Failed SEND events
Corresponding set of events :
-
SEND_FAILURE
When a message suffers a send failure, the original content file is
either deleted or archived, according to the value configured in
property fsplugin.messages.failed.action or its domain-specific
definition. In all cases, an additional error file is created detailing
the error (more details below).
When archiving, the original file is moved from the OUT folder to the
FAILED folder, while maintaining the same sub-folder hierarchy, for example:
<domain root>/OUT/subfolder1/subfolder2/file
is moved to:
<domain root>/FAILED/subfolder1/subfolder2/file
When archiving, the file is also renamed as follows:
originalName_messageId.originalExtension
An error file is always created and placed in the "FAILED" folder while maintaining the original sub-folder hierarchy. Its name follows the form:
originalName_messageId.originalExtension.error
Example:
message1_3c5558e4-7b6d-11e7-bb31-be2e44b06b34@domibus.eu.xml.error
The error file’s contents have the following format:
errorCode: <error_code_value>
errorDetail:http://192.168.1.66:8080/domibus/services/msh
[<error_detail_value>]
messageInErrorId:
mailto:92620d75-c900-4007-b1f9-fc2c3fae0c61@domibus.eu
[<message_id_value>]
mshRole: <msh_role_value>
notified: <notified_null>
timestamp: <timestamp_value>All the error values are provided to the FS Plugin by the Domibus Access Point.
|
See Also
|
For more about messages and error codes, see the WS Plugin Interface Message Standards. |
Example:
errorCode: EBMS:0005
errorDetail: Error dispatching message to http://192.168.1.66:8080/domibus/services/msh
[http://192.168.1.66:8080/domibus/services/msh]
messageInErrorId: mailto:92620d75-c900-4007-b1f9-fc2c3fae0c61@domibus.eu
[92620d75-c900-4007-b1f9-fc2c3fae0c61@domibus.eu]
mshRole: SENDING
notified: null
timestamp: 2017-09-07 11:48:03.0Receive Files Sequence
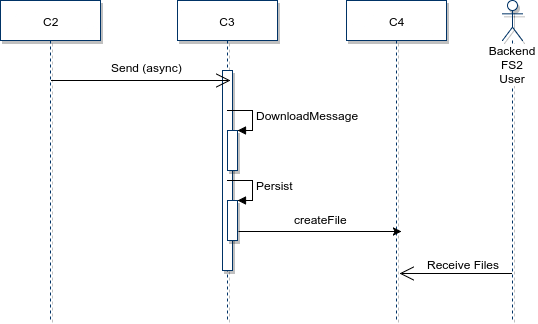
When the Domibus core (C3) receives an AS4 message it passes it to the
FS Plugin. The FS plugin starts by extracting the Service and Action
values from the message and crosses that information with the various
domain expressions to select the applicable domain location defining the
destination directory. The domain expressions are taken from properties
fsplugin.domains.<domain_id>.messages.expression and are evaluated in
order, according to properties fsplugin.domains.<domain_id>.order. If
no domain is found to match the pair Service/Action, the main location
is selected as the destination folder.
If the AS4 message contains a single payload, a new file is created in the incoming folder of the location identified above. This file will have a name in the form:
messageID.extension
Where messageId is the id of the message and extension is a file
extension derived from the MIME type of the payload.
If the AS4 message contains multiple payloads, multiples files are created. NOTE: Though only one payload can be sent at once using the FS Plugin, reception of multiple payloads is possible if initiated with other plugins.
Those files will be named similar to the above but also contain the CID of the payload, in the form:
-
messageID_partInfoCid.extension
-
6d38e798-26d7-45a9-9314-3a280cf02c8d_message.pdf
10.1.3. Plugin Notifications
Domibus core notifies the FS Plugin on the following events:
-
MESSAGE_RECEIVED -
MESSAGE_SEND_FAILURE -
MESSAGE_RECEIVED_FAILURE -
MESSAGE_SEND_SUCCESS -
MESSAGE_STATUS_CHANGE
The type of events received can be configured using the FS Plugin
property: fsplugin.messages.notifications.
The property can be found in fs-plugin.properties file in the
domibus-distribution-xxx-default-fs-plugin.zip.
|
See Also
|
For more see the Plugin Cookbook. |
10.1.4. Multitenancy
The Default FS Plugin can be used when Domibus is configured in Multitenancy mode.
In Multitenancy mode the plugins security is activated by default, regardless of the configured value in domibus.properties for the domibus.auth.unsecureLoginAllowed property.
As a result, every request to Domibus to send a file must be authenticated via plugin username and password, which are configured in fs-plugin.properties per domain. Please find below a configuration example for domain DOMAIN1:
# Mandatory in Multitenancy mode.
# The user that submits messages to Domibus.
# It is used to associate the current user
# with a specific domain.
fsplugin.domains.DOMAIN1.authentication.user=
# Mandatory in Multitenancy mode.
# The credentials of the user defined under the property username.
fsplugin.domains.DOMAIN1.authentication.password=|
See Also
|
For more information on how to create plugin users for authentication use, see Plugin Users. |
FS Plugin Configuration
Prerequisites
Domibus 3.3 or a later version needs to be already installed in a folder
called edelivery.
See Administration Guide or the Quick Start Guide guides.
The FS Plugin can either be installed on the Sending Access Point or on the Receiving Access Point, or on both.
Configuration Procedure
The FS (File System) Plugin configuration procedure includes:
-
Downloading and installing the FS Plugin
-
Specifying the FS Plugin location and setting its permissions
-
Configuring the message filter
-
Configuring the metadata.xml file
-
Configuring the PMode
Each of these steps is described in details below.
-
Download the
domibus-distribution-5.1.8-default-fs-plugin.zipfrom the Digital website (See ☞ FS Plugin Properties Configuration). -
Extract the zip file downloaded previously
-
Copy the
domibus-default-fs-plugin-5.1.8.jarfile toedelivery/conf/domibus/plugins/libfolder (whereedeliveryis the Domibus installation location) -
Copy the
fs-plugin.xmland thefs-plugin.propertiesfiles specific to the Application Server used tomcat, weblogic or wildfly) to<edelivery>/conf/domibus/plugins/config.
The FS Plugin supports multiple file system types via Apache VFS. There are 4 file systems currently supported:
-
Local
-
SMB/CIFS
-
SFTP
-
FTP
These four file systems are described below.
A local file system is simply a directory on the local physical system. The URI format is:
-
[file://]absolute-path
Where absolute-path is a valid absolute directory name on the local
platform. UNC names are supported under Windows.
This type of file system does not support authentication hence the Domibus user needs read/write access to this directory.
|
See Also
|
Examples:
-
file:///C:/Documents and Settings -
/home/someuser/somedir -
c:\program files\some dir -
c:/program files/some dir
A SMB/CIFS file system is a remote directory shared via Samba or Windows Share, with the following URI format:
-
smb://hostname[:port]/sharename[/relative-path]
Notice that a share name is mandatory.
This type of file system supports authentication via user and password domain properties. See FS Plugin Configuration for more details.
Examples:
-
smb://somehost/shareA -
smb://somehost/shareB/nesteddir
An SFTP file system is a remote directory shared via SFTP. Uses an URI of the following format:
-
sftp://hostname[:port][/relative-path]
The path is relative to whatever path the SFTP server has configured as base directory, usually the user’s home directory.
This type of file system also supports authentication via user and password domain properties. See section FS Plugin Configuration for more details.
Example:
-
sftp://somehost/pub/downloads/
An FTP file system is a remote directory shared via FTP. It accepts URIs of the following format:
-
:port[/relative-path]
The path is relative to whatever path the FTP server has configured as base directory, usually the user’s home directory.
This type of file system also supports authentication via user and password domain properties. See section FS Plugin Configuration for more details.
Example:
Due to incompatibilities between the current version of VFS and certain FTP servers on Linux (e.g.: vsftpd), using a relative path prevents some of the plugin’s functionality from working correctly. For that reason, in those cases an absolute path must be specified, e.g.:
-
Choose a name for the File System Plugin folder, where various types of messages will be stored (e.g:
filestorerefers to this folder in our documentation). Create the folder and make sure it can be read and written by the user running Domibus. -
Edit the
edelivery_path/conf/domibus/plugins/conf/fs-plugin.properties. -
Set
fsplugin.messages.location=<PATH>/filestorewhere <PATH> is the full path to thefilestorefolder.Example:fsplugin.messages.location=/home/domibus/fs_plugin_data/MAIN. -
Optional: Set the_
fsplugin.messages.payload.idproperty (Default iscid:message). -
Restart Domibus.
The following folders should automatically be created under the
filestore folder, after the successful start of Domibus:
-
IN: folder where the messages are received. -
SENT: folder where the messages sent are stored. -
FAILED: folder where the messages that failed to be sent are stored. -
OUT: folder from where the messages are sent.
|
Note
|
It is possible to configure multiple locations for incoming and outgoing files to be sent with the Domibus file plugin. The procedure of configuring different domains is described in Specific Domain Setup. |
Properties defined in the property file <edelivery_path>
/conf/domibus/plugins/conf/fs-plugin.properties can be used to
configure the FS Plugin.
The list of FS Plugin properties can be found in the FS Plugin ICD document
Log on the Administration Console. Make sure that the FS Plugin is the first in the the order of Plugins that are processed using the following procedure in the Admin Console:
-
Choose Messages filter:
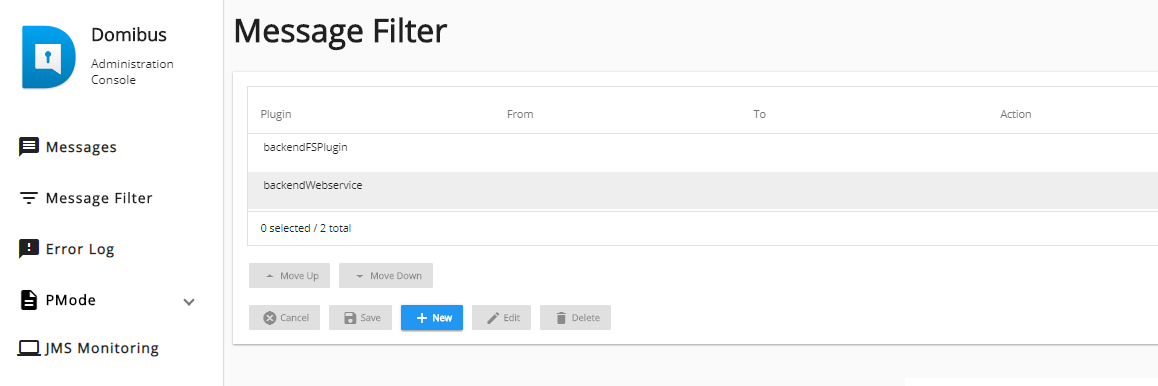
-
Select the backendFSPlugin, then click on Move Up to move it up to the top of the list:
-
Save the changes.
The metadata.xml contains the details of the sender and receiver party
IDs as well as other information and affects all future message
exchanges immediately after the file is placed in the OUT(tray) folder
of the Sending Access Point.
A sample metadata.xml file is provided, which needs to be modified to
match the PMode specifications of the sending and receiving Access
points used.
<?xml version="1.0" encoding="UTF-8" ?>
<UserMessage
xmlns="http://docs.oasis-open.org/ebxml-msg/ebms/v3.0/ns/core/200704/">
<PartyInfo>
<From>
<PartyId
type="urn:oasis:names:tc:ebcore:partyid-type:unregistered">
domibus-blue
</PartyId>
<Role>
http://docs.oasis-open.org/ebxml-msg/ebms/v3.0/ns/core/200704/initiator
</Role>
</From>
<!--Optional:-->
<To>
<PartyId
type="urn:oasis:names:tc:ebcore:partyid-type:unregistered">domibus-red</PartyId>
<Role>
http://docs.oasis-open.org/ebxml-msg/ebms/v3.0/ns/core/200704/responder
</Role>
</To>
<!--Optional:-->
</PartyInfo>
<CollaborationInfo>
<!--You may enter the following 4 items in any order-->
<!--Optional:-->
<!-- <AgreementRef type="">A1</AgreementRef> -->
<Service type="tc1">bdx:noprocess</Service>
<Action>TC1Leg1</Action>
</CollaborationInfo>
<MessageProperties>
<!--1 or more repetitions:-->
<!--originalSender and finalRecipient are mandatory-->
<Property
name="originalSender">
urn:oasis:names:tc:ebcore:partyid-type:unregistered:C1
</Property>
<Property
name="finalRecipient">
urn:oasis:names:tc:ebcore:partyid-type:unregistered:C4
</Property>
</MessageProperties>
<PayloadInfo>
<PartInfo href="cid:message">
<PartProperties>
<Property name="MimeType">text/xml</Property>
</PartProperties>
</PartInfo>
</PayloadInfo>
</UserMessage>Metadata.xml file-
Copy the metadata.xml file to the sender’s filestore
/OUTfolder.
|
Note
|
For each message received a metadata.xml file is also generated by
FS-Plugin and stored in the /IN/FINAL_RECIPIENT/MESSAGE_ID/… folder
|
Using the sample PMode file provided with the Domibus software:
-
Edit the PMode file and remove the 2 instances of
-
payloadProfile="MessageProfile"below:
<?xml version="1.0" encoding="UTF-8"?>
……..
……..
<legConfigurations>
<legConfiguration
name="pushTestcase1tc1Action"
service="testService1"
action="tc1Action"
defaultMpc="defaultMpc"
reliability="AS4Reliability"
security="eDeliveryAS4Policy"
receptionAwareness="receptionAwareness"
propertySet="eDeliveryPropertySet"
payloadProfile="MessageProfile"
errorHandling="demoErrorHandling"
compressPayloads="true"/>
<legConfiguration name="testServiceCase"
service="testService"
action="testAction"
defaultMpc="defaultMpc"
reliability="AS4Reliability"
security="eDeliveryAS4Policy"
receptionAwareness="receptionAwareness"
propertySet="eDeliveryPropertySet"
payloadProfile="MessageProfile"
errorHandling="demoErrorHandling"
compressPayloads="true"/>
</legConfigurations>
<process name="tc1Process"
……..
……..
……..-
Upload the PMode to the Access point using the PMode Option in the admin console:

Sending Procedure Options
In this section we will demonstrate, using examples, how messages Payloads are sent from one Access Point to another.
If FS-plugin is used for the sending as well as the receiving:
-
Place the
metadata.xmlfile under the sender’sfilestore/OUTfolder. -
Any subsequent file(s) placed in the same
filestore/OUTfolder will automatically be sent to the receiver’s Access Point and placed under the receiver’sfilestore/INfolder.
If WS-plugin is used to send a message to an FS-plugin access point, then:
-
The metadata.xml file is not used at the sender side, instead you can use SoapUI or another client backend application.
-
Sent payloads will be also placed under the receiver’s
filestore/INfolder.
|
Note
|
The next sections describe the structure of the receiver’s filestore
/IN folder which contains received messages.
|
If WS-plugin is used at the sender’s side, we will have two configuration choices:
-
If the
PayloadNameProperty_nameis used as shown below, where SoapUI is used as Backend, the received payload name will be the value given to thePayloadNameparameter (testing1.xml):<ns:Property name="finalRecipient">urn:oasis:names:tc:ebcore:partyid-type:unregistered:C4</ns:Property> </ns:MessageProperties> <ns:PayloadInfo> <ns:PartInfo href="cid:message"> <ns:PartProperties> <ns:Property name="MimeType">text/xml</ns:Property> <ns:Property name="PayloadName">testing1.xml</ns:Property> </ns:PartProperties> </ns:PartInfo> </ns:PayloadInfo> </ns:UserMessage> … -
The SoapUI response is shown here:

-
At the Receiver’s IN folder, a first subfolder is created and named using the finalRecipient parameter value from the Sender’s metadata.xml file (e.g:
urn_oasis_names_tc_ebcore_partyid-type_unregistered_C4).NoteThat the colon ":" in the folder name has been replaced by the underscore (_) character: 
-
Within the
finalRecipientfolder, is then created a second subfolder named using theMessageID(e.g:1b8da6f2-bc5e-42ab-9a10-583938609367@domibus.euin this case).
-
Finally, the payload (testing1.xml) and the metadata.xml file are stored in the second folder, the MessageID folder (1b8da6f2-bc5e-42ab-9a10-583938609367@domibus.eu) as shown here:
-
The received payload name will be the value given after
href="cid:xxxxx"as shown (e.g:message.xml) or a random string if href is absent (e.g.:476cb7ab-df21-456f-bb6e-619e1d6fb1ea.xml):… <ns:Property name="finalRecipient">urn:oasis:names:tc:ebcore:partyid-type:unregistered:C4</ns:Property> </ns:MessageProperties> <ns:PayloadInfo> <ns:PartInfo href="cid:message"> <ns:PartProperties> <ns:Property name="MimeType">text/xml</ns:Property> </ns:PartProperties> </ns:PartInfo> </ns:PayloadInfo> </ns:UserMessage>…. -
The SoapUI response is shown here:

-
At the Receiver’s
INfolder, a first subfolder is created and named using thefinalRecipientparameter value (e.g:urn_oasis_names_tc_ebcore_partyid-type_unregistered_C4). Note that the colon ":" in the folder name has been replaced by the underscore (_) character: -
Within the
finalRecipientfolder a second subfolder is created, with a name using the currentMessageIDvalue (e.g:f090cfe0-4896-49a6-8942-42c6bd98913c@domibus.euin this case)
-
Finally, the payload (
message.txt) and themetadata.xmlfile are stored in the secondMessageIDfolder (f090cfe0-4896-49a6-8942-42c6bd98913c@domibus.eu) as shown here:
-
With the
finalRecipientparameter, inmetadata.xml, set tourn:oasis:names:tc:ebcore:partyid-type:unregistered:C4:<MessageProperties> <Property name="originalSender">urn:oasis:names:tc:ebcore:partyid-type:unregistered:C1</Property> <Property name="finalRecipient">[.mark]##urn:oasis:names:tc:ebcore:partyid-type:unregistered:C4 </Property> </MessageProperties> </UserMessage> -
And a payload (e.g: test.txt) is placed in the Sender’s OUT folder, to be sent, as shown here:

-
At the Receiver’s OUT folder, a first subfolder named using the
finalRecipientparameter value is created (e.g:urn_oasis_names_tc_ebcore_partyid-type_unregistered_C4).Notethat the colon ":" in the folder name has been replaced by the underscore (_) character: 
-
Within the finalRecipient folder is then created a second subfolder named using the current
MessageIDvalue (e.g:e15fb76e-8806-48e7-8368-db784e12648b@domibus.euin this case).
-
Finally, the payload (
test.txt) and themetadata.xmlfile copied from the Sender’sOUTfolder are stored in the second folder, theMessageIDfolder (e15fb76e-8806-48e7-8368-db784e12648b@domibus.eu) as shown here:
|
Note
|
Using the
|
Fine Tuning
The fs-plugin.properties can be setup to either delete sent or failed
messages or archive them in the sent or failed folders under filestore.
-
fsplugin.messages.sent.action=delete: message Deleted after being sent -
fsplugin.messages.failed.action=delete: message Deleted after send failure
-
fsplugin.messages.failed.action=archive: message Archived in theFAILEDfolder after failing to be sent. -
fsplugin.messages.sent.action=archive: message Archived in theSENTfolder after being sent.
-
fsplugin.messages.received.purge.expired=600: will trigger a quartz job that will delete the entiremessage_idfolder underIN/FINAL_RECIPIENT. -
fsplugin.messages.sent.purge.expired=will keep the message in theSENTfolder indefinitely (thefsplugin.messages.sent.action=archivemust be set first).
In order to configure multiple locations for incoming and outgoing files to be sent with the Domibus file plugin, multiple domains can be setup in order to store messages in Domain specific locations.
-
Create a
SOMEDOMAINfolder, before (re)starting Domibus whereSOMEDOMAINis a user defined name. You can have as manySOMEDOMAINfolders as needed (SOMEDOMAIN1,SOMEDOMAIN2etc…) or your multiple locations purpose.-
Add the following details to the
fs-plugin.propertiesfiles (see the below highlighted sections in yellow):-
The new Domain expression which includes the domain name and location (e.g:
SOMEDOMAIN), the Domain Service (e.g:SomeDomainService) and the Domain Action (e.g:SomeDomaineAction).
-
-
#fsplugin.domains.DOMAIN1.order=1
# Regular expression used to match the domain for the reception of
messages. This regular expression will be evaluated
# against the Service and Action values from the incoming message
separated by #.#fsplugin.domains.DOMAIN1.messages.expression=
#fsplugin.domains.SOMEDOMAIN.messages.expression=SomeDomainService#SomeDomainAction
# The location of the folder that the plugin will use to manage the
messages to be sent and received in case no domain
# expression matches. This location must be accessible to the Domibus
instance. The domain locations must be independent
# from each other and should not overlap./home/domibus/fs_plugin_data/DOMAIN1#fsplugin.domains.DOMAIN1.messages.location=
#fsplugin.domains.SOMEDOMAIN.messages.location=/PATH/SOMEDOMAIN
# The user used to access the domain location specified by the property
fsplugin.domains.<domain_id>.messages.location.
# This value must be provided if the location access is secured at the
file system level so that users from other|
Note
|
(Optional) Set the fsplugin.domains.SOMEDOMAIN.messages.payload.id property (Default is cid:message)
|
|
Note
|
|
The following properties defined in the property file
<edelivery_path>/conf/domibus/plugins/conf/fs-plugin.properties
can be used to configure the FS-Plugin for a particular domain:
Insert an additional Service and Action in the metadata.xml as in the following example:
<?xml version="1.0" encoding="UTF-8" ?>
<UserMessage
xmlns="http://docs.oasis-open.org/ebxml-msg/ebms/v3.0/ns/core/200704/">
<PartyInfo>
<From>
<PartyId
type="urn:oasis:names:tc:ebcore:partyid-type:unregistered">
domibus-blue
</PartyId>
<Role>
http://docs.oasis-open.org/ebxml-msg/ebms/v3.0/ns/core/200704/initiator
</Role>
</From>
<!--Optional:-->
<To>
<PartyId
type="urn:oasis:names:tc:ebcore:partyid-type:unregistered">
domibus-red
</PartyId>
<Role>http://docs.oasis-open.org/ebxml-msg/ebms/v3.0/ns/core/200704/responder</Role>
</To>
</PartyInfo>
<CollaborationInfo>
<!--You may enter the following 4 items in any order-->
<!--Optional:-->
<!--<AgreementRef type="">A1</AgreementRef-->
<Service type="tc1">SomeDomainService</Service>
<Action>SomeDomainAction</Action>
</CollaborationInfo>
<MessageProperties>
<!--1 or more repetitions:-->
<!--originalSender and finalRecipient are mandatory-->
<Property
name="originalSender">
urn:oasis:names:tc:ebcore:partyid-type:unregistered:C1
</Property>
<Property
name="finalRecipient">urn:oasis:names:tc:ebcore:partyid-type:unregistered:
</Property>
</MessageProperties>
</UserMessage>Insert the following additions to the existing Pmode:
|
Note
|
|
<?xml version="1.0" encoding="UTF-8"?>
<--! ... -->
<services>
<service name="testService1" value="bdx:noprocess" type="tc1"/>
<service name="SomeDomainService" value="SomeDomainService" type="tc1"/>
</services>
<actions>
<action name="tc1Action" value="TC1Leg1"/>
<action name="tc2Action" value="TC2Leg1"/>
<action name="SomeDomainAction" value="SomeDomainAction"/>
</actions>
<--! ... -->
<legConfiguration name="pushTestcase1tc3Action"
service="SomeDomainService
action="SomeDomainAction"
defaultMpc="defaultMpc"
reliability="AS4Reliability"
security="eDeliveryPolicy"
receptionAwareness="receptionAwareness"
errorHandling="demoErrorHandling"
compressPayloads="true"/>
undefined</legConfigurations>undefined<process name="tc1Process"
agreement=""
mep="oneway"
binding="push"
initiatorRole="defaultInitiatorRole"
responderRole="defaultResponderRole">
<initiatorParties>
<initiatorParty name="blue_gw"/>
<initiatorParty name="red_gw"/>
</initiatorParties>
<responderParties>
<responderParty name="blue_gw"/>
<responderParty name="red_gw"/>
</responderParties>
<legs>
<leg name="pushTestcase1tc1Action"/>
<leg name="pushTestcase1tc2Action"/>
<leg name="pushTestcase1tc3Action"/>
</legs>undefined</process>undefined</businessProcesses>undefined</db:configuration>Once the PModes are loaded in the sender and receiver’s Access points, the
user is able to drop the Payload into the /PATH/SOMEDOMAIN/OUT
folder.
The payload is received in the receiver’s /PATH/SOMEDOMAIN/IN folder.
Multitenancy
The FS Plugin can be used when Domibus is configured in Multitenancy mode.
In Multitenancy mode the plugins security is activated by default,
regardless of the configured value in domibus.properties for the
domibus.auth.unsecureLoginAllowed property.
As a result, every request to Domibus to send a file must be authenticated
via plugin username and password, which are configured in fs-plugin.properties
per domain.
DOMAIN1# Mandatory in Multitenancy mode.
# The user that submits messages to Domibus.
# It is used to associate the current user with a specific domain.
fsplugin.domains.DOMAIN1.authentication.user=
# Mandatory in Multitenancy mode. The credentials of the user defined
# under the property username.
fsplugin.domains.DOMAIN1.authentication.password=More information on how to create plugin users used for authentication can be found in Plugin Users).
Different recipients
To send multiple files to different recipients, create different
sub-folders under the Sender’s OUT folder, for each recipient. (One
OUT/sub-folder per recipient).
Each of the subfolders would contain a metadata.xml file that contains
details of its corresponding recipient.
The FS Plugin would then scan each of these sub-folders and send the message present in each using the metadata.xml details.
|
Note
|
To put the message to be distributed in each of the sub-folders, either create a script which copies the message to each sub-folder, using a pre-prepared list of recipients or develop a client program that does a similar task. |
Domibus must be able to write the incoming messages to the specified IN
folder at the receiver end, whether a domain setup is used or not.
For local file systems, the Domibus user must have the necessary
write permissions to the IN, OUT, SENT and FAILED folders.
For remote file systems like SMB (Server Message Block), SFTP or FTP
protocols, where the location access is secured at the file system
level and where users from other domains cannot access its contents, the
fs-plugin.properties file must include the credentials of a user (or
users) allowed to access the IN, OUT, SENT and the FAILED folders
specific to each domain.
The fields to setup include are described in the following example. See FS Plugin Configuration for more details:
……
fsplugin.domains.DOMAIN1.messages.user= user_name
fsplugin.domains.DOMAIN1.messages.password=user_password
…….|
Note
|
A typical error that would occur if the sent Payload cannot be written to the receiver’s IN folder is described here: |
2017-10-18 15:25:08,772 [] []
#ERROR e.d.p.f.w.FSSendMessagesService:66 - Error setting up folders for domain: SOMEDOMAIN
eu.domibus.plugin.fs.exception.FSSetUpException: IO error setting up folders
at
eu.domibus.plugin.fs.FSFilesManager.getEnsureChildFolder(FSFilesManager.java:104)In this situation, the message is moved to the sender’s SENT
folder, even though it has not actually been successfully delivered to
the receiver’s IN folder.
The message will only be released to the receiver’s IN tray when the
correct (e.g.: write) permissions are set.
11. WS Plugin
11.1. WS Plugin Interface
About this content
This content defines the participant’s interface to the Access Point (Corner Two and Corner Three in the four-corner topology that will be explained later in this document) component of the eDelivery building block. This document describes the WSDL and the observable behaviour of the interface provided by Domibus and included in the default-ws-plugin.
This section describes the WSDL and the observable behaviour of the interface provided by Domibus 4.x.y and included in the default-ws-plugin.
Here you can find information to understand the Access Point (Corner Two and Corner Three in the four-corner model) services provided by Domibus delivered by eDelivery.
There is one interface described in this document:
| Interface | Description |
|---|---|
WebServicePlugin.wsdl |
The webservices interface for Domibus WS default plugin |
Scope
This content covers the service interface of the Access Point. It includes information regarding the description of the services available, the list of use cases, the information model and the sequence of message exchanges for the services provided. This specification is limited to the service interface of the Access Point. All other aspects of its implementation are not covered by this document.
Audience
The intended target audience for this guide are:
-
The Directorate Generals and Services of the European Commission, Member States (MS) and also companies of the private sector wanting to set up a connection between their backend systems and the Access Point. In particular:
-
Architects will find it useful for determining how to best exploit the Access Point to create a fully-fledged solution and as a starting point for connecting a Back-Office system to the Access Point.
-
Analysts will find it useful to understand the Access Point that will enable them to have an holistic and detailed view of the operations and data involved in the use cases.
-
Developers will find it essential as a basis of their development concerning the Access Point plugin services.
-
Testers can use this document in order to test the interface by following the use cases described.
-
Useful Resources
Below you can find useful information sources:
-
Document holding technical specifications and implementation instructions.
-
HTTP Methods for RESTful Services
Short descriptions and using HTTP Methods for RESTful Services
-
Business Document Metadata Service Location
BDMSL Software Architecture Document
This document is the Software Architecture document of the CIPA eDelivery Business Document Metadata Service Location application (BDMSL) sample implementation.
It intends to provide detailed information about the project:-
An overview of the solution
-
The different layers
-
The principles governing its software architecture
-
-
About the Electronic Business using eXtensible Markup Language(ebXML)
-
Web Services Description Language (WSDL) 1.1
WS-I Basic Profile Version 1.1
-
Electronic Business using eXtensible Markup Language (ebXML)
Services' implementers and consumers can find a complete specification of the WS Plugin:
-
Functional Specification, this specifies the set of services and the operations provided by each service and this is represented by the flows explained in the use cases.
-
Behavioural Specification, this specifies the expected sequence of steps to be respected by the participants in the implementation when calling a service or a set of services and this is represented by the sequence diagrams presented in the use cases.
-
Message Standards, this specifies the syntax and semantics of the data.
Functional Specification
The Access Point provides the functionality supporting Corner Two and Corner Three components.
In order to understand the Use Cases that will be described below it is important to explain the topology; i.e. the four – corner model.
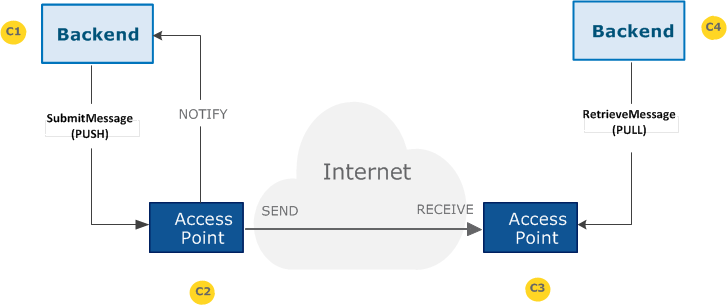
In this model we have the following elements:
-
Corner One (C1): Backend C1 is the system that will send messages to the sending AP (Access Point)
-
Corner Two (C2): Sending Access Point C2
-
Corner Three (C3): Receiving Access Point C3
-
Corner Four (C4): Backend C4 is the system that received messages from the receiving AP (Access Point)
There are two backend adapters (i.e. corner one and corner four). They send messages to and download messages from the AS4 APs configured in the PMode configuration files.
Use Cases Overview
| Actor | Definition |
|---|---|
Backend C1 |
Any participant submitting messages to any other Backend C4 and using the Sending AP C2 for that purpose. |
Backend C4 |
Any participant retrieving messages from any other Backend C1 and using the Receiving AP C3 for that purpose. |
|
Note
|
Greyed use cases in this paragraph show deprecated operations in the WSDL (in these diagrams, the use cases below these replace them). Since deprecated and replacing operations have the same functionality (only technical changes), in each case only one use case is presented for both. |
| ID | UC | Description | Operation | System |
|---|---|---|---|---|
Submit Message |
Submit any type of document from a Backend C1 to a Backend C4 |
submitMessage |
Domibus 4.x.y |
|
Get Status of the Message |
Get the status of the Message with messageId and access point role. |
|
Domibus 5.1 |

| ID | UC | Description | Operation | System |
|---|---|---|---|---|
Download Message |
Retrieve the message from the Receiving AP C3 |
retrieveMessage |
Domibus 4.x.y |
|
Get Status of the Message |
Get the status of the Message |
getStatus |
Domibus 4.x.y |
|
ListPending Messages |
Check the pending messages to be retrieved by the Backend C4 from C3 |
listPendingMessages |
Domibus 4.x.y |

Use Cases Detail
The following paragraphs define the use cases listed above with more detail.
The Interface Functional Specification is described in the detailed uses cases using the Request and the Response examples. It is important to remark that the Inputs and Responses provided as examples for the use cases are based on a specific PMode configuration.
As defined in the
eDelivery Specification Library,
a PMode is the contextual information that governs the processing of
a particular message (thus is basically a set of configuration parameters).
The PMode associated with a message determines, among other things,
which security and/or which reliability protocol and parameters,
as well as which MEP (Message Exchange Pattern)
is being used when sending a message. The technical representation of
the PMode configuration is implementation dependent.
C1 and C4 may be one or more participants.
The state machine diagrams presented below depict the various states in which a message may be during its lifecycle when submitting or downloading the message. These are presented to have a more comprehensive vision of the process that the messages go through. It is also important to remark that also the sequence diagram of the basic flow is presented in the use cases.
The state machine diagram for submitting the message in C2:

The state machine diagram for downloading the message in C3:

Click to Open
- Brief description
-
Submit any message with attachments from Backend C1 to the Backend C4. The response from C2 to C1 is synchronous and contains a messageId.
MTOM feature is required when sending large files so that the attachments are send outside the XML envelope, as parts. Otherwise, the attachments will be encoded base64 and sent inside the envelope and the maximum limit would be 128Mb.
The state machine of the outgoing messages is the following:Sequence Diagram C1 to C2 – SubmitMessage
| Actors | |
|---|---|
C1 |
Backend C1 |
C2 |
Access Point C2 |
C3 |
Access Point C3 |
| Preconditions | |
|---|---|
C1 |
Backend C1 has a message to submit. |
C1 |
The message is valid. A message is valid if it respects the message standard format (See ☞ Message Standards). |
C2,C3 |
The Sending AP (C2) and the Receiving AP (C3) are up and running and properly configured. |
| Actor | Step | Description | C2 Message State |
C3 Message state |
|---|---|---|---|---|
C1 |
1 |
Backend C1 submits the message. |
N/A |
- |
C2 |
2 |
C2 sends an ACK to C1 containing the ID of the message. |
SEND_ENQUEUED |
- |
C2 |
3 |
The message directly passes through to SEND_ENQUEUED, meaning that it is available for processing. All messages go through this step regardless of load. |
SEND_ENQUEUED |
- |
C2 |
4 |
Once the sending process finishes the status changes to WAITING_FOR_RECEIPT. |
WAITING_FOR_RECEIPT |
- |
C3 |
5 |
Once the reception is finished by C3, the status changes to RECEIVED. |
WAITING_FOR_RECEIPT |
RECEIVED |
C3 |
6 |
The Receiving AP (C3) responds ACK to C2 |
WAITING_FOR_RECEIPT |
RECEIVED |
C2 |
7 |
The status of the message changes to ACKNOWLEDGED. |
ACKNOWLEDGED |
RECEIVED |
- |
8 |
Use case ends in successful condition. |
- |
- |
| Actor | Step | Description | C2 Message State |
C3 Message state |
|---|---|---|---|---|
C2 |
E2.1 |
The ID provided by C1 already exists |
- |
- |
C2 |
E2.1.1 |
The |
SEND_FAILURE |
- |
C2 |
E2.1.2 |
|||
C2 |
E11.1 |
Wrong receipt received or any other failure (e.g connection lost) |
- |
- |
C2 |
E11.1.1 |
The status changes to WAITING_FOR_RETRY. |
WAITING_FOR_RETRY |
- |
C2 |
E11.1.2 |
Continue to step 3 |
- |
- |
C2 |
E11.1.3.1 |
The maximum number or retries (Configurable via PMode on a by-usecase basis) has been reached |
- |
- |
C2 |
E11.1.3.1.1 |
The status of the message changes to SEND_FAILURE. |
SEND_FAILURE |
- |
C2 |
E11.1.3.1.1 |
A notification can be sent to the Backend C1 that initially submitted the message. |
SEND_FAILURE |
|
C2 |
E11.1.3.1.3 |
Use case ends in failure condition. |
- |
- |
Successful conditions |
The operation is a success if getStatus in C2 is ACKNOWLEDGED and this means that the Receiving AP (C3) has received the message submitted by the Backend C1 and the status in C3 is RECEIVED. The method getStatus must be called with the identifier of the message received in the response or specified in the request. |
|---|---|
Failure Conditions |
Errors may be sent as SOAP Fault or as http:5XX. |
<soap:Envelope
xmlns:soap="http://www.w3.org/2003/05/soap-envelope"
xmlns:ns="http://docs.oasis-open.org/ebxml-msg/ebms/v3.0/ns/core/200704/"
xmlns:_1="http://eu.domibus.wsplugin/">
<soap:Header>
<ns:Messaging> +
# <#ns:UserMessage## mpc=”
http://docs.oasis-open.org/ebxml-msg/ebms/v3.0/ns/core/200704/defaultMPC”>
<ns:PartyInfo>
<ns:From>
<ns:PartyId
type="urn:oasis:names:tc:ebcore:partyid-type:unregistered">domibus-blue</ns:PartyId>
<ns:Role>http://docs.oasis-open.org/ebxml-msg/ebms/v3.0/ns/core/200704/initiator</ns:Role>
</ns:From>
<ns:To>
<ns:PartyId
type="urn:oasis:names:tc:ebcore:partyid-type:unregistered">domibus-red</ns:PartyId>
<ns:Role>http://docs.oasis-open.org/ebxml-msg/ebms/v3.0/ns/core/200704/responder</ns:Role>
</ns:To>
</ns:PartyInfo>
<ns:CollaborationInfo>
<ns:Service type="tc1">bdx:noprocess</ns:Service>
<ns:Action>TC1Leg1</ns:Action>
</ns:CollaborationInfo>
<ns:MessageProperties>
<ns:Property
name="originalSender">urn:oasis:names:tc:ebcore:partyid-type:unregistered:C1</ns:Property>
<ns:Property
name="finalRecipient">urn:oasis:names:tc:ebcore:partyid-type:unregistered:C4</ns:Property>
</ns:MessageProperties>
<ns:PayloadInfo>
<ns:PartInfo href="cid:message">
<ns:PartProperties>
<ns:Property name="MimeType">text/xml</ns:Property>
</ns:PartProperties>
</ns:PartInfo>
</ns:PayloadInfo>
</ns:UserMessage>
</ns:Messaging>
</soap:Header>
<soap:Body>
<_1:submitRequest>
<|--Optional-->
<bodyload>
<value>cid:bodyload</value>
</bodyload>
<payload payloadId="cid:message" contentType="text/xml">
<value>PD94bWwgdmVyc2lvbj0iMS4wIiBlbmNvZGluZz0iVVRGLTgiPz4KPGhlbGxvPndvcmxkPC9oZWxsbz4=</value>
</payload>
</_1:submitRequest>
</soap:Body>undefined</soap:Envelope>undefined<soap:Body>
<_1:submitRequest>
<payloadpayloadId="cid:message"contentType="text/xml">
<value>PD94bWwgdmVyc2lvbj0iMS4wIiBlbmNvZGluZz0iVVRGLTgiPz4KPGhlbGxvPndvcmxkPC9oZWxsbz4=</value>
</payload>
<payloadpayloadId="cid:attachment"contentType="application/octet-stream">
<value>PD94bWwgdmVyc2lvbj0iMS4wIiBlbmNvZGluZz0iVVRGLTgiPz4KPGhlbGxvPndvcmxkPC9oZWxsbz4=</value>
</payload>
</_1:submitRequest>undefined</soap:Body>undefined</soap:Envelope><soap:Envelopeundefinedxmlns:soap="http://www.w3.org/2003/05/soap-envelope">undefined<soap:Body>
<ns5:submitResponse
xmlns:ns6="http://docs.oasis-open.org/ebxml-msg/ebms/v3.0/ns/core/200704/"
xmlns:ns5="http://eu.domibus.wsplugin"
xmlns:xmime="http://www.w3.org/2005/05/xmlmime">
<messageID>23dce7d9-2781-4623-beeb-6b43ab9e7d37@domibus.eu</messageID>
</ns5:submitResponse>undefined</soap:Body>undefined</soap:Envelope>-
N/A
Click to Open
- Brief description
-
Retrieve any type of message sent from Backend C1 to Backend C4. The retrieval of the message is based on a PULL mechanism. C4 downloads the message from C3.
Please note that
retrieveMessagemethod replaces the deprecated method downloadMessage to support the retrieval of large files. MTOM feature is required when retrieving large files.Sequence Diagram C4 to C3 – retrieveMessage
| Actors | |
|---|---|
C3 |
Access Point C3 |
C4 |
Backend C4 |
| Preconditions | |
|---|---|
C3 |
There is at least one message sent by AP C2 and successfully received in the Receiving AP C3. |
C3 |
The Receiving AP (C3) is up and running and properly configured. |
C4 |
C4 Has previously requested information about pending messages from C3. |
| Actor | Step | Description | C3 Message State |
|---|---|---|---|
C4 |
1 |
Requests, to the Receiving AP C3, the service |
RECEIVED |
C3 |
2 |
Receiving AP C3 retrieves and sends the information retrieveMessageResponse to C4 as response to his request. This is the payload (message content and attachments) and metadata, analogous to the message sent from C1 to C2 in UC01. The status of the message changes to DOWNLOADED when the message is retrieved by the Backend C4. |
DOWNLOADED |
C4 |
3 |
Receives the message as sent by C1 |
DOWNLOADED |
C3 |
4 |
Deletes the payload of the message from the database if
retention timeout for downloaded messages = 0. |
DELETED |
C3 |
5 |
The status of the message changes to DELETED when the message is deleted by C3 after the configured retention timeout for downloaded messages (retention_downloaded) expired. Note: If retention_downloaded has a negative value, the message will never be deleted from C3. If the message was not downloaded, the retention_undownloaded value will be used as timeout for deletion. |
DELETED |
| Actor | Step | Description | C3 Message State |
|---|---|---|---|
C3 |
A1.1 |
Configured retention time has passed |
RECEIVED |
C3 |
A1.1.1 |
Go directly to step 4 |
RECEIVED |
| Actor | Step | Description | C3 Message State |
|---|---|---|---|
C4 |
A2.1 |
Requests, to the Receiving AP C3, the service
|
RECEIVED |
C3 |
A2.2 |
Receiving AP C3 retrieves and sends the information
|
RECEIVED |
C4 |
A2.3 |
Receives the message as sent by C1. |
RECEIVED |
C4 |
A2.4 |
Requests, to the Receiving AP C3, the service
|
RECEIVED |
C3 |
A2.5 |
C3 responds with a confirmation message containing the
|
DOWNLOADED |
C3 |
A2.6 |
Go to step 4 |
DELETED |
| Actor | Step | Description | C3 Message State |
|---|---|---|---|
C3 |
E2.1 |
Wrong messageID (malformed or missing), this is a condition of failure. |
(NOT FOUND) |
C3 |
E2.1.1 |
The |
(NOT FOUND) |
C3 |
E2.1.2 |
Use case ends in failure condition |
Successful conditions |
It is a success if the Message Status is |
|---|---|
Failure Conditions |
No message payload is returned to C4. The response contains a
description of the encountered error. The operation is not a success if
|
<soap:Envelope
xmlns:soap="http://www.w3.org/2003/05/soap-envelope" xmlns:_1="
http://eu.domibus.wsplugin/">
<soap:Header/>
<soap:Body>
<_1:retrieveMessageRequest>
<messageID>$\{ResponseParameters#messageID}</messageID>
</_1:retrieveMessageRequest>
</soap:Body>
</soap:Envelope><soap:Envelope
xmlns:soap="http://www.w3.org/2003/05/soap-envelope">
<soap:Header>
<ns6:Messaging mustUnderstand="false"
xmlns:ns6="http://docs.oasis-open.org/ebxml-msg/ebms/v3.0/ns/core/200704/"
xmlns:ns5=" http://eu.domibus.wsplugin/"
xmlns:xmime="http://www.w3.org/2005/05/xmlmime">
<ns6:UserMessage> mpc=”http://docs.oasis-open.org/ebxml-msg/ebms/v3.0/ns/core/200704/defaultMPC”>
<ns6:MessageInfo>
<ns6:Timestamp>2017-10-02T17:32:14.956+02:00</ns6:Timestamp>
<ns6:MessageId>d05051c6-951c-4f40-90b5-459eca9d8302@domibus.eu</ns6:MessageId>
</ns6:MessageInfo>
<ns6:PartyInfo>
<ns6:From>
<ns6:PartyId
type="urn:oasis:names:tc:ebcore:partyid-type:unregistered">domibus-blue</ns6:PartyId>
<ns6:Role>http://docs.oasis-open.org/ebxml-msg/ebms/v3.0/ns/core/200704/initiator</ns6:Role>
</ns6:From>
<ns6:To>
<ns6:PartyId
type="urn:oasis:names:tc:ebcore:partyid-type:unregistered">domibus-red</ns6:PartyId>
<ns6:Role>http://docs.oasis-open.org/ebxml-msg/ebms/v3.0/ns/core/200704/responder</ns6:Role>
</ns6:To>
</ns6:PartyInfo>
<ns6:CollaborationInfo>
<ns6:Service type="tc1">bdx:noprocess</ns6:Service>
<ns6:Action>TC1Leg1</ns6:Action>
<ns6:ConversationId>52f1c57d-bd35-4ab2-a0a5-da9a15101dba@domibus.eu</ns6:ConversationId>
</ns6:CollaborationInfo>
<ns6:MessageProperties>
<ns6:Property
name="finalRecipient">urn:oasis:names:tc:ebcore:partyid-type:unregistered:C4</ns6:Property>
<ns6:Property
name="originalSender">urn:oasis:names:tc:ebcore:partyid-type:unregistered:C1</ns6:Property>
</ns6:MessageProperties>
<ns6:PayloadInfo>
<ns6:PartInfo href="cid:message">
<ns6:Schema/>
<ns6:PartProperties>
<ns6:Property name="MimeType">text/xml</ns6:Property>
</ns6:PartProperties>
</ns6:PartInfo>
</ns6:PayloadInfo>
</ns6:UserMessage>
</ns6:Messaging>
</soap:Header>
<soap:Body>
<ns5:retrieveMessageResponse
xmlns:ns6="http://docs.oasis-open.org/ebxml-msg/ebms/v3.0/ns/core/200704/"
xmlns:ns5=" http://eu.domibus.wsplugin/"
xmlns:xmime="http://www.w3.org/2005/05/xmlmime">
<payload payloadId="cid:message">
<value>PD94bWwgdmVyc2lvbj0iMS4wIiBlbmNvZGluZz0iVVRGLTgiPz4KPGhlbGxvPndvcmxkPC9oZWxsbz4=</value>
</payload>
</ns5:retrieveMessageResponse>
</soap:Body>
</soap:Envelope>- Security
-
In Multitenancy mode, the general property domibus.auth.unsecureLoginAllowed is ignored and authentication is always required. For more about authentication options, see the Domibus Authentication section in the Administration.
Click to Open
- Brief description
-
Get the status of the Message sent from Backend C1 or received by the Backend C4:
Sequence Diagram – GetStatus
| Actors | |
|---|---|
C1 |
Backend C1 |
C2 |
Access Point C2 |
C3 |
Access Point C3 |
C4 |
Backend C4 |
| Preconditions | |
|---|---|
There is at least one message sent by Backend C1 or to be retrieved by Backend C4. |
|
The Sending AP C2 and the Receiving AP C3 are up and running and properly configured. |
|
-
Backend C1 or the Backend C4 launch a
statusRequestusing themessageIdand access point role. -
The Access Point (Sending AP C2 or Receiving AP C3) retrieve the
getStatusResponse. -
Use case ends.
-
N/A
Successful conditions |
The operation is a success if * |
|---|---|
Failure Conditions |
The message does not exist. |
-
N/A
- Security
-
In Multitenancy mode, the general property domibus.auth.unsecureLoginAllowed is ignored and authentication is always required.
For more about authentication options, see the Domibus Authentication section in the Administration.
<soap:Envelope
xmlns:soap="http://www.w3.org/2003/05/soap-envelope" xmlns:_1="
http://eu.domibus.wsplugin/">
<soap:Header/>
<soap:Body>
<_1:statusRequest>
<messageID>d05051c6-951c-4f40-90b5-459eca9d8302@domibus.eu</messageID>
</_1:statusRequest>
</soap:Body>
</soap:Envelope><soap:Envelope
xmlns:soap="http://www.w3.org/2003/05/soap-envelope">
<soap:Body>
<ns5:getStatusResponse
xmlns:ns6="http://docs.oasis-open.org/ebxml-msg/ebms/v3.0/ns/core/200704/"
xmlns:ns5=" http://eu.domibus.wsplugin/"
xmlns:xmime="http://www.w3.org/2005/05/xmlmime">NOT_FOUND</ns5:getStatusResponse>
</soap:Body>
</soap:Envelope>Click to Open
- Brief description
-
List the status Messages pending to be received by the Backend C4.
Sequence Diagram C4 to C3 – ListPendingMessages
| Actors | |
|---|---|
C4 |
Backend C4 |
Preconditions |
|
There is at least one message be downloaded by Backend C4. |
|
The Receiving AP C3 is up and running and properly configured. |
|
Steps: 1. Backend C4 launches the service listPendingMessages. 2. The Access Point (Receiving AP C3) retrieves the list of messageIds for messages with status RECEIVED. 3. Use case ends.
-
N/A
Successful conditions |
The operation is a success if listPendingMessagesResponse contains all the messageIDs of the pending messages to be retrieved or the list is empty in the case that there are no pending messages. |
|---|---|
Failure Conditions |
N/A |
-
N/A
In Multitenancy mode, the general property domibus.auth.unsecureLoginAllowed
is ignored and authentication is always required.
For more about authentication options, see the Domibus Authentication section in the
Administration.
When authentication is required, the returned messages will always be
filtered having authenticated user overwriting finalRecipient value (if
finalRecipient is provided as below).
The listPendingMessagesRequest accepts 8 optional parameters in order
to filter the returned list of messages in status RECEIVED.
Date time optional parameters like “receivedFrom” and “receivedTo” can
be provided in ISO-8601 format, with or without an offset. When the
offset is provided, the user MUST NOT provide any additional timezone
IDs so a value of “2021-07-21T14:27:00+02:00[Europe/Brussels]” is
invalid. When the offset is missing, these parameter values are
considered to be provided in UTC, having an offset of “+00:00”. For
example, the following two values are valid and point to the same
instant of 21st of July 2021, 12:27:00 in UTC:
-
“2021-07-21T14:27:00+02:00” will be interpreted to have an offset of 02:00;
-
“2021-07-21T12:27:00” will be interpreted to be in the UTC timezone with a +00:00 offset.
<soap:Envelope
xmlns:soap="http://www.w3.org/2003/05/soap-envelope" xmlns:_1="
http://eu.domibus.wsplugin/">
<soap:Header/>
<soap:Body>
<_1:listPendingMessagesRequest>
<messageId>4078cfea-74e9-4058-9d14-1dceee597abd@domibus.eu</messageId>
<conversationId>52f1c57d-bd35-4ab2-a0a5-da9a15101dba@domibus.eu</conversationId>
<refToMessageId>d05051c6-951c-4f40-90b5-459eca9d8302@domibus.eu</refToMessageId>
<fromPartyId>domibus-blue</fromPartyId>
<finalRecipient>urn:oasis:names:tc:ebcore:partyid-type:unregistered:C4</finalRecipient>
<originalSender>urn:oasis:names:tc:ebcore:partyid-type:unregistered:C1</originalSender>
<receivedFrom>2021-01-15T09:00:00</receivedFrom>
<receivedTo>2021-01-29T09:00:00</receivedTo>
</_1:listPendingMessagesRequest>
</soap:Body>
</soap:Envelope><soap:Envelope
xmlns:soap="http://www.w3.org/2003/05/soap-envelope">
<soap:Body>
<ns6:listPendingMessagesResponse
xmlns:S11="http://schemas.xmlsoap.org/soap/envelope/"
xmlns:eb="http://docs.oasis-open.org/ebxml-msg/ebms/v3.0/ns/core/200704/"
xmlns:S12="http://www.w3.org/2003/05/soap-envelope"
xmlns:xmime="http://www.w3.org/2005/05/xmlmime" xmlns:ns6="
http://eu.domibus.wsplugin/">
<messageID>4078cfea-74e9-4058-9d14-1dceee597abd@domibus.eu</messageID>
</ns6:listPendingMessagesResponse>
</soap:Body>
</soap:Envelope>WS Plugin configuration
The WS plugin configuration is done in the ws-plugin.properties file.
Following properties are configurable in this file:
| Configuration Property | Description and Usage | Default |
|---|---|---|
|
When TRUE enables the support for MTOM. |
|
|
Enable the schema validation. By default, the schema validation has been disabled due to performance reasons. For large files, it is recommended to keep the schema validation as disabled. |
|
|
The maximum number of pending messages to be listed from the pending messages table. Setting this property is expected to avoid timeouts due to huge _resultsets being served. Setting this property to zero returns all pending messages._ |
|
|
The notifications sent by Domibus to the plugin. The following values are possible:
|
|
|
Timeout values for communication between the ws plugin and the backend service |
|
|
ReceiveTimeout - Specifies the amount of time, in milliseconds, that the consumer will wait for a response before it times out. 0 is infinite. |
|
|
Allows chunking when sending messages to the backend service |
|
|
If |
|
|
Specifies if the connection will be kept alive between C2-C1 and C3-C4. |
|
|
Specify concurrency limits via a "lower-upper" String, e.g. "5-10", or a simple
upper limit String, e.g. "10" (the lower limit will be 1 in this case) |
|
|
Enables push notifications to the Backend. |
|
|
Description of the rule X |
- |
|
Recipient that will trigger the rule (ex: urn:oasis:names:tc:ebcore:partyid-type:unregistered:C1). If empty, the rule is triggered for any recipient. |
- |
|
End point used to submit a message to the backend (ex: http://localhost:8080/backend) |
- |
|
Cron expression for the retry mechanism to push to backend |
- |
|
Type of notifications to be sent to the Backend:
|
- |
|
Basic authentication username that will be added to the http header of push notification requests to C4. If not specified, no authorization header will be added. |
- |
|
Basic authentication password that will be added to the http header of push notification requests to C4. If not specified, no authorization header will be added. |
- |
|
If TRUE, the |
|
WSDL Model
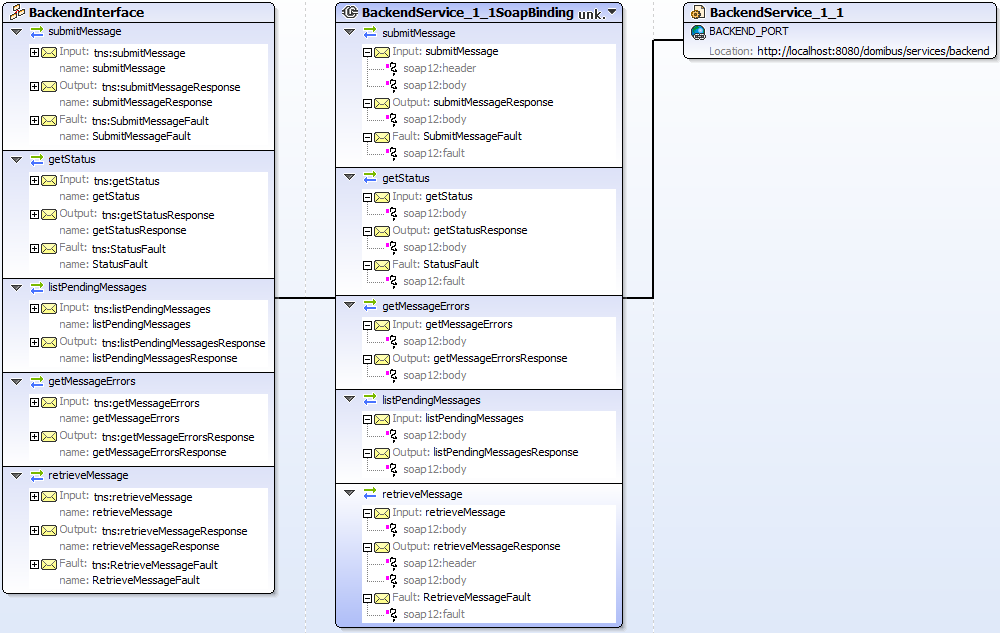
The WSDL schema defines the envelope that consists of one AP Header and one AP Body.
The service sends a message and receives a response. There are ten operations:
-
submitMessage -
getStatusthis method is marked as deprecated, but it is maintained for backwards compatibility. For self-sending message, this method will throw duplicate messages found as exceptions. Instead of this method, use the newly added methodgetStatusWithAccessPointRolewhere you can specify the access point role. -
getStatusWithAccessPointRolethis newly added method is to get the status based on the messageId and the role of the access point. For empty messageId or invalid AP role, it throws exception. -
listPendingMessages -
getMessageErrorsit can be used if you get aSEND_FAILUREstatus as response from the getStatus service, in which case this operation can be used to get the details of the encountered errors. There can be multiple errors as each retry might produce one. For self-sending message, this method will throw duplicate messages found as exceptions. Instead of this method, use the newly added method getMessageErrorsWithAccessPointRole where we can specify the access point role. -
getMessageErrorsWithAccessPointRolethis newly added method is used to get the details of the encountered errors of the failed messages withmessageIdandaccesspointrole. There can be multiple errors as each retry might produce one. For empty messageId or invalid AP role, it throws exception. -
retrieveMessagethis operation retrieves and downloads the message based on a query parametermarkAsDownloaded. This parameter’s value isTRUEby default, in which case the method 1) marks the message as downloaded and 2) downloads the message from the plugin table (WS_PLUGIN_TB_MESSAGE_LOG) containing pending messages.
WhenmarkAsDownloadedisFALSE, the WS Plugin does not mark the message as downloaded. -
listPushFailedMessagesthis operation returns the list of messagesId’s which are pushed to C4 but still in the failed status.
We can also check if messages are pushed but still in failed status by itsmessageId,originalSender,finalRecipient,receivedFromorreceivedTodate. -
rePushFailedMessagesthis operation allows to re push the list of failed messages by the message ids. -
markMessageAsDownloadedthis operation 1) marks the message as downloaded and 2) deletes this message from the WS plugin table(WS_PLUGIN_TB_MESSAGE_LOG).
To encapsulate errors, the following fault elements are specified for their respective services:
-
<wsdl:fault name="SubmitMessageFault"/> -
<wsdl:fault name="RetrieveMessageFault"/> -
<wsdl:fault name="StatusFault"/> -
<wsdl:fault name="MarkMessageAsDownloadedFault"/> -
<wsdl:fault name="getMessageErrorsFault"/> -
<wsdl:fault name="listPendingMessagesFault"/> -
<wsdl:fault name="listPushFailedMessagesFault"/> -
<wsdl:fault name="rePushFailedMessagesFault"/>
It must be generated and processed according to the SOAP1.2 specification.
In this case, the SOAP protocol is used and the binding is <soap:binding>.
The transport is SOAP messages on top of HTTP protocol:
transport="http://schemas.xmlsoap.org/soap/http"/>
C1-C2 SubmitMessage Data Model
In this section we explain the data model applicable to SubmitMessage from C1 to C2 (domibus-submission.xsd).
Messaging/UserMessage mpc attribute
The Optional attribute occurs once and contains the qualified name of the MPC (Message Partition Chanel). MPCs allow for partitioning the flow of messages from a Sending MSH to a Receiving MSH into several flows that can be controlled separately and consumed differently.
| Description | Field (xpath) | Mandatory | Occurrences | Constraints & Valid example |
|---|---|---|---|---|
mpc |
[local-name()='schema']/[local-name()='complexType' and @name=UserMessage]/[local-name()='attribute' and @name='mpc'] |
N |
Max 1 |
Valid Example
Default value: |
In this section, the data model is explained.
Messaging/UserMessage/MessageInfo
This Optional element occurs once and contains the identifier of the current message, and (may) relate to other messages' identifiers.

-
Timestamp element has a value representing the date at which the message header was created.
-
MessageId has a value representing – for each message - a globally unique identifier.
-
RefToMessageId contains the MessageId value of an ebMS Message to which this message relates, in a way that conforms to the MEP in use.
| Description | Field (xpath) | Mandatory | Occurrences | Constraints & Valid example |
|---|---|---|---|---|
Timestamp |
[local-name()='schema']/[local-name()='complexType' and @name='MessageInfo'] /[local-name()='all']/[local-name()='element' and @name='Timestamp'] |
N |
Max 1 |
Constraints
Valid Example
|
MessageId |
[local-name()='schema']/[local-name()='complexType' and @name='MessageInfo'] /[local-name()='all']/[local-name()='element' and @name='MessageId'] |
N |
Max 1 |
Constraints
Valid Example
|
RefToMessageId |
/[local-name()='schema']/[local-name()='complexType' and @name='MessageInfo'] /[local-name()='all']/[local-name()='element' and @name='RefToMessageId'] |
N |
Max 1 |
Constraints
Valid Example
|
Messaging/UserMessage/PartyInfo
This REQUIRED element occurs once, and contains data about originating and destination parties. This element has the following children elements:
-
From: This REQUIRED element occurs once, and contains information describing the originating party. It can be either endpoint C1 or endpoint C2.
-
To: This REQUIRED element occurs once, and contains information describing the destination party and it can be either endpoint C3 or endpoint C4.

If the From and To are C1, and C1' and C4, C4' respectively,
-
the private keys of the certificates of C1 and C1' are stored in C2
-
the public keys of the certificates of C4 and C4' are stored in C3.
But if the From and To are C2 and C3,
-
the private key of the certificate of C2 is stored in C2
-
the public key of C3 is stored in C3.
| From | To | Private key of | Private key stored in | Public key of | Public Key stored in |
|---|---|---|---|---|---|
C1, C1' |
C4, C4' |
C1, C1' |
C2 |
C4,C4' |
C3 |
C2 |
C3 |
C2 |
C2 |
C3 |
C3 |
-
Role: This required element identifies the authorized role of the Party sending or receiving the message.
-
Type: indicates the domain of names to which the string in the content of the
PartyIdelement belongs.

| Description | Field (xpath) | Mandatory | Occurrences | Constraints & Valid example |
|---|---|---|---|---|
From/PartyId |
/[local-name()='schema']/[local-name()='complexType' and @name='From'] /[local-name()='all']/[local-name()='element' and x@name='PartyId'] |
Y |
Max 1 |
Constraints
Valid Example
|
From/Role |
/[local-name()='schema']/[local-name()='complexType' and @name='From'] /[local-name()='all']/[local-name()='element' and @name='Role'] |
Y |
Max 1 |
Constraints
|
From/PartyType |
/[local-name()='schema']/[local-name()='complexType' and @name='PartyId']//*[local-name()='attribute' and @name='type'] |
N |
Max 1 |
Constraints
Valid Example
|
To/PartyId |
/[local-name()='schema']/[local-name()='complexType' and @name='To'] /[local-name()='all']/[local-name()='element' and @name='PartyId'] |
N |
Max 1 |
Constraints
Valid Example
|
To/Role |
/[local-name()='schema']/[local-name()='complexType' and @name='To'] /[local-name()='all']/[local-name()='element' and @name='Role'] |
N |
Max 1 |
Constraints
|
To/PartyType |
/[local-name()='schema']/[local-name()='complexType' and @name='PartyId']//*[local-name()='attribute' and @name='type'] |
N |
Max 1 |
Constraints
Valid Example
|
Messaging/UserMessage/CollaborationInfo
This required element occurs once, and contains elements that facilitate collaboration between parties.
-
The AgreementRef element is a string that identifies the entity or artifact governing the exchange of messages between the parties.
-
Service must identify a set of related business transactions or other message exchanges in the context of a business process or use case.
-
Action must identify the different types of business transactions or other message exchanges in the context of an identified Service.
-
ConversationId element is a string identifying the set of related messages that make up a conversation between Parties.
So, as defined in the eDelivery Specifications Library, it provides a more general way to associate a message with an ongoing conversation, without requiring a message to be a response to a single specific previous message, but allowing update messages to existing conversations from both Sender and Receiver of the original message.
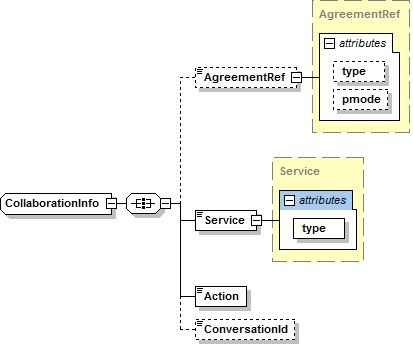
| Description | Field (xpath) | Mandatory | Occurrences | Constraints & Valid example |
|---|---|---|---|---|
AgreementRef |
/[local-name()='schema']/[local-name()='complexType' and @name='CollaborationInfo']/[local-name()='all']/[local-name()='element' and @name='AgreementRef'] |
N |
Max 1 |
Constraints
Valid Example
|
agreementRef@type |
/[local-name()='schema']/[local-name()='complexType' and @name='AgreementRef']/[local-name()='simpleContent']/[local-name()='extension']/*[local-name()='attribute' and @name='type'] |
N |
Max 1 |
Constraints
Valid Example
|
agreementRef@pmode |
/[local-name()='schema']/[local-name()='complexType' and @name='AgreementRef']/[local-name()='simpleContent']/[local-name()='extension']/*[local-name()='attribute' and @name='type'] |
N |
Max 1 |
Constraints
Valid Example
|
Service |
/[local-name()='schema']/[local-name()='complexType' and @name='CollaborationInfo']/[local-name()='all']/[local-name()='element' and @name='Service'] |
Y |
Max 1 |
Constraints
Valid Example
|
Service@Type |
/[local-name()='schema']/[local-name()='complexType' and @name='Service'] /[local-name()='simpleContent']//[local-name()='extension']/*[local-name()='attribute'] |
N |
Constraints
|
|
Action |
/[local-name()='schema']/[local-name()='complexType' and @name='CollaborationInfo'] /[local-name()='all']/[local-name()='element' and @name='Action'] |
Y |
Max 1 |
Constraints
Valid Example
|
ConversationId |
/[local-name()='schema']/[local-name()='complexType' and @name='CollaborationInfo']/[local-name()='all']/[local-name()='element' and @name='ConversationId'] |
N |
Max 1 |
Constraints
Valid Example
|
MessageProperties
This element is required in the 4-corner model. It occurs at most once, and contains message properties that are implementation specific. As parts of the header such properties allow for more efficient monitoring, correlating, dispatching and validating functions (even if these are out of scope of ebMS specification) which would otherwise require payload access.
These elements hold a set of name-value properties that will hold for
instance the identifiers for the originalSender and finalRecipient,
as in the example below:
<ns:MessageProperties>
<ns:Property name="originalSender">urn:oasis:names:tc:ebcore:partyid-type:unregistered:C1</ns:Property>
<ns:Property name="finalRecipient">urn:oasis:names:tc:ebcore:partyid-type:unregistered:C4</ns:Property>
</ns:MessageProperties>The property value (e.g. urn:oasis:names:tc:ebcore:partyid-type:unregistered:C1) is limited to 1024 characters length.
If this value is overpassed and the schema validation is enabled, an error message will appear and the message will not be submitted.
If the schema validation is not enabled and the value overpassed, an EbMS3Exception will be raised by the AP (Domibus) and the message will
also not be submitted.

| Description | Field (xpath) | Mandatory | Occurrences | Constraints & Valid example |
|---|---|---|---|---|
Property name |
/[local-name()='schema']/[local-name()='complexType' and @name='Property']//*[local-name()='attribute' and @name='name'] |
Y |
Max 1 |
Constraints
Valid Example
|
Property type |
/[local-name()='schema']/[local-name()='complexType' and @name='Property']//*[local-name()='attribute' and @name='type'] |
N |
Max 1 |
Constraints
Valid Example
|
PayloadInfo
This required element identifies payload data associated with the
message. The payload themselves are carried in separate MIME parts,
PartInfo elements reference the corresponding MIME parts by using
the Content-ID value of those parts in their href attribute.
When a message with multiple payloads is submitted, the order of the corresponding PartInfo elements is preserved.
In any exchange involving a message that has a structured document
payload (e.g XML, JSON) and any number of associated payloads, the
structured document must be referenced by the first PartInfo element
and it represents the leading payload part for business processing.
-
href: this attribute has a value that is the Content-ID URI of the payload object referenced.
The absence of the attribute href in the elementPartInfoindicates that the payload part being referenced is the SOAP Body element itself. -
Payloads are expected to be exchanged in separate MIME parts and not in the SOAP Body.
-
Due to requirements from different domains, Domibus allows the sending of one structured payload in the SOAP Body. This payload is sent along by the Access Point, via the AS4 protocol, in the SOAP Body as well. This practice is nonconforming to the eDelivery AS4 profile, and so it is discouraged.
It is recommended to leave the SOAP Body always empty. -
PartProperties: This element contains a list of properties describing the payload.
Every property has a required@nameattribute.
A@nameattribute with valueMimeTypeis required to identify the MIME type of the payload before compression is applied.
PayloadInfo type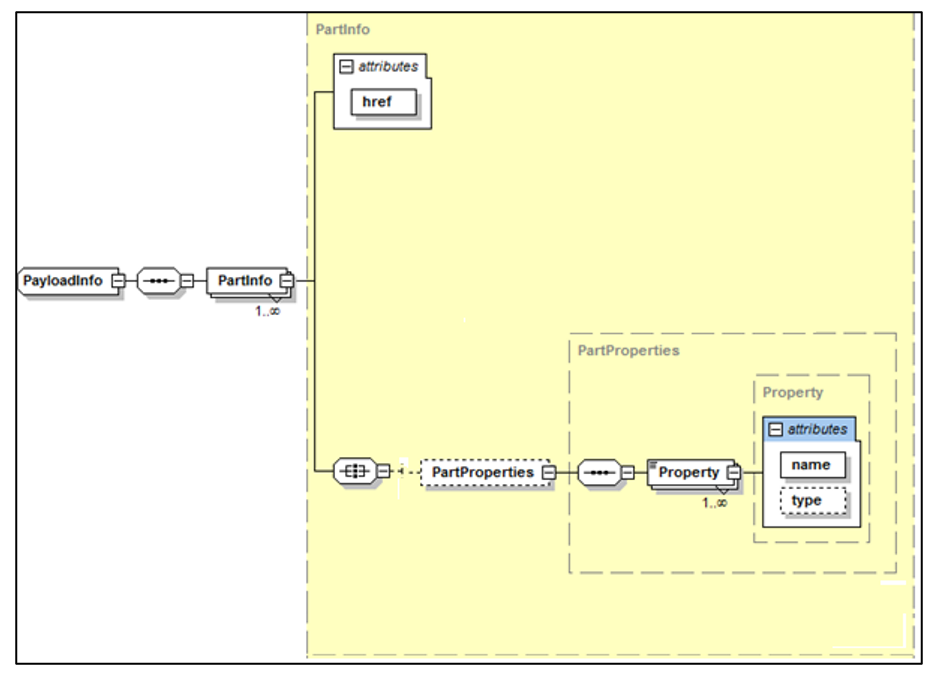
| Description | Field (xpath) | Mandatory | Occurrences | Constraints & Valid example |
|---|---|---|---|---|
href |
/[local-name()='schema']/[local-name()='complexType' and @name='PartInfo'] /*[local-name()='attribute' and @name='href'] |
N |
Max 1 |
Constraints
Valid Example
|
PartProperties/ Property/ MimeType |
/[local-name()='schema']/[local-name()='complexType' and @name='PartProperties']/[local-name()='sequence']/[local-name()='element' and @name='Property'] |
N |
Max 1 |
Constraints
Valid Example
|
PartProperties/ Property/ Description |
/[local-name()='schema']/[local-name()='complexType' and @name='PartProperties']/[local-name()='sequence']/[local-name()='element' and @name='Property'] |
N |
Max 1 |
Constraints
Valid Example
|
Deprecated fields
Besides webserviceplugin.wsdl, the WS Plugin provides also five other XSDs:
-
envelope.xsd -
webservicePlugin-body.xsd -
webservicePlugin-header.xsd -
xml.xsd -
xmlmime.xsd
Starting with 5.1.4 the attribute mustUnderstand from webservicePlugin-header.xsd is marked as deprecated.
This attribute will be removed in Domibus 6.0 release.
Referencing Payloads
Files can be either:
-
Sent as attachment in the SOAP request,
-
Sent as part of the value of a payload element embedded in the SOAP body,
-
Referenced in the SOAP header. This is achieved by:
-
Adding a
PartInfoelement withinPayloadInfoproperties.
This is similar to sending a normal message except for the addition of the extraPartInfospecial property. -
The payload value must be left empty and will be ignored if provided.
-
Identify the
PartInfowithhref=”cid:message”and provide a mimeType for the referenced file as well as the filepath reference pointing to where the file is stored. -
In the SOAP body, we need to provide a payload with
payloadId=”cid:message”and the appropriatecontentTypeattribute.
-
<soap:Envelope
xmlns:soap="http://www.w3.org/2003/05/soap-envelope"
xmlns:ns="http://docs.oasis-open.org/ebxml-msg/ebms/v3.0/ns/core/200704/"
xmlns:eu="http://eu.domibus.wsplugin/">
<soap:Header>
<ns:Messaging>
<ns:UserMessage mpc="http://docs.oasis-open.org/ebxml-msg/ebms/v3.0/ns/core/200704/defaultMPC">
<ns:PartyInfo>
<ns:From>
<ns:PartyId type="urn:oasis:names:tc:ebcore:partyid-type:unregistered">domibus-blue</ns:PartyId>
<ns:Role>http://docs.oasis-open.org/ebxml-msg/ebms/v3.0/ns/core/200704/initiator</ns:Role>
</ns:From>
<ns:To>
<ns:PartyId type="urn:oasis:names:tc:ebcore:partyid-type:unregistered">domibus-red</ns:PartyId>
<ns:Role>http://docs.oasis-open.org/ebxml-msg/ebms/v3.0/ns/core/200704/responder</ns:Role>
</ns:To>
</ns:PartyInfo>
<ns:CollaborationInfo>
<ns:Service type="tc1">bdx:noprocess</ns:Service>
<ns:Action>TC1Leg1</ns:Action>
</ns:CollaborationInfo>
<ns:MessageProperties>
<ns:Property name="originalSender">urn:oasis:names:tc:ebcore:partyid-type:unregistered:C1</ns:Property>
<ns:Property name="finalRecipient">urn:oasis:names:tc:ebcore:partyid-type:unregistered:C4</ns:Property>
</ns:MessageProperties>
<ns:PayloadInfo>
<ns:PartInfo href="cid:message">
<ns:PartProperties>
<ns:Property name="MimeType">text/xml</ns:Property>
<ns:Property name="filepath">file:/some_filepath/some_file</ns:Property>
</ns:PartProperties>
</ns:PartInfo>
</ns:PayloadInfo>
</ns:UserMessage>
</ns:Messaging>
</soap:Header>
<soap:Body>
<eu:submitRequest>
<payload payloadId="cid:message" contentType="text/xml">
<value></value>
</payload>
</eu:submitRequest>
</soap:Body>
</soap:Envelope>|
Important
|
To use a payload file reference, Domibus must be configured to store the payloads in the file system. |
|
See Also
|
For more information how to use a payload file reference, See the Administration Guide. |
11.2. Security
11.2.1. Authentication
The default WS Plugin implements authentication and authorization. By default, the plugin’s security is disabled and all the methods of the plugin can be called with no authentication credentials.
WS Plugin supports three authentication methods:
-
Basic Authentication
-
X509 Certificates Authentication
-
Blue Coat Authentication
11.2.2. Basic Authentication
Basic authentication is the most common used method used for the WS Plugin.
An existing user defined in the Plugin User UI page can authenticate with basic authentication and call any WS Plugin
operation.
|
See Also
|
For more details on how to create plugin users to use for basic authentication, see Plugin Users. |
userC1 in domibus.
Here the soapUI client uses the basic authentication and connects to the server with userC1, a plugin user created for this effect.
The HTTP request must contain Authorization as header key, and Basic as header value.
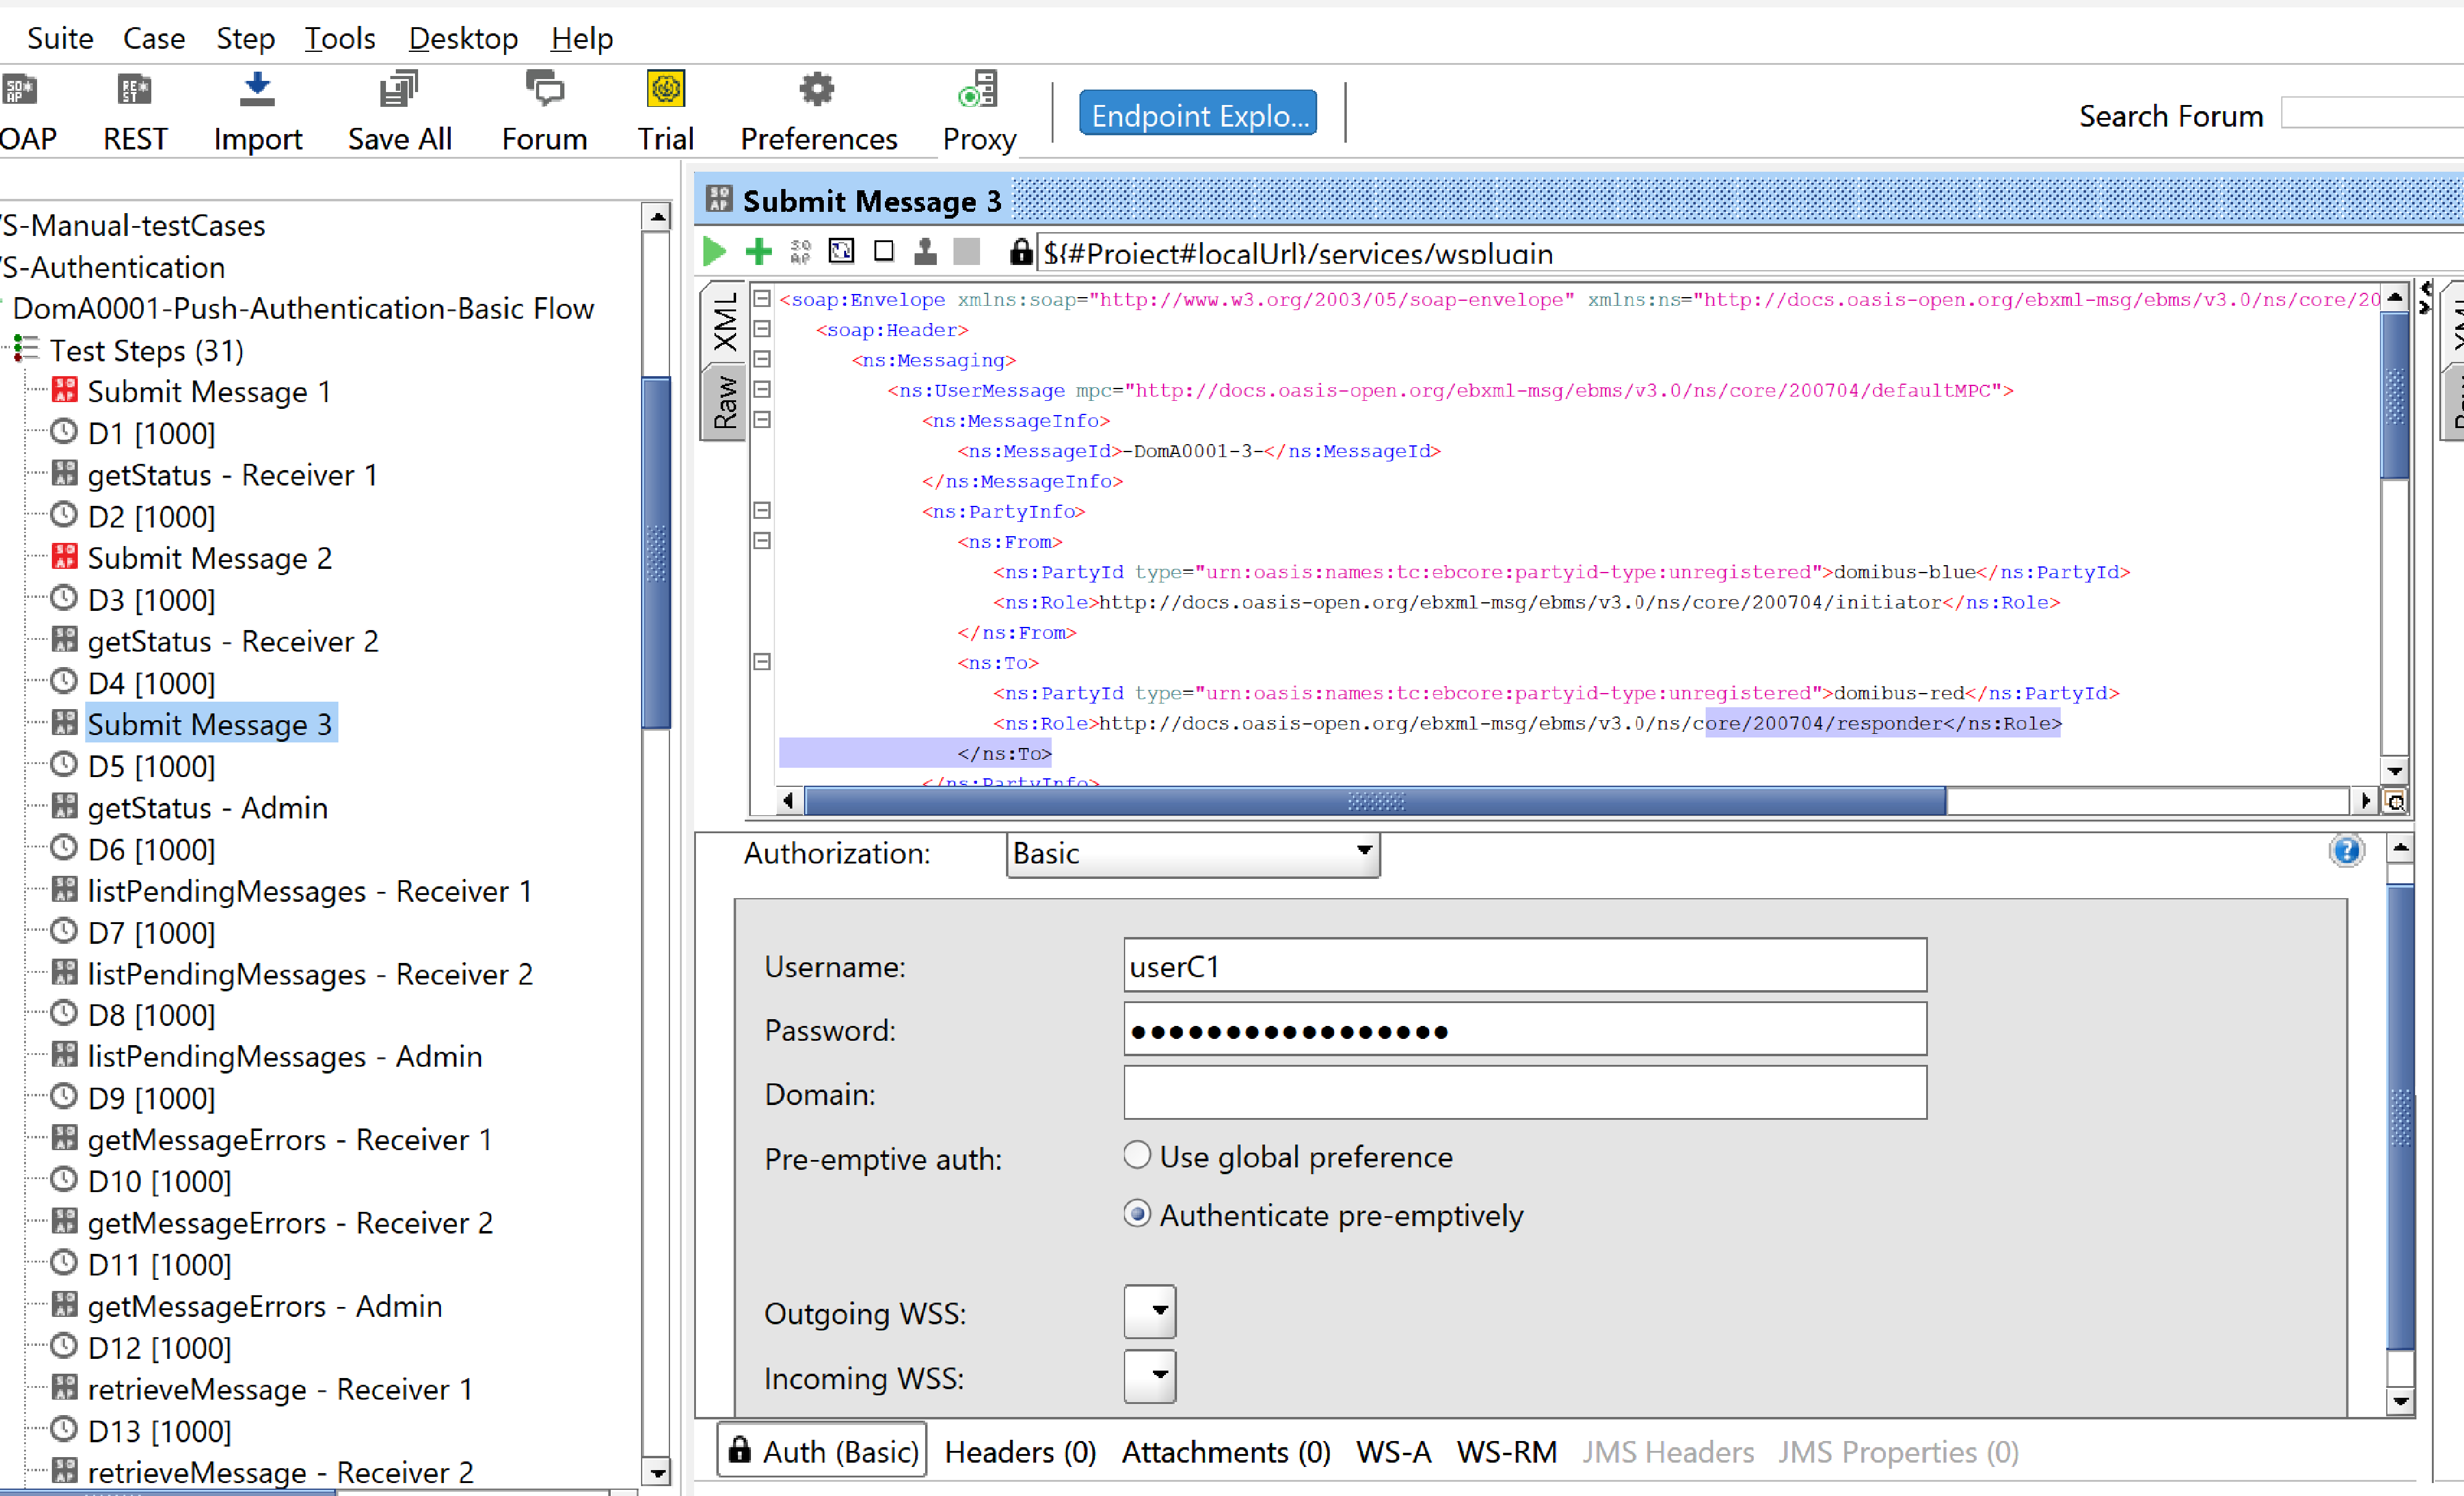
11.2.3. Authorization
The WS Plugin uses the authorization mechanism described in Plugin Authorization.
There are two default users already inserted in the database.
|
Important
|
Make sure you already ran the migration scripts. |
These pre-defined users are:
-
admin, with the roleROLE_ADMIN -
user, with the roleROLE_USER
ROLE_ADMIN has the permission to call:
-
submitMessage- with any value for theoriginalSenderproperty; -
retrieveMessage- any message among messages notified to this plugin; -
listPendingMessages- lists all pending messages for this plugin; -
getStatus; -
getStatusWithAccessPointRole; -
getMessageErrors; -
getMessageErrorsWithAccessPointRole; -
markMessageAsDownloaded; -
listPushFailedMessages- with any value for theoriginalSenderproperty; -
rePushFailedMessages.
ROLE_USER has the permission to call:
-
submitMessage- withoriginalSenderequal to theoriginalUser; -
retrieveMessage- only iffinalRecipientequals theoriginalUser; -
listPendingMessages, only messages withfinalRecipientequal to theoriginalUser; -
getStatus,getStatusWithAccessPointRole,andgetErrors- for its own messages; -
markMessageAsDownloaded; -
listPushFailedMessages- only iffinalRecipientequals theoriginalUser; -
rePushFailedMessages.
11.2.4. X509 Certificates Authentication
A security mechanism that uses digital certificates, X509 Certificates Authentication, is based on the X509 standard to verify users or devices identity.
It uses Public Key Infrastructure (PKI) to verify identities via certificates issued by a trusted Certificate Authority (CA). Relies on certificates containing public and private keys for encryption and signing. Commonly used in TLS/SSL encryption for secure communications (e.g., HTTPS, VPNs, email security,etc.).
-
Client presents the X509 certificate.
Example: Here in the soapUI client we configure the keystore certificate. Client authentication is mandatory in domibus.
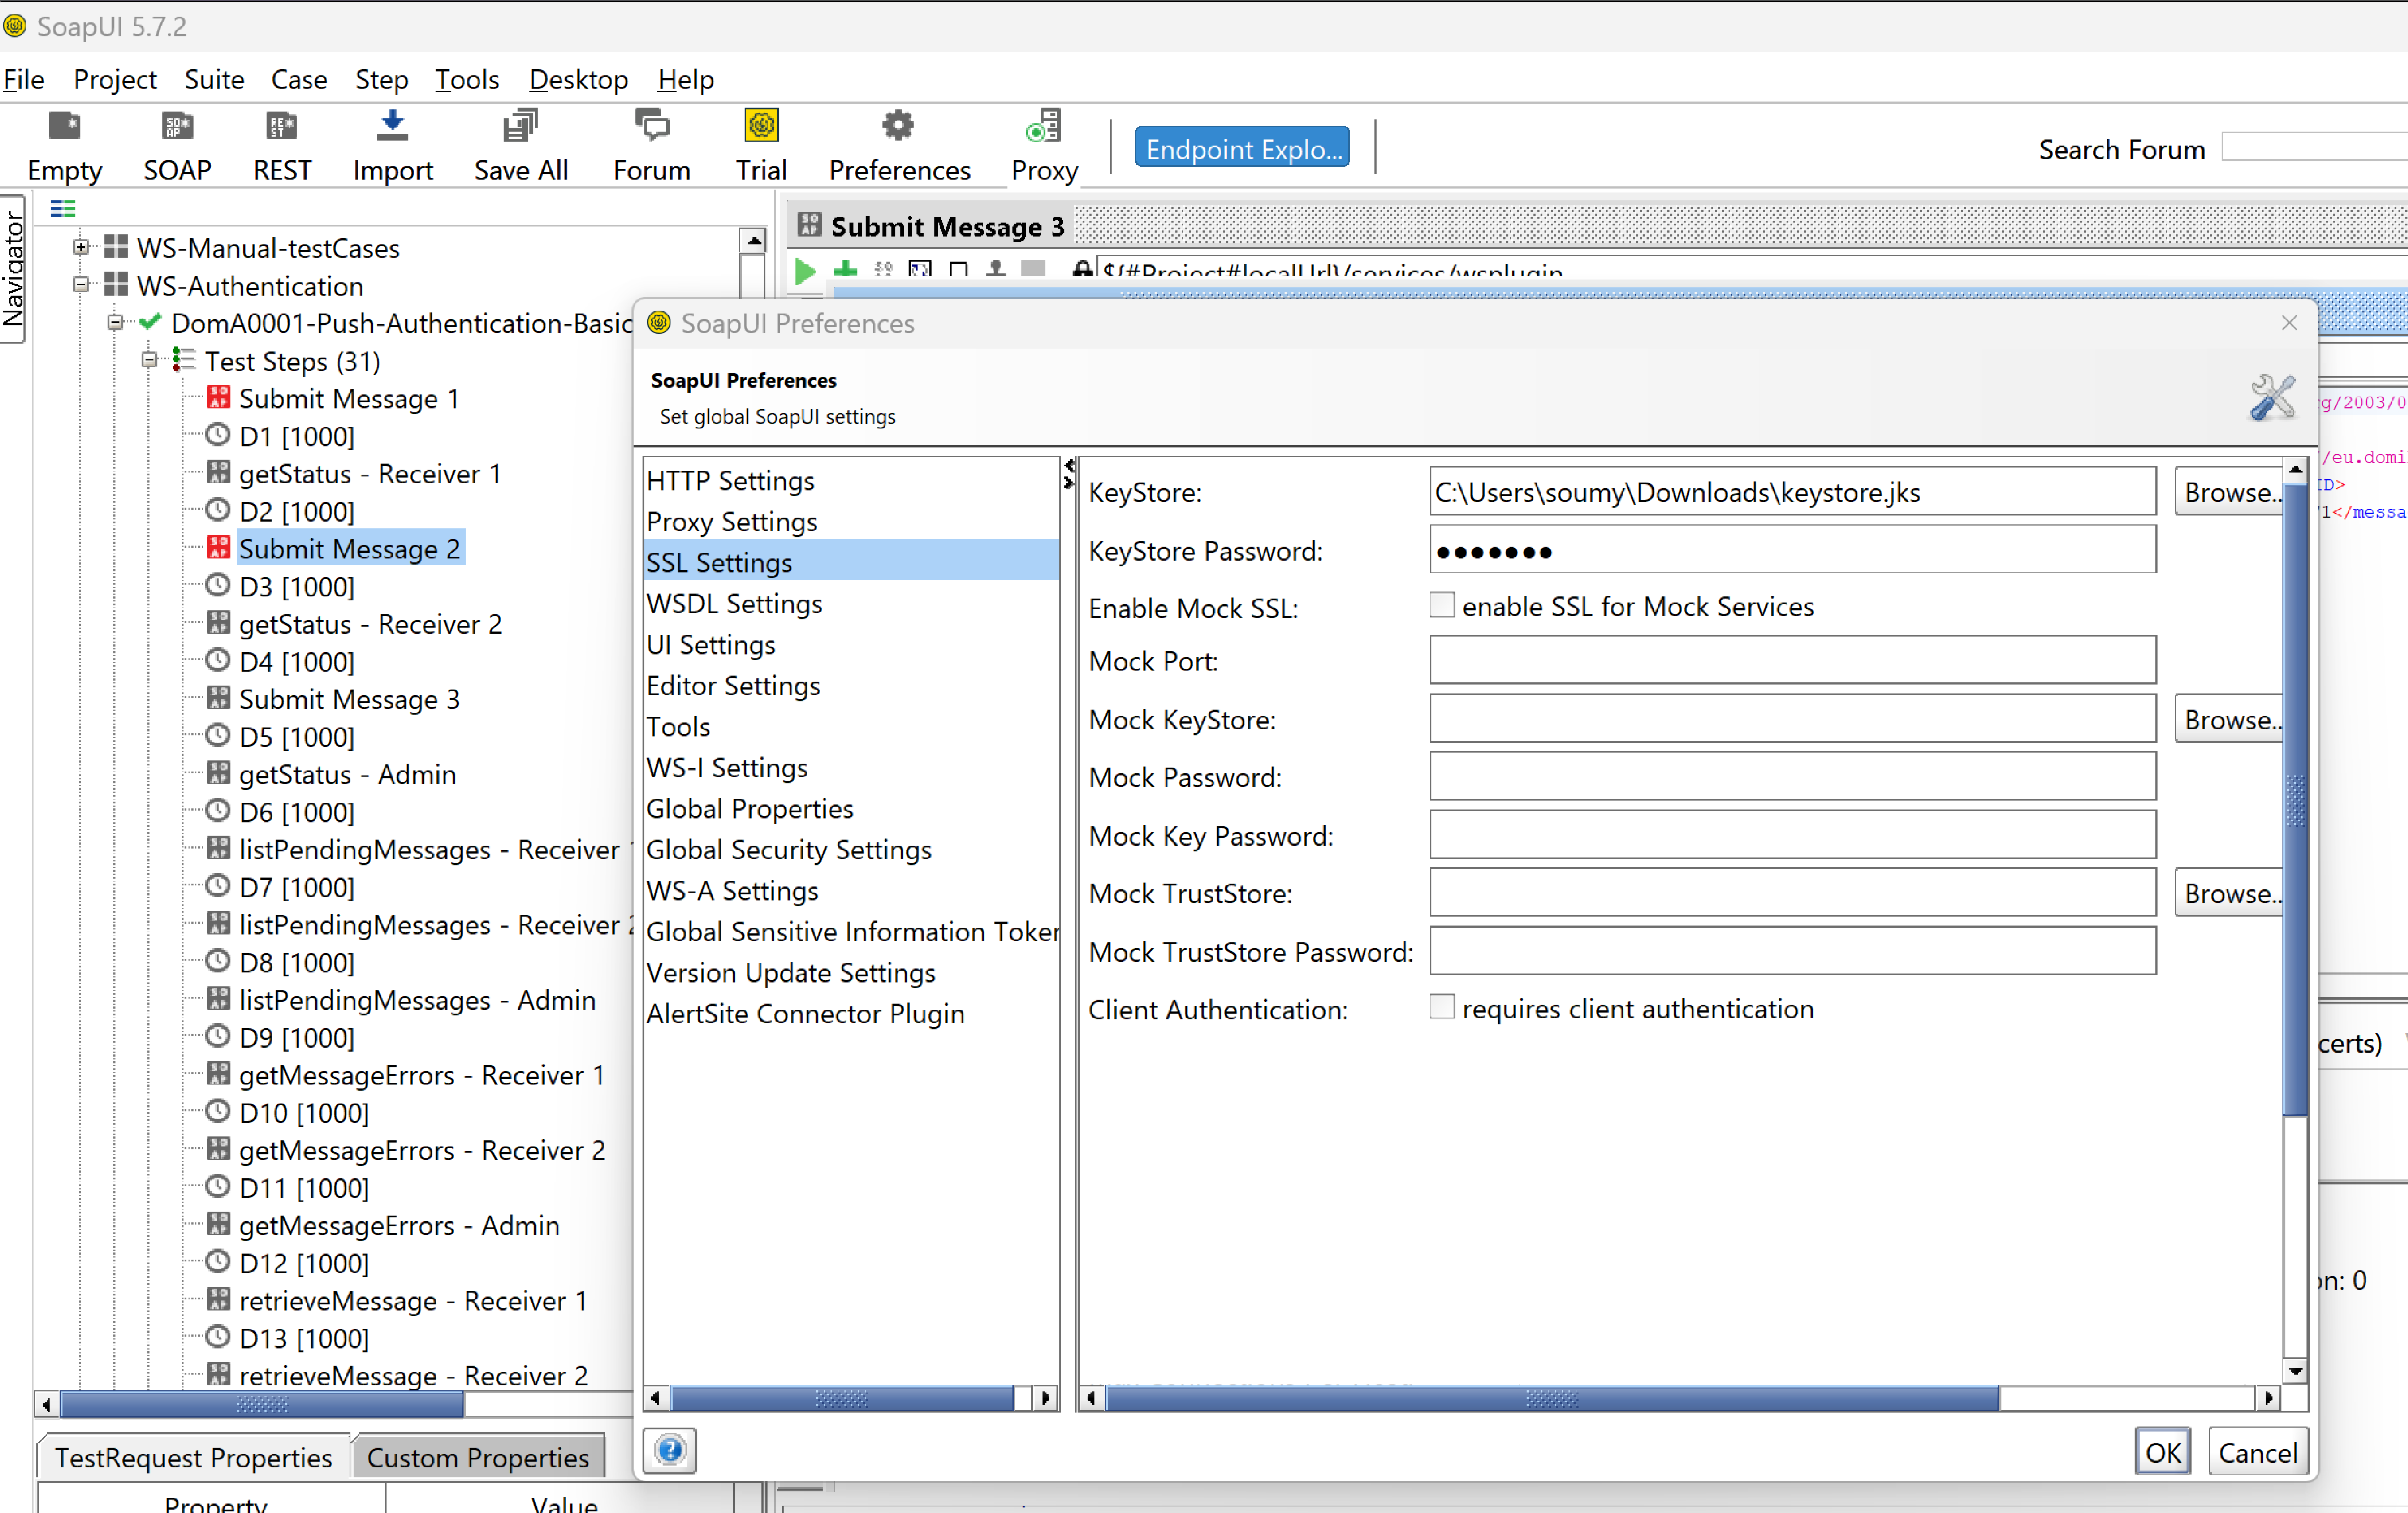
-
Server verifies certificate via CA.
We need to add this certificate in the domibus truststore.
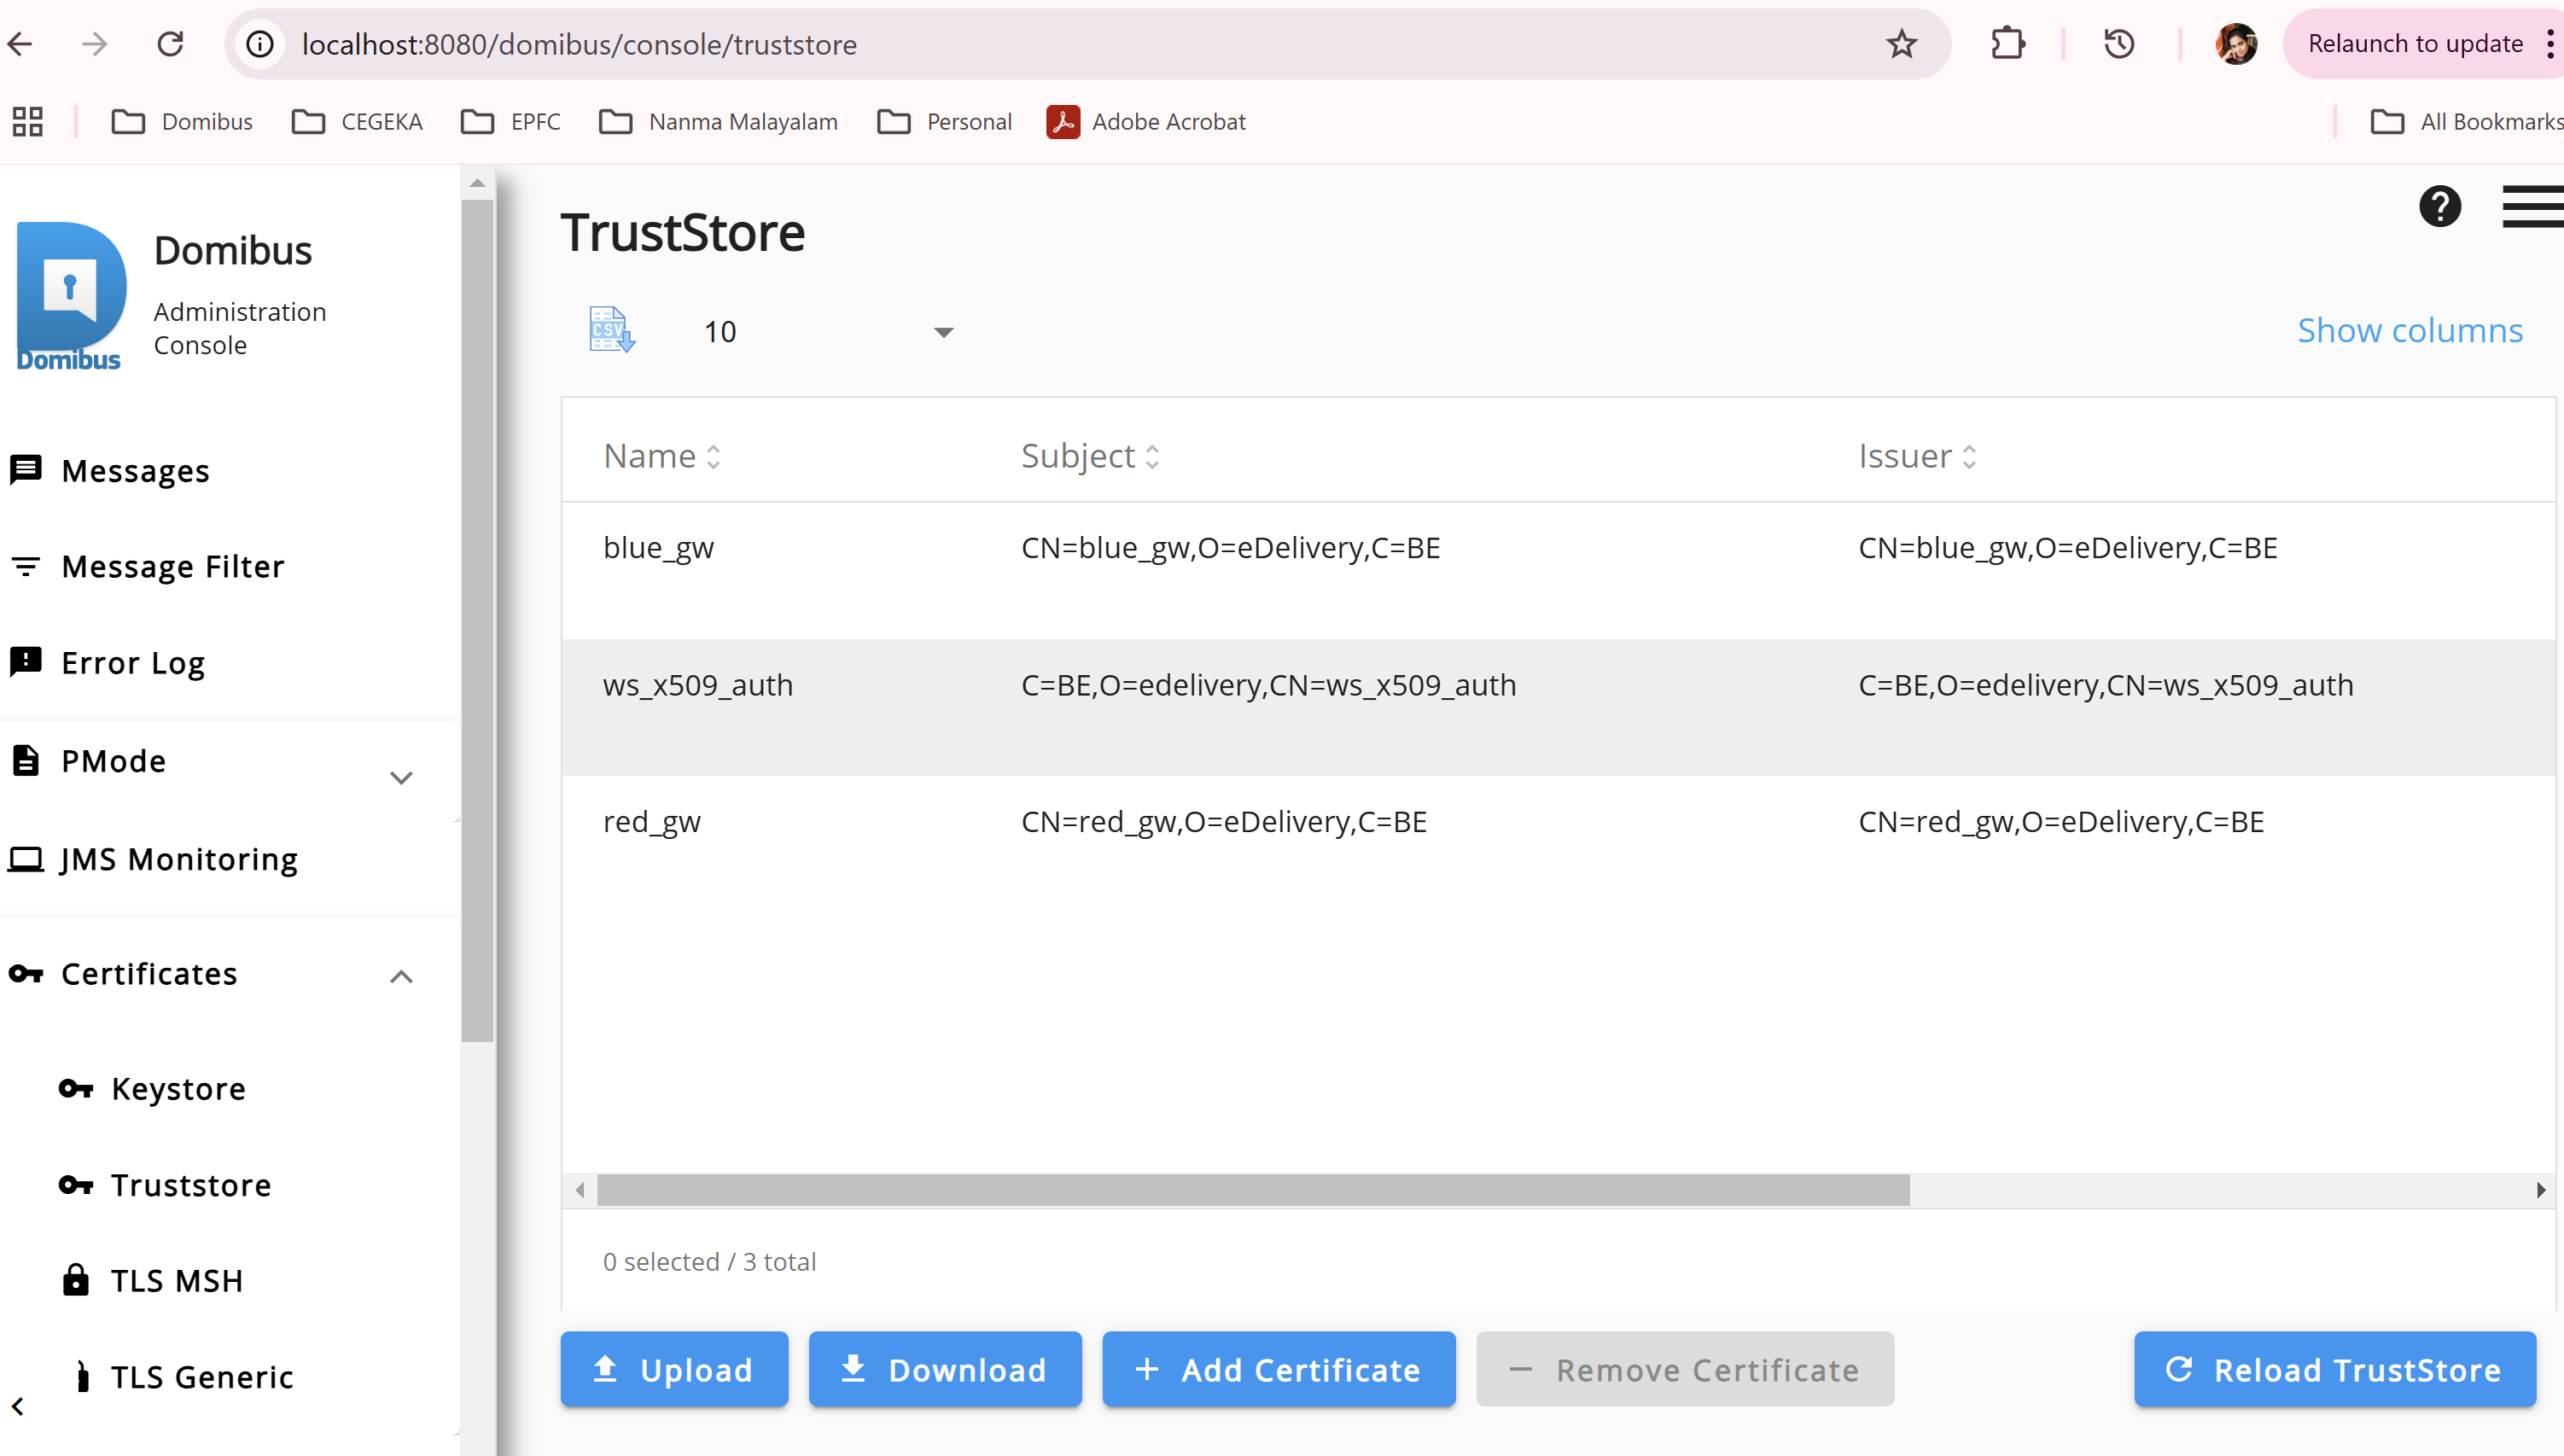
In Tomcat server, certificate details needs to be configured in the
server.xml.
-
To enable SSL support for a particular instance of this Connector, set the
SSLEnabledattribute to true.
You also need to set:schemetohttpsandsecuretotrue, to pass correct information to the servlets. -
Each secure connector must define at least one
SSLHostConfig. The names of theSSLHostConfigelements must be unique and one of them must match thedefaultSSLHostConfigNameattribute of theConnector.<Connector port="8580" protocol="org.apache.coyote.http11.Http11NioProtocol" maxThreads="150" SSLEnabled="true" scheme="https" secure="true" maxParameterCount="1000"> <SSLHostConfig truststoreFile="${domibus.config.location}/keystores/tls/msh/gateway_truststore.jks" truststorePassword="test123" certificateVerification="required"> <Certificate certificateKeystoreFile="${domibus.config.location}/keystores/tls/msh/gateway_keystore.jks" certificateKeystorePassword="test123" /> </SSLHostConfig> </Connector> -
Each
SSLHostConfigmust in turn define at least oneCertificate. ThecertificateVerificationattribute inSSLHostConfigis used in servers (such as Tomcat) to define whether client authentication (mutual SSL) is required. It determines whether the client must present an X.509 certificate for authentication during the TLS handshake. -
set
certificateVerificationto:-
requiredif you want the SSL stack to require a valid certificate chain from the client before accepting a connection. -
optionalif you want the SSL stack to request a client Certificate, but not fail if one isn’t presented. -
optionalNoCAif you want client certificates to be optional and you don’t want Tomcat to check them against the list of trusted CAs.
-
-
-
If a valid certificate is present both in the client and server sides, and the server’s SSL/TLS settings are correct, then authentication is granted.
11.2.5. Blue Coat Authentication
Blue Coat Authentication is used to control and manage user access to Domibus. It ensures secure access by integrating with a Certificate-Based Authentication (X509 Certificates) mechanism.
-
User requests web access.
Example: Here in the soapUI client we configure the certificate details in the header. It forwards the request in HTTP with the certificate details inside the request (
Client-Certheader key).Client-Cert : sno=625457577648406838511319155759091299914860828980&subject=CN=ws_x509_auth,O=edelivery,C=BE&validfrom=Jun 1 10:37:53 2015 CEST&validto=Jun 1 10:37:53 2035 CEST&issuer=CN=rootCN,OU=B4,O=DIGIT,L=Brussels,ST=BE,C=BE
-
Proxy server checks authentication policies.
The request passes through Proxy. If authentication is required, the proxy intercepts the request. Proxy verifies the client’s SSL certificate against an authentication server and if the authentication is successful, then the request proceeds.
-
User is authenticated via configured method (e.g. certificate)
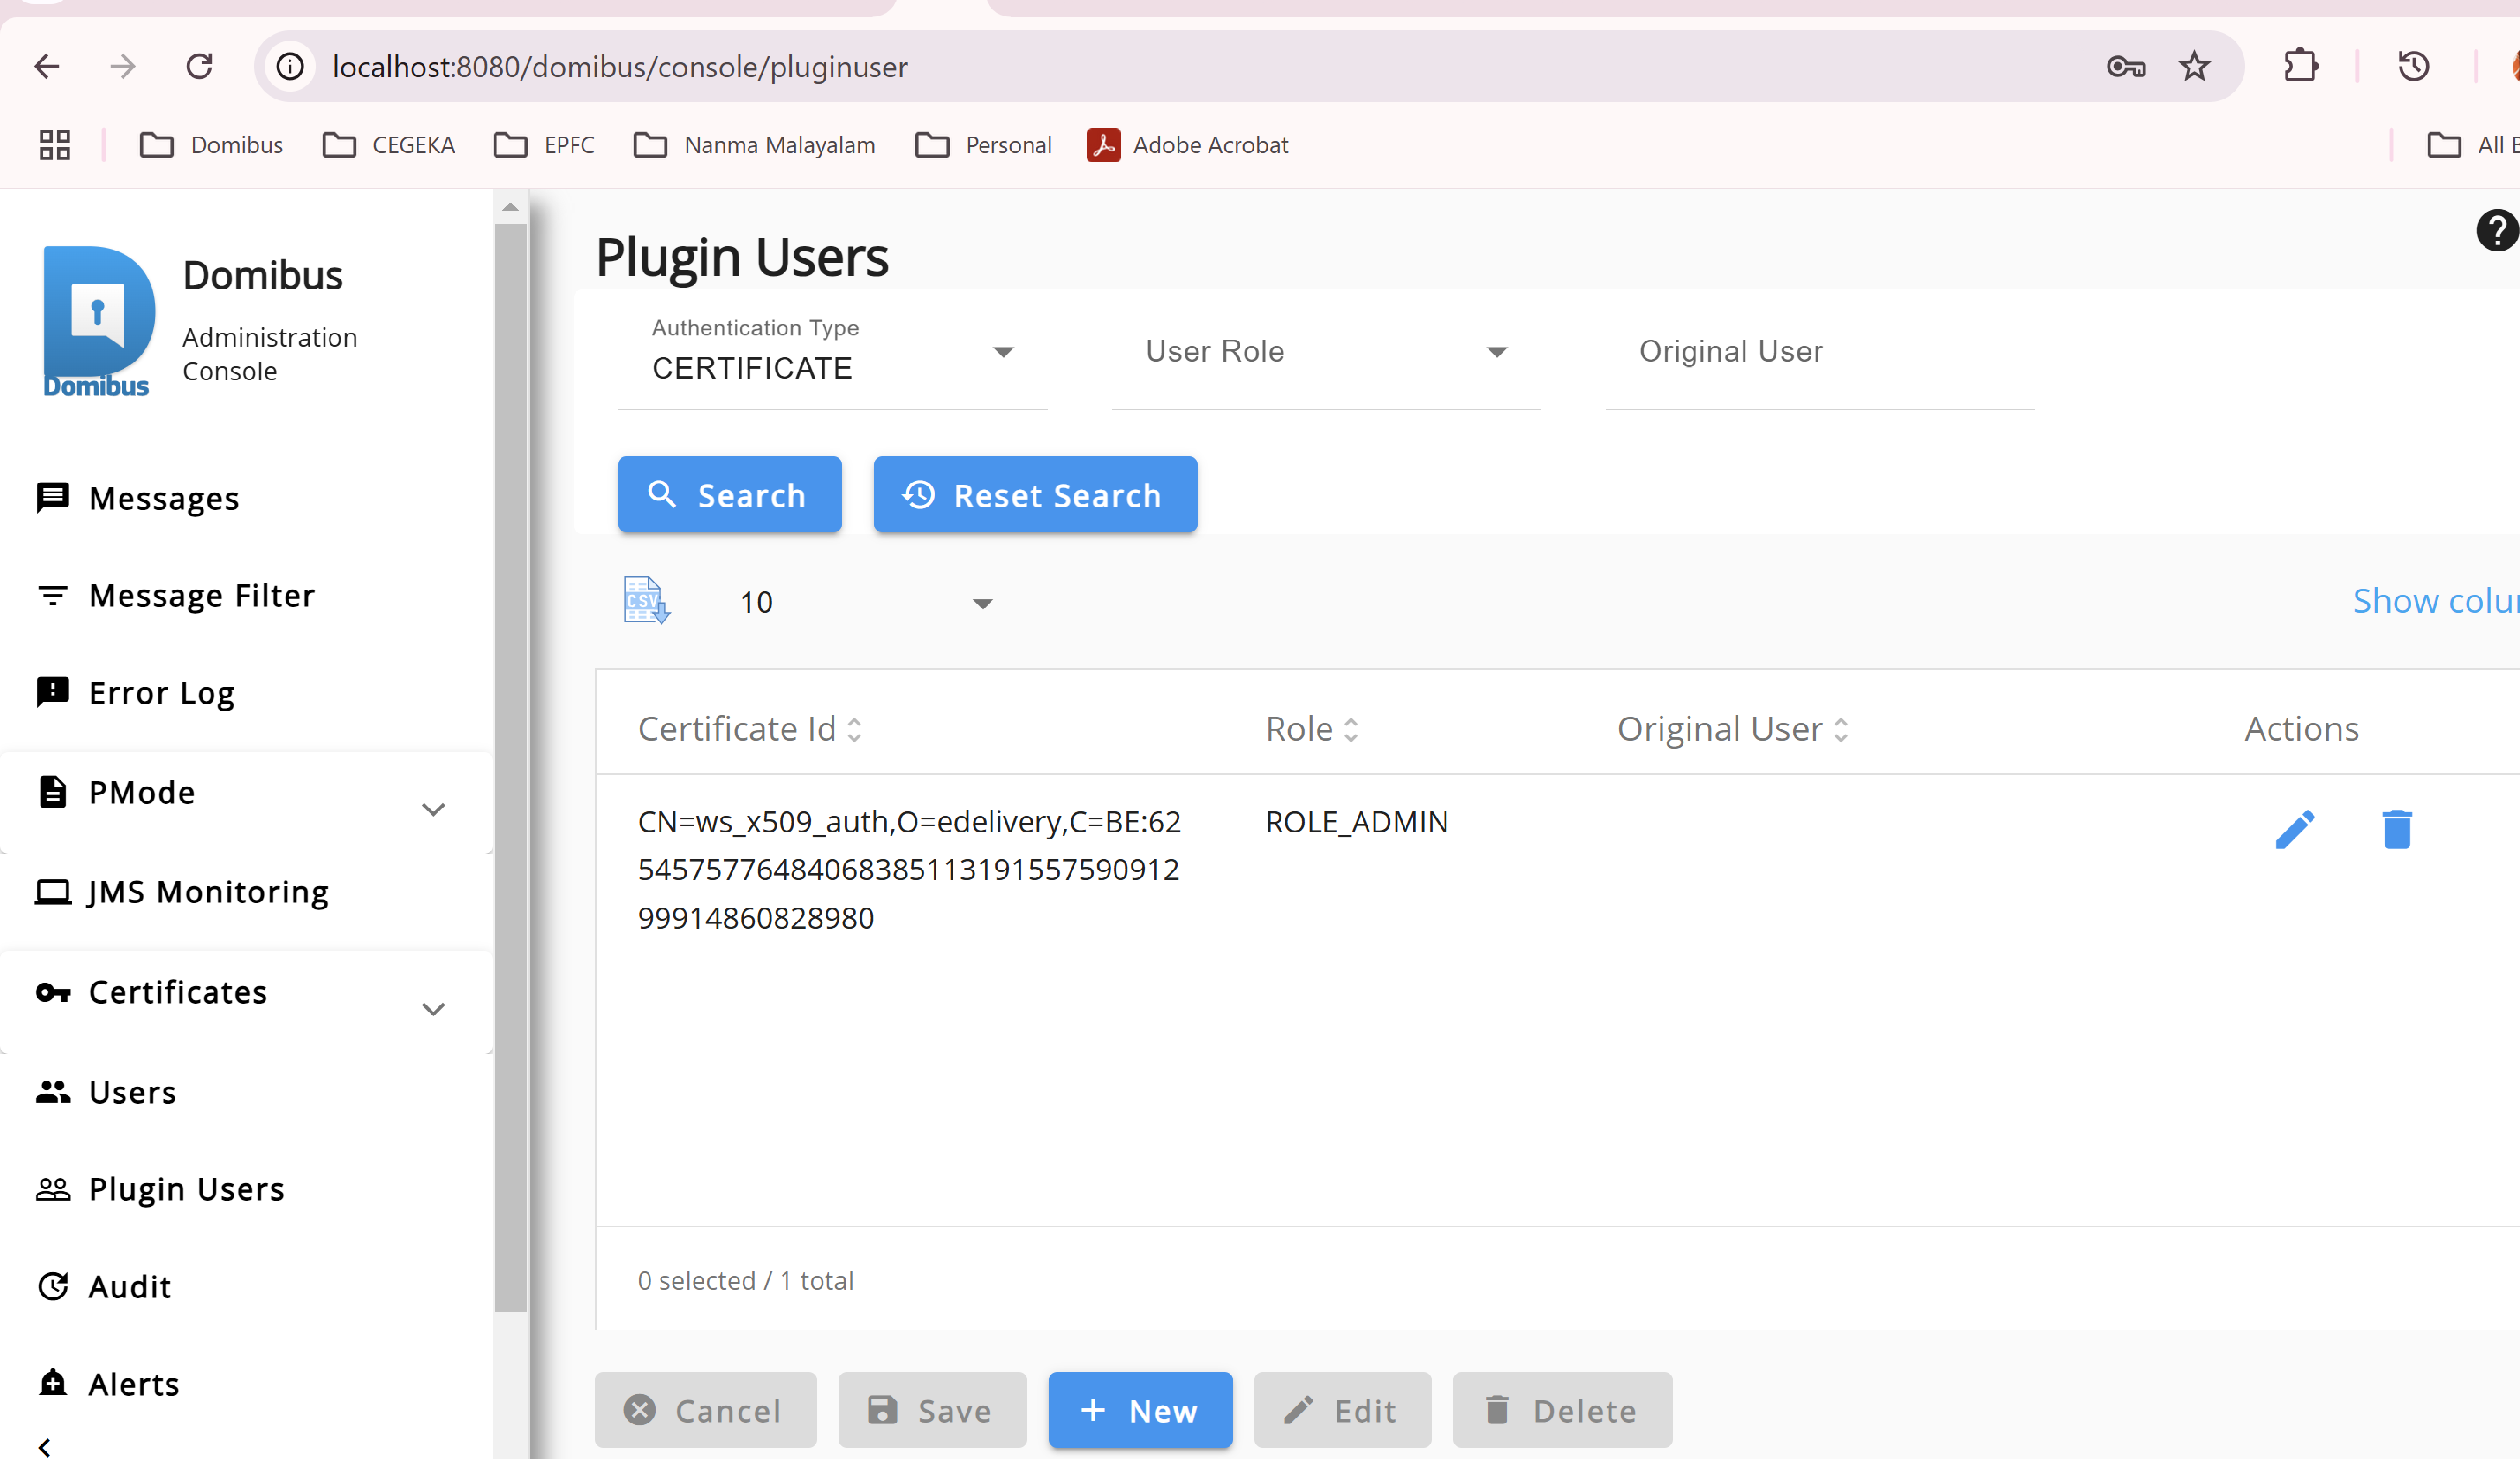
As in the above image, in Domibus we should configure the certificate as a Plugin User. The certificate’s Id must be in the format below.
After country code (e.g, C=BE) it should have the certificate serial number (dec). The same serial number should be there in the user requestClient-Certheader.Certificate Id: CN=ws_x509_auth,O=edelivery,C=BE:625457577648406838511319155759091299914860828980The WS Plugin uses a custom interceptor,
eu.domibus.plugin.webService.impl.CustomAuthenticationInterceptor, to intercept the incoming requests and perform authentication.
Once the request is intercepted, theCustomAuthenticationInterceptorinterceptor delegates the authentication to the serviceeu.domibus.ext.services.AuthenticationExtServicewhich is provided by the Plugin API.
11.3. Plugin Notifications
Domibus core notifies the WS Plugin on the following events:
-
MESSAGE_RECEIVED -
MESSAGE_SEND_FAILURE -
MESSAGE_RECEIVED_FAILURE -
MESSAGE_SEND_SUCCESS -
MESSAGE_STATUS_CHANGE
The type of events received can be configured using the WS Plugin
property wsplugin.messages.notifications. You will find that property
in the file ws-plugin.properties under \domibus\plugins\ in the
Domibus configuration folder.
For more information see the Plugin Cookbook.
11.4. Push to Backend
Push to backend functionality produces SOAP calls towards a pre-defined
URL triggered by Domibus events depending on the final recipient of the
user message it concerns. For example, after successfully sending a
message from C2 to C3, WS plugin might be notified by domibus with a
notification type MESSAGE_SEND_SUCCESS.
The following chapters will describe
-
Triggers (notifications to WS plugin)
-
Configuration per final recipients (rules)
-
TypeS of SOAP calls available (notifications)
The final recipient of a user message is the party to which the message is being sent to.
11.4.1. Notifications to plugin
-
MESSAGE_RECEIVED: Domibus notifies the plugin when it receives successfully a UserMessage from C2. Domibus notifies the plugin using the java method receiveSuccess for each final recipient. The SOAP methodsubmitMessagewill be used to send the message to the backend. If the propertywsplugin.push.markAsDownloaded=false, the backend will be able to retrieve the same message multiple times and explicitly set the message status toDOWNLOADED. -
MESSAGE_SEND_FAILURE: Domibus notifies the plugin when it fails to send a UserMessage to C3. Domibus notifies the plugin using the java method messageSendFailed for each final recipient. -
MESSAGE_RECEIVED_FAILURE: Domibus notifies the plugin when it fails to receive aUserMessagefrom C2.
Domibus notifies the plugin using the java method messageReceiveFailed for each final recipient. -
MESSAGE_SEND_SUCCESS: Domibus notifies the plugin when it sends successfully aUserMessageto C3.
Domibus notifies the plugin using the java method deliverMessage for each final recipient. -
DELETE: (not configurable) Domibus notifies the plugin when a user message changes status.
Domibus notifies the plugin using the java method messageStatusChanged for each final recipient. -
DELETE_BATCH: (not configurable) Domibus notifies the plugin when a user message changes status.
Domibus notifies the plugin using the java methodmessageStatusChangedfor each final recipient.
11.4.2. Rules configuration
In order to enable the push of notifications to a backend url, the property wsplugin.push.enabled should be set to TRUE (default is FALSE).
The notification push requests can optionally have basic authentication configured in the HTTP Authorization header, if the properties wsplugin.push.auth.username and wsplugin.push.auth.password are defined.
Then, for each recipient, a set of properties should be set to properly configure a rule to follow.
For example, red1 is an arbitrary rule name:
wsplugin.push.rules.red1=first rule description domibus-red
wsplugin.push.rules.red1.recipient=urn:oasis:names:tc:ebcore:partyid-type:unregistered:C4
wsplugin.push.rules.red1.endpoint=http://localhost:8080/backend
wsplugin.push.rules.red1.retry=1;5;CONSTANT
wsplugin.push.rules.red1.type=RECEIVE_SUCCESS,RECEIVE_FAIL|
See Also
|
For more about the properties used in the above sample,see WS Plugin Configuration. |
11.4.3. Notifications to the Backend
Below are the existing notifications and the SOAP methods called to notify the Backend.
-
MESSAGE_RECEIVED-
Notifies C3 received successfully the message from C2 for a given final recipient.
-
receiveSuccessis called to notify the Backend.
-
-
MESSAGE_RECEIVED_FAILURE-
Notifies C3 failed to receive from C2 for a given final recipient.
-
receiveFailureis called to notify the Backend.
-
-
SEND_SUCCESS-
Notifies C2 sent the message successfully to C3 for a given final recipient.
-
sendSuccessis called to notify the Backend.
-
-
MESSAGE_SEND_FAILURE-
Notifies C2 failed to send the message to C3, for a given final recipient.
-
sendFailureis called to notify the Backend.
-
-
MESSAGE_STATUS_CHANGE-
Notifies of a status change, for a given final recipient.
-
messageStatusChangeis called to notify the Backend.
-
-
MESSAGE_RECEIVED-
Notifies message sent by C2 was successfully received by C3, for a given final recipient. **
submitMessageis called to notify the Backend.
-
-
DELETED-
Notifies of a message deletion in Domibus (retention worker), for a given final recipient.
-
deleteis called to notify the Backend.
-
-
DELETED_BATCH-
Notifies of a batch message deletion in Domibus (retention worker), for a given final recipient.
-
deleteBatchis called to notify the Backend.
-
11.5. Backward compatibility
Starting with Domibus 5.0, the default WS plugin is using the endpoint /wsplugin and not /backend anymore. The previous endpoint is still available, but it has been deprecated. Users still using the deprecated version will notice in the logs log statements indicating the usage of a deprecated version.
For more information about the endpoint /backend, please refer to Domibus documentation on the Digital page.
The table below is describing the differences between the two web-services implementations:
| Domibus 4.x and prior | Domibus 5.x and later | |
|---|---|---|
End point name |
/backend |
/wsplugin |
wsdl |
BackendService_1_1.wsdl |
WebServicePlugin.wsdl |
namespace |
11.6. Message Standards
AS4 does not define a maximum message size, though implementations will have practical limits based on available memory, disk, or database storage, etc.
11.6.1. Error Codes
EBMS error codes contained in the backend.wsdl.
<eb:Error origin="ebMS" category="Unpackaging"
shortDescription="InvalidHeader"
errorCode="EBMS:0009" severity="fatal">
<eb:Description xml:lang="en"> … </eb:Description>
</eb:Error>List of EBMS Error Codes
| Error Code |
Short Description |
Recommended Severity |
Category Value |
Description or Semantics |
|---|---|---|---|---|
|
|
Failure |
Content |
Although the message document is well formed and schema valid, some element/attribute contains a value that could not be recognized and therefore could not be used by the MSH. |
|
|
Warning |
Content |
Although the message document is well formed and schema valid, some element/attribute value cannot be processed as expected because the related feature is not supported by the MSH. |
|
|
Failure |
Content |
Although the message document is well formed and schema valid, some element/attribute value is inconsistent either with the content of other element/attribute, or with the processing mode of the MSH, or with the normative requirements of the ebMS specification. |
|
Other |
Failure |
Content |
- |
|
|
Failure |
Communication |
The MSH is experiencing temporary or permanent failure in trying to open a transport connection with a remote MSH. |
|
|
Warning |
Communication |
There is no message available for pulling from this MPC at this moment. |
|
|
Failure |
Unpackaging |
The use of MIME is not consistent with the required usage in this specification. |
|
|
Failure |
Unpackaging |
Although the message document is well formed and schema valid, the presence or absence of some element/ attribute is not consistent with the capability of the MSH, with respect to supported features. |
|
|
Failure |
Unpackaging |
The ebMS header is either not well formed as an XML document, or does not conform to the ebMS packaging rules. |
|
|
Failure |
Processing |
The ebMS header or another header (e.g. reliability, security) expected by the MSH is not compatible with the expected content, based on the associated P-Mode. |
|
|
Failure |
Content |
The MSH is unable to resolve an external payload reference (i.e. a Part that is not contained within the ebMS Message, as identified by a PartInfo/href URI). |
|
|
Failure |
Processing |
The signature in the Security header intended for the "ebms" SOAP actor, could not be validated by the Security module. |
|
|
Failure |
Processing |
The encrypted data reference the Security header intended for the "ebms" SOAP actor could not be decrypted by the Security Module. |
|
|
Failure |
Processing |
The processor determined that the message’s security methods, parameters, scope or other security policy-level requirements or agreements were not satisfied. |
|
|
Failure |
Processing |
Some reliability function as implemented by the Reliability module, is not operational, or the reliability state associated with this message sequence is not valid. |
|
|
Failure |
Communication |
Although the message was sent under Guaranteed delivery requirement, the Reliability module could not get assurance that the message was properly delivered, despite resending efforts. |
|
|
Failure |
Communication |
A Receipt has not been received for a message that was previously sent by the MSH generating this error. |
|
|
Failure |
Communication |
A Receipt has been received for a message that was previously sent by the MSH generating this error, but the content does not match the message content (e.g. some part has not been acknowledged, or the digest associated does not match the signature digest, for NRR). |
|
|
Failure |
Communication |
An error occurred during the decompression. |
|
|
Failure |
Processing |
An Intermediary MSH was unable to route an ebMS message and stopped processing the message. |
|
|
Failure |
Processing |
An entry in the routing function is matched that assigns the message to an MPC for pulling, but the intermediary MSH is unable to store the message with this MPC. |
|
|
Failure |
Processing |
An intermediary MSH has assigned the message to an MPC for pulling and has successfully stored it. However, the intermediary set a limit on the time it was prepared to wait for the message to be pulled, and that limit has been reached. |
|
|
Warning |
Processing |
An MSH has determined that the message is expired and will not attempt to forward or deliver it. |
|
|
Failure |
Content |
The structure of a received bundle is not in accordance with the bundling rules. |
|
|
Failure |
Processing |
A message unit in a bundle was not processed because a related message unit in the bundle caused an error. |
|
|
Failure |
Content |
A fragment is received that relates to a group that was previously rejected. |
|
|
Failure |
Content |
A fragment is received but more than one fragment message in a group of fragments specifies a value for this element. |
|
|
Failure |
Content |
A fragment is received but more than one fragment message in a group of fragments specifies a value for this element. |
|
|
Failure |
Content |
A fragment is received but more than one fragment message in a group of fragments specifies a value for this element. |
|
|
Failure |
Content |
A fragment is received but more than one fragment message in a group of fragments specifies a value for this element. |
|
|
Failure |
Content |
A fragment is received but more than one fragment message in a group of fragments specifies a value for a compression element. |
|
|
Failure |
Content |
A fragment is received
but a previously received fragment message had the same values for
|
|
|
Failure |
Unpackaging |
The href attribute does not reference a valid MIME data part, MIME parts other than the fragment header and a data part are in the message, or the SOAP Body is not empty. |
|
|
Failure |
Content |
An incoming message fragment has a a value greater than the known FragmentCount. |
|
|
Failure |
Content |
A value is set for FragmentCount, but a previously received fragment had a greater value. |
|
|
Warning |
Unpackaging |
The size of the
data part in a fragment message is greater than |
|
|
Failure |
Unpackaging |
More time
than |
|
|
Warning |
Unpackaging |
Message properties were
present in the fragment SOAP header that were not specified in
|
|
|
Failure |
Unpackaging |
The eb3:Message header copied to the fragment header does not match the eb3:Message header in the reassembled source message. |
|
|
Failure |
Unpackaging |
Not enough disk space available to store all (expected) fragments of the group. |
|
|
Failure |
Processing |
An error occurred while decompressing the reassembled message. |
|
|
Warning |
Processing |
A responding MSH indicates that it applies the alternate MEP binding to the response message. |
|
|
Failure |
Content |
The XML could not be validated against the corresponding XSD. |
Web Service WSDL
<?xml version='1.0' encoding='UTF-8'?>
<wsdl:definitions
xmlns:wsdl="http://schemas.xmlsoap.org/wsdl/"
xmlns:soap12="http://schemas.xmlsoap.org/wsdl/soap12/"
xmlns:tns="http://eu.domibus.wsplugin/"
xmlns:ns1="http://docs.oasis-open.org/ebxml-msg/ebms/v3.0/ns/core/200704/" name="WebServicePlugin" targetNamespace="http://eu.domibus.wsplugin/">
<wsdl:types>
<schema xmlns="http://www.w3.org/2001/XMLSchema">
<import namespace="http://www.w3.org/XML/1998/namespace" schemaLocation="xml.xsd"/>
</schema>
<schema xmlns="http://www.w3.org/2001/XMLSchema">
<import namespace="http://www.w3.org/2005/05/xmlmime" schemaLocation="xmlmime.xsd"/>
</schema>
<schema xmlns="http://www.w3.org/2001/XMLSchema">
<import namespace="http://www.w3.org/2003/05/soap-envelope" schemaLocation="envelope.xsd"/>
</schema>
<schema xmlns="http://www.w3.org/2001/XMLSchema">
<import namespace="http://eu.domibus.wsplugin/" schemaLocation="webservicePlugin-body.xsd"/>
</schema>
<schema xmlns="http://www.w3.org/2001/XMLSchema">
<import namespace="http://docs.oasis-open.org/ebxml-msg/ebms/v3.0/ns/core/200704/" schemaLocation="webservicePlugin-header.xsd"/>
</schema>
</wsdl:types>
<wsdl:message name="getMessageErrors">
<wsdl:part element="tns:getErrorsRequest" name="getErrorsRequest"></wsdl:part>
</wsdl:message>
<wsdl:message name="getMessageErrorsWithAccessPointRole">
<wsdl:part element="tns:getErrorsRequestWithAccessPointRole" name="getErrorsRequestWithAccessPointRole"></wsdl:part>
</wsdl:message>
<wsdl:message name="retrieveMessage">
<wsdl:part element="tns:retrieveMessageRequest"
name="retrieveMessageRequest"></wsdl:part>
</wsdl:message>
<wsdl:message name="RetrieveMessageFault">
<wsdl:part element="tns:FaultDetail"
name="RetrieveMessageFault"></wsdl:part>
</wsdl:message>
<wsdl:message name="markMessageAsDownloaded">
<wsdl:part element="tns:markMessageAsDownloadedRequest"
name="markMessageAsDownloadedRequest"></wsdl:part>
</wsdl:message>
<wsdl:message name="MarkMessageAsDownloadedFault">
<wsdl:part element="tns:FaultDetail"
name="MarkMessageAsDownloadedFault"></wsdl:part>
</wsdl:message>
<wsdl:message name="markMessageAsDownloadedResponse">
<wsdl:part element="tns:markMessageAsDownloadedResponse"
name="markMessageAsDownloadedResponse"></wsdl:part>
<wsdl:part element="ns1:Messaging" name="ebMSHeaderInfo"></wsdl:part>
</wsdl:message>
<wsdl:message name="listPendingMessagesFault">
<wsdl:part element="tns:FaultDetail" name="listPendingMessagesFault"></wsdl:part>
</wsdl:message>
<wsdl:message name="listPushFailedMessagesFault">
<wsdl:part element="tns:FaultDetail" name="listPushFailedMessagesFault"></wsdl:part>
</wsdl:message>
<wsdl:message name="rePushFailedMessagesFault">
<wsdl:part element="tns:FaultDetail" name="rePushFailedMessagesFault"></wsdl:part>
</wsdl:message>
<wsdl:message name="getMessageErrorsFault">
<wsdl:part element="tns:FaultDetail" name="getMessageErrorsFault"></wsdl:part>
</wsdl:message>
<wsdl:message name="retrieveMessageResponse">
<wsdl:part element="tns:retrieveMessageResponse"
name="retrieveMessageResponse"></wsdl:part>
<wsdl:part element="ns1:Messaging" name="ebMSHeaderInfo"></wsdl:part>
</wsdl:message>
<wsdl:message name="listPendingMessagesResponse">
<wsdl:part element="tns:listPendingMessagesResponse"
name="listPendingMessagesResponse"></wsdl:part>
</wsdl:message>
<wsdl:message name="listPushFailedMessagesResponse">
<wsdl:part element="tns:listPushFailedMessagesResponse"
name="listPushFailedMessagesResponse"></wsdl:part>
</wsdl:message>
<wsdl:message name="rePushFailedMessagesResponse"></wsdl:message>
<wsdl:message name="getStatusResponse">
<wsdl:part element="tns:getStatusResponse" name="getStatusResponse"></wsdl:part>
</wsdl:message>
<wsdl:message name="listPendingMessages">
<wsdl:part element="tns:listPendingMessagesRequest"
name="listPendingMessagesRequest"></wsdl:part>
</wsdl:message>
<wsdl:message name="listPushFailedMessages">
<wsdl:part element="tns:listPushFailedMessagesRequest"
name="listPushFailedMessagesRequest"></wsdl:part>
</wsdl:message>
<wsdl:message name="rePushFailedMessages">
<wsdl:part element="tns:rePushFailedMessagesRequest"
name="rePushFailedMessagesRequest"></wsdl:part>
</wsdl:message>
<wsdl:message name="getStatus">
<wsdl:part element="tns:statusRequest" name="statusRequest"></wsdl:part>
</wsdl:message>
<wsdl:message name="getStatusWithAccessPointRole">
<wsdl:part element="tns:statusRequestWithAccessPointRole"
name="statusRequestWithAccessPointRole"></wsdl:part>
</wsdl:message>
<wsdl:message name="StatusFault">
<wsdl:part element="tns:FaultDetail" name="StatusFault"></wsdl:part>
</wsdl:message>
<wsdl:message name="submitMessage">
<wsdl:part element="tns:submitRequest" name="submitRequest"></wsdl:part>
<wsdl:part element="ns1:Messaging" name="ebMSHeaderInfo"></wsdl:part>
</wsdl:message>
<wsdl:message name="submitMessageResponse">
<wsdl:part element="tns:submitResponse" name="submitResponse"></wsdl:part>
</wsdl:message>
<wsdl:message name="SubmitMessageFault">
<wsdl:part element="tns:FaultDetail" name="SubmitMessageFault"></wsdl:part>
</wsdl:message>
<wsdl:message name="getMessageErrorsResponse">
<wsdl:part element="tns:getMessageErrorsResponse"
name="getMessageErrorsResponse"></wsdl:part>
</wsdl:message>
<wsdl:portType name="WebServicePluginInterface">
<wsdl:operation name="submitMessage">
<wsdl:input message="tns:submitMessage" name="submitMessage"></wsdl:input>
<wsdl:output message="tns:submitMessageResponse"
name="submitMessageResponse"></wsdl:output>
<wsdl:fault message="tns:SubmitMessageFault" name="SubmitMessageFault"></wsdl:fault>
</wsdl:operation>
<wsdl:operation name="getStatus">
<wsdl:input message="tns:getStatus" name="getStatus"></wsdl:input>
<wsdl:output message="tns:getStatusResponse" name="getStatusResponse"></wsdl:output>
<wsdl:fault message="tns:StatusFault" name="StatusFault"></wsdl:fault>
</wsdl:operation>
<wsdl:operation name="getStatusWithAccessPointRole">
<wsdl:input message="tns:getStatusWithAccessPointRole"
name="getStatusWithAccessPointRole"></wsdl:input>
<wsdl:output message="tns:getStatusResponse" name="getStatusResponse"></wsdl:output>
<wsdl:fault message="tns:StatusFault" name="StatusFault"></wsdl:fault>
</wsdl:operation>
<wsdl:operation name="listPendingMessages">
<wsdl:input message="tns:listPendingMessages"
name="listPendingMessages"></wsdl:input>
<wsdl:output message="tns:listPendingMessagesResponse"
name="listPendingMessagesResponse"></wsdl:output>
<wsdl:fault message="tns:listPendingMessagesFault"
name="listPendingMessagesFault"></wsdl:fault>
</wsdl:operation>
<wsdl:operation name="listPushFailedMessages">
<wsdl:input message="tns:listPushFailedMessages"
name="listPushFailedMessages"></wsdl:input>
<wsdl:output message="tns:listPushFailedMessagesResponse"
name="listPushFailedMessagesResponse"></wsdl:output>
<wsdl:fault message="tns:listPushFailedMessagesFault"
name="listPushFailedMessagesFault"></wsdl:fault>
</wsdl:operation>
<wsdl:operation name="rePushFailedMessages">
<wsdl:input message="tns:rePushFailedMessages"
name="rePushFailedMessages"></wsdl:input>
<wsdl:output message="tns:rePushFailedMessagesResponse"
name="rePushFailedMessagesResponse"></wsdl:output>
<wsdl:fault message="tns:rePushFailedMessagesFault"
name="rePushFailedMessagesFault"></wsdl:fault>
</wsdl:operation>
<wsdl:operation name="getMessageErrors">
<wsdl:input message="tns:getMessageErrors" name="getMessageErrors"></wsdl:input>
<wsdl:output message="tns:getMessageErrorsResponse"
name="getMessageErrorsResponse"></wsdl:output>
<wsdl:fault message="tns:getMessageErrorsFault"
name="getMessageErrorsFault"></wsdl:fault>
</wsdl:operation>
<wsdl:operation name="getMessageErrorsWithAccessPointRole">
<wsdl:input message="tns:getMessageErrorsWithAccessPointRole"
name="getMessageErrorsWithAccessPointRole"></wsdl:input>
<wsdl:output message="tns:getMessageErrorsResponse"
name="getMessageErrorsResponse"></wsdl:output>
<wsdl:fault message="tns:getMessageErrorsFault"
name="getMessageErrorsFault"></wsdl:fault>
</wsdl:operation>
<wsdl:operation name="retrieveMessage">
<wsdl:input message="tns:retrieveMessage" name="retrieveMessage"></wsdl:input>
<wsdl:output message="tns:retrieveMessageResponse"
name="retrieveMessageResponse"></wsdl:output>
<wsdl:fault message="tns:RetrieveMessageFault"
name="RetrieveMessageFault"></wsdl:fault>
</wsdl:operation>
<wsdl:operation name="markMessageAsDownloaded">
<wsdl:input message="tns:markMessageAsDownloaded"
name="markMessageAsDownloaded"></wsdl:input>
<wsdl:output message="tns:markMessageAsDownloadedResponse"
name="markMessageAsDownloadedResponse"></wsdl:output>
<wsdl:fault message="tns:MarkMessageAsDownloadedFault"
name="MarkMessageAsDownloadedFault"></wsdl:fault>
</wsdl:operation>
</wsdl:portType>
<wsdl:binding name="WebServicePlugin_SoapBinding"
type="tns:WebServicePluginInterface">
<soap12:binding style="document"
transport="http://schemas.xmlsoap.org/soap/http"/>
<wsdl:operation name="submitMessage">
<soap12:operation soapAction="" style="document"/>
<wsdl:input name="submitMessage">
<soap12:header message="tns:submitMessage" part="ebMSHeaderInfo"
use="literal"/>
<soap12:body parts="submitRequest" use="literal"/>
</wsdl:input>
<wsdl:output name="submitMessageResponse">
<soap12:body use="literal"/>
</wsdl:output>
<wsdl:fault name="SubmitMessageFault">
<soap12:fault name="SubmitMessageFault" use="literal"/>
</wsdl:fault>
</wsdl:operation>
<wsdl:operation name="getStatus">
<soap12:operation soapAction="" style="document"/>
<wsdl:input name="getStatus">
<soap12:body use="literal"/>
</wsdl:input>
<wsdl:output name="getStatusResponse">
<soap12:body use="literal"/>
</wsdl:output>
<wsdl:fault name="StatusFault">
<soap12:fault name="StatusFault" use="literal"/>
</wsdl:fault>
</wsdl:operation>
<wsdl:operation name="getStatusWithAccessPointRole">
<soap12:operation soapAction="" style="document"/>
<wsdl:input name="getStatusWithAccessPointRole">
<soap12:body use="literal"/>
</wsdl:input>
<wsdl:output name="getStatusResponse">
<soap12:body use="literal"/>
</wsdl:output>
<wsdl:fault name="StatusFault">
<soap12:fault name="StatusFault" use="literal"/>
</wsdl:fault>
</wsdl:operation>
<wsdl:operation name="getMessageErrors">
<soap12:operation soapAction="" style="document"/>
<wsdl:input name="getMessageErrors">
<soap12:body use="literal"/>
</wsdl:input>
<wsdl:output name="getMessageErrorsResponse">
<soap12:body use="literal"/>
</wsdl:output>
<wsdl:fault name="getMessageErrorsFault">
<soap12:fault name="getMessageErrorsFault" use="literal"/>
</wsdl:fault>
</wsdl:operation>
<wsdl:operation name="getMessageErrorsWithAccessPointRole">
<soap12:operation soapAction="" style="document"/>
<wsdl:input name="getMessageErrorsWithAccessPointRole">
<soap12:body use="literal"/>
</wsdl:input>
<wsdl:output name="getMessageErrorsResponse">
<soap12:body use="literal"/>
</wsdl:output>
<wsdl:fault name="getMessageErrorsFault">
<soap12:fault name="getMessageErrorsFault" use="literal"/>
</wsdl:fault>
</wsdl:operation>
<wsdl:operation name="listPendingMessages">
<soap12:operation soapAction="" style="document"/>
<wsdl:input name="listPendingMessages">
<soap12:body use="literal"/>
</wsdl:input>
<wsdl:output name="listPendingMessagesResponse">
<soap12:body use="literal"/>
</wsdl:output>
<wsdl:fault name="listPendingMessagesFault">
<soap12:fault name="listPendingMessagesFault" use="literal"/>
</wsdl:fault>
</wsdl:operation>
<wsdl:operation name="listPushFailedMessages">
<soap12:operation soapAction="" style="document"/>
<wsdl:input name="listPushFailedMessages">
<soap12:body use="literal"/>
</wsdl:input>
<wsdl:output name="listPushFailedMessagesResponse">
<soap12:body use="literal"/>
</wsdl:output>
<wsdl:fault name="listPushFailedMessagesFault">
<soap12:fault name="listPushFailedMessagesFault" use="literal"/>
</wsdl:fault>
</wsdl:operation>
<wsdl:operation name="rePushFailedMessages">
<soap12:operation soapAction="" style="document"/>
<wsdl:input name="rePushFailedMessages">
<soap12:body use="literal"/>
</wsdl:input>
<wsdl:output name="rePushFailedMessagesResponse">
<soap12:body use="literal"/>
</wsdl:output>
<wsdl:fault name="rePushFailedMessagesFault">
<soap12:fault name="rePushFailedMessagesFault" use="literal"/>
</wsdl:fault>
</wsdl:operation>
<wsdl:operation name="retrieveMessage">
<soap12:operation soapAction="" style="document"/>
<wsdl:input name="retrieveMessage">
<soap12:body use="literal"/>
</wsdl:input>
<wsdl:output name="retrieveMessageResponse">
<soap12:header message="tns:retrieveMessageResponse"
part="ebMSHeaderInfo" use="literal"/>
<soap12:body parts="retrieveMessageResponse" use="literal"/>
</wsdl:output>
<wsdl:fault name="RetrieveMessageFault">
<soap12:fault name="RetrieveMessageFault" use="literal"/>
</wsdl:fault>
</wsdl:operation>
<wsdl:operation name="markMessageAsDownloaded">
<soap12:operation soapAction="" style="document"/>
<wsdl:input name="markMessageAsDownloaded">
<soap12:body use="literal"/>
</wsdl:input>
<wsdl:output name="markMessageAsDownloadedResponse">
<soap12:header message="tns:markMessageAsDownloadedResponse" part="ebMSHeaderInfo" use="literal"/>
<soap12:body parts="markMessageAsDownloadedResponse" use="literal"/>
</wsdl:output>
<wsdl:fault name="MarkMessageAsDownloadedFault">
<soap12:fault name="MarkMessageAsDownloadedFault" use="literal"/>
</wsdl:fault>
</wsdl:operation>
</wsdl:binding>
<wsdl:service name="WebServicePlugin">
<wsdl:port binding="tns:WebServicePlugin_SoapBinding" name="WEBSERVICEPLUGIN_PORT">
<soap12:address location="http://localhost:8080/domibus/services/wsplugin"/>
</wsdl:port>
</wsdl:service>undefined
</wsdl:definitions>Web Service Schemas
xmlmime.xsd
<?xml version="1.0"?>
<!--
W3C XML Schema defined in the Describing Media Content of Binary Data in XML
specification.
http://www.w3.org/TR/xml-media-types
Copyright © 2005 World Wide Web Consortium,
(Massachusetts Institute of Technology, European Research
Consortium for Informatics and Mathematics, Keio University).
All Rights Reserved.
This work is distributed under the W3C® Software License [1] in the
hope that it will be useful, but WITHOUT ANY WARRANTY; without even the
implied warranty of MERCHANTABILITY or FITNESS FOR A PARTICULAR
PURPOSE.
http://www.w3.org/Consortium/Legal/2002/copyright-software-20021231
$Id: xmlmime.xsd,v 1.1 2005/04/25 17:08:35 hugo Exp $
-->
<xs:schema
xmlns:xs="http://www.w3.org/2001/XMLSchema"
xmlns:xmime="http://www.w3.org/2005/05/xmlmime"
targetNamespace="http://www.w3.org/2005/05/xmlmime">
<xs:attribute name="contentType">
<xs:simpleType>
<xs:restriction base="xs:string">
<xs:minLength value="3"/>
</xs:restriction>
</xs:simpleType>
</xs:attribute>
<xs:attribute name="expectedContentTypes" type="xs:string"/>
<xs:complexType name="base64Binary">
<xs:simpleContent>
<xs:extension base="xs:base64Binary">
<xs:attribute ref="xmime:contentType"/>
</xs:extension>
</xs:simpleContent>
</xs:complexType>
<xs:complexType name="hexBinary">
<xs:simpleContent>
<xs:extension base="xs:hexBinary">
<xs:attribute ref="xmime:contentType"/>
</xs:extension>
</xs:simpleContent>
</xs:complexType>
</xs:schema>envelope.xsd
<?xml version="1.0" encoding="UTF-8"?>
<xs:schema
xmlns:xs="http://www.w3.org/2001/XMLSchema"
xmlns:env="http://www.w3.org/2003/05/soap-envelope"
targetNamespace="http://www.w3.org/2003/05/soap-envelope"
elementFormDefault="qualified" version="1.0">
<xs:import namespace="http://www.w3.org/XML/1998/namespace"/>
<xs:element name="Body" type="env:Body"/>
<xs:element name="Envelope" type="env:Envelope"/>
<xs:element name="Fault" type="env:Fault"/>
<xs:element name="Header" type="env:Header"/>
<xs:element name="NotUnderstood" type="env:NotUnderstoodType"/>
<xs:element name="Upgrade" type="env:UpgradeType"/>
<xs:complexType name="Fault">
<xs:sequence>
<xs:element name="Code" type="env:faultcode"/>
<xs:element name="Reason" type="env:faultreason"/>
<xs:element name="Node" type="xs:anyURI" minOccurs="0"/>
<xs:element name="Role" type="xs:anyURI" minOccurs="0"/>
<xs:element name="Detail" type="env:detail" minOccurs="0"/>
</xs:sequence>
</xs:complexType>
<xs:complexType name="faultcode">
<xs:sequence>
<xs:element name="Value" type="xs:QName"/>
<xs:element name="Subcode" type="env:subcode" minOccurs="0"/>
</xs:sequence>
</xs:complexType>
<xs:complexType name="subcode">
<xs:sequence>
<xs:element name="Value" type="xs:QName"/>
<xs:element name="Subcode" type="env:subcode" minOccurs="0"/>
</xs:sequence>
</xs:complexType>
<xs:complexType name="faultreason">
<xs:sequence>
<xs:element name="Text" type="env:reasontext"
maxOccurs="unbounded"/>
</xs:sequence>
</xs:complexType>
<xs:complexType name="reasontext">
<xs:simpleContent>
<xs:extension base="xs:string">
<xs:attribute ref="xml:lang" use="required"/>
</xs:extension>
</xs:simpleContent>
</xs:complexType>
<xs:complexType name="detail">
<xs:sequence>
<xs:any namespace="##other" processContents="lax" minOccurs="0"
maxOccurs="unbounded"/>
</xs:sequence>
<xs:anyAttribute namespace="##other" processContents="skip"/>
</xs:complexType>
<xs:complexType name="Envelope">
<xs:sequence>
<xs:element name="Header" type="env:Header" minOccurs="0"/>
<xs:element name="Body" type="env:Body"/>
</xs:sequence>
<xs:anyAttribute namespace="##other" processContents="skip"/>
</xs:complexType>
<xs:complexType name="Header">
<xs:sequence>
<xs:any namespace="##other" processContents="lax" minOccurs="0"
maxOccurs="unbounded"/>
</xs:sequence>
<xs:anyAttribute namespace="##other" processContents="skip"/>
</xs:complexType>
<xs:complexType name="Body">
<xs:sequence>
<xs:any namespace="##other" processContents="lax" minOccurs="0"
maxOccurs="unbounded"/>
</xs:sequence>
<xs:anyAttribute namespace="##other" processContents="skip"/>
</xs:complexType>
<xs:complexType name="NotUnderstoodType">
<xs:sequence/>
<xs:attribute name="qname" type="xs:QName" use="required"/>
</xs:complexType>
<xs:complexType name="UpgradeType">
<xs:sequence>
<xs:element name="SupportedEnvelope"
type="env:SupportedEnvType" maxOccurs="unbounded"/>
</xs:sequence>
</xs:complexType>
<xs:complexType name="SupportedEnvType">
<xs:sequence/>
<xs:attribute name="qname" type="xs:QName" use="required"/>
</xs:complexType>
<xs:attribute name="mustUnderstand" type="xs:boolean"/>
</xs:schema>domibus-backend.xsd
<?xml version="1.0" encoding="UTF-8"?>
<xsd:schema
xmlns:xsd="http://www.w3.org/2001/XMLSchema"
xmlns:tns="http://eu.domibus.wsplugin/"
xmlns:ns1="http://www.w3.org/2005/05/xmlmime"
attributeFormDefault="unqualified"
elementFormDefault="unqualified"
targetNamespace="http://eu.domibus.wsplugin/">
<xsd:import namespace="http://www.w3.org/2005/05/xmlmime"/>
<xsd:simpleType name="max255-non-empty-string">
<xsd:restriction base="xsd:string">
<xsd:minLength value="1"/>
<xsd:maxLength value="255"/>
</xsd:restriction>
</xsd:simpleType>
<xsd:element name="FaultDetail">
<xsd:complexType>
<xsd:sequence>
<xsd:element name="code" type="xsd:string"/>
<xsd:element name="message" nillable="true"
type="xsd:string"/>
</xsd:sequence>
</xsd:complexType>
</xsd:element>
<xsd:element name="retrieveMessageRequest">
<xsd:complexType>
<xsd:sequence>
<xsd:element name="messageID" type="tns:max255-non-empty-string"
nillable="true"/>
</xsd:sequence>
</xsd:complexType>
</xsd:element>
<xsd:element name="retrieveMessageResponse">
<xsd:complexType>
<xsd:sequence>
<xsd:element minOccurs="0" name="bodyload"
type="tns:LargePayloadType"/>
<xsd:element maxOccurs="unbounded" minOccurs="0"
name="payload" type="tns:LargePayloadType"/>
</xsd:sequence>
</xsd:complexType>
</xsd:element>
<xsd:element name="listPendingMessagesRequest">
<xsd:complexType>
<xsd:sequence>
<xsd:element name="messageId" type="tns:max255-non-empty-string"
minOccurs="0"/>
<xsd:element name="conversationId"
type="tns:max255-non-empty-string" minOccurs="0"/>
<xsd:element name="refToMessageId"
type="tns:max255-non-empty-string" minOccurs="0"/>
<xsd:element name="fromPartyId"
type="tns:max255-non-empty-string" minOccurs="0"/>
<xsd:element name="finalRecipient"
type="tns:max255-non-empty-string" minOccurs="0"/>
<xsd:element name="originalSender"
type="tns:max255-non-empty-string" minOccurs="0"/>
<xsd:element name="receivedFrom" type="xsd:dateTime"
minOccurs="0"/>
<xsd:element name="receivedTo" type="xsd:dateTime"
minOccurs="0"/>
</xsd:sequence>
</xsd:complexType>
</xsd:element>
<xsd:element name="listPendingMessagesResponse">
<xsd:complexType>
<xsd:sequence>
<xsd:element maxOccurs="unbounded" minOccurs="0"
name="messageID" nillable="true" type="xsd:string"/>
</xsd:sequence>
</xsd:complexType>
</xsd:element>
<xsd:element name="messageErrorsRequest">
<xsd:complexType>
<xsd:sequence>
<xsd:element name="messageID"
type="tns:max255-non-empty-string"/>
</xsd:sequence>
</xsd:complexType>
</xsd:element>
<xsd:element name="messageStatusRequest">
<xsd:complexType>
<xsd:sequence>
<xsd:element name="messageID"
type="tns:max255-non-empty-string"/>
</xsd:sequence>
</xsd:complexType>
</xsd:element>
<xsd:element name="submitRequest">
<xsd:complexType>
<xsd:sequence>
<xsd:element minOccurs="0" name="bodyload"
type="tns:LargePayloadType"/>
<xsd:element maxOccurs="unbounded" minOccurs="0"
name="payload" nillable="true" type="tns:LargePayloadType"/>
</xsd:sequence>
</xsd:complexType>
</xsd:element>
<xsd:element name="submitResponse">
<xsd:complexType>
<xsd:sequence>
<xsd:element maxOccurs="unbounded" minOccurs="0"
name="messageID" nillable="true" type="xsd:string"/>
</xsd:sequence>
</xsd:complexType>
</xsd:element>
<xsd:complexType name="PayloadType">
<xsd:simpleContent>
<xsd:extension base="ns1:base64Binary">
<xsd:attribute name="payloadId" type="xsd:token"
use="required"/>
</xsd:extension>
</xsd:simpleContent>
</xsd:complexType>
<xsd:complexType name="LargePayloadType">
<xsd:sequence>
<xsd:element name="value" type="xsd:base64Binary"
ns1:expectedContentTypes="application/octet-stream"></xsd:element>
</xsd:sequence>
<xsd:attribute name="payloadId" type="xsd:token"/>
<xsd:attribute name="contentType" type="xsd:string"/>
</xsd:complexType>
<xsd:complexType name="errorResultImpl">
<xsd:sequence>
<xsd:element minOccurs="0" name="errorCode"
type="tns:errorCode"/>
<xsd:element minOccurs="0" name="errorDetail"
type="xsd:string"/>
<xsd:element minOccurs="0" name="messageInErrorId"
type="xsd:string"/>
<xsd:element minOccurs="0" name="mshRole"
type="tns:mshRole"/>
<xsd:element minOccurs="0" name="notified"
type="xsd:dateTime"/>
<xsd:element minOccurs="0" name="timestamp"
type="xsd:dateTime"/>
</xsd:sequence>
</xsd:complexType>
<xsd:complexType name="PayloadURLType">
<xsd:simpleContent>
<xsd:extension base="xsd:string">
<xsd:attribute name="payloadId" type="xsd:token"
use="required"/>
</xsd:extension>
</xsd:simpleContent>
</xsd:complexType>
<xsd:simpleType name="messageStatus">
<xsd:restriction base="xsd:string">
<xsd:enumeration value="READY_TO_PULL"/>
<xsd:enumeration value="SEND_ENQUEUED"/>
<xsd:enumeration value="WAITING_FOR_RECEIPT"/>
<xsd:enumeration value="ACKNOWLEDGED"/>
<xsd:enumeration value="SEND_FAILURE"/>
<xsd:enumeration value="NOT_FOUND"/>
<xsd:enumeration value="WAITING_FOR_RETRY"/>
<xsd:enumeration value="RECEIVED"/>
<xsd:enumeration value="DELETED"/>
<xsd:enumeration value="DOWNLOADED"/>
</xsd:restriction>
</xsd:simpleType>
<xsd:simpleType name="errorCode">
<xsd:restriction base="xsd:string">
<xsd:enumeration value="EBMS_0001"/>
<xsd:enumeration value="EBMS_0002"/>
<xsd:enumeration value="EBMS_0003"/>
<xsd:enumeration value="EBMS_0004"/>
<xsd:enumeration value="EBMS_0005"/>
<xsd:enumeration value="EBMS_0006"/>
<xsd:enumeration value="EBMS_0007"/>
<xsd:enumeration value="EBMS_0008"/>
<xsd:enumeration value="EBMS_0009"/>
<xsd:enumeration value="EBMS_0010"/>
<xsd:enumeration value="EBMS_0011"/>
<xsd:enumeration value="EBMS_0101"/>
<xsd:enumeration value="EBMS_0102"/>
<xsd:enumeration value="EBMS_0103"/>
<xsd:enumeration value="EBMS_0201"/>
<xsd:enumeration value="EBMS_0202"/>
<xsd:enumeration value="EBMS_0301"/>
<xsd:enumeration value="EBMS_0302"/>
<xsd:enumeration value="EBMS_0303"/>
<xsd:enumeration value="EBMS_0020"/>
<xsd:enumeration value="EBMS_0021"/>
<xsd:enumeration value="EBMS_0022"/>
<xsd:enumeration value="EBMS_0023"/>
<xsd:enumeration value="EBMS_0030"/>
<xsd:enumeration value="EBMS_0031"/>
<xsd:enumeration value="EBMS_0040"/>
<xsd:enumeration value="EBMS_0041"/>
<xsd:enumeration value="EBMS_0042"/>
<xsd:enumeration value="EBMS_0043"/>
<xsd:enumeration value="EBMS_0044"/>
<xsd:enumeration value="EBMS_0045"/>
<xsd:enumeration value="EBMS_0046"/>
<xsd:enumeration value="EBMS_0047"/>
<xsd:enumeration value="EBMS_0048"/>
<xsd:enumeration value="EBMS_0049"/>
<xsd:enumeration value="EBMS_0050"/>
<xsd:enumeration value="EBMS_0051"/>
<xsd:enumeration value="EBMS_0052"/>
<xsd:enumeration value="EBMS_0053"/>
<xsd:enumeration value="EBMS_0054"/>
<xsd:enumeration value="EBMS_0055"/>
<xsd:enumeration value="EBMS_0060"/>
<xsd:enumeration value="EBMS_0065"/>
</xsd:restriction>
</xsd:simpleType>
<xsd:simpleType name="mshRole">
<xsd:restriction base="xsd:string">
<xsd:enumeration value="SENDING"/>
<xsd:enumeration value="RECEIVING"/>
</xsd:restriction>
</xsd:simpleType>
<xsd:complexType final="#all" name="errorResultImplArray">
<xsd:sequence>
<xsd:element maxOccurs="unbounded" minOccurs="0" name="item"
nillable="true" type="tns:errorResultImpl"/>
</xsd:sequence>
</xsd:complexType>
<xsd:element name="getStatusRequest" nillable="true">
<xsd:complexType>
<xsd:sequence>
<xsd:element name="messageID"
type="tns:max255-non-empty-string"/>
</xsd:sequence>
</xsd:complexType>
</xsd:element>
<xsd:element name="statusRequest" nillable="true">
<xsd:complexType>
<xsd:sequence>
<xsd:element name="messageID"
type="tns:max255-non-empty-string"/>
</xsd:sequence>
</xsd:complexType>
</xsd:element>
<xsd:element name="getStatusResponse" nillable="true"
type="tns:messageStatus"/>
<xsd:element name="getErrorsRequest" nillable="true">
<xsd:complexType>
<xsd:sequence>
<xsd:element name="messageID"
type="tns:max255-non-empty-string"/>
</xsd:sequence>
</xsd:complexType>
</xsd:element>
<xsd:element name="getMessageErrorsResponse" nillable="true"
type="tns:errorResultImplArray"/>
</xsd:schema>domibus-header.xsd
<?xml version="1.0" encoding="UTF-8"?>
<xsd:schema
xmlns="http://docs.oasis-open.org/ebxml-msg/ebms/v3.0/ns/core/200704/"#
xmlns:xsd="http://www.w3.org/2001/XMLSchema"#
xmlns:tns="http://docs.oasis-open.org/ebxml-msg/ebms/v3.0/ns/core/200704/"#
xmlns:xml="http://www.w3.org/XML/1998/namespace"#
targetNamespace="http://docs.oasis-open.org/ebxml-msg/ebms/v3.0/ns/core/200704/"#
elementFormDefault="qualified"
attributeFormDefault="unqualified">
<xsd:import
namespace="http://www.w3.org/XML/1998/namespace"/>
<xsd:annotation>
<xsd:appinfo>Schema for Domibus messages' headers
submission</xsd:appinfo>
<xsd:documentation xml:lang="en">
*This schema defines an XML subset of ebMS-3 headers which is
used to validate messages submitted to Domibus*#
*through WS plugin.#*
</xsd:documentation>
</xsd:annotation>
<xsd:element name="Messaging" type="Messaging"/>
<xsd:complexType name="Messaging">
<xsd:sequence>
<xsd:element name="UserMessage" type="UserMessage"
minOccurs="0"/>
</xsd:sequence>
<xsd:attribute name="mustUnderstand" type="xsd:boolean"
use="optional"/>
</xsd:complexType>
<xsd:complexType name="UserMessage">
<xsd:all>
<xsd:element name="MessageInfo" type="MessageInfo"
minOccurs="0"/>
<xsd:element name="PartyInfo" type="PartyInfo"/>
<xsd:element name="CollaborationInfo"
type="CollaborationInfo"/>
<xsd:element name="MessageProperties"
type="tns:MessageProperties" minOccurs="0"/>
<xsd:element name="PayloadInfo" type="tns:PayloadInfo"
minOccurs="0"/>
</xsd:all>
<xsd:attribute name="mpc" type="xsd:anyURI"
use="optional"/>
</xsd:complexType>
<xsd:complexType name="MessageInfo">
<xsd:all>
<xsd:element name="Timestamp" type="xsd:dateTime"
minOccurs="0"/>
<xsd:element name="MessageId"
type="tns:max255-non-empty-string" minOccurs="0"/>
<xsd:element name="RefToMessageId"
type="tns:max255-non-empty-string" minOccurs="0"/>
</xsd:all>
</xsd:complexType>
<xsd:complexType name="PartyInfo">
<xsd:all>
<xsd:element name="From" type="tns:From"/>
<xsd:element name="To" type="tns:To"
minOccurs="0"/>
</xsd:all>
</xsd:complexType>
<xsd:complexType name="PartyId">
<xsd:simpleContent>
<xsd:extension base="tns:max255-non-empty-string">
<xsd:attribute name="type"
type="tns:max255-non-empty-string"/>
</xsd:extension>
</xsd:simpleContent>
</xsd:complexType>
<xsd:complexType name="From">
<xsd:all>
<xsd:element name="PartyId" type="tns:PartyId"/>
<xsd:element name="Role"
type="tns:max255-non-empty-string"/>
</xsd:all>
</xsd:complexType>
<xsd:complexType name="To">
<xsd:all>
<xsd:element name="PartyId" type="tns:PartyId"/>
<xsd:element name="Role"
type="tns:max255-non-empty-string"/>
</xsd:all>
</xsd:complexType>
<xsd:complexType name="CollaborationInfo">
<xsd:all>
<xsd:element name="AgreementRef" type="tns:AgreementRef"
minOccurs="0"/>
<xsd:element name="Service" type="tns:Service"/>
<xsd:element name="Action" type="xsd:token"/>
<xsd:element name="ConversationId" type="xsd:token"
minOccurs="0"/>
</xsd:all>
</xsd:complexType>
<xsd:complexType name="Service">
<xsd:simpleContent>
<xsd:extension base="tns:max255-non-empty-string">
<xsd:attribute name="type"
type="tns:max255-non-empty-string" use="optional"/>
</xsd:extension>
</xsd:simpleContent>
</xsd:complexType>
<xsd:complexType name="AgreementRef">
<xsd:simpleContent>
<xsd:extension base="tns:max255-non-empty-string">
<xsd:attribute name="type"
type="tns:max255-non-empty-string" use="optional"/>
<xsd:attribute name="pmode"
type="tns:max255-non-empty-string" use="optional"/>
</xsd:extension>
</xsd:simpleContent>
</xsd:complexType>
<xsd:complexType name="PayloadInfo">
<xsd:sequence>
<xsd:element name="PartInfo" type="tns:PartInfo"
maxOccurs="unbounded"/>
</xsd:sequence>
</xsd:complexType>
<xsd:complexType name="PartInfo">
<xsd:all>
<xsd:element name="PartProperties"
type="tns:PartProperties" minOccurs="0"/>
</xsd:all>
<xsd:attribute name="href" type="xsd:token"/>
</xsd:complexType>
<xsd:complexType name="Property">
<xsd:simpleContent>
<xsd:extension base="tns:max1024-non-empty-string">
<xsd:attribute name="name"
type="tns:max255-non-empty-string" use="required"/>
<xsd:attribute name="type"
type="tns:max255-non-empty-string" use="optional"/>
</xsd:extension>
</xsd:simpleContent>
</xsd:complexType>
<xsd:complexType name="PartProperties">
<xsd:sequence>
<xsd:element name="Property" type="tns:Property"
maxOccurs="unbounded"/>
</xsd:sequence>
</xsd:complexType>
<xsd:complexType name="MessageProperties">
<xsd:sequence>
<xsd:element name="Property" type="Property"
maxOccurs="unbounded"/>
</xsd:sequence>
</xsd:complexType>
<xsd:simpleType name="max255-non-empty-string">
<xsd:restriction base="xsd:string">
<xsd:minLength value="1"/>
<xsd:maxLength value="255"/>
</xsd:restriction>
</xsd:simpleType>
<xsd:simpleType name="max1024-non-empty-string">
<xsd:restriction base="xsd:string">
<xsd:minLength value="1"/>
<xsd:maxLength value="1024"/>
</xsd:restriction>
</xsd:simpleType>
</xsd:schema>11.6.2. Backend Messages Standards
Backend WSDL
<?xml version='1.0' encoding='UTF-8'?>
<wsdl:definitions
xmlns:wsdl="http://schemas.xmlsoap.org/wsdl/"
xmlns:soap12="http://schemas.xmlsoap.org/wsdl/soap12/"
xmlns:tns="eu.domibus"
name="backendService"
targetNamespace="eu.domibus">
<wsdl:types>
<schema
xmlns="http://www.w3.org/2001/XMLSchema">
<import namespace="eu.domibus"
schemaLocation="BackendService.xsd"/>
</schema>
</wsdl:types>
<wsdl:message name="submitMessage">
<wsdl:part element="tns:submitMessage" name="submitMessage"/>
</wsdl:message>
<wsdl:message name="submitMessageResponse"/>
<wsdl:message name="submitMessageFault">
<wsdl:part element="tns:BackendFaultDetail"
name="submitMessageFault"/>
</wsdl:message>
<wsdl:message name="sendSuccess">
<wsdl:part element="tns:sendSuccess" name="sendSuccess"/>
</wsdl:message>
<wsdl:message name="sendSuccessResponse"/>
<wsdl:message name="sendSuccessFault">
<wsdl:part element="tns:BackendFaultDetail"
name="sendSuccessFault"/>
</wsdl:message>
<wsdl:message name="sendFailure">
<wsdl:part element="tns:sendFailure" name="sendFailure"/>
</wsdl:message>
<wsdl:message name="sendFailureResponse"/>
<wsdl:message name="sendFailureFault">
<wsdl:part element="tns:BackendFaultDetail"
name="sendFailureFault"/>
</wsdl:message>
<wsdl:message name="receiveSuccess">
<wsdl:part element="tns:receiveSuccess" name="receiveSuccess"/>
</wsdl:message>
<wsdl:message name="receiveSuccessResponse"/>
<wsdl:message name="receiveSuccessFault">
<wsdl:part element="tns:BackendFaultDetail"
name="receiveSuccessFault"/>
</wsdl:message>
<wsdl:message name="receiveFailure">
<wsdl:part element="tns:receiveFailure" name="receiveFailure"/>
</wsdl:message>
<wsdl:message name="receiveFailureResponse"/>
<wsdl:message name="receiveFailureFault">
<wsdl:part element="tns:BackendFaultDetail"
name="receiveFailureFault"/>
</wsdl:message>
<wsdl:message name="delete">
<wsdl:part element="tns:delete" name="delete"/>
</wsdl:message>
<wsdl:message name="deleteResponse"/>
<wsdl:message name="deleteFault">
<wsdl:part element="tns:BackendFaultDetail" name="deleteFault"/>
</wsdl:message>
<wsdl:message name="deleteBatch">
<wsdl:part element="tns:deleteBatch" name="deleteBatch"/>
</wsdl:message>
<wsdl:message name="deleteBatchResponse"/>
<wsdl:message name="deleteBatchFault">
<wsdl:part element="tns:BackendFaultDetail"
name="deleteBatchFault"/>
</wsdl:message>
<wsdl:message name="messageStatusChange">
<wsdl:part element="tns:messageStatusChange"
name="messageStatusChange"/>
</wsdl:message>
<wsdl:message name="messageStatusChangeResponse"/>
<wsdl:message name="messageStatusChangeFault">
<wsdl:part element="tns:BackendFaultDetail"
name="messageStatusChangeFault"/>
</wsdl:message>
<wsdl:portType name="BackendInterface">
<wsdl:operation name="submitMessage">
<wsdl:input message="tns:submitMessage" name="submitMessage"></wsdl:input>
<wsdl:output message="tns:submitMessageResponse"
name="submitMessageResponse"></wsdl:output>
<wsdl:fault message="tns:submitMessageFault"
name="submitMessageFault"></wsdl:fault>
</wsdl:operation>
<wsdl:operation name="sendSuccess">
<wsdl:input message="tns:sendSuccess" name="sendSuccess"></wsdl:input>
<wsdl:output message="tns:sendSuccessResponse"
name="sendSuccessResponse"></wsdl:output>
<wsdl:fault message="tns:sendSuccessFault"
name="sendSuccessFault"></wsdl:fault>
</wsdl:operation>
<wsdl:operation name="sendFailure">
<wsdl:input message="tns:sendFailure" name="sendFailure"></wsdl:input>
<wsdl:output message="tns:sendFailureResponse"
name="sendFailureResponse"></wsdl:output>
<wsdl:fault message="tns:sendFailureFault"
name="sendFailureFault"></wsdl:fault>
</wsdl:operation>
<wsdl:operation name="receiveSuccess">
<wsdl:input message="tns:receiveSuccess" name="receiveSuccess"></wsdl:input>
<wsdl:output message="tns:receiveSuccessResponse"
name="receiveSuccessResponse"></wsdl:output>
<wsdl:fault message="tns:receiveSuccessFault"
name="receiveSuccessFault"></wsdl:fault>
</wsdl:operation>
<wsdl:operation name="receiveFailure">
<wsdl:input message="tns:receiveFailure" name="receiveFailure"></wsdl:input>
<wsdl:output message="tns:receiveFailureResponse"
name="receiveFailureResponse"></wsdl:output>
<wsdl:fault message="tns:receiveFailureFault"
name="receiveFailureFault"></wsdl:fault>
</wsdl:operation>
<wsdl:operation name="delete">
<wsdl:input message="tns:delete" name="delete"></wsdl:input>
<wsdl:output message="tns:deleteResponse" name="deleteResponse"></wsdl:output>
<wsdl:fault message="tns:deleteFault" name="deleteFault"></wsdl:fault>
</wsdl:operation>
<wsdl:operation name="deleteBatch">
<wsdl:input message="tns:deleteBatch" name="deleteBatch"></wsdl:input>
<wsdl:output message="tns:deleteBatchResponse"
name="deleteBatchResponse"></wsdl:output>
<wsdl:fault message="tns:deleteBatchFault"
name="deleteBatchFault"></wsdl:fault>
</wsdl:operation>
<wsdl:operation name="messageStatusChange">
<wsdl:input message="tns:messageStatusChange"
name="messageStatusChange"></wsdl:input>
<wsdl:output message="tns:messageStatusChangeResponse"
name="messageStatusChangeResponse"></wsdl:output>
<wsdl:fault message="tns:messageStatusChangeFault"
name="messageStatusChangeFault"></wsdl:fault>
</wsdl:operation>
</wsdl:portType>
<wsdl:binding name="BackendServiceSoapBinding"
type="tns:BackendInterface">
<soap12:binding style="document"
transport="http://schemas.xmlsoap.org/soap/http"/>
<wsdl:operation name="submitMessage">
<soap12:operation soapAction="" style="document"/>
<wsdl:input name="submitMessage">
<soap12:body parts="submitMessage" use="literal"/>
</wsdl:input>
<wsdl:output name="submitMessageResponse">
<soap12:body use="literal"/>
</wsdl:output>
<wsdl:fault name="submitMessageFault">
<soap12:fault name="submitMessageFault" use="literal"/>
</wsdl:fault>
</wsdl:operation>
<wsdl:operation name="sendSuccess">
<soap12:operation soapAction="" style="document"/>
<wsdl:input name="sendSuccess">
<soap12:body parts="sendSuccess" use="literal"/>
</wsdl:input>
<wsdl:output name="sendSuccessResponse">
<soap12:body use="literal"/>
</wsdl:output>
<wsdl:fault name="sendSuccessFault">
<soap12:fault name="sendSuccessFault" use="literal"/>
</wsdl:fault>
</wsdl:operation>
<wsdl:operation name="sendFailure">
<soap12:operation soapAction="" style="document"/>
<wsdl:input name="sendFailure">
<soap12:body parts="sendFailure" use="literal"/>
</wsdl:input>
<wsdl:output name="sendFailureResponse">
<soap12:body use="literal"/>
</wsdl:output>
<wsdl:fault name="sendFailureFault">
<soap12:fault name="sendFailureFault" use="literal"/>
</wsdl:fault>
</wsdl:operation>
<wsdl:operation name="receiveSuccess">
<soap12:operation soapAction="" style="document"/>
<wsdl:input name="receiveSuccess">
<soap12:body parts="receiveSuccess" use="literal"/>
</wsdl:input>
<wsdl:output name="receiveSuccessResponse">
<soap12:body use="literal"/>
</wsdl:output>
<wsdl:fault name="receiveSuccessFault">
<soap12:fault name="receiveSuccessFault" use="literal"/>
</wsdl:fault>
</wsdl:operation>
<wsdl:operation name="receiveFailure">
<soap12:operation soapAction="" style="document"/>
<wsdl:input name="receiveFailure">
<soap12:body parts="receiveFailure" use="literal"/>
</wsdl:input>
<wsdl:output name="receiveFailureResponse">
<soap12:body use="literal"/>
</wsdl:output>
<wsdl:fault name="receiveFailureFault">
<soap12:fault name="receiveFailureFault" use="literal"/>
</wsdl:fault>
</wsdl:operation>
<wsdl:operation name="delete">
<soap12:operation soapAction="" style="document"/>
<wsdl:input name="delete">
<soap12:body parts="delete" use="literal"/>
</wsdl:input>
<wsdl:output name="deleteResponse">
<soap12:body use="literal"/>
</wsdl:output>
<wsdl:fault name="deleteFault">
<soap12:fault name="deleteFault" use="literal"/>
</wsdl:fault>
</wsdl:operation>
<wsdl:operation name="deleteBatch">
<soap12:operation soapAction="" style="document"/>
<wsdl:input name="deleteBatch">
<soap12:body parts="deleteBatch" use="literal"/>
</wsdl:input>
<wsdl:output name="deleteBatchResponse">
<soap12:body use="literal"/>
</wsdl:output>
<wsdl:fault name="deleteBatchFault">
<soap12:fault name="deleteBatchFault" use="literal"/>
</wsdl:fault>
</wsdl:operation>
<wsdl:operation name="messageStatusChange">
<soap12:operation soapAction="" style="document"/>
<wsdl:input name="messageStatusChange">
<soap12:body parts="messageStatusChange" use="literal"/>
</wsdl:input>
<wsdl:output name="messageStatusChangeResponse">
<soap12:body use="literal"/>
</wsdl:output>
<wsdl:fault name="messageStatusChangeFault">
<soap12:fault name="messageStatusChangeFault" use="literal"/>
</wsdl:fault>
</wsdl:operation>
</wsdl:binding>
<wsdl:service name="BackendService">
<wsdl:port binding="tns:BackendServiceSoapBinding"
name="BACKEND_PORT">
<soap12:address location="http://localhost:8080/backend"/>
</wsdl:port>
</wsdl:service>
</wsdl:definitions>backend.xsd
<?xml version="1.0" encoding="UTF-8"?>
<xsd:schema
xmlns:xsd="http://www.w3.org/2001/XMLSchema"
xmlns:xmime="http://www.w3.org/2005/05/xmlmime"
xmlns:tns="eu.domibus"
targetNamespace="eu.domibus">
<xsd:simpleType name="max255-non-empty-string">
<xsd:restriction base="xsd:string">
<xsd:minLength value="1"/>
<xsd:maxLength value="255"/>
</xsd:restriction>
</xsd:simpleType>
<xsd:simpleType name="messageStatus">
<xsd:restriction base="xsd:string">
<xsd:enumeration value="READY_TO_PULL"/>
<xsd:enumeration value="SEND_ENQUEUED"/>
<xsd:enumeration value="WAITING_FOR_RECEIPT"/>
<xsd:enumeration value="ACKNOWLEDGED"/>
<xsd:enumeration value="SEND_FAILURE"/>
<xsd:enumeration value="NOT_FOUND"/>
<xsd:enumeration value="WAITING_FOR_RETRY"/>
<xsd:enumeration value="RECEIVED"/>
<xsd:enumeration value="DELETED"/>
<xsd:enumeration value="DOWNLOADED"/>
</xsd:restriction>
</xsd:simpleType>
<xsd:complexType name="LargePayloadType">
<xsd:sequence>
<xsd:element name="value" type="xsd:base64Binary"
xmime:expectedContentTypes="application/octet-stream"/>
</xsd:sequence>
<xsd:attribute name="payloadId" type="xsd:token"/>
<xsd:attribute name="contentType" type="xsd:string"/>
<xsd:attribute name="mimeType" type="xsd:string"/>
<xsd:attribute name="payloadName" type="xsd:string"/>
</xsd:complexType>
<xsd:element name="submitMessage">
<xsd:complexType>
<xsd:sequence>
<xsd:element name="messageID"
type="tns:max255-non-empty-string"/>
<xsd:element name="finalRecipient"
type="tns:max255-non-empty-string"/>
<xsd:element name="originalSender"
type="tns:max255-non-empty-string"/>
<xsd:element minOccurs="0" name="bodyload"
type="tns:LargePayloadType"/>
<xsd:element maxOccurs="unbounded" minOccurs="0"
name="payload" type="tns:LargePayloadType"/>
</xsd:sequence>
</xsd:complexType>
</xsd:element>
<xsd:element name="BackendFaultDetail">
<xsd:complexType>
<xsd:sequence>
<xsd:element name="code" type="xsd:string"/>
<xsd:element name="message" nillable="true"
type="xsd:string"/>
</xsd:sequence>
</xsd:complexType>
</xsd:element>
<xsd:element name="sendSuccess">
<xsd:complexType>
<xsd:sequence>
<xsd:element name="messageID"
type="tns:max255-non-empty-string"/>
</xsd:sequence>
</xsd:complexType>
</xsd:element>
<xsd:element name="sendFailure">
<xsd:complexType>
<xsd:sequence>
<xsd:element name="messageID"
type="tns:max255-non-empty-string"/>
</xsd:sequence>
</xsd:complexType>
</xsd:element>
<xsd:element name="receiveSuccess">
<xsd:complexType>
<xsd:sequence>
<xsd:element name="messageID"
type="tns:max255-non-empty-string"/>
</xsd:sequence>
</xsd:complexType>
</xsd:element>
<xsd:element name="receiveFailure">
<xsd:complexType>
<xsd:sequence>
<xsd:element name="messageID"
type="tns:max255-non-empty-string"/>
</xsd:sequence>
</xsd:complexType>
</xsd:element>
<xsd:element name="delete">
<xsd:complexType>
<xsd:sequence>
<xsd:element name="messageID"
type="tns:max255-non-empty-string"/>
</xsd:sequence>
</xsd:complexType>
</xsd:element>
<xsd:element name="deleteBatch">
<xsd:complexType>
<xsd:sequence>
<xsd:element maxOccurs="unbounded" minOccurs="0"
name="messageIds" nillable="true" type="xsd:string"/>
</xsd:sequence>
</xsd:complexType>
</xsd:element>
<xsd:element name="messageStatusChange">
<xsd:complexType>
<xsd:sequence>
<xsd:element name="messageID"
type="tns:max255-non-empty-string"/>
<xsd:element name="messageStatus" type="tns:messageStatus"/>
</xsd:sequence>
</xsd:complexType>
</xsd:element>
</xsd:schema>12. (Old) WS Plugin Interface
About this content
|
Important
|
This interface is to be deprecated in the next release. |
This guide defines the participant’s interface to the Access Point (Corner Two and Corner Three in the four-corner topology that will be explained later in this document) component of the eDelivery building block.
This guide describes the WSDL and the observable behaviour of the interface provided by Domibus 4.x.y and included in the default-ws-plugin.
Here you can find information to understand the the Access Point (Corner Two and Corner Three in the four-corner model) services provided by Domibus 4.x.y delivered by eDelivery.
There is 1 interface described in this document:
| Interface | Description | Version |
|---|---|---|
BackendService_1_1.wsdl |
The backend webservices for Domibus |
4.x.y |
Scope
This document covers the service interface of the Access Point. It includes information regarding the description of the services available, the list of use cases, the information model and the sequence of message exchanges for the services provided. This specification is limited to the service interface of the Access Point. All other aspects of its implementation are not covered by this document. The ICD specification provides both the provider (i.e. the implementer) of the services and their consumers with a complete specification of the following aspects:
-
Interface Functional Specification, this specifies the set of services and the operations provided by each service and this is represented by the flows explained in the use cases.
-
Interface Behavioural Specification, this specifies the expected sequence of steps to be respected by the participants in the implementation when calling a service or a set of services and this is represented by the sequence diagrams presented in the use cases.
-
Interface Message standards, this specifies the syntax and semantics of the data and this is
Audience
This document is aimed at Directorate Generals and Services of the European Commission, Member States (MS) and also companies of the private sector wanting to set up a connection between their backend system and the Access Point. In particular:
-
Architects will find it useful for determining how to best use the File System Plugin to create a fully-fledged solution and as a starting point for connecting a Back-Office system to the Access Point.
-
Analysts will find it useful to understand the File System Plugin that will enable them to have a holistic and detailed view of the operations and data involved in the use cases.
-
Developers will find it essential as a basis of their development concerning the File System Plugin interface.
-
Testers can use this document in order to test the interface by following the use cases described.
Useful Resources
Below you can find useful information sources:
-
HTTP Methods for RESTful Services
Short descriptions and using HTTP Methods for RESTful Services
-
Business Document Metadata Service Location
BDMSL Software Architecture Document
This document is the Software Architecture document of the CIPA eDelivery Business Document Metadata Service Location application (BDMSL) sample implementation.
It intends to provide detailed information about the project:-
An overview of the solution
-
The different layers
-
The principles governing its software architecture
-
-
About the Electronic Business using eXtensible Markup Language(ebXML)
-
Web Services Description Language (WSDL) 1.1
WS-I Basic Profile Version 1.1
-
Electronic Business using eXtensible Markup Language (ebXML)
12.1. Functional Specification
In order to understand the Use Cases that will be described below it is important to explain the topology; i.e. the four – corner model.

In this model we have the following elements:
-
Corner One (C1): Backend C1 is the system that will send messages to the sending AP (Access Point)
-
Corner Two (C2): Sending Access Point C2
-
Corner Three (C3): Receiving Access Point C3
-
Corner Four (C4): Backend C4 is the system that received messages from the receiving AP (Access Point)
There are two backend adapters (i.e. corner one and corner four). They send messages to and download messages from the AS4 APs configured in the PMode configuration files.
The Access Point provides the functionality supporting Corner Two and Corner Three components.
12.1.1. Use case overview
| Actor | Definition |
|---|---|
Backend C1 |
Any participant submitting messages to any other Backend C4 and using the Sending AP C2 for that purpose. |
Backend C4 |
Any participant retrieving messages from any other Backend C1 and using the Receiving AP C3 for that purpose. |
|
Note
|
Greyed use cases in this paragraph show deprecated operations in the WSDL (in these diagrams, the use cases below these replace them). Since deprecated and replacing operations have the same functionality (only technical changes), in each case only one use case is presented for both. |
Use cases diagram
| ID | UC | Short description | Oper. | System |
|---|---|---|---|---|
Submit Message |
Submit any type of document from a Backend C1 to a Backend C4 |
submitMessage |
Domibus 5.x.y |
|
Get Status of the Message |
Get the status of the Message |
getStatus |
Domibus 5.x.y |
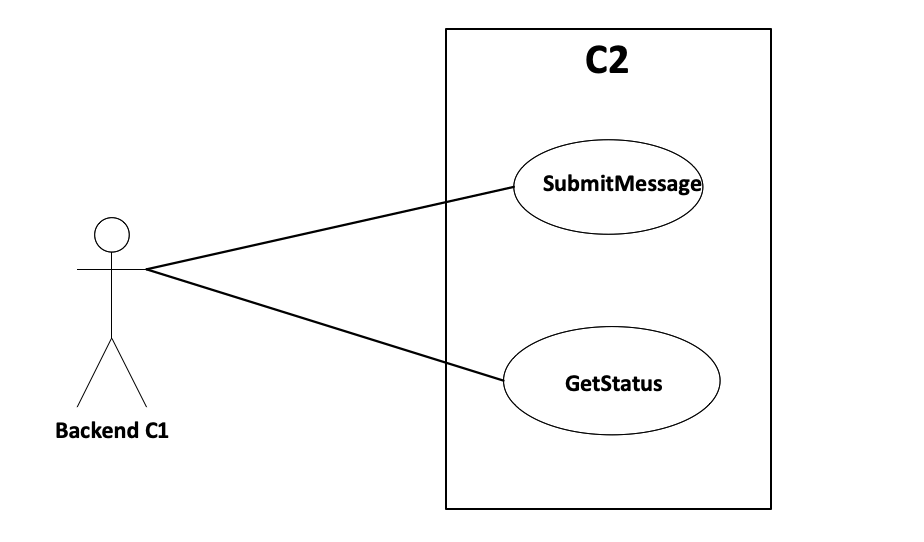
| ID | UC | Description | Operation | System |
|---|---|---|---|---|
Download Message |
Retrieve the message from the Receiving AP C3 |
|
Domibus 5.x.y |
|
Get Status of the Message |
Get the status of the Message |
|
Domibus 5.x.y |
|
ListPending Messages |
Check the pending messages to be retrieved by the Backend C4 from C3 |
|
Domibus 5.x.y |
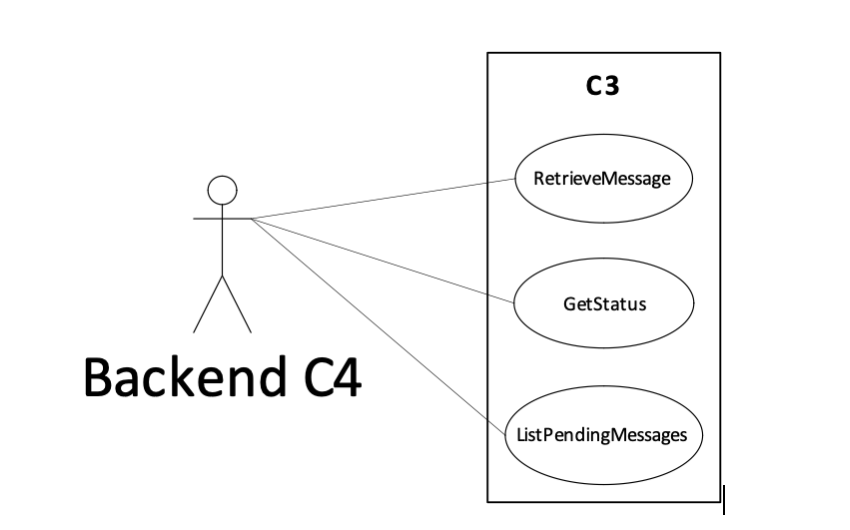
12.1.2. Detailed uses cases
The following paragraphs define the use cases listed above with more detail.
The WS Plugin Interface Functional Specification is described in the detailed
uses cases using Request and Response examples.
It is important to note that the Inputs and Responses provided as examples for the
uses cases are based on a specific PMode configuration.
As defined in the eDelivery Specification Library, a PMode is the contextual information that governs the processing of a particular message (thus is basically a set of configuration parameters). The PMode associated with a message determines, among other things, which security and/or which reliability protocol and parameters, as well as which MEP (Message Exchange Pattern) is being used when sending a message. The technical representation of the PMode configuration is implementation-dependent. C1 and C4 may be one or more participants.
The state machine diagrams presented below depict the various states in which a message may be during its lifecycle when submitting or downloading the message. These are presented in order to have a more comprehensive vision of the process that the messages go through. Note also the sequence diagram of the basic flow is presented in the use cases.
On C2, the state machine diagram for submitting the message:
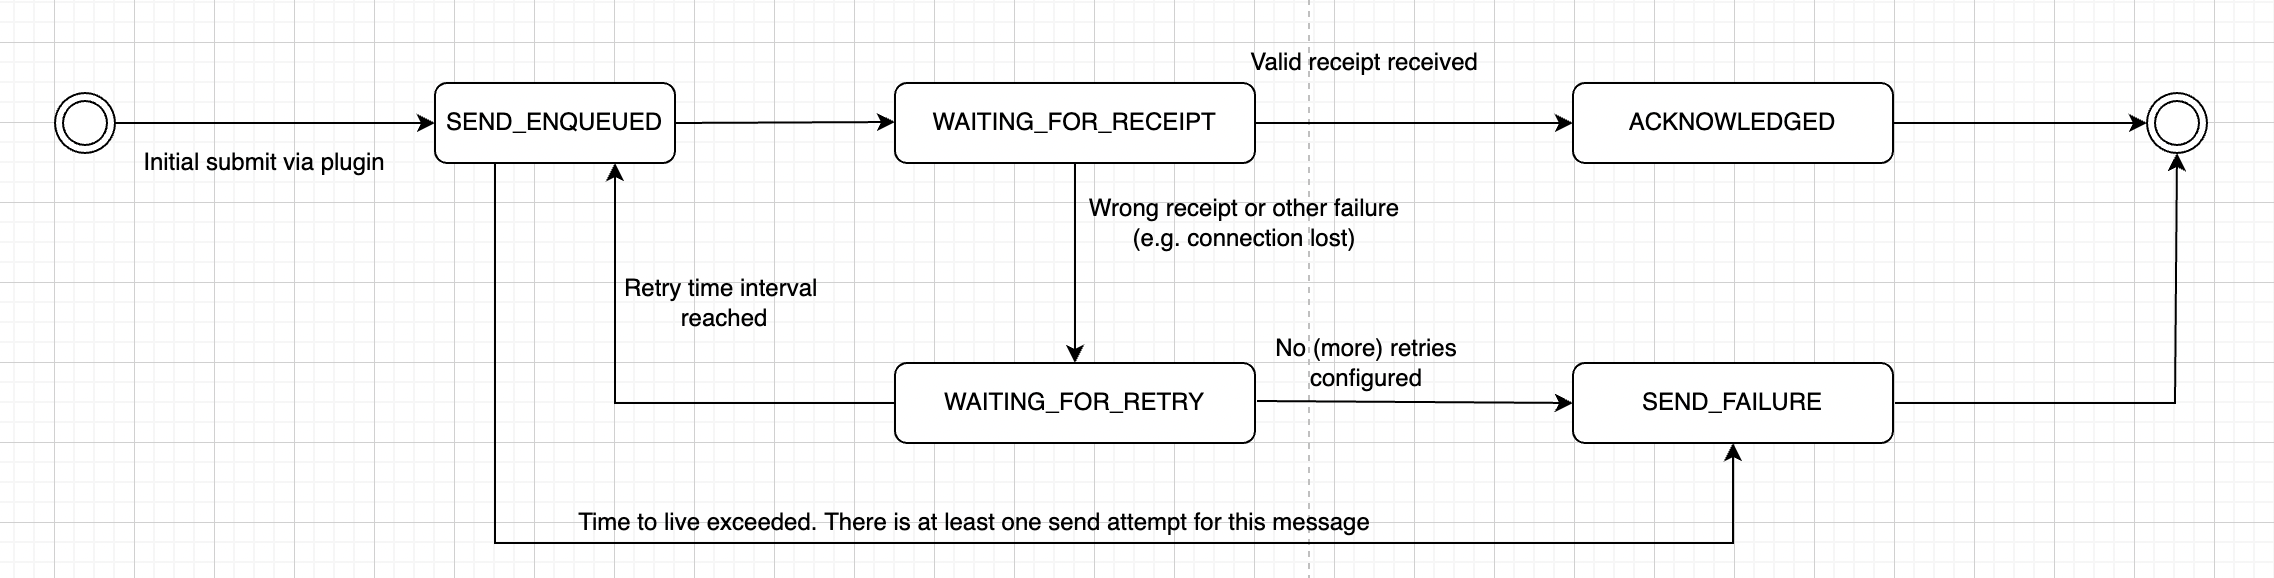
On C3, the state machine diagram for downloading the message:

UC01 – Submit Message
Click to Open
- Brief description
-
Submit any message with attachments from Backend C1 to the Backend C4. The response from C2 to C1 is synchronous and contains a messageId.
MTOM feature is required when sending large files so that the attachments are send outside the XML envelope, as parts. Otherwise, the attachments will be encoded base64 and sent inside the envelope and the maximum limit would be 128Mb.
The state machine of the outgoing messages is the following:
Sequence Diagram C1 to C2 – SubmitMessage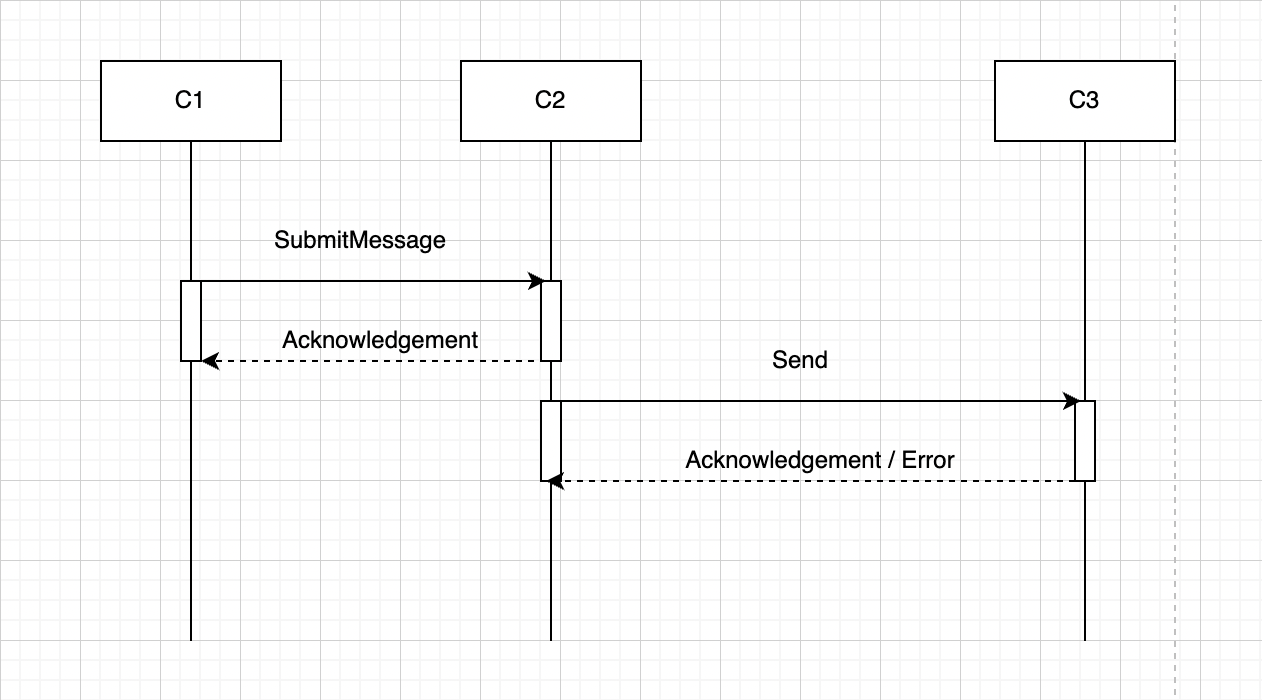
| Actors | |
|---|---|
C1 |
Backend C1 |
C2 |
Access Point C2 |
C3 |
Access Point C3 |
| Preconditions | |
|---|---|
C1 |
Backend C1 has a message to submit. |
C1 |
The message is valid. A message is valid if it respects the message standard format (see Annex 5.1 - Interface Message standards) |
C2, C3 |
The Sending AP (C2) and the Receiving AP (C3) are up and running and properly configured. |
| Actor | Step | Description | C2 Message State | C3 Message state |
|---|---|---|---|---|
C1 |
1 |
Backend C1 submits the message. |
N/A |
- |
C2 |
2 |
C2 sends an ACK to C1 containing the ID of the message. |
SEND_ENQUEUED |
- |
C2 |
3 |
The message directly passes through to SEND_ENQUEUED, meaning that it is available for processing. All messages go through this step regardless of load |
SEND_ENQUEUED |
- |
C2 |
4 |
Once the sending process finishes the status changes to WAITING_FOR_RECEIPT. |
WAITING_FOR_RECEIPT |
- |
C3 |
5 |
Once the reception is finished by C3, the status changes to RECEIVED |
WAITING_FOR_RECEIPT |
RECEIVED |
C3 |
6 |
The Receiving AP (C3) responds ACK to C2 |
WAITING_FOR_RECEIPT |
RECEIVED |
C2 |
7 |
The status of the message changes to ACKNOWLEDGED. |
ACKNOWLEDGED |
RECEIVED |
8 |
Use case ends in successful condition. |
| Actor | Step | Description | C2 Message State | C3 Message state |
|---|---|---|---|---|
C2 |
E2.1 |
The ID provided by C1 already exists |
- |
- |
C2 |
E2.1.1 .2 |
The |
- |
- |
C2 |
E2.1.2 |
The |
SEND_FAILURE |
- |
C2 |
E11.1 |
Wrong receipt received or any other failure (e.g connection lost) |
- |
- |
C2 |
E11.1.1 |
The status changes to WAITING_FOR_RETRY |
WAITING_FOR_RETRY |
- |
C2 |
E11.1.2 |
Continue to step 3 |
- |
- |
C2 |
E11.1.3.1 |
The maximum number or retries (Configurable via PMode on a by-usecase basis) has been reached |
- |
- |
C2 |
E11.1.3.1.1 |
The status of the message changes to
|
SEND_FAILURE |
- |
C2 |
E11.1.3.1.2 |
A notification can be sent to the Backend C1 that initially submitted the message. |
SEND_FAILURE |
- |
C2 |
E11.1.3.1.3 |
Use case ends in failure condition. |
- |
- |
Successful conditions |
The operation is a success if getStatus in C2 is ACKNOWLEDGED and this means that the Receiving AP (C3) has received the message submitted by the Backend C1 and the status in C3 is RECEIVED. The method getStatus must be called with the identifier of the message received in the response or specified in the request. |
|---|---|
Failure Conditions |
Errors may be sent as SOAP Fault or as http:5XX . |
<soap:Envelope
xmlns:soap="http://www.w3.org/2003/05/soap-envelope"
xmlns:ns="http://docs.oasis-open.org/ebxml-msg/ebms/v3.0/ns/core/200704/"
xmlns:_1="http://org.ecodex.backend/1_1/">
<soap:Header>
<ns:Messaging>
<ns:UserMessage
mpc=”http://docs.oasis-open.org/ebxml-msg/ebms/v.0/ns/core/200704/defaultMPC”>
<ns:PartyInfo>
<ns:From>
<ns:PartyId
type="urn:oasis:names:tc:ebcore:partyid-type:unregistered">domibus-blue
</ns:PartyId>
<ns:Role>http://docs.oasis-open.org/ebxml-msg/ebms/v3.0/ns/core/200704/initiator</ns:Role>
</ns:From>
<ns:To>
<ns:PartyId
type="urn:oasis:names:tc:ebcore:partyid-type:unregistered">domibus-red</ns:PartyId>
<ns:Role>http://docs.oasis-open.org/ebxml-msg/ebms/v3.0/ns/core/200704/responder</ns:Role>
</ns:To>
</ns:PartyInfo>
<ns:CollaborationInfo>
<ns:Service type="tc1">bdx:noprocess</ns:Service>
<ns:Action>TC1Leg1</ns:Action>
</ns:CollaborationInfo>
<ns:MessageProperties>
<ns:Property
name="originalSender">urn:oasis:names:tc:ebcore:partyid-type:unregistered:C1</ns:Property>
<ns:Property
name="finalRecipient">urn:oasis:names:tc:ebcore:partyid-type:unregistered:C4</ns:Property>
</ns:MessageProperties>
<ns:PayloadInfo>
<ns:PartInfo href="cid:message">
<ns:PartProperties>
<ns:Property name="MimeType">text/xml</ns:Property>
</ns:PartProperties>
</ns:PartInfo>
</ns:PayloadInfo>
</ns:UserMessage>
</ns:Messaging>
</soap:Header>
<soap:Body>
<_1:submitRequest>
<|--Optional-->
<bodyload>
<value>cid:bodyload</value>
</bodyload>
<payload payloadId="cid:message" contentType="text/xml">
<value>
PD94bWwgdmVyc2lvbj0iMS4wIiBlbmNvZGluZz0iVVRGLTgiPz4KPGhlbGxvPndvcmxkPC9oZWxsbz4=
</value>
</payload>
</_1:submitRequest>
</soap:Body>
</soap:Envelope>
<soap:Body>
<_1:submitRequest>
<payload payloadId="cid:message"contentType="text/xml">
<value>
PD94bWwgdmVyc2lvbj0iMS4wIiBlbmNvZGluZz0iVVRGLTgiPz4KPGhlbGxvPndvcmxkPC9oZWxsbz4=
</value>
</payload>
<payload payloadId="cid:attachment"contentType="application/octet-stream">
<value>
PD94bWwgdmVyc2lvbj0iMS4wIiBlbmNvZGluZz0iVVRGLTgiPz4KPGhlbGxvPndvcmxkPC9oZWxsbz4=
</value>
</payload>
</_1:submitRequest>
</soap:Body>undefined</soap:Envelope><soap:Envelope
xmlns:soap="http://www.w3.org/2003/05/soap-envelope">
<soap:Body>
<ns5:submitResponse
xmlns:ns6="http://docs.oasis-open.org/ebxml-msg/ebms/v3.0/ns/core/200704/"
xmlns:ns5="http://org.ecodex.backend/1_1/"
xmlns:xmime="http://www.w3.org/2005/05/xmlmime">
<messageID>23dce7d9-2781-4623-beeb-6b43ab9e7d37@domibus.eu</messageID>
</ns5:submitResponse>
</soap:Body>
</soap:Envelope>-
N/A
UC02 - Retrieve Message
Click to Open
- Brief description
-
Retrieve any type of message sent from Backend C1 to Backend C4. The retrieval of the message is based on a PULL mechanism. C4 downloads the message from C3.
Please note that retrieveMessage method replaces the deprecated method downloadMessage to support the retrieval of large files. MTOM feature is required when retrieving large files.
Sequence Diagram C4 to C3 – retrieveMessage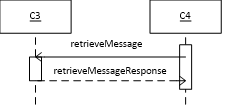
| Actors | |
|---|---|
C3 |
Access Point C3 |
C4 |
Backend C4 |
| Preconditions | |
|---|---|
C3 |
There is at least one message sent by AP C2 and successfully received in the Receiving AP C3. |
C3 |
The Receiving AP (C3) is up and running and properly configured. |
C4 |
C4 Has previously requested information about pending messages from C3. C3 has returned a response containing the messageID('s) of the message(s) received (cf. UC04). |
| Actor | Step | Description | C3 Message State |
|---|---|---|---|
C4 |
1 |
Requests, to the Receiving AP C3, the service retrieveMessage by providing the messageID |
RECEIVED |
C3 |
2 |
Receiving AP C3 retrieves and sends the information retrieveMessageResponse to C4 as response to his request. This is the payload (message content and attachments) and metadata, analogous to the message sent from C1 to C2 in UC01. The status of the message changes to DOWNLOADED when the message is retrieved by the backend C4. |
DOWNLOADED |
C4 |
3 |
Receives the message as sent by C1 |
DOWNLOADED |
C3 |
4 |
Deletes the payload of the message from the database if
retention timeout for downloaded messages = 0. |
DELETED |
C3 |
5 |
The status of the message changes to DELETED when the message is deleted by C3 after the configured retention timeout for downloaded messages (retention_downloaded) expired. Note: If retention_downloaded has a negative value, the message will never be deleted from C3. If the message was not downloaded, the retention_undownloaded value will be used as timeout for deletion. |
DELETED |
- |
6 |
Use case ends |
DELETED |
| Actor | Step | Description | C3 Message State |
|---|---|---|---|
C3 |
A1.1 |
Configured retention time has passed |
RECEIVED |
C3 |
A1.1.1 |
Go directly to step 4 |
RECEIVED |
| Actor | Step | Description | C3 Message State |
|---|---|---|---|
C3 |
E2.1 |
Wrong messageID (malformed or missing), this is a condition of failure. |
(NOT FOUND) |
C3 |
E2.1.1 |
The NOT FOUND status is a pseudo state for messages that are not available for download (were never received or were rejected). |
(NOT FOUND) |
C3 |
E2.1.2 |
Use case ends in failure condition |
(NOT FOUND) |
Successful Conditions |
It is a success if the Message Status is |
|---|---|
Failure |
No message payload is returned to C4. The response contains a
description of the encountered error. The operation is not a success if
GetStatus is |
<soap:Envelope
xmlns:soap="http://www.w3.org/2003/05/soap-envelope"
xmlns:_1="http://org.ecodex.backend/1_1/">
<soap:Header/>
<soap:Body>
<_1:retrieveMessageRequest>
<messageID>$\{ResponseParameters#messageID}</messageID>
</_1:retrieveMessageRequest>
</soap:Body>
</soap:Envelope><soap:Envelope
xmlns:soap="http://www.w3.org/2003/05/soap-envelope">
<soap:Header>
<ns6:Messaging mustUnderstand="false"
xmlns:ns6="http://docs.oasis-open.org/ebxml-msg/ebms/v3.0/ns/core/200704/"
xmlns:ns5="http://org.ecodex.backend/1_1/"
xmlns:xmime="http://www.w3.org/2005/05/xmlmime">
<ns6:UserMessage> mpc=”http://docs.oasis-open.org/ebxml-msg/ebms/v3.0/ns/core/200704/defaultMPC”>
<ns6:MessageInfo>
<ns6:Timestamp>2017-10-02T17:32:14.956+02:00</ns6:Timestamp>
<ns6:MessageId>d05051c6-951c-4f40-90b5-459eca9d8302@domibus.eu</ns6:MessageId>
</ns6:MessageInfo>
<ns6:PartyInfo>
<ns6:From>
<ns6:PartyId
type="urn:oasis:names:tc:ebcore:partyid-type:unregistered">domibus-blue</ns6:PartyId>
<ns6:Role>http://docs.oasis-open.org/ebxml-msg/ebms/v3.0/ns/core/200704/initiator</ns6:Role>
</ns6:From>
<ns6:To>
<ns6:PartyId
type="urn:oasis:names:tc:ebcore:partyid-type:unregistered">domibus-red</ns6:PartyId>
<ns6:Role>http://docs.oasis-open.org/ebxml-msg/ebms/v3.0/ns/core/200704/responder</ns6:Role>
</ns6:To>
</ns6:PartyInfo>
<ns6:CollaborationInfo>
<ns6:Service type="tc1">bdx:noprocess</ns6:Service>
<ns6:Action>TC1Leg1</ns6:Action>
<ns6:ConversationId>52f1c57d-bd35-4ab2-a0a5-da9a15101dba@domibus.eu</ns6:ConversationId>
</ns6:CollaborationInfo>
<ns6:MessageProperties>
<ns6:Property
name="finalRecipient">urn:oasis:names:tc:ebcore:partyid-type:unregistered:C4
</ns6:Property>
<ns6:Property
name="originalSender">urn:oasis:names:tc:ebcore:partyid-type:unregistered:C1</ns6:Property>
</ns6:MessageProperties>
<ns6:PayloadInfo>
<ns6:PartInfo href="cid:message">
<ns6:Schema/>
<ns6:PartProperties>
<ns6:Property name="MimeType">text/xml</ns6:Property>
</ns6:PartProperties>
</ns6:PartInfo>
</ns6:PayloadInfo>
</ns6:UserMessage>
</ns6:Messaging>
</soap:Header>
<soap:Body>
<ns5:retrieveMessageResponse
xmlns:ns6="http://docs.oasis-open.org/ebxml-msg/ebms/v3.0/ns/core/200704/"
xmlns:ns5="http://org.ecodex.backend/1_1/"
xmlns:xmime="http://www.w3.org/2005/05/xmlmime">
<payload payloadId="cid:message">
<value> PD94bWwgdmVyc2lvbj0iMS4wIiBlbmNvZGluZz0iVVRGLTgiPz4KPGhlbGxvPndvcmxkPC9oZWxsbz4=
</value>
</payload>
</ns5:retrieveMessageResponse>
</soap:Body>
</soap:Envelope>- Security
-
In Multitenancy mode, the general property
domibus.auth.unsecureLoginAllowedis ignored and authentication is always required. More about authentication options can be read in the Administration Guide, in the Domibus Authentication.
UC03 - Get the status of the Message
Click to Open
- Brief description
-
Get the status of the Message sent from Backend C1 or received by the Backend C4
Sequence Diagram – GetStatus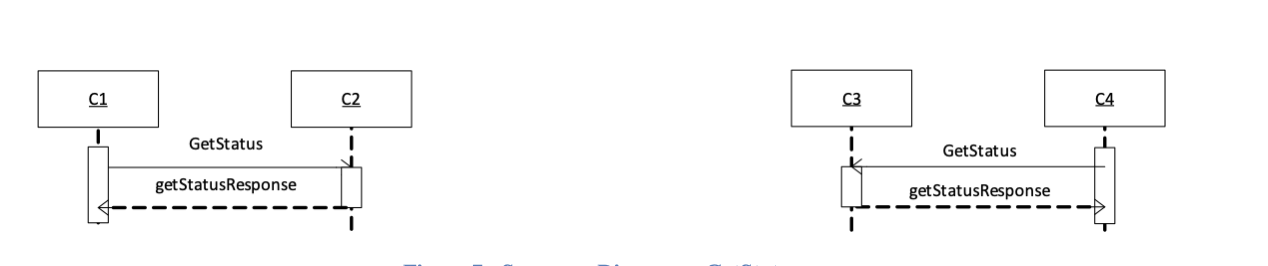
| Actors | |
|---|---|
C1 |
Backend C1 |
C2 |
Access Point C2 |
C3 |
Access Point C3 |
C4 |
Backend C4 |
| Preconditions | |
|---|---|
- |
There is at least one message sent by Backend C1 or to be retrieved by Backend C4. |
- |
The Sending AP C2 and the Receiving AP C3 are up and running and properly configured. |
| Step | Description |
|---|---|
1 |
Backend C1 or the Backend C4 launch a statusRequest using the messageId. |
2 |
The Access Point (Sending AP C2 or Receiving AP C3) retrieve the getStatusResponse. |
3 |
Use case ends. |
| Step | Description |
|---|---|
N/A |
|
Successful Conditions |
The operation is a success if GetStatusResponse retrieves any status of the following:
|
|---|---|
Failure |
The message does not exist. |
-
N/A
- Security
-
In Multitenancy mode, the general property domibus.auth.unsecureLoginAllowed is ignored and authentication is always required. More about authentication options can be read in the Administration Guide, in the Domibus Authentication section.
<soap:Envelope
xmlns:soap="http://www.w3.org/2003/05/soap-envelope"
xmlns:_1="http://org.ecodex.backend/1_1/">
<soap:Header/>
<soap:Body>
<_1:statusRequest>
<messageID>d05051c6-951c-4f40-90b5-459eca9d8302@domibus.eu</messageID>
</_1:statusRequest>
</soap:Body>
</soap:Envelope><soap:Envelope
xmlns:soap="http://www.w3.org/2003/05/soap-envelope">
<soap:Body>
<ns5:getStatusResponse
xmlns:ns6="http://docs.oasis-open.org/ebxml-msg/ebms/v3.0/ns/core/200704/"
xmlns:ns5="http://org.ecodex.backend/1_1/"
xmlns:xmime="http://www.w3.org/2005/05/xmlmime">NOT_FOUND</ns5:getStatusResponse>
</soap:Body>
</soap:Envelope>UC04 – List Pending Messages
Click to Open
- Brief description
-
-
List the status Messages pending to be received by the Backend C4.
Sequence Diagram C4 to C3 – ListPendingMessages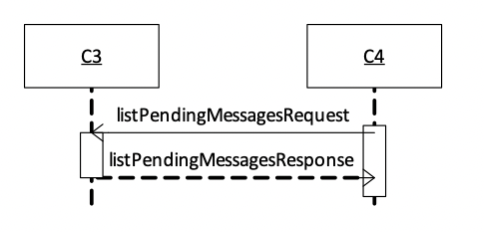
-
| Actors | |
|---|---|
C4 |
Backend C4 |
| Preconditions | |
|---|---|
There is at least one message be downloaded by Backend C4. |
|
The Receiving AP C3 is up and running and properly configured. |
Steps:
-
Backend C4 launches the service listPendingMessages.
-
The Access Point (Receiving AP C3) retrieves the list of messageIds for messages with status RECEIVED.
-
Use case ends.
-
N/A
Successful conditions |
The operation is a success if listPendingMessagesResponse contains all the messageIDs of the pending messages to be retrieved or the list is empty in the case that there are no pending messages. |
|---|---|
Failure Conditions |
N/A |
-
N/A
- Security
-
In Multitenancy mode, the general property
domibus.auth.unsecureLoginAllowedis ignored and authentication is always required. More about authentication options can be read in the Administration Guide, in the Domibus Authentication section.
<soap:Envelope
xmlns:soap="http://www.w3.org/2003/05/soap-envelope"
xmlns:_1="http://org.ecodex.backend/1_1/">
<soap:Header/>
<soap:Body>
<_1:listPendingMessagesRequest></_1:listPendingMessagesRequest>
</soap:Body>
</soap:Envelope><soap:Envelope
xmlns:soap="http://www.w3.org/2003/05/soap-envelope">
<soap:Body>
<ns6:listPendingMessagesResponse
xmlns:S11="http://schemas.xmlsoap.org/soap/envelope/"
xmlns:eb="http://docs.oasis-open.org/ebxml-msg/ebms/v3.0/ns/core/200704/"
xmlns:S12="http://www.w3.org/2003/05/soap-envelope"
xmlns:xmime="http://www.w3.org/2005/05/xmlmime"
xmlns:ns6="http://org.ecodex.backend/1_1/">
<messageID>4078cfea-74e9-4058-9d14-1dceee597abd@domibus.eu</messageID>
</ns6:listPendingMessagesResponse>
</soap:Body>
</soap:Envelope>12.2. Behavioural Specification
12.2.1. WS plugin configuration
The WS plugin configuration is done in the ws-plugin.properties file. Following properties are configurable in this file:
| Property name | Default value | Description |
|---|---|---|
wsplugin.mtom.enabled |
false |
Enable the support for MTOM. |
wsplugin.schema.validation.enabled |
false |
Enable the schema validation. By default, the schema validation has been disabled due to performance reasons. For large files, it is recommended to keep the schema validation as disabled. |
wsplugin.messages.pending.list.max |
500 |
The maximum number of pending messages to be listed from the pending messages table. Setting this property is expected to avoid timeouts due to huge resultsets being served. Setting this property to zero returns all pending messages. |
12.2.2. WSDL model for Domibus 5.x.y
The WSDL schema

The WSDL defines the envelope that consists of one AP Header and one AP Body.
The service sends a message and receives a response. There are five operations:
-
submitMessage
-
getStatus
-
listPendingMessages
-
getMessageErrors It can be used if you get a SEND_FAILURE status as response from the getStatus service in which case this operation can be used to get the details of the encountered errors. There can be multiple errors as each retry might produce one.
-
retrieveMessage
To encapsulate errors, the fault element is specified for only two services (submitMessage and retrieveMessage):
-
<wsdl:fault name="SubmitMessageFault"/>
-
<wsdl:fault name="RetrieveMessageFault"/>
It must be generated and processed according to the [SOAP1.2] specification. In this case SOAP protocol is used and the binding is <soap:binding>. The transport is SOAP messages on top of HTTP protocol:
transport="http://schemas.xmlsoap.org/soap/http"/>
The data model applicable to SubmitMessage from C1 to C2 (domibus-submission.xsd)
In this section the data model is explained.
Messaging/UserMessage mpc attribute:
The Optional attribute occurs once and contains the qualified name of the MPC (Message Partition Chanel). MPCs allow for partitioning the flow of messages from a Sending MSH to a Receiving MSH into several flows that can be controlled separately and consumed differently.
| Description | * Field (xpath)* |
Mandatory | Occurrences | Constraints | Valid example |
|---|---|---|---|---|---|
mpc |
/[local-name()='schema']/[local-name()='complexType' and @name=UserMessage]//*[local-name()='attribute' and @name='mpc']# |
N |
Max 1 |
|
Default value: http://docs.oasis-open.org/ebxml-msg/ebms/v3.0/ns/core/200704/defaultMPC |
In this section, the data model is explained.
Messaging/UserMessage/MessageInfo:
This Optional element occurs once and contains the identifier of the current message, and (may) relate to other messages' identifiers.
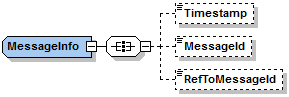
Figure 10 – MessageInfo type
-
Timestamp element has a value representing the date at which the message header was created.
-
MessageId has a value representing – for each message - a globally unique identifier.
-
RefToMessageId contains the MessageId value of an ebMS Message to which this message relates, in a way that conforms to the MEP in use.
| Description | * Field (xpath)* |
Mandatory | Occurrences | Constraints | Valid example |
|---|---|---|---|---|---|
Timestamp |
[local-name()='schema']/[local-name()='complexType' and @name='MessageInfo'] /[local-name()='all']/[local-name()='element' and @name='Timestamp']# |
N |
Max 1 |
|
2016-03-31T09:00:44.418Z |
MessageId |
[local-name()='schema']/[local-name()='complexType' and @name='MessageInfo'] /[local-name()='all']/[local-name()='element' and @name='MessageId']# |
N |
Max 1 |
|
346ea37f-7583-40b0-9ffc-3f4cfa88bf8b@domibus.eu |
RefToMessageId |
/[local-name()='schema']/[local-name()='complexType' and @name='MessageInfo'] /[local-name()='all']/[local-name()='element' and @name='RefToMessageId']# |
N |
Max 1 |
|
346ea37f-7583-40b0-9ffc-3f4cfa88bf8b@domibus.eu |
Messaging/UserMessage/PartyInfo
This REQUIRED element occurs once, and contains data about originating and destination parties. This element has the following children elements:
-
From: This REQUIRED element occurs once, and contains information describing the originating party. It can be either endpoint C1 or endpoint C2.
-
To: This REQUIRED element occurs once, and contains information describing the destination party and it can be either endpoint C3 or endpoint C4.
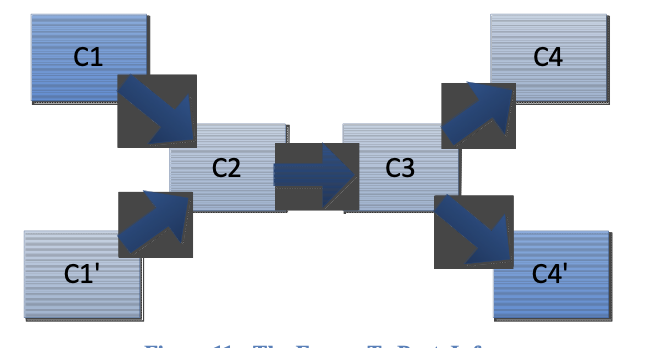
If the From and To are C1, C1' and C4, C4' respectively, the private keys of the certificates of C1 and C1' are stored in C2 and the public keys of the certificates of C4 and C4' are stored in C3. But if the From and To are C2 and C3, the private key of the certificate of C2 is stored in C2 and the public key of C3 is stored in C3.
| From | To | Private key of | Private key stored in | Public key of | Public Key stored in |
|---|---|---|---|---|---|
C1, C1' |
C4, C4' |
C1, C1' |
C2 |
C4,C4' |
C3 |
C2 |
C3 |
C2 |
C2 |
C3 |
C3 |
-
Role: This REQUIRED element identifies the authorized role of the Party sending or receiving the message.
-
Type: This element indicates the domain of names to which the string in the content of the PartyId element belongs.

| Description | * Field (xpath)* |
Mandatory | Occurrences | Constraints | Valid example |
|---|---|---|---|---|---|
From/PartyId |
/[local-name()='schema']/[local-name()='complexType' and @name='From'] /[local-name()='all']/[local-name()='element' and @name='PartyId']# |
Y |
Max 1 |
|
C2 |
From/Role |
/[local-name()='schema']/[local-name()='complexType' and @name='From'] /[local-name()='all']/[local-name()='element' and @name='Role']# |
Y |
Max 1 |
|
http://docs.oasis-open.org/ebxml-msg/ebms/v3.0/ns/core/200704/initiator |
From/PartyType |
/[local-name()='schema']/[local-name()='complexType' and @name='PartyId']//*[local-name()='attribute' and @name='type']# |
N |
Max 1 |
|
urn:oasis:names:tc:ebcore:partyid-type:unregistered |
To/PartyId |
/[local-name()='schema']/[local-name()='complexType' and @name='To'] /[local-name()='all']/[local-name()='element' and @name='PartyId']# |
N |
Max 1 |
|
C3 |
To/Role |
/[local-name()='schema']/[local-name()='complexType' and @name='To'] /[local-name()='all']/[local-name()='element' and @name='Role']# |
N |
Max 1 |
|
http://docs.oasis-open.org/ebxml-msg/ebms/v3.0/ns/core/200704/responder |
To/PartyType |
/[local-name()='schema']/[local-name()='complexType' and @name='PartyId']//*[local-name()='attribute' and @name='type']# |
N |
Max 1 |
|
urn:oasis:names:tc:ebcore:partyid-type:unregistered |
Messaging/UserMessage/CollaborationInfo
This REQUIRED element occurs once, and contains elements that facilitate collaboration between parties.
-
The AgreementRef element is a string that identifies the entity or artifact governing the exchange of messages between the parties.
-
Service SHOULD identify a set of related business transactions or other message exchanges in the context of a business process or use case.
-
Action SHOULD identify the different types of business transactions or other message exchanges in the context of an identified Service.
-
ConversationId element is a string identifying the set of related messages that make up a conversation between Parties. So, as defined in the eDelivery Specifications Library, it provides a more general way to associate a message with an ongoing conversation, without requiring a message to be a response to a single specific previous message, but allowing update messages to existing conversations from both Sender and Receiver of the original message.

| Description | Field (xpath) | Mandatory | Occurrences | Constraints | Valid example |
|---|---|---|---|---|---|
AgreementRef |
/[local-name()='schema']/[local-name()='complexType' and @name='CollaborationInfo'] /[local-name()='all']/[local-name()='element' and @name='AgreementRef']# |
N |
Max 1 |
|
|
agreementRef@type |
/[local-name()='schema']/[local-name()='complexType' and @name='AgreementRef']/[local-name()='simpleContent']/[local-name()='extension']/*[local-name()='attribute' and @name='type']# |
N |
Max 1 |
|
MyServiceTypes |
agreementRef@pmode |
/[local-name()='schema']/[local-name()='complexType' and @name='AgreementRef']/[local-name()='simpleContent']/[local-name()='extension']/*[local-name()='attribute' and @name='type']# |
N |
Max 1 |
|
PurchaseOrderFromACME |
Service |
/[local-name()='schema']/[local-name()='complexType' and @name='CollaborationInfo'] /[local-name()='all']/[local-name()='element' and @name='Service']# |
Y |
Max 1 |
|
SupplierOrderProcessing |
Service@Type |
/[local-name()='schema']/[local-name()='complexType' and @name='Service'] /[local-name()='simpleContent']//[local-name()='extension']/*[local-name()='attribute']# |
N |
|
||
Action |
/[local-name()='schema']/[local-name()='complexType' and @name='CollaborationInfo'] /[local-name()='all']/[local-name()='element' and @name='Action']# |
Y |
Max 1 |
|
NewOrder |
ConversationId |
/[local-name()='schema']/[local-name()='complexType' and @name='CollaborationInfo'] /[local-name()='all']/[local-name()='element' and @name='ConversationId']# |
N |
Max 1 |
|
06689621-428e-48a4-86e6-4a86539363f5 |
MessageProperties
|
Important
|
This element is required in the 4-corner model. |
It occurs at most once, and contains message properties that are implementation specific. As parts of the header such properties allow for more efficient monitoring, correlating, dispatching and validating functions (even if these are out of scope of ebMS specification) which would otherwise require payload access.
These elements hold a set of name-value properties that will hold for instance the identifiers for the 'originalSender' and 'finalRecipient', as in the example below:
<ns:MessageProperties>
<ns:Property
name="originalSender">urn:oasis:names:tc:ebcore:partyid-type:unregistered:C1
</ns:Property>
<ns:Property
name="finalRecipient">urn:oasis:names:tc:ebcore:partyid-type:unregistered:C4
</ns:Property>
</ns:MessageProperties>The property value (e.g. urn:oasis:names:tc:ebcore:partyid-type:unregistered:C1) is limited to
1024 characters length. If this value is overpassed and the schema
validation is enabled, an error message will appear and the message will
not be submitted.
If the schema validation is not enabled and the value overpassed, an EbMS3Exception will be raised by the AP (Domibus) and the message will also not be submitted.
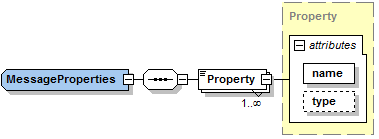
| Description | Field (xpath) | Mandatory | Occurrences | Constraints | Valid Example |
|---|---|---|---|---|---|
Property name |
/[local-name()='schema']/[local-name()='complexType' and @name='Property']//*[local-name()='attribute' and @name='name'] |
Y |
Max 1 |
|
originalSender |
Property type |
/[local-name()='schema']/[local-name()='complexType' and @name='Property']//*[local-name()='attribute' and @name='type']# |
N |
Max 1 |
|
String |
PayloadInfo
This required element identifies payload data associated with the
message. The payload themselves are carried in separate MIME parts,
PartInfo elements reference the corresponding MIME parts by using
the Content-ID value of those parts in their href attribute.
When a message with multiple payloads is submitted, the order of the corresponding PartInfo elements is preserved.
In any exchange involving a message that has a structured document
payload (e.g XML, JSON) and any number of associated payloads, the
structured document must be referenced by the first PartInfo element
and it represents the leading payload part for business processing.
-
href: This attribute has a value that is the Content-ID URI of the payload object referenced. The absence of the attribute href in the element PartInfo indicates that the payload part being referenced is the SOAP Body element itself.
|
Important
|
Payloads are expected to be exchanged in separate MIME parts and not in
the SOAP Body. Due to requirements from different domains, Domibus
allows the sending of one structured payload in the SOAP Body. This
payload is sent along by the Access Point, via the AS4 protocol, in the
SOAP Body as well. This practice is not conformant with the eDelivery AS4
profile and therefore it is discouraged. It is recommended to leave the SOAP Body always empty. |
-
PartProperties: This element contains a list of properties describing the payload. Every Property has a REQUIRED @name attribute. *@name*attribute with valueMimeTypeis REQUIRED to identify the MIME type of the payload before compression was applied.
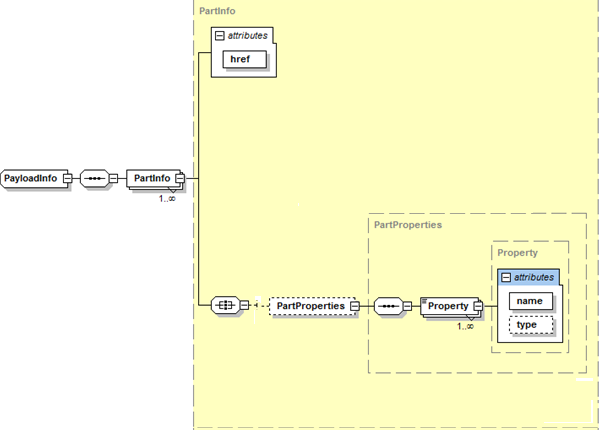
| Description | * Field (xpath)* |
Mandatory | Occurrences | Constraints | Valid example |
|---|---|---|---|---|---|
href |
/[local-name()='schema']/[local-name()='complexType' and @name='PartInfo'] /*[local-name()='attribute' and @name='href'] |
N |
Max 1 |
|
cid:message |
PartProperties/ Property/ MimeType |
/[local-name()='schema']/[local-name()='complexType' and @name='PartProperties'] /[local-name()='sequence']/[local-name()='element' and @name='Property'] |
N |
Max 1 |
|
application/xml |
PartProperties/ Property/ Description |
/[local-name()='schema']/[local-name()='complexType' and @name='PartProperties'] /[local-name()='sequence']/[local-name()='element' and @name='Property'] |
N |
Max 1 |
|
Message Payload |
12.3. Security
12.3.1. Authentication
The Default WS Plugin implements authentication and authorization. By default, the plugins security is disabled and all the methods of the Default WS Plugin can be called with no authentication credentials.
The Defaul WS Plugin supports 3 authentication methods:
-
Basic Authentication
-
X509 Certificates Authentication
-
Blue Coat Authentication
|
Note
|
Blue Coat is the name of the reverse proxy at the Commission. It forwards the request in HTTP with the certificate details inside the request (“Client-Cert” header key). |
Basic authentication is the most common used method used for the Default WS Plugin. An existing user defined in the Plugin User UI page can authenticate with basic authentication and call any operation of the Default WS Plugin. More details on how to create plugin users used for basic authentication can be found in the Domibus Administration Guide, section Plugin Users.
The Default WS Plugin uses a custom interceptor eu.domibus.plugin.webService.impl.CustomAuthenticationInterceptor to intercept the incoming requests and perform authentication. Once the request is intercepted the CustomAuthenticationInterceptor delegates the authentication to the service eu.domibus.ext.services.AuthenticationExtService provided in the Plugin API.
12.3.2. Authorization
The Default WS Plugin uses the authorization mechanism described in the Plugin Cookbook(cf.Error| Reference source not found.), section Plugin Authorization.
There are two default users already inserted in the database (make sure you already ran the migration scripts):
-
admin and user both with 123456 as password.
-
admin has the role ROLE_ADMIN and user has the role ROLE_USER.
Roles:
ROLE_ADMIN has the permission to call:
-
submitMessage with any value for originalSender property
-
retrieveMessage (any message among messages notified to this plugin)
-
listPendingMessages will list all pending messages for this plugin
-
getStatus and getMessageErrors
ROLE_USER has the permission to call:
-
submitMessage with originalSender equal to the originalUser
-
retrieveMessage, only if finalRecipient equals the originalUser
-
listPendingMessages, only messages with finalRecipient equal to the origi-nalUser
-
getStatus and getErrors for its own messages
12.4. Plugin Notifications
Domibus core notifies the WS Plugin on the following events: MESSAGE_RECEIVED, MESSAGE_SEND_FAILURE,MESSAGE_RECEIVED_FAILURE, MESSAGE_SEND_SUCCESS, MESSAGE_STATUS_CHANGE.
The type of events received can be configured using the WS Plugin property wsplugin.messages.notifications. You will find that property in the file ‘ws-plugin.properties’ under \domibus\plugins\ in the Domibus configuration folder. More details can be found in the Plugin Cookbok.
12.5. Multitenancy
The Default WS Plugin can be used when Domibus is configured in Multitenancy mode.
In Multitenancy mode the plugins security is activated by default,
regardless of the value configured in domibus.properties for the
domibus.auth.unsecureLoginAllowed property.
As a result, every request sent to Domibus via the Default WS Plugin needs to be authenticated and it will affect only the domain associated to the authenticated user. More information about the Default WS Plugin authentication can be found in section 4.1 Authentication.
More details on how to create plugin users used for basic authentication can be found in the Domibus Administration Guide, section Plugin Users.
12.6. Annexes
12.6.1. Interface Message standards
AS4 does not define a maximum message size, though implementations will have practical limits based on available memory, disk or database storage etc.
Errors codes table
EBMS error codes contained in the backenxd.wsdl:
Example:
<eb:Error origin="ebMS" category="Unpackaging"
shortDescription="InvalidHeader"
errorCode="EBMS:0009" severity="fatal">
<eb:Description xml:lang="en"> … </eb:Description>
</eb:Error>| Error Code | Short Description | Recommended Severity | Category Value | Description or Semantics |
|---|---|---|---|---|
EBMS_0001 |
ValueNotRecognized |
failure |
Content |
Although the message document is well formed and schema valid, some element/attribute contains a value that could not be recognized and therefore could not be used by the MSH. |
EBMS_0002 |
FeatureNotSupported |
warning |
Content |
Although the message document is well formed and schema valid, some element/attribute value cannot be processed as expected because the related feature is not supported by the MSH. |
EBMS_0003 |
ValueInconsistent |
failure |
Content |
Although the message document is well formed and schema valid, some element/attribute value is inconsistent either with the content of other element/attribute, or with the processing mode of the MSH, or with the normative requirements of the ebMS specification. |
EBMS_0004 |
Other |
failure |
Content |
|
EBMS_0005 |
ConnectionFailure |
failure |
Communication |
The MSH is experiencing temporary or permanent failure in trying to open a transport connection with a remote MSH. |
EBMS_0006 |
EmptyMessagePartitionChannel |
warning |
Communication |
There is no message available for pulling from this MPC at this moment. |
EBMS_0007 |
MimeInconsistency |
failure |
Unpackaging |
The use of MIME is not consistent with the required usage in this specification. |
EBMS_0008 |
FeatureNotSupported |
failure |
Unpackaging |
Although the message document is well formed and schema valid, the presence or absence of some element/ attribute is not consistent with the capability of the MSH, with respect to supported features. |
EBMS_0009 |
InvalidHeader |
failure |
Unpackaging |
The ebMS header is either not well formed as an XML document, or does not conform to the ebMS packaging rules. |
EBMS_0010 |
ProcessingModeMismatch |
failure |
Processing |
The ebMS header or another header (e.g. reliability, security) expected by the MSH is not compatible with the expected content, based on the associated P-Mode. |
EBMS_0011 |
ExternalPayloadError |
failure |
Content |
The MSH is unable to resolve an external payload reference (i.e. a Part that is not contained within the ebMS Message, as identified by a PartInfo/href URI). |
EBMS_0101 |
FailedAuthentication |
failure |
Processing |
The signature in the Security header intended for the "ebms" SOAP actor, could not be validated by the Security module. |
EBMS_0102 |
FailedDecryption |
failure |
Processing |
The encrypted data reference the Security header intended for the "ebms" SOAP actor could not be decrypted by the Security Module. |
EBMS_0103 |
PolicyNoncompliance |
failure |
Processing |
The processor determined that the message’s security methods, parameters, scope or other security policy-level requirements or agreements were not satisfied. |
EBMS_0201 |
DysfunctionalReliability |
failure |
Processing |
Some reliability function as implemented by the Reliability module, is not operational, or the reliability state associated with this message sequence is not valid. |
EBMS_0202 |
DeliveryFailure |
failure |
Communication |
Although the message was sent under Guaranteed delivery requirement, the Reliability module could not get assurance that the message was properly delivered, in spite of resending efforts. |
EBMS_0301 |
MissingReceipt |
failure |
Communication |
A Receipt has not been received for a message that was previously sent by the MSH generating this error |
EBMS_0302 |
InvalidReceipt |
failure |
Communication |
A Receipt has been received for a message that was previously sent by the MSH generating this error, but the content does not match the message content (e.g. some part has not been acknowledged, or the digest associated does not match the signature digest, for NRR). |
EBMS_0303 |
DecompressionFailure |
failure |
Communication |
An error occurred during the decompression |
EBMS_0020 |
RoutingFailure |
failure |
Processing |
An Intermediary MSH was unable to route an ebMS message and stopped processing the message. |
EBMS_0021 |
MPCCapacityExceeded |
failure |
Processing |
An entry in the routing function is matched that assigns the message to an MPC for pulling, but the intermediary MSH is unable to store the message with this MPC |
EBMS_0022 |
MessagePersistenceTimeout |
failure |
Processing |
An intermediary MSH has assigned the message to an MPC for pulling and has successfully stored it. However, the intermediary set a limit on the time it was prepared to wait for the message to be pulled, and that limit has been reached. |
EBMS_0023 |
MessageExpired |
warning |
Processing |
An MSH has determined that the message is expired and will not attempt to forward or deliver it. |
EBMS_0030 |
BundlingError |
failure |
Content |
The structure of a received bundle is not in accordance with the bundling rules. |
EBMS_0031 |
RelatedMessageFailed |
failure |
Processing |
A message unit in a bundle was not processed because a related message unit in the bundle caused an error. |
EBMS_0040 |
BadFragmentGroup |
failure |
Content |
A fragment is received that relates to a group that was previously rejected. |
EBMS_0041 |
DuplicateMessageSize |
failure |
Content |
A fragment is received but more than one fragment message in a group of fragments specifies a value for this element. |
EBMS_0042 |
DuplicateFragmentCount |
failure |
Content |
A fragment is received but more than one fragment message in a group of fragments specifies a value for this element. |
EBMS_0043 |
DuplicateMessageHeader |
failure |
Content |
A fragment is received but more than one fragment message in a group of fragments specifies a value for this element. |
EBMS_0044 |
DuplicateAction |
failure |
Content |
A fragment is received but more than one fragment message in a group of fragments specifies a value for this element. |
EBMS_0045 |
DuplicateCompressionInfo |
failure |
Content |
A fragment is received but more than one fragment message in a group of fragments specifies a value for a compression element. |
EBMS_0046 |
DuplicateFragment |
failure |
Content |
A fragment is received but a previously received fragment message had the same values for GroupId and FragmentNum |
EBMS_0047 |
BadFragmentStructure |
failure |
Unpackaging |
The href attribute does not reference a valid MIME data part, MIME parts other than the fragment header and a data part are in the message, or the SOAP Body is not empty. |
EBMS_0048 |
BadFragmentNum |
failure |
Content |
An incoming message fragment has a a value greater than the known FragmentCount. |
EBMS_0049 |
BadFragmentCount |
failure |
Content |
A value is set for FragmentCount, but a previously received fragment had a greature value. |
EBMS_0050 |
FragmentSizeExceeded |
warning |
Unpackaging |
The size of the data part in a fragment message is greater than Pmode[].Splitting.FragmentSize |
EBMS_0051 |
ReceiveIntervalExceeded |
failure |
Unpackaging |
More time than Pmode[].Splitting.JoinInterval has passed since the first fragment was received but not all other fragments are received. |
EBMS_0052 |
BadProperties |
warning |
Unpackaging |
Message properties were present in the fragment SOAP header that were not specified in Pmode[].Splitting.RoutingProperties |
EBMS_0053 |
HeaderMismatch |
failure |
Unpackaging |
The eb3:Message header copied to the fragment header does not match the eb3:Message header in the reassembled source message. |
EBMS_0054 |
OutOfStorageSpace |
failure |
Unpackaging |
Not enough disk space available to store all (expected) fragments of the group. |
EBMS_0055 |
DecompressionError |
failure |
Processing |
An error occurred while decompressing the reassembled message. |
EBMS_0060 |
ResponseUsingAlternateMEP |
Warning |
Processing |
A responding MSH indicates that it applies the alternate MEP binding to the response message. |
EBMS_0065 |
InvalidXML |
failure |
Content |
The XML could not be validated agains the corresponding xsd. |
Web service WSDL
Details
<?xml version="1.0" encoding="UTF-8"?>
<wsdl:definitions
xmlns:wsdl="http://schemas.xmlsoap.org/wsdl/"
xmlns:soap12="http://schemas.xmlsoap.org/wsdl/soap12/"
xmlns:tns="http://org.ecodex.backend/1_1/"
xmlns:ns1="http://docs.oasis-open.org/ebxml-msg/ebms/v3.0/ns/core/200704/"
name="BackendService_1_1"
targetNamespace="http://org.ecodex.backend/1_1/">
<wsdl:types>
<schema
xmlns="http://www.w3.org/2001/XMLSchema">
<import namespace="http://www.w3.org/XML/1998/namespace"
schemaLocation="xml.xsd"/>
</schema>
<schema
xmlns="http://www.w3.org/2001/XMLSchema">
<import namespace="http://www.w3.org/2005/05/xmlmime"
schemaLocation="xmlmime.xsd"/>
</schema>
<schema
xmlns="http://www.w3.org/2001/XMLSchema">
<import namespace="http://www.w3.org/2003/05/soap-envelope"
schemaLocation="envelope.xsd"/>
</schema>
<schema
xmlns="http://www.w3.org/2001/XMLSchema">
<import namespace="http://org.ecodex.backend/1_1/"
schemaLocation="domibus-backend.xsd"/>
</schema>
<schema
xmlns="http://www.w3.org/2001/XMLSchema">
<import
namespace="http://docs.oasis-open.org/ebxml-msg/ebms/v3.0/ns/core/200704/"
schemaLocation="domibus-header.xsd"/>
</schema>
</wsdl:types>
<wsdl:message name="getMessageErrors">
<wsdl:part name="getErrorsRequest"
element="tns:getErrorsRequest"></wsdl:part>
</wsdl:message>
<wsdl:message name="retrieveMessage">
<wsdl:part name="retrieveMessageRequest"
element="tns:retrieveMessageRequest"></wsdl:part>
</wsdl:message>
<wsdl:message name="RetrieveMessageFault">
<wsdl:part name="RetrieveMessageFault"
element="tns:FaultDetail"></wsdl:part>
</wsdl:message>
<wsdl:message name="retrieveMessageResponse">
<wsdl:part name="retrieveMessageResponse"
element="tns:retrieveMessageResponse"></wsdl:part>
<wsdl:part name="ebMSHeaderInfo" element="ns1:Messaging"></wsdl:part>
</wsdl:message>
<wsdl:message name="listPendingMessagesResponse">
<wsdl:part name="listPendingMessagesResponse"
element="tns:listPendingMessagesResponse"></wsdl:part>
</wsdl:message>
<wsdl:message name="getStatusResponse">
<wsdl:part name="getStatusResponse"
element="tns:getStatusResponse"></wsdl:part>
</wsdl:message>
<wsdl:message name="listPendingMessages">
<wsdl:part name="listPendingMessagesRequest"
element="tns:listPendingMessagesRequest"></wsdl:part>
</wsdl:message>
<wsdl:message name="getStatus">
<wsdl:part name="statusRequest" element="tns:statusRequest"></wsdl:part>
</wsdl:message>
<wsdl:message name="StatusFault">
<wsdl:part name="StatusFault" element="tns:FaultDetail"></wsdl:part>
</wsdl:message>
<wsdl:message name="submitMessage">
<wsdl:part name="submitRequest" element="tns:submitRequest"></wsdl:part>
<wsdl:part name="ebMSHeaderInfo" element="ns1:Messaging"></wsdl:part>
</wsdl:message>
<wsdl:message name="submitMessageResponse">
<wsdl:part name="submitResponse" element="tns:submitResponse"></wsdl:part>
</wsdl:message>
<wsdl:message name="SubmitMessageFault">
<wsdl:part name="SubmitMessageFault"
element="tns:FaultDetail"></wsdl:part>
</wsdl:message>
<wsdl:message name="getMessageErrorsResponse">
<wsdl:part name="getMessageErrorsResponse"
element="tns:getMessageErrorsResponse"></wsdl:part>
</wsdl:message>
<wsdl:portType name="BackendInterface">
<wsdl:operation name="submitMessage">
<wsdl:input name="submitMessage" message="tns:submitMessage"></wsdl:input>
<wsdl:output name="submitMessageResponse"
message="tns:submitMessageResponse"></wsdl:output>
<wsdl:fault name="SubmitMessageFault"
message="tns:SubmitMessageFault"></wsdl:fault>
</wsdl:operation>
<wsdl:operation name="getStatus">
<wsdl:input name="getStatus" message="tns:getStatus"></wsdl:input>
<wsdl:output name="getStatusResponse"
message="tns:getStatusResponse"></wsdl:output>
<wsdl:fault name="StatusFault" message="tns:StatusFault"></wsdl:fault>
</wsdl:operation>
<wsdl:operation name="listPendingMessages">
<wsdl:input name="listPendingMessages"
message="tns:listPendingMessages"></wsdl:input>
<wsdl:output name="listPendingMessagesResponse"
message="tns:listPendingMessagesResponse"></wsdl:output>
</wsdl:operation>
<wsdl:operation name="getMessageErrors">
<wsdl:input name="getMessageErrors"
message="tns:getMessageErrors"></wsdl:input>
<wsdl:output name="getMessageErrorsResponse"
message="tns:getMessageErrorsResponse"></wsdl:output>
</wsdl:operation>
<wsdl:operation name="retrieveMessage">
<wsdl:input name="retrieveMessage"
message="tns:retrieveMessage"></wsdl:input>
<wsdl:output name="retrieveMessageResponse"
message="tns:retrieveMessageResponse"></wsdl:output>
<wsdl:fault name="RetrieveMessageFault"
message="tns:RetrieveMessageFault"></wsdl:fault>
</wsdl:operation>
</wsdl:portType>
<wsdl:binding name="BackendService_1_1SoapBinding"
type="tns:BackendInterface">
<soap12:binding style="document"
transport="http://schemas.xmlsoap.org/soap/http"/>
<wsdl:operation name="submitMessage">
<soap12:operation soapAction="" style="document"/>
<wsdl:input name="submitMessage">
<soap12:header message="tns:submitMessage"
part="ebMSHeaderInfo" use="literal"/>
<soap12:body parts="submitRequest" use="literal"/>
</wsdl:input>
<wsdl:output name="submitMessageResponse">
<soap12:body use="literal"/>
</wsdl:output>
<wsdl:fault name="SubmitMessageFault">
<soap12:fault name="SubmitMessageFault" use="literal"/>
</wsdl:fault>
</wsdl:operation>
<wsdl:operation name="getStatus">
<soap12:operation soapAction="" style="document"/>
<wsdl:input name="getStatus">
<soap12:body use="literal"/>
</wsdl:input>
<wsdl:output name="getStatusResponse">
<soap12:body use="literal"/>
</wsdl:output>
<wsdl:fault name="StatusFault">
<soap12:fault name="StatusFault" use="literal"/>
</wsdl:fault>
</wsdl:operation>
<wsdl:operation name="getMessageErrors">
<soap12:operation soapAction="" style="document"/>
<wsdl:input name="getMessageErrors">
<soap12:body use="literal"/>
</wsdl:input>
<wsdl:output name="getMessageErrorsResponse">
<soap12:body use="literal"/>
</wsdl:output>
</wsdl:operation>
<wsdl:operation name="listPendingMessages">
<soap12:operation soapAction="" style="document"/>
<wsdl:input name="listPendingMessages">
<soap12:body use="literal"/>
</wsdl:input>
<wsdl:output name="listPendingMessagesResponse">
<soap12:body use="literal"/>
</wsdl:output>
</wsdl:operation>
<wsdl:operation name="retrieveMessage">
<soap12:operation soapAction="" style="document"/>
<wsdl:input name="retrieveMessage">
<soap12:body use="literal"/>
</wsdl:input>
<wsdl:output name="retrieveMessageResponse">
<soap12:header message="tns:retrieveMessageResponse"
part="ebMSHeaderInfo" use="literal"/>
<soap12:body parts="retrieveMessageResponse" use="literal"/>
</wsdl:output>
<wsdl:fault name="RetrieveMessageFault">
<soap12:fault name="RetrieveMessageFault" use="literal"/>
</wsdl:fault>
</wsdl:operation>
</wsdl:binding>
<wsdl:service name="BackendService_1_1">
<wsdl:port name="BACKEND_PORT"
binding="tns:BackendService_1_1SoapBinding">
<soap12:address
location="http://localhost:8080/domibus/services/backend"/>
</wsdl:port>
</wsdl:service>
</wsdl:definitions>Web service Schema’s
xmlmime.xsd
<?xml version="1.0"?>
<!--
W3C XML Schema defined in the Describing Media Content of Binary
Data in XML specification
http://www.w3.org/TR/xml-media-types
Copyright © 2005 World Wide Web Consortium,
(Massachusetts Institute of Technology, European Research
Consortium for#
Informatics and Mathematics, Keio University). All Rights
Reserved. This#
work is distributed under the W3C® Software License [1] in the
hope that it will be useful, but WITHOUT ANY WARRANTY;
without even the implied warranty of MERCHANTABILITY or
FITNESS FOR A PARTICULAR PURPOSE.
[1]
http://www.w3.org/Consortium/Legal/2002/copyright-software-20021231
$Id: xmlmime.xsd,v 1.1 2005/04/25 17:08:35 hugo Exp $
-->
<xs:schema
xmlns:xs="http://www.w3.org/2001/XMLSchema"
xmlns:xmime="http://www.w3.org/2005/05/xmlmime"
targetNamespace="http://www.w3.org/2005/05/xmlmime">
<xs:attribute name="contentType">
<xs:simpleType>
<xs:restriction base="xs:string">
<xs:minLength value="3"/>
</xs:restriction>
</xs:simpleType>
</xs:attribute>
<xs:attribute name="expectedContentTypes" type="xs:string"/>
<xs:complexType name="base64Binary">
<xs:simpleContent>
<xs:extension base="xs:base64Binary">
<xs:attribute ref="xmime:contentType"/>
</xs:extension>
</xs:simpleContent>
</xs:complexType>
<xs:complexType name="hexBinary">
<xs:simpleContent>
<xs:extension base="xs:hexBinary">
<xs:attribute ref="xmime:contentType"/>
</xs:extension>
</xs:simpleContent>
</xs:complexType>
</xs:schema>envelope.xsd
<?xml version="1.0" encoding="UTF-8"?>
<xs:schema
xmlns:xs="http://www.w3.org/2001/XMLSchema"
xmlns:env="http://www.w3.org/2003/05/soap-envelope"
targetNamespace="http://www.w3.org/2003/05/soap-envelope"
elementFormDefault="qualified" version="1.0">
<xs:import namespace="http://www.w3.org/XML/1998/namespace"/>
<xs:element name="Body" type="env:Body"/>
<xs:element name="Envelope" type="env:Envelope"/>
<xs:element name="Fault" type="env:Fault"/>
<xs:element name="Header" type="env:Header"/>
<xs:element name="NotUnderstood" type="env:NotUnderstoodType"/>
<xs:element name="Upgrade" type="env:UpgradeType"/>
<xs:complexType name="Fault">
<xs:sequence>
<xs:element name="Code" type="env:faultcode"/>
<xs:element name="Reason" type="env:faultreason"/>
<xs:element name="Node" type="xs:anyURI" minOccurs="0"/>
<xs:element name="Role" type="xs:anyURI" minOccurs="0"/>
<xs:element name="Detail" type="env:detail" minOccurs="0"/>
</xs:sequence>
</xs:complexType>
<xs:complexType name="faultcode">
<xs:sequence>
<xs:element name="Value" type="xs:QName"/>
<xs:element name="Subcode" type="env:subcode" minOccurs="0"/>
</xs:sequence>
</xs:complexType>
<xs:complexType name="subcode">
<xs:sequence>
<xs:element name="Value" type="xs:QName"/>
<xs:element name="Subcode" type="env:subcode" minOccurs="0"/>
</xs:sequence>
</xs:complexType>
<xs:complexType name="faultreason">
<xs:sequence>
<xs:element name="Text" type="env:reasontext"
maxOccurs="unbounded"/>
</xs:sequence>
</xs:complexType>
<xs:complexType name="reasontext">
<xs:simpleContent>
<xs:extension base="xs:string">
<xs:attribute ref="xml:lang" use="required"/>
</xs:extension>
</xs:simpleContent>
</xs:complexType>
<xs:complexType name="detail">
<xs:sequence>
<xs:any namespace="##other" processContents="lax" minOccurs="0"
maxOccurs="unbounded"/>
</xs:sequence>
<xs:anyAttribute namespace="##other" processContents="skip"/>
</xs:complexType>
<xs:complexType name="Envelope">
<xs:sequence>
<xs:element name="Header" type="env:Header" minOccurs="0"/>
<xs:element name="Body" type="env:Body"/>
</xs:sequence>
<xs:anyAttribute namespace="##other" processContents="skip"/>
</xs:complexType>
<xs:complexType name="Header">
<xs:sequence>
<xs:any namespace="##other" processContents="lax" minOccurs="0"
maxOccurs="unbounded"/>
</xs:sequence>
<xs:anyAttribute namespace="##other" processContents="skip"/>
</xs:complexType>
<xs:complexType name="Body">
<xs:sequence>
<xs:any namespace="##other" processContents="lax" minOccurs="0"
maxOccurs="unbounded"/>
</xs:sequence>
<xs:anyAttribute namespace="##other" processContents="skip"/>
</xs:complexType>
<xs:complexType name="NotUnderstoodType">
<xs:sequence/>
<xs:attribute name="qname" type="xs:QName" use="required"/>
</xs:complexType>
<xs:complexType name="UpgradeType">
<xs:sequence>
<xs:element name="SupportedEnvelope"
type="env:SupportedEnvType" maxOccurs="unbounded"/>
</xs:sequence>
</xs:complexType>
<xs:complexType name="SupportedEnvType">
<xs:sequence/>
<xs:attribute name="qname" type="xs:QName" use="required"/>
</xs:complexType>
<xs:attribute name="mustUnderstand" type="xs:boolean"/>
</xs:schema>domibus-backend.xsd
<?xml version="1.0" encoding="UTF-8"?>
<xsd:schema
xmlns:xsd="http://www.w3.org/2001/XMLSchema"
xmlns:tns="http://org.ecodex.backend/1_1/"
xmlns:ns1="http://www.w3.org/2005/05/xmlmime"
attributeFormDefault="unqualified"
elementFormDefault="unqualified"
targetNamespace="http://org.ecodex.backend/1_1/">
<xsd:import namespace="http://www.w3.org/2005/05/xmlmime"/>
<xsd:simpleType name="max255-non-empty-string">
<xsd:restriction base="xsd:string">
<xsd:minLength value="1"/>
<xsd:maxLength value="255"/>
</xsd:restriction>
</xsd:simpleType>
<xsd:element name="FaultDetail">
<xsd:complexType>
<xsd:sequence>
<xsd:element name="code" type="xsd:string"/>
<xsd:element name="message" nillable="true" type="xsd:string"/>
</xsd:sequence>
</xsd:complexType>
</xsd:element>
<xsd:element name="retrieveMessageRequest">
<xsd:complexType>
<xsd:sequence>
<xsd:element name="messageID" type="tns:max255-non-empty-string"
nillable="true"/>
</xsd:sequence>
</xsd:complexType>
</xsd:element>
<xsd:element name="retrieveMessageResponse">
<xsd:complexType>
<xsd:sequence>
<xsd:element minOccurs="0" name="bodyload"
type="tns:LargePayloadType"/>
<xsd:element maxOccurs="unbounded" minOccurs="0" name="payload"
type="tns:LargePayloadType"/>
</xsd:sequence>
</xsd:complexType>
</xsd:element>
<xsd:element name="listPendingMessagesRequest"
type="xsd:anyType" nillable="false"/>
<xsd:element name="listPendingMessagesResponse">
<xsd:complexType>
<xsd:sequence>
<xsd:element maxOccurs="unbounded" minOccurs="0"
name="messageID" nillable="true" type="xsd:string"/>
</xsd:sequence>
</xsd:complexType>
</xsd:element>
<xsd:element name="messageErrorsRequest">
<xsd:complexType>
<xsd:sequence>
<xsd:element name="messageID"
type="tns:max255-non-empty-string"/>
</xsd:sequence>
</xsd:complexType>
</xsd:element>
<xsd:element name="messageStatusRequest">
<xsd:complexType>
<xsd:sequence>
<xsd:element name="messageID"
type="tns:max255-non-empty-string"/>
</xsd:sequence>
</xsd:complexType>
</xsd:element>
<xsd:element name="submitRequest">
<xsd:complexType>
<xsd:sequence>
<xsd:element minOccurs="0" name="bodyload"
type="tns:LargePayloadType"/>
<xsd:element maxOccurs="unbounded" minOccurs="0" name="payload"
nillable="true" type="tns:LargePayloadType"/>
</xsd:sequence>
</xsd:complexType>
</xsd:element>
<xsd:element name="submitResponse">
<xsd:complexType>
<xsd:sequence>
<xsd:element maxOccurs="unbounded" minOccurs="0"
name="messageID" nillable="true" type="xsd:string"/>
</xsd:sequence>
</xsd:complexType>
</xsd:element>
<xsd:complexType name="PayloadType">
<xsd:simpleContent>
<xsd:extension base="ns1:base64Binary">
<xsd:attribute name="payloadId" type="xsd:token"
use="required"/>
</xsd:extension>
</xsd:simpleContent>
</xsd:complexType>
<xsd:complexType name="LargePayloadType">
<xsd:sequence>
<xsd:element name="value" type="xsd:base64Binary"
ns1:expectedContentTypes="application/octet-stream"></xsd:element>
</xsd:sequence>
<xsd:attribute name="payloadId" type="xsd:token"
use="required"/>
<xsd:attribute name="contentType" type="xsd:string"/>
</xsd:complexType>
<xsd:complexType name="errorResultImpl">
<xsd:sequence>
<xsd:element minOccurs="0" name="errorCode"
type="tns:errorCode"/>
<xsd:element minOccurs="0" name="errorDetail"
type="xsd:string"/>
<xsd:element minOccurs="0" name="messageInErrorId"
type="xsd:string"/>
<xsd:element minOccurs="0" name="mshRole" type="tns:mshRole"/>
<xsd:element minOccurs="0" name="notified"
type="xsd:dateTime"/>
<xsd:element minOccurs="0" name="timestamp"
type="xsd:dateTime"/>
</xsd:sequence>
</xsd:complexType>
<xsd:complexType name="PayloadURLType">
<xsd:simpleContent>
<xsd:extension base="xsd:string">
<xsd:attribute name="payloadId" type="xsd:token"
use="required"/>
</xsd:extension>
</xsd:simpleContent>
</xsd:complexType>
<xsd:simpleType name="messageStatus">
<xsd:restriction base="xsd:string">
<xsd:enumeration value="READY_TO_PULL"/>
<xsd:enumeration value="SEND_ENQUEUED"/>
<xsd:enumeration value="WAITING_FOR_RECEIPT"/>
<xsd:enumeration value="ACKNOWLEDGED"/>
<xsd:enumeration value="SEND_FAILURE"/>
<xsd:enumeration value="NOT_FOUND"/>
<xsd:enumeration value="WAITING_FOR_RETRY"/>
<xsd:enumeration value="RECEIVED"/>
<xsd:enumeration value="DELETED"/>
<xsd:enumeration value="DOWNLOADED"/>
</xsd:restriction>
</xsd:simpleType>
<xsd:simpleType name="errorCode">
<xsd:restriction base="xsd:string">
<xsd:enumeration value="EBMS_0001"/>
<xsd:enumeration value="EBMS_0002"/>
<xsd:enumeration value="EBMS_0003"/>
<xsd:enumeration value="EBMS_0004"/>
<xsd:enumeration value="EBMS_0005"/>
<xsd:enumeration value="EBMS_0006"/>
<xsd:enumeration value="EBMS_0007"/>
<xsd:enumeration value="EBMS_0008"/>
<xsd:enumeration value="EBMS_0009"/>
<xsd:enumeration value="EBMS_0010"/>
<xsd:enumeration value="EBMS_0011"/>
<xsd:enumeration value="EBMS_0101"/>
<xsd:enumeration value="EBMS_0102"/>
<xsd:enumeration value="EBMS_0103"/>
<xsd:enumeration value="EBMS_0201"/>
<xsd:enumeration value="EBMS_0202"/>
<xsd:enumeration value="EBMS_0301"/>
<xsd:enumeration value="EBMS_0302"/>
<xsd:enumeration value="EBMS_0303"/>
<xsd:enumeration value="EBMS_0020"/>
<xsd:enumeration value="EBMS_0021"/>
<xsd:enumeration value="EBMS_0022"/>
<xsd:enumeration value="EBMS_0023"/>
<xsd:enumeration value="EBMS_0030"/>
<xsd:enumeration value="EBMS_0031"/>
<xsd:enumeration value="EBMS_0040"/>
<xsd:enumeration value="EBMS_0041"/>
<xsd:enumeration value="EBMS_0042"/>
<xsd:enumeration value="EBMS_0043"/>
<xsd:enumeration value="EBMS_0044"/>
<xsd:enumeration value="EBMS_0045"/>
<xsd:enumeration value="EBMS_0046"/>
<xsd:enumeration value="EBMS_0047"/>
<xsd:enumeration value="EBMS_0048"/>
<xsd:enumeration value="EBMS_0049"/>
<xsd:enumeration value="EBMS_0050"/>
<xsd:enumeration value="EBMS_0051"/>
<xsd:enumeration value="EBMS_0052"/>
<xsd:enumeration value="EBMS_0053"/>
<xsd:enumeration value="EBMS_0054"/>
<xsd:enumeration value="EBMS_0055"/>
<xsd:enumeration value="EBMS_0060"/>
<xsd:enumeration value="EBMS_0065"/>
</xsd:restriction>
</xsd:simpleType>
<xsd:simpleType name="mshRole">
<xsd:restriction base="xsd:string">
<xsd:enumeration value="SENDING"/>
<xsd:enumeration value="RECEIVING"/>
</xsd:restriction>
</xsd:simpleType>
<xsd:complexType final="#all" name="errorResultImplArray">
<xsd:sequence>
<xsd:element maxOccurs="unbounded" minOccurs="0" name="item"
nillable="true" type="tns:errorResultImpl"/>
</xsd:sequence>
</xsd:complexType>
<xsd:element name="getStatusRequest" nillable="true">
<xsd:complexType>
<xsd:sequence>
<xsd:element name="messageID"
type="tns:max255-non-empty-string"/>
</xsd:sequence>
</xsd:complexType>
</xsd:element>
<xsd:element name="statusRequest" nillable="true">
<xsd:complexType>
<xsd:sequence>
<xsd:element name="messageID"
type="tns:max255-non-empty-string"/>
</xsd:sequence>
</xsd:complexType>
</xsd:element>
<xsd:element name="getStatusResponse" nillable="true"
type="tns:messageStatus"/>
<xsd:element name="getErrorsRequest" nillable="true">
<xsd:complexType>
<xsd:sequence>
<xsd:element name="messageID"
type="tns:max255-non-empty-string"/>
</xsd:sequence>
</xsd:complexType>
</xsd:element>
<xsd:element name="getMessageErrorsResponse" nillable="true"
type="tns:errorResultImplArray"/>
</xsd:schema>domibus-header.xsd
<?xml version="1.0" encoding="UTF-8"?>
<xsd:schema
xmlns="http://docs.oasis-open.org/ebxml-msg/ebms/v3.0/ns/core/200704/"
xmlns:xsd="http://www.w3.org/2001/XMLSchema"
xmlns:tns="http://docs.oasis-open.org/ebxml-msg/ebms/v3.0/ns/core/200704/"
targetNamespace="http://docs.oasis-open.org/ebxml-msg/ebms/v3.0/ns/core/200704/"
elementFormDefault="qualified" attributeFormDefault="unqualified">
<xsd:import namespace="http://www.w3.org/XML/1998/namespace"/>
<xsd:annotation>
<xsd:appinfo>Schema for Domibus messages' headers
submission</xsd:appinfo>
<xsd:documentation xml:lang="en">
This schema defines an XML subset of ebMS-3 headers which is
used to validate messages submitted to Domibus#
through WS plugin.#
</xsd:documentation>
</xsd:annotation>
<xsd:element name="Messaging" type="Messaging"/>
<xsd:complexType name="Messaging">
<xsd:sequence>
<xsd:element name="UserMessage" type="UserMessage"
minOccurs="0"/>
</xsd:sequence>
<xsd:attribute name="mustUnderstand" type="xsd:boolean"
use="optional"/>
</xsd:complexType>
<xsd:complexType name="UserMessage">
<xsd:all>
<xsd:element name="MessageInfo" type="MessageInfo"
minOccurs="0"/>
<xsd:element name="PartyInfo" type="PartyInfo"/>
<xsd:element name="CollaborationInfo"
type="CollaborationInfo"/>
<xsd:element name="MessageProperties"
type="tns:MessageProperties"/>
<xsd:element name="PayloadInfo" type="tns:PayloadInfo"/>
</xsd:all>
<xsd:attribute name="mpc" type="xsd:anyURI" use="optional"/>
</xsd:complexType>
<xsd:complexType name="MessageInfo">
<xsd:all>
<xsd:element name="Timestamp" type="xsd:dateTime"
minOccurs="0"/>
<xsd:element name="MessageId"
type="tns:max255-non-empty-string" minOccurs="0"/>
<xsd:element name="RefToMessageId"
type="tns:max255-non-empty-string" minOccurs="0"/>
</xsd:all>
</xsd:complexType>
<xsd:complexType name="PartyInfo">
<xsd:all>
<xsd:element name="From" type="tns:From"/>
<xsd:element name="To" type="tns:To" minOccurs="0"/>
</xsd:all>
</xsd:complexType>
<xsd:complexType name="PartyId">
<xsd:simpleContent>
<xsd:extension base="tns:max255-non-empty-string">
<xsd:attribute name="type" type="tns:max255-non-empty-string"
/>
</xsd:extension>
</xsd:simpleContent>
</xsd:complexType>
<xsd:complexType name="From">
<xsd:all>
<xsd:element name="PartyId" type="tns:PartyId"/>
<xsd:element name="Role" type="tns:max255-non-empty-string"/>
</xsd:all>
</xsd:complexType>
<xsd:complexType name="To">
<xsd:all>
<xsd:element name="PartyId" type="tns:PartyId"/>
<xsd:element name="Role" type="tns:max255-non-empty-string"/>
</xsd:all>
</xsd:complexType>
<xsd:complexType name="CollaborationInfo">
<xsd:all>
<xsd:element name="AgreementRef" type="tns:AgreementRef"
minOccurs="0"/>
<xsd:element name="Service" type="tns:Service"/>
<xsd:element name="Action" type="xsd:token"/>
<xsd:element name="ConversationId" type="xsd:token"
minOccurs="0"/>
</xsd:all>
</xsd:complexType>
<xsd:complexType name="Service">
<xsd:simpleContent>
<xsd:extension base="tns:max255-non-empty-string">
<xsd:attribute name="type" type="tns:max255-non-empty-string"
use="optional"/>
</xsd:extension>
</xsd:simpleContent>
</xsd:complexType>
<xsd:complexType name="AgreementRef">
<xsd:simpleContent>
<xsd:extension base="tns:max255-non-empty-string">
<xsd:attribute name="type" type="tns:max255-non-empty-string"
use="optional"/>
<xsd:attribute name="pmode" type="tns:max255-non-empty-string"
use="optional"/>
</xsd:extension>
</xsd:simpleContent>
</xsd:complexType>
<xsd:complexType name="PayloadInfo">
<xsd:sequence>
<xsd:element name="PartInfo" type="tns:PartInfo"
maxOccurs="unbounded"/>
</xsd:sequence>
</xsd:complexType>
<xsd:complexType name="PartInfo">
<xsd:all>
<xsd:element name="Schema" type="Schema" minOccurs="0"/>
<xsd:element name="Description" type="tns:Description"
minOccurs="0"/>
<xsd:element name="PartProperties" type="tns:PartProperties"
minOccurs="0"/>
</xsd:all>
<xsd:attribute name="href" type="xsd:token" use="required"/>
</xsd:complexType>
<xsd:complexType name="Property">
<xsd:simpleContent>
<xsd:extension base="tns:max255-non-empty-string">
<xsd:attribute name="name" type="tns:max255-non-empty-string"
use="required"/>
<xsd:attribute name="type" type="tns:max255-non-empty-string"
use="optional"/>
</xsd:extension>
</xsd:simpleContent>
</xsd:complexType>
<xsd:complexType name="PartProperties">
<xsd:sequence>
<xsd:element name="Property" type="tns:Property"
maxOccurs="unbounded"/>
</xsd:sequence>
</xsd:complexType>
<xsd:complexType name="MessageProperties">
<xsd:sequence>
<xsd:element name="Property" type="Property"
maxOccurs="unbounded"/>
</xsd:sequence>
</xsd:complexType>
<xsd:complexType name="Schema">
<xsd:attribute name="location" type="xsd:anyURI"
use="optional"/>
<xsd:attribute name="version"
type="tns:max255-non-empty-string" use="optional"/>
<xsd:attribute name="namespace"
type="tns:max255-non-empty-string" use="optional"/>
</xsd:complexType>
<xsd:complexType name="Description">
<xsd:simpleContent>
<xsd:extension base="tns:max255-non-empty-string">
<xsd:attribute ref="xml:lang" use="required"/>
</xsd:extension>
</xsd:simpleContent>
</xsd:complexType>
<xsd:simpleType name="max255-non-empty-string">
<xsd:restriction base="xsd:string">
<xsd:minLength value="1"/>
<xsd:maxLength value="255"/>
</xsd:restriction>
</xsd:simpleType>
</xsd:schema>13. JMS Plugin
13.1. JMS Plugin Interface
The purpose of this content is to outline the JMS Data Format Exchange to be used as part of the default JMS backend integration solution for the Domibus Access Point.
|
See Also
|
According to eDelivery, an Access Point is an implementation of the OpenPEPPOL AS2 Profile or the eDelivery AS4 Profile. The data exchange protocols of eDelivery are profiles, meaning that several options of the original technical specifications were narrowed down in order to increase consistency, interoperability and to simplify deployment. The profile of AS2 was developed by OpenPEPPOL, and the profile of AS4 was developed by e-SENS in collaboration with several service providers while being implemented in the e-Justice domain by e-CODEX.
An Access Point exposes two interfaces:
-
An interface to connect the Backend system with the Access Point. Typically, this interface is customisable as communication between Access Points and Backend systems may use any messaging or transport protocol.
-
A standard messaging interface between Access Points, this interface is configurable according to the options of the profiles supported by eDelivery. It is important to note that eDelivery standardises the communication only between the Access Points.
This document will univocally define the JMS plugin that acts as an interface to the Access Point (Corner Two and Corner Three in the four corner topology that will be explained later in this document) component of the eDelivery building block.
There is 1 interface described in this document:
| Interface | Description | Version |
|---|---|---|
JMS backend integration |
The JMS plugin |
4.x.y |
This document covers the service interface of the Access Point from the perspective of the JMS backend integration. It includes information regarding the description of the JMS-Queues, information model and the types of messages for the services provided. This specification addresses no more than the service interface of the Access Point. All other aspects of its implementation are not covered by this document (i.e. the service consumer). The ICD specification provides both the provider (i.e. the implementer) of the services and their consumers with a complete specification of the following aspects:
-
Interface Functional Specification, this specifies the set of services and the operations provided by each service;
-
Interface Behavioural Specification, this specifies the expected sequence of steps to be respected when calling a service or a set of services;
-
Interface Message standards, this specifies the syntax and semantics of the data and metadata;
-
Interface Policy Specification, this specifies constraints and policies regarding the operation of the service.
This document is intended to the Directorate Generals and Services of the European Commission, Member States (MS) and also companies of the private sector wanting to set up a connection between their backend systems and the Access Point.
In particular:
-
Architects will find it useful for determining how to best exploit the Access Point to create a fully-fledged solution and as a starting point for connecting a Back-Office system to the Access Point.
-
Analysts will find it useful to understand the Access Point that will enable them to have a holistic and detailed view of the operations and data involved in the use cases.
-
Developers will find it essential as a basis of their development concerning the Access Point plugin services.
-
Testers can use this document in order to test the interface by following the use cases described.
| Acronym | Definition |
|---|---|
ebMS# |
ebXML Messaging Service Specification |
MEP# |
Message Exchange Pattern A Message Exchange Pattern describes the pattern of messages required by a communications protocol to establish or use a communication channel. |
ebXML# |
Electronic Business XML Project to use XML to standardise the secure exchange of business data. |
P-Mode# |
Processing Mode |
MSH |
Message Service Handler The MSH is an entity that is able to generate or process messages that conform to the ebMS specification, and which act in at least one of the two ebMS roles: Sender and Receiver. In terms of SOAP processing, an MSH is either a SOAP processor or a chain of SOAP processors. In either case, an MSH has to be able to understand the eb:Messaging header (qualified with the ebMS namespace). |
13.1.1. Functional Specification
The four corner model
In order to understand the Use Cases that will be described below it is important to explain the topology; i.e. the four – corner model.
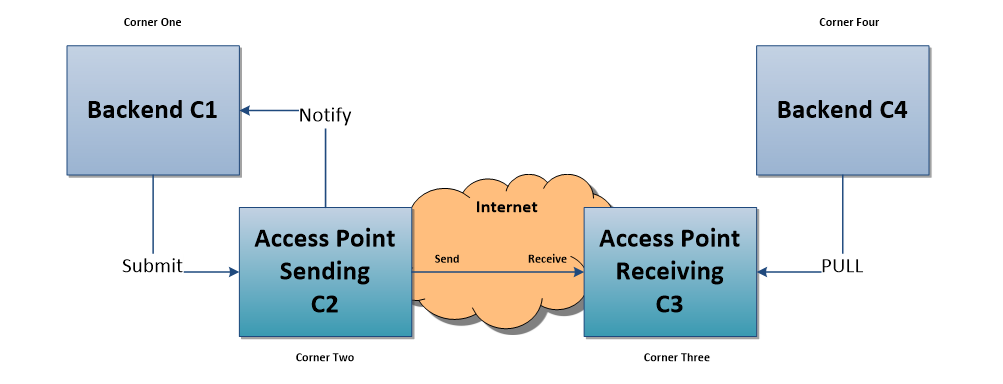
In this model we have the following elements:
-
Corner One (C1): Backend C1 is the system that will send messages to the sending AP (Access Point)
-
Corner Two (C2): Sending Access Point C2
-
Corner Three (C3): Receiving Access Point C3
-
Corner Four (C4): Backend C4 is the system that will receive messages from the receiving AP (Access Point)
The JMS backend is described in this document. JMS (Java Message Service) is an API that provides the facility to create, send and read messages. It provides loosely coupled, reliable and asynchronous communication. JMS is also known as the standard for Java asynchronous messaging service. Messaging is a technique to enabling inter-application communications.
There are two types of messaging domains in JMS.
-
Point-to-Point Messaging Domain
-
Publisher/Subscriber Messaging Domain
The present JMS backend integration uses Publisher/Subscriber Messaging pattern where senders of messages, called publishers, do not plan the messages to be sent directly to specific receivers (called subscribers) but, instead, characterize published messages into classes without knowledge of which subscribers will be. Similarly, subscribers express interest in one or more classes and only receive the messages that are of their interest, without knowledge of which publishers are sending those messages. The intent of interest is done by means of a subscription.
Introduction to Domibus - AS4
Using as reference DEP DIGITAL, Domibus is the Open Source project of the AS4 Access Point maintained by the European Commission. Third-party software vendors offer alternative implementations of the eDelivery AS4 Profile (commercial or open-source). Each software vendor also provides different added-value services from integration to the support of day-to-day operations. For safeguarding interoperability, eDelivery encourages implementers to consult the list of software products that have passed the conformance tests by the European Commission of the eDelivery AS4 profile.
The sample software, Domibus, may be used to test other implementations of the AS4 profile or as a working solution in a production environment. The users of the sample implementation remain fully responsible for its integration with backend systems, deployment and operation. The support and maintenance of the sample implementation, as well as any other auxiliary services, are provided by the European Commission according to the terms defined in the eDelivery Access Point Component Offering Description.
It is also important to comment on the PMode. A processing mode – or PMode – is a collection of parameters that determine how user messages are exchanged between a pair of Access Points with respect to Quality of Service, Transmission Mode and Error Handling. A PMode maps the recipient Access Point from the partyId, which represents the backend offices associated to this Access Point.
13.1.2. Behavioural Specification
A JMS queue is a staging area that contains messages that have been sent and are waiting to be read. Contrary to what the name queue suggests, messages do not have to be received in the order in which they were sent. A JMS queue only guarantees that each message is processed only once.
Domibus queues are classified in 3 types:
- Internal queues
-
are accessed only by the core of the system
- Notification queues
-
are populated by the core of the system to be retrieved by the plugins deployed on the local access points
- Backend queues
-
are accessed by the backend themselves to either insert into or retrieve message from it.
Plugins are the intermediate components that will allow incoming messages from corner 1 to enter corner 2 and outgoing messages to exit corner 3 to reach corner 4. These plugins must be compliant to Domibus specifications, and are specific to the backend implementation.
The following will introduce the queues chronologically, i.e. following the flow of message processed from corner 1 to corner 4.
The processing of a message, in short is processed as follows:
-
Corner 1 sends a message to an (input) plugin of corner 2.
-
The (input) plugin calls a set of API’s exposed by the core to store the message into the database, generates a unique message ID and put that ID the internal dispatch queue referring to it.
-
The core of corner 2 discovers the message ID in the internal dispatch queue and the dispatcher sends it to the appropriate access point (corner 3).
-
The core of corner 3 stores it into the database, and creates a message into the internal notification queue referring to it
-
The notification listener of corner 3 discovers the message ID in the internal notification queue and makes it available into the notification dedicated queue of the appropriate (output) plugin of corner 3.
-
The (output) plug-in discovers the message ID into its dedicated queue and retrieves the message from the database.
-
JMS (output) plugins will put it into the outQueue onto which its back-end (corner 4) is listening to.
-
Web service (output) plugin (Future implementation) will be sent it directly to its back-end (retry will be done later in case of temporary unavailability of corner 4).
-
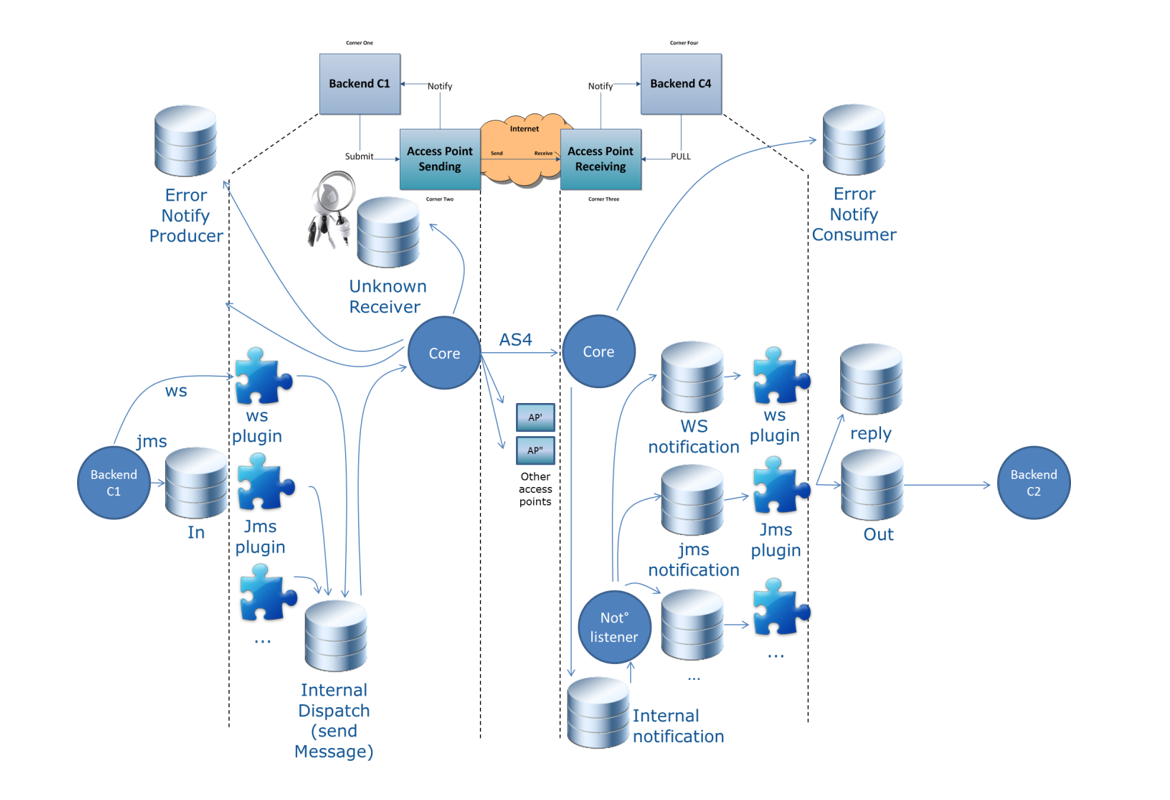
The following section specifies the data format to be used to enable the following functions via JMS:
-
Submit a message to the Access Point
-
Push pending messages to a queue for retrieval
It uses the JMS MapMessage type to implement the request and response data formats for each of the functions mentioned above. The Meta data in each case will be set in the JMS message properties using name/value pairs and these will be outlined in each case.
JMS-Messages
Before going into the detail of the JMS queues it is important to describe the meaning of each tag included in the message that will be sent. It is Important to note that most values (parties, services, actions, etc…) are specified by the use case and multilateral agreements and thus not to be chosen by the caller when the message is submitted. They are underlined in the table below.
| Name | Description |
|---|---|
mpc |
Message Partition Channels (MPCs) allow for partitioning the flow of messages from a Sending MSH to a Receiving MSH into several flows that can be controlled separately and consumed differently. |
action |
This element is a string identifying an operation or an activity within a Service. Its actual semantics is beyond the scope of this specification. Action SHALL be unique within the Service in which it is defined. The value of the Action element is specified by the designer of the service. |
service |
This element identifies the service that acts on the message. Its actual semantics is beyond the scope of this specification. The designer of the service may be a standards organization, or an individual or enterprise. In other words, service element denotes the service that processes the message at the destination. As an example of what might exist in the Service element, consider the text urn:Invoice, denoting a message that should be processed by the invoice service. |
serviceType |
The Service element MAY contain a single @type attribute, that indicates how the parties sending and receiving the message will interpret the value of the element. There is no restriction on the value of the type attribute. If the type attribute is not present, the content of the Service element MUST be a URI. |
conversationId |
The Party initiating a conversation determines the value of the ConversationId element that SHALL be reflected in all messages pertaining to that conversation. The actual semantics of this value is beyond the scope of this specification. Implementations SHOULD provide a facility for mapping between their identification scheme and a ConversationId generated by another implementation. |
messageId |
This element has a value representing – for each message - a globally unique identifier. Note: In the Message_Id and Content_Id MIME headers, values are always surrounded by angle brackets. However, references in mid: or cid: scheme URI’s and the MessageId and RefToMessageId elements MUST NOT include these delimiters. |
refToMessageId |
This element occurs at most once. When present, it MUST contain the MessageId value for which the message is related. |
agreementRef |
AgreementRef is a string value that identifies the agreement that governs the exchange. The value of an AgreementRef element MUST be unique within a namespace mutually agreed by the two parties. This could be a concatenation of the From and To PartyId’s values, a URI containing the Internet domain name of one of the parties, or a namespace offered and managed by some other naming or registry service. It is RECOMMENDED that the AgreementRef is a URI. |
agreementRefType |
This attribute indicates how the parties sending and receiving the message will interpret the value of the reference. There is no restriction on the value of the type attribute. If the type attribute is not present, the content of the eb:AgreementRef element MUST be a URI. |
fromRole |
This element occurs once and identifies the authorized role (fromAuthorizedRole) of the Party sending (present as a child of the From element) the message. The value of the fromRole element is a non- empty string, with a default value of http://docs.oasis-open.org/ebxml-msg/ebms/v3.0/ns/core/200704/defaultRole. Other possible values are subject to partner agreement. |
toRole |
This element occurs once and identifies the authorized role (toAuthorizedRole) of the Party receiving (present as a child of the To element) the message. The value of the toRole element is a non- empty string, with a default value of http://docs.oasis-open.org/ebxml-msg/ebms/v3.0/ns/core/200704/defaultRole. Other possible values are subject to partner agreement. |
messageType |
A string representing the type of the message. |
JMScorrelationId |
The JMSCorrelationID header field is used for linking one message with another. It typically links a reply message with its requesting message. JMSCorrelationID can hold a provider-specific message ID, an application-specific String object, or a provider-native byte[] value. |
fromPartyId |
Access Point C2. This element has a string value content that identifies a party, or that is one of the identifiers of this party who is sending the message. |
fromPartyType |
A string that identifies the type of the sender partyId. The type attribute indicates the domain of names to which the string in the content of the fromPartyId element belongs. It is RECOMMENDED that the value of the type attribute be a URI. It is further RECOMMENDED that these values be taken from the EDIRA , EDIFACT or ANSI ASC X12 registries. Technical specifications for the first two registries can be found at and [ISO6523] and [ISO9735], respectively. |
toPartyId |
Access Point C3. This element has a string value content that identifies a partyId, or that is one of the identifiers of this party. The one who is receiving the message. |
toPartyType |
A string that identifies the type of the receiver partyId. The type attribute indicates the domain of names to which the string in the content of the toPartyId element belongs. It is RECOMMENDED that the value of the type attribute be a URI. It is further RECOMMENDED that these values be taken from the EDIRA , EDIFACT or ANSI ASC X12 registries. Technical specifications for the first two registries can be found at and [ISO6523] and [ISO9735], respectively. |
originalSender |
Backend C1. This element has a string value content that identifies the message producer (who created the message). |
originalSenderType |
Backend C1. This element has a string value content that identifies the message producer type. |
finalRecipient |
Backend C4. This element has a string value content that identifies the message consumer (who is the final receiver of the message). |
finalRecipientType |
Backend C4. This element has a string value content
that could identify the message consumer, along with finalRecipient
element. |
protocol |
The description of the protocol used. For the scenario described in this document it MUST be AS4. |
totalNumberOfPayloads |
Defines the number of payloads available in the message. |
P1InBody (true/false) |
Boolean that indicates if the payload is in the body of the AS4 message or not. If the payload is not in the body of the AS4 message it will be sent as attachment in the SOAP message. |
putAttachmentInQueue |
If true, all the payloads from the User Message will be stored as bytes in the JMS message. If false and Domibus is configured to save the payloads on the file system (property domibus.attachment.storage.location), the payloads file locations will be stored in the JMS message This property should be disabled for large file transfers. |
username |
Mandatory in Multitenancy mode. The user that submits messages to Domibus. It is used to associate the current user with a specific domain. |
password |
Mandatory in Multitenancy mode. The credentials of the user defined under the property username. |
processingType |
This attribute specifies if the message should be sent directly or wait to be pulled from another accespoint. |
The only mandatory rule is that only messageType=submitMessage messages may be put on the domibus.backend.jmsInQueue. All other queues (that go from the plugin to the backend) can be freely aggregated. I.e. if you only want one replyQueue you are free to send all success and errorMessages there.
Dynamic Discovery with JMS Plugin
The fields in charge to identify the Party (C3) are empty in this
scenario (toRole, toPartyId, toPartyType).
-
The finalRecipientType is mandatory together with finalRecipient to enable messaging in Dynamic Discovery mode.
-
The following example shows the relevant section of a function for submitting a message in Dynamic mode. The complete function is shown in the 6 ANNEXE.
messageMap.setStringProperty("messageType", "submitMessage");
messageMap.setStringProperty("service",
"urn:www.cenbii.eu:profile:bii04:ver1.0");
messageMap.setStringProperty("serviceType", "cenbii-procid-ubl");
messageMap.setStringProperty("action",
"busdox-docid-qns::urn:oasis:names:specification:ubl:schema:xsd:Invoice-12::Invoiceurn:www.cenbii.eu:transaction:biicoretrdm010:ver1.0:urn:www.peppol.eu:bis:peppol4a:ver1.0::2.0");
messageMap.setStringProperty("fromPartyId", "senderalias");
messageMap.setStringProperty("fromPartyType",
"urn:oasis:names:tc:ebcore:partyid-type:unregistered");
messageMap.setStringProperty("fromRole",
"http://docs.oasis-open.org/ebxml-msg/ebms/v3.0/ns/core/200704/initiator");
messageMap.setStringProperty("originalSender",
"urn:oasis:names:tc:ebcore:partyid-type:unregistered:C1");
messageMap.setStringProperty("finalRecipient", "0777:tt001:oasis");
messageMap.setStringProperty("finalRecipientType",
"iso6523-actorid-upis");
messageMap.setStringProperty("protocol"", "AS4");JMS-Queues
domibus.backend.jmsInQueue
Description:
Submit a message from a Backend to Domibus. If a property is set in the plugin properties (jms-plugin.properties) but not in the message itself, the value from the properties file will be used.
Message type: javax.jms.MapMessage
| Property name | Optional | Available in plugin properties | Notes |
|---|---|---|---|
messageType |
No |
No |
Value = submitMessage |
messageId |
Yes |
No |
Must be a globally unique Id, max 255 characters long |
action |
No |
Yes |
|
conversationId |
Yes |
No |
|
JMScorrelationId |
Yes |
No |
Used by a backend to correlate between JMS messages submitted in jms.InQueue and response sent in jms.ReplyQueue. |
fromPartyId |
No |
Yes |
|
fromRole |
No |
Yes |
|
fromPartyType |
Yes |
Yes |
|
toPartyId |
Yes |
Yes |
Empty in DYNAMIC DISCOVERY |
toRole |
Yes |
Yes |
Empty in DYNAMIC DISCOVERY |
toPartyType |
Yes |
Yes |
|
originalSender |
Yes |
No |
|
originalSenderType |
Yes |
No |
|
finalRecipient |
Yes |
No |
Mandatory in DYNAMIC DISCOVERY |
finalRecipientType |
Yes |
No |
Mandatory in DYNAMIC DISCOVERY |
service |
No |
Yes |
|
serviceType |
Yes |
Yes |
Only optional if the service is untyped |
protocol |
Yes |
No |
Values other than AS4 or empty will raise an exception |
refToMessageId |
Yes |
No |
|
agreementRef |
Yes |
Yes |
|
totalNumberOfPayloads |
No |
No |
Outlining the total number of payloads, 0 payloads is valid |
P1InBody (true/false) |
Yes |
No |
If true, payload_1 will be sent in the body of the AS4 message. Only XML payloads may be sent in the AS4 message body. |
putAttachmentInQueue (true/false) |
Yes |
Yes |
If true, all the payloads from the User Message will be stored as bytes in the JMS message. If false and Domibus is configured to save the payloads on the filesystem (property domibus.attachment.storage.location), the payloads file locations will be stored in the JMS message This property should be disabled for large file transfers. |
username |
Yes |
No |
Mandatory in Multitenancy mode |
password |
Yes |
No |
Mandatory in Multitenancy mode |
mpc |
Yes |
No |
Mandatory starting from Domibus release 5.0 in case the mpc in the leg configuration (check in Pmode) is not the default mpc. |
Payload handling:
The following properties should be set for each payload in the message. In the list below, the string “[NUM]” of each property name should be replaced with a numerical value representing each payload. The payload with the prefix payload_1 is transported inside the body of the AS4 message if the property p1InBody is set to true.
Each payload can either be sent in byte format or set in the MapMessage using the setBytes method of the MapMessage class, or an URL from where the payload can be downloaded by the Domibus Access Point. Each payload should be identified by the property payload_[NUM].
The following properties can be set for each payload using the setStringProperty method of the MapMessage class:
-
payload_[NUM]_MimeContentID: For example, the MimeContentID for the first payload will be identified by the property payload_1_MimeContentID. This is the payload contentId. Setting it is required if the pmode payload profiling is used. If unset Domibus generates an UUID for it.
-
payload_[NUM]_MimeType: The mime type of the payload. If not provided the mime type application/octet-stream is assumed
-
payload_[NUM]_FileName: The file location of the payload, if putAttachmentInQueue is set.
-
payload_[NUM]_[NAME] can be used to set custom payload properties. For example, to set the custom property maxSize to payload 2 use payload_2_maxSize.
-
payload_[NUM]_Type_[NAME] can be used to set the type of payload_[NUM]_[NAME] custom payload property. Custom payload properties can be specified with or without the type. For example, to set the type for custom property maxSize of payload 2 use payload_2_Type_maxSize.
Property Handling
Message properties are handled in the following way:
-
Properties named property_[NAME] are put into the outgoing message using [NAME] as key inside the AS4 message.
-
For each property_[NAME] property there MAY be a corresponding propertyType_[NAME] property set. The corresponding value MAY be NULL, indicating an untyped property. Older AS4 implementations which do not have implemented the latest errata MIGHT REJECT messages where a property type is NOT NULL
domibus.backend.jms.replyQueue
Description: The result of the submit operation and contains either the messageId or an error. The messageId is (usually) generated by Domibus. If the submissionis rejected, no messageId is generated. Additionally, there is no guarantee that the set MessageId of a rejected message can be read. This message has to be correlated using the JMSCorrelationID. Corner 2 reports back to corner 1 about the success/Failure of an intended message submission.
Message type: javax.jms.Message
domibus.backend.jms.outQueuemessage fields
| Property name | Optional | Notes |
|---|---|---|
messageType |
No |
Value=submitResponse |
messageId |
Yes |
null, if there is an errorDetail |
errorDetail |
Yes |
null, if there is a messageId |
Description: A message has been successfully sent to another AS4 Access Point. The status changes to messageSent when the message has been sent from C2 to C3. The reason why this is a different logical queue is to allow better configuration options, i.e. you might want to send those messages to a monitoring system (or dev/null) and not to the back office application. As this is only a logical queue, nothing prevents it from using the same physical queue if all of those messages have the same recipient.
| Property name | Optional | Notes |
|---|---|---|
messageType |
No |
Value=messageSent |
messageId |
No |
Payload handling: N/A
Property Handling: N/A
domibus.backend.jms.outQueue
Description: submit a message from Domibus (corner 3) to a backend (corner4)
Message type: javax.jms.MapMessage
| Property name | Optional | Notes |
|---|---|---|
messageType |
No |
Value = incomingMessage |
messageId |
No |
Must be a globally unique Id |
mpc |
Yes |
|
action |
No |
|
conversationId |
No |
|
fromPartyId |
No |
|
fromRole |
No |
|
fromPartyType |
Yes |
|
toPartyId |
No |
|
toRole |
No |
|
toPartyType |
Yes |
|
originalSender |
Yes |
|
originalSenderType |
Yes |
|
finalRecipient |
Yes |
|
finalRecipientType |
Yes |
ONLY for DYNAMIC DISCOVERY |
service |
No |
|
serviceType |
Yes |
Only optional if the service is untyped |
protocol |
No |
Value = AS4 |
refToMessageId |
Yes |
|
agreementRef |
Yes |
|
totalNumberOfPayloads |
No |
outlining the total number of payloads, 0 payloads is valid |
Payload handling:
The following properties are set for each payload in the message. In the list below, the string “[NUM]” of each property name is replaced with a numerical value representing each payload. If a payload has been transported in the message body of the corresponding AS4 message, this is always the payload with the prefix payload_1. Each payload is sent in byte format. Each payload is identified by the property payload_[NUM].
The following properties may be available for each payload:
-
payload_[NUM]_MimeContentID: for example, the MimeContentID for the first payload will be identified by the property payload_1_MimeContentID. This is the payload contentId. Setting it is required if the pmode payload profiling is used. If unset Domibus generates an UUID for it. -
payload_[NUM]_MimeType: The mime type of the payload -
payload_[NUM]_FileName: The file location of the payload, if putAttachmentInQueue is set.
Property Handling
Message properties are handled in the following way:
-
Properties named [NAME] are put into the incoming message using property_[NAME] as key inside the JMS message
-
For each property_[NAME] property there is a corresponding propertyType_[NAME] property set. The corresponding value MAY be NULL, indicating an untyped property. Older AS4 implementations which do not have implemented the latest errata will only ever send untyped properties
domibus.backend.jms.errorNotifyProducer
Description: A message that was accepted as submission could not be sent to the recipient.
Message type: javax.jms.Message
| Property name | Optional | Notes |
|---|---|---|
|
No |
Value=messageSendFailure |
|
No |
|
|
No |
The ebMS3 error code of the corresponding error |
|
No |
A textual description of the error |
Payload handling: N/A
domibus.backend.jms.errorNotifyConsumer
Description: An incoming message was rejected because of an error or agreement violation. To generate such a message, the Domibus Access Point must, at least, be able to determine the intended recipient for the original message. If this is not possible, no messageReceptionFailure will be generated.
Message type: javax.jms.Message
| Property name | Optional | Notes |
|---|---|---|
messageType |
No |
Value=messageReceptionFailure |
messageId |
No |
|
errorCode |
No |
The ebMS3 error code of the corresponding error |
errorDetail |
No |
A textual description of the error |
endPoint |
Yes |
The internet address of the access point that tried to send the message |
Payload handling: N/A
Property Handling: N/A
Routing messages to specific queues
By default, the JMS Plugin dispatches UserMessages to the default configured queues. It does not have support to dispatch to different queues depending on the combination service/action.
This means that all UserMessages dispatched to the JMS Plugin will end up in the same queue, regardles of service/action values. This behaviour applies even if the UserMessage concerns different backend systems.
The possibility to dispatch UserMessages to specific JMS queues depending on different service/action value provides flexibility to address different backends.
This way flows belonging to different backend systems remain separated from each other. Flooding the application by UserMessages having one combination of service/action will only have an impact on the latency of processing UserMessages for one backend but not the other ones.
For this purpose, the possibility of routing UserMessages depending on service/action combination has been implemented. This feature is available for the JMS queues configured using the following properties:
-
jmsplugin.queue.out -
jmsplugin.queue.reply -
jmsplugin.queue.consumer.notification.error -
jmsplugin.queue.producer.notification.error
In order to define a routing rule for a specific queue the routing rule name must be defined first.
The convention is to define the routing rule name based on default queue
property and the keyword routing.
For instance, one can define a routing rule named rule1 for the default JMS out queue defined under the property jmsplugin.queue.out:
jmsplugin.queue.out.routing.rule1=<Routing rule description>
Once the rule name is defined, other properties, like service, action and routing queue can be also defined using the rule name. For instance:
jmsplugin.queue.out.routing.rule1.service=ServiceValue
jmsplugin.queue.out.routing.rule1.action=ActionValue
jmsplugin.queue.out.routing.rule1.queue=jms/domibus.backend.jms.outQueue.queue1
Once a UserMessage having a service/action combination is matching a service/action combination configured for a rule than the UserMessage will be dispatched to the queue configured for the matching rule.
|
Note
|
service/action combinations configured for routing rules must be unique. |
13.1.3. Plugin Notifications
Domibus core notifies the JMS Plugin on the following events: MESSAGE_RECEIVED, MESSAGE_SEND_FAILURE, MESSAGE_RECEIVED_FAILURE, MESSAGE_SEND_SUCCESS, MESSAGE_STATUS_CHANGE.
The type of events received can be configured using the JMS Plugin
property: jmsplugin.messages.notifications. The property can be found
in “jms-plugin.properties” file in the
domibus-distribution-xxx-default-jms-plugin.zip. More details can be
found in the Plugin Cookbook.
13.1.4. Multitenancy
The Default JMS Plugin can be used when Domibus is configured in Multitenancy mode.
In Multitenancy mode the plugins security is activated by default, no matter if value configured in domibus.properties for the domibus.auth.unsecureLoginAllowed property.
As a result, every request sent to the domibus.backend.jmsInQueue
queue via the Default JMS Plugin needs to be authenticated via the
user and password JMS properties.
See also Plugin Users.
Please note that the default domain is already configured to use the Default JMS Plugin in Multitenancy mode and the below steps must be followed only for additional domains.
Each configured domain that is using the Default JMS Plugin to send messages to Domibus has to create the following JMS queues that will be used exclusively by the domain:
-
<domain>.domibus.backend.jms.outQueue -
<domain>.domibus.backend.jms.replyQueue -
<domain>.domibus.backend.jms.errorNotifyConsumer -
<domain>.domibus.backend.jms.errorNotifyProducer
where <domain> is the domain name.
For example, if the domain name is test1, then this will prefix each declared property for that domain such as, test1.domibus.backend.jms.outQueue.
The backend C1 linked to a specific domain must subscribe to the associated JMS domain queues in order to receive notifications linked to that domain
More details on the above queues and the structure of the sent and received messages via the Default JMS Plugin can be found in the previous chapter.
The above mentioned queues have to be configured in the JMS broker
specific to the chosen server: activemq.xml for Tomcat and in the
application server configuration for WebLogic and WildFly. The details
on how to configure JMS queues specific to a server can be found in JMS Queue Management.
Once created the domain queues have to be configured in the
jms-plugin.properties configuration file.
#Domain configuration
# The following queues need to be created per domain. Please replace the
<domain> value with the domain code.
# It is recommended to secure the queues so that only users belonging to
# <domain> can read.
DOMAIN.jmsplugin.queue.out=<domain>.domibus.backend.jms.outQueue
DOMAIN.jmsplugin.queue.reply=<domain>.domibus.backend.jms.replyQueue
DOMAIN.jmsplugin.queue.consumer.notification.error=<domain>.domibus.backend.jms.errorNotifyConsumer
DOMAIN.jmsplugin.queue.producer.notification.error=<domain>.domibus.backend.jms.errorNotifyProducerDomain specific properties
The JMS Plugin configuration allows configuring specific properties per domain. The entire properties specific to a domain must be prefixed by the domain name.
| Domain configuration Property | Description | ||
|---|---|---|---|
|
Sender party ID |
||
|
Sender party type |
||
|
Sender party role |
||
|
Receiver party ID |
||
|
Receiver party type |
||
|
Receiver party role |
||
|
Agreement reference |
||
|
Service value |
||
|
Service type |
||
|
Action value |
||
|
Default value is If configured to true, all the payloads from the User Message will be stored as bytes in the JMS message. If configured to false and Domibus is configured to save the payloads on
the file system (property
|
13.2. JMS Plugin Configuration
The Default JMS Plugin is configured using the jms-plugin.properties file. In the section below we describe the available properties from the configuration file.
13.2.1. Message properties
This set of properties contains default values for the business process.
When a message is submitted to the JMS backend with missing business
values, those values are defaulting to the business values configured in
the jms-plugin.properties file.
Default values are defined for properties identifying the sending and the receiving parties, the business agreement and process. The complete list is available in the JMS-Queues table.
13.2.2. General properties
| Property name | Default value | Description | Domain specific |
|---|---|---|---|
|
jms/domibus.notification.jms |
This queue is used by Domibus to notify the JMS Plugin about message events. |
No |
|
jms/domibus.backend.jms.inQueue |
This queue is the entry point for messages to be sent to Domibus via the JMS plugin |
No |
|
5-20 |
Concurrency setting for the in queue |
No |
|
jms/domibus.backend.jms.outQueue |
This queue contains the received messages, the backend listens to this queue to consume the received messages |
Yes |
|
jms/domibus.backend. |
This queue is used to inform the backend about the message status after sending a message to Domibus |
Yes |
|
jms/domibus.backend.jms.errorNotifyConsumer |
This queue is used to inform the backend that an error occurred during the processing of receiving a message |
Yes |
|
jms/domibus.backend.jms. |
This queue is used to inform the backend that an error occurred during the processing of sending a message |
Yes |
|
MESSAGE_RECEIVED, |
The notifications sent by Domibus to the plugin. The following values
are possible:
MESSAGE_RECEIVED, |
13.3. Referencing Payloads
When using the JMS plugin exchange messages with Domibus, the payloads are embedded in the JMS message binary format.
In order to send payloads embedded in the JMS messages, the following property of the JMS Plugin must be configured as below:
jmsplugin.putAttachmentInQueue = true
This is perfectly fine when sending small payloads, but it might become problematic when sending large files as JMS brokers are not designed to support large payloads.
When sending messages via the JMS Plugin, you have two options to send the message payloads:
-
directly in the JMS message as bytes (in body payload)
-
as a String property containing the URL to the payload. The URL can be an HTTP URL or a URL pointing to a file system
No configuration is needed. In case the payload is not sent via URL reference (no String property is found for the value payload_{int}), the payload will be sent in the JMS message body as bytes.
About the jmsplugin.putAttachmentInQueue property:
-
When set to
true(default value), all the payloads from the User Message will be stored as bytes in the JMS message. -
When set to
false-
and Domibus is configured to save the payloads on the file system (see property
domibus.attachment.storage.location), the payloads file locations will be stored in the JMS message. -
Specifies how the
UserMessagepayloads are referred.-
Possible values:
FILEorURL(see below for more details).
-
-
-
Should be disabled for large file transfers.
When exchanging large files via the JMS plugin, it is preferred to store the payloads outside of the JMS messages and reference the location of the payloads in the JMS message as string properties.
There are two ways to reference the payloads in the JMS messages:
-
File reference
-
REST endpoint reference
13.3.1. File reference
In order to use payload file reference, Domibus must be configured to store the payloads on the file system. Please check the Domibus Administration Guide for more information on how to do this.
Once Domibus has been configured to store the payloads on the file system, the following properties of the JMS Plugin must be configured as below:
jmsplugin.putAttachmentInQueue = false jmsplugin.attachment.reference.type = FILE
The payload file reference is set as a JMS string property having the following name:
payload[NUM]fileName where NUM is the payload number
13.3.2. REST endpoint reference
In order to use payload REST endpoint reference, the following properties of the JMS Plugin must be configured as below:
jmsplugin.putAttachmentInQueue = false
jmsplugin.attachment.reference.type = URL
Where:
-
jmsplugin.attachment.reference.type=URL, this property is used to create the payload reference URL:
jmsplugin.attachment.reference.context= http://localhost:8080/domibus. -
jmsplugin.attachment.reference.type=URL, this property is used to create the payload reference URL
jmsplugin.attachment.reference.url =
/ext/messages/ids/MESSAGE_ENTITY_ID/payloads/cid:C
Once activated, the payload URL will be included as a string property in the JMS message, e.g.:
Where:
-
MESSAGE_ENTITY_IDis the internal primary key id of the UserMessage -
PAYLOAD_CIDis the cid of the UserMessage payload
All Domibus REST endpoints, included the ones above, are protected using basic authentication. Please use a plugin user in order to authenticate. For more information, please check the Domibus Administration Guide. The base context http://localhost:8080 can be configured using the following property of the JMS Plugin as below:
jmsplugin.attachment.reference.context=http://localhost:8080/domibus
The payload REST endpoint reference is set a as a JMS string property having the following name:
payload_[NUM] _fileURL, where NUM is the payload number
13.4. Interface Policy Specification
The Party initiating a conversation MUST determine the value of the ConversationId element that is reflected in all messages pertaining to that conversation. The actual semantics of this value is beyond the scope of this specification. Implementations SHOULD provide a facility for mapping between their identification scheme and a ConversationId generated by another implementation.
The following details two simple functions, one for Static Discovery
mode, the other for Dynamic Discovery mode, for submitting a message
in the correct format to a queue where it will be picked up by a
MessageListener on the Access Point.
package eu.domibus.plugin.jms;
import org.apache.activemq.ActiveMQConnectionFactory;
import org.junit.Ignore;
import org.junit.Test;
import javax.jms.*;
import javax.naming.NamingException;
public class MessageSender \{
@Test
@Ignore //This is just an example the used PMode does not actually exist
public void sendMessage() throws NamingException, JMSException \{
ActiveMQConnectionFactory connectionFactory = new
ActiveMQConnectionFactory("tcp://localhost:61616");//default port of activeMQ
Connection connection = null;
MessageProducer producer = null;
connection = connectionFactory.createConnection("domibus", "changeit");
//username and password of the default JMS broker
Session session = connection.createSession(false,
Session.AUTO_ACKNOWLEDGE);
Destination destination = session.createQueue("domibus.backend.jms.inQueue");
producer = session.createProducer(destination);
producer.setDeliveryMode(DeliveryMode.NON_PERSISTENT);
MapMessage messageMap = session.createMapMessage();
// Declare message as submit
messageMap.setStringProperty("messageType", "submitMessage");
// Set up the Communication properties for the message
messageMap.setStringProperty("service", "demoService");
messageMap.setStringProperty("action", "demoAction");
messageMap.setStringProperty("conversationId", "");
messageMap.setStringProperty("fromPartyId", "GW1");
messageMap.setStringProperty("fromPartyIdType",
"urn:oasis:names:tc:ebcore:partyid-type:iso3166-1");
messageMap.setStringProperty("fromRole", "buyer");
messageMap.setStringProperty("toPartyId", "GW1");
messageMap.setStringProperty("toPartyIdType",
"urn:oasis:names:tc:ebcore:partyid-type:iso3166-1");
messageMap.setStringProperty("toRole", "seller");
messageMap.setStringProperty("originalSender", "sending_buyer_id");
messageMap.setStringProperty("finalRecipient", "receiving_seller_id");
messageMap.setStringProperty("serviceType", "");
messageMap.setStringProperty("protocol", "AS4");
messageMap.setStringProperty("refToMessageId", "");
messageMap.setStringProperty("agreementRef", "");
messageMap.setJMSCorrelationID("MESS1");
//Set up the payload properties
messageMap.setStringProperty("totalNumberOfPayloads", "3");
messageMap.setStringProperty("payload_1_mimeContentId",
"cid:cid_of_payload_1");
messageMap.setStringProperty("payload_2_mimeContentId",
"cid:cid_of_payload_2");
messageMap.setStringProperty("payload_3_mimeContentId",
"cid:cid_of_payload_3");
messageMap.setStringProperty("payload_1_mimeType", "application/xml");
messageMap.setStringProperty("payload_2_mimeType", "application/xml");
messageMap.setStringProperty("payload_3_mimeType", "application/xml");
messageMap.setStringProperty("payload_1_fileName", "filenameLocation1");
messageMap.setStringProperty("payload_2_fileName", "filenameLocation2");
messageMap.setStringProperty("payload_3_fileName", "filenameLocation3");
String pay1 = "<XML><test></test></XML>";
byte[] payload = pay1.getBytes();
messageMap.setBytes("payload_1", payload);
messageMap.setBytes("payload_2", payload);
messageMap.setBytes("payload_3", payload);
producer.send(messageMap);
connection.close();
}
}DYNAMIC DISCOVERY MODE:
package eu.domibus.plugin.jms;
import org.apache.activemq.ActiveMQConnectionFactory;
import org.junit.Ignore;
import org.junit.Test;
import javax.jms.*;
import javax.naming.NamingException;
public class MessageSender \{
@Test
@Ignore //This is just an example the used PMode does not actually exist
public void sendMessage() throws NamingException, JMSException \{
ActiveMQConnectionFactory connectionFactory = new
ActiveMQConnectionFactory("tcp://localhost:61616");//default port of activeMQ
Connection connection = null;
MessageProducer producer = null;
connection = connectionFactory.createConnection("domibus", "changeit");
//username and password of the default JMS broker
Session session = connection.createSession(false,
Session.AUTO_ACKNOWLEDGE);
Destination destination =
session.createQueue("domibus.backend.jms.inQueue");
producer = session.createProducer(destination);
producer.setDeliveryMode(DeliveryMode.NON_PERSISTENT);
MapMessage messageMap = session.createMapMessage();
// Declare message as submit
messageMap.setStringProperty("messageType", "submitMessage");
// Set up the Communication properties for the message
messageMap.setStringProperty("service", "demoService");
messageMap.setStringProperty("action", "demoAction");
messageMap.setStringProperty("conversationId", "");
messageMap.setStringProperty("fromPartyId", "GW1");
messageMap.setStringProperty("fromPartyIdType",
"urn:oasis:names:tc:ebcore:partyid-type:iso3166-1");
messageMap.setStringProperty("fromRole", "buyer");
messageMap.setStringProperty("originalSender", "sending_buyer_id");
messageMap.setStringProperty("finalRecipient", "receiving_seller_id");
messageMap.setStringProperty("finalRecipienttype", "
receiving_seller_id_type");
messageMap.setStringProperty("serviceType", "");
messageMap.setStringProperty("protocol", "AS4");
messageMap.setStringProperty("refToMessageId", "");
messageMap.setStringProperty("agreementRef", "");
messageMap.setJMSCorrelationID("MESS1");
//Set up the payload properties
messageMap.setStringProperty("totalNumberOfPayloads", "3");
messageMap.setStringProperty("payload_1_mimeContentId",
"cid:cid_of_payload_1");
messageMap.setStringProperty("payload_2_mimeContentId",
"cid:cid_of_payload_2");
messageMap.setStringProperty("payload_3_mimeContentId",
"cid:cid_of_payload_3");
messageMap.setStringProperty("payload_1_mimeType", "application/xml");
messageMap.setStringProperty("payload_2_mimeType", "application/xml");
messageMap.setStringProperty("payload_3_mimeType", "application/xml");
messageMap.setStringProperty("payload_1_fileName", "filenameLocation1");
messageMap.setStringProperty("payload_2_fileName", "filenameLocation2");
messageMap.setStringProperty("payload_3_fileName", "filenameLocation3");
String pay1 = "<XML><test></test></XML>";
byte[] payload = pay1.getBytes();
messageMap.setBytes("payload_1", payload);
messageMap.setBytes("payload_2", payload);
messageMap.setBytes("payload_3", payload);
producer.send(messageMap);
connection.close();
}
}13.5. Error codes table
The following tables summarize all possible errors returned by the Access Point services:
| Error Code | Short Description | Recommended Severity | Category Value | Description or Semantics |
|---|---|---|---|---|
|
ValueNotRecognized |
Failure |
Content |
Although the message document is well formed and schema valid, some element/attribute contains a value that could not be recognized and therefore could not be used by the MSH. |
|
FeatureNotSupported |
Warning |
Content |
Although the message document is well formed and schema valid, some element/attribute value cannot be processed as expected because the related feature is not supported by the MSH. |
|
ValueInconsistent |
Failure |
Content |
Although the message document is well formed and schema valid, some element/attribute value is inconsistent either with the content of other element/attribute, or with the processing mode of the MSH, or with the normative requirements of the ebMS specification. |
|
Other |
Failure |
Content |
|
|
ConnectionFailure |
Failure |
Communication |
The MSH is experiencing temporary or permanent Failure in trying to open a transport connection with a remote MSH. |
|
EmptyMessagePartitionChannel |
Warning |
Communication |
There is no message available for pulling from this MPC at this moment. |
|
MimeInconsistency |
Failure |
Unpackaging |
The use of MIME is not consistent with the required usage in this specification. |
|
FeatureNotSupported |
Failure |
Unpackaging |
Although the message document is well formed and schema valid, the presence or absence of some element/ attribute is not consistent with the capability of the MSH, with respect to supported features. |
|
InvalidHeader |
Failure |
Unpackaging |
The ebMS header is either not well formed as an XML document, or does not conform to the ebMS packaging rules. |
|
ProcessingModeMismatch |
Failure |
Processing |
The ebMS header or another header (e.g. reliability, security) expected by the MSH is not compatible with the expected content, based on the associated P-Mode. |
|
ExternalPayloadError |
Failure |
Content |
The MSH is unable to resolve an external payload reference (i.e. a Part that is not contained within the ebMS Message, as identified by a PartInfo/href URI). |
|
FailedAuthentication |
Failure |
Processing |
The signature in the Security header intended for the "ebms" SOAP actor could not be validated by the Security module. |
|
FailedDecryption |
Failure |
Processing |
The encrypted data reference the Security header intended for the "ebms" SOAP actor could not be decrypted by the Security Module. |
|
PolicyNoncompliance |
Failure |
Processing |
The processor determined that the message’s security methods, parameters, scope or other security policy-level requirements or agreements were not satisfied. |
|
DysfunctionalReliability |
Failure |
Processing |
Some reliability function as implemented by the Reliability module is not operational, or the reliability state associated with this message sequence is not valid. |
|
DeliveryFailure |
Failure |
Communication |
Although the message was sent under Guaranteed delivery requirement, the Reliability module could not get assurance that the message was properly delivered, in spite of resending efforts. |
|
MissingReceipt |
Failure |
Communication |
A Receipt has not been received for a message that was previously sent by the MSH generating this error |
|
InvalidReceipt |
Failure |
Communication |
A Receipt has been received for a message that was previously sent by the MSH generating this error, but the content does not match the message content (e.g. some part has not been acknowledged, or the digest associated does not match the signature digest, for NRR). |
|
|
Failure |
Communication |
An error occurred during the decompression |
|
|
Failure |
Processing |
An Intermediary MSH was unable to route an ebMS message and stopped processing the message. |
|
|
Failure |
Processing |
An entry in the routing function is matched that assigns the message to an MPC for pulling, but the intermediary MSH is unable to store the message with this MPC |
|
|
Failure |
Processing |
An intermediary MSH has assigned the message to an MPC for pulling and has successfully stored it. However, the intermediary set a limit on the time it was prepared to wait for the message to be pulled, and that limit has been reached. |
EBMS_0023 |
|
Warning |
Processing |
An MSH has determined that the message is expired and will not attempt to forward or deliver it. |
|
|
Failure |
Content |
The structure of a received bundle is not in accordance with the bundling rules. |
|
|
Failure |
Processing |
A message unit in a bundle was not processed because a related message unit in the bundle caused an error. |
|
|
Failure |
Content |
A fragment is received that relates to a group that was previously rejected. |
|
|
Failure |
Content |
A fragment is received but more than one fragment message in a group of fragments specifies a value for this element. |
|
|
Failure |
Content |
A fragment is received but more than one fragment message in a group of fragments specifies a value for this element. |
|
|
Failure |
Content |
A fragment is received but more than one fragment message in a group of fragments specifies a value for this element. |
|
|
Failure |
Content |
A fragment is received but more than one fragment message in a group of fragments specifies a value for this element. |
|
|
Failure |
Content |
A fragment is received but more than one fragment message in a group of fragments specifies a value for a compression element. |
|
|
Failure |
Content |
A fragment is received but a previously received fragment message had the same values for GroupId and FragmentNum |
|
|
Failure |
Unpackaging |
The href attribute does not reference a valid MIME data part, MIME parts other than the fragment header and a data part are in the message, or the SOAP Body is not empty. |
|
|
Failure |
Content |
An incoming message fragment has a value greater than the known FragmentCount. |
|
|
Failure |
Content |
A value is set for FragmentCount, but a previously received fragment had a greature value. |
|
|
Warning |
Unpackaging |
The size of the data part in a fragment message is greater than Pmode[].Splitting.FragmentSize |
|
|
Failure |
Unpackaging |
More time than Pmode[].Splitting.JoinInterval has passed since the first fragment was received but not all other fragments are received. |
|
|
Warning |
Unpackaging |
Message properties were present in the fragment SOAP header that were not specified in Pmode[].Splitting.RoutingProperties |
|
|
Failure |
Unpackaging |
The eb3:Message header copied to the fragment header does not match the eb3:Message header in the reassembled source message. |
|
|
Failure |
Unpackaging |
Not enough disk space available to store all (expected) fragments of the group. |
|
|
Failure |
Processing |
An error occurred while decompressing the reassembled message. |
|
|
Warning |
Processing |
A responding MSH indicates that it applies the alternate MEP binding to the response message. |
14. Custom Plugins
14.1. Custom Plugin Deployment
Users can develop their own plugins. For information on how to develop a custom plugin, see Plugin Development.
|
Note
|
Plugin Deployment or Registration
See section Message Log to know more about the routing of the
specific plugin in question after registering it on your Application Server.
|
14.1.1. Tomcat
In order to install a custom plugin for Tomcat, please follow the steps below:
-
Stop Tomcat server.
-
Copy the custom plugin .jar file into the plugins folder,
CATALINA_HOME/conf/domibus/plugins/lib.NoteWhere CATALINA_HOMEis the folder where Tomcat is installed. -
Copy the custom plugin XML configuration files under the Tomcat subfolder directly to
CATALINA_HOME/conf/domibus/plugins/config.
There shouldn’t be any Tomcat folder underDOMAIN_HOME/conf/domibus/plugins/config -
Start Tomcat server.
14.1.2. WebLogic
In order to install a custom plugin for WebLogic please follow the steps below:
-
Stop the WebLogic server
-
Copy the custom plugin jar file into the plugins folder:
DOMAIN_HOME/conf/domibus/plugins/libNoteWhere DOMAIN_HOMEis the folder corresponding to the WebLogic domain. -
Copy the custom plugin XML configuration files under the WebLogic subfolder directly into
DOMAIN_HOME/conf/domibus/plugins/configfolder. There should not be any WebLogic folder underDOMAIN_HOME/conf/domibus/plugins/config -
Start the WebLogic server.
14.1.3. WildFly
In order to install a custom plugin please follow the steps below:
-
Stop the WildFly server
-
Copy the custom plugin jar file to the plugins folder
cef_edelivery_path/conf/domibus/plugins/lib.NoteWhere cef_edelivery_pathis where you have Domibus installed. -
Copy the custom plugin XML configuration files under the WildFly subfolder directly into
cef_edelivery_path/conf/domibus/plugins/config.There shouldn’t be a WildFly folder under
DOMAIN_HOME/conf/domibus/plugins/config -
Start the WildFly server.
14.2. Custom Plugin Configuration
14.2.1. Plugin authentication
By default the authentication is disabled for the Domibus default plugins. In order to enable the plugin authentication, do as follows:
-
Set the property
domibus.auth.unsecureLoginAllowedtoFALSEindomibus.properties:-
domibus.auth.unsecureLoginAllowed=false
-
-
Configure the application server to allow HTTP(S) requests and pass the authentication credentials to Domibus.
14.2.2. Plugin notifications
Domibus' core notifies the plugins of the following different events:
-
MESSAGE_RECEIVED -
MESSAGE_FRAGMENT_RECEIVED -
MESSAGE_SEND_FAILURE -
MESSAGE_FRAGMENT_SEND_FAILURE -
MESSAGE_RECEIVED_FAILURE -
MESSAGE_FRAGMENT_RECEIVED_FAILURE -
MESSAGE_SEND_SUCCESS -
MESSAGE_FRAGMENT_SEND_SUCCESS -
MESSAGE_STATUS_CHANGE -
MESSAGE_FRAGMENT_STATUS_CHANGE
|
Note
|
You can specify the list of events received in the properties configuration file of each plugin. |
|
See Also
|
For more on this, see:
|
14.2.3. Plugin Ehcache files
(QUESTION +: Are these instructions?) Plugins are able to use their own Ehcache files for defining caches:
-
Default Classpath file (into the .jar of the plugin) – must be of name
plugin-default-ehcache.xmlplace it in a folder named/ehcache. -
External file which overrides the caches defined in the default file: must have the name
plugin-ehcache.xmland should be situated in the Domibus configuration folder atlocation/plugins/configalong with the other plugin´s configuration files.
For more see the Plugin Cookbook.
15. Plugin Development
This document describes the Domibus plugin architecture and plugin API.
After reading this document, the reader should be aware of the capabilities provided by the Domibus plugin system. Additionally, a developer familiar with the AS4 protocol will be able to implement a plugin integrating an existing back office application into Domibus.
15.1. Target Audience
This content is intended for the Directorate Generals and Services of the European Commission, Member States (MS) and companies of the private sector wanting to set up a connection between their backend system and the Access Point.
In particular:
-
Business Architects will find it useful for determining how to best exploit the Access Point to create a fully-fledged solution.
-
Analysts will find it useful to understand the Use-Cases of the Access Point.
-
Architects will find it useful as a starting point for connecting a Back-Office system to the Access Point.
-
Developers will find it essential as a basis of their development concerning the Access Point services.
-
Testers can use this document in order to test the use cases described.
15.2. Backend Integration
15.2.1. General Overview
The purpose of Domibus is to facilitate B2B communication. To achieve this goal it provides a very flexible plugin model which allows the integration with nearly all back office applications.
There are three default plugins available with the Domibus distribution:
-
the domibus-default-jms-plugin
-
the domibus-default-ws-plugin
-
the domibus-default-fs-plugin
|
See Also
|
Further documentation about those plugins can be found at https://ec.europa.eu/digital-building-blocks/wikis/display/DIGITAL/Domibus. |
|
Important
|
Developers of custom plugins should ensure that their plugins can be deployed alongside the standard Domibus Default Plugins, given that they share a common classloader and Spring context. |
15.2.2. Plugin Structure
A plugin is dependent on the domibus-plugin-api module which is
released together with the main Domibus application. Any changes to
previous API versions will be addressed in a migration guide.
In addition to this required module, another module is available (more information about this module can be found in the Domibus Software Architecture Document.
|
Note
|
Software Architecture Document
Download the PDF at https://ec.europa.eu/digital-building-blocks/wikis/display/DIGITAL/Domibus in the documentation section.
|
-
domibus-logging: may be used to maintain a uniform logging style with the Domibus core.
A plugin consists of the implementation of:
-
at least two interfaces
-
eu.domibus.plugin.transformer.MessageSubmissionTransformer -
eu.domibus.plugin.transformer.MessageRetrievalTransformer
-
-
and the extension of one abstract class,
-
eu.domibus.plugin.AbstractBackendConnector
-
This way multiple plugins can share the same data formats while using different transport protocols or enforcing different security policies. It is also possible to implement transport handlers for protocols while keeping the actual data format pluggable as those classes are not necessarily coupled and can be reused independently from each other.
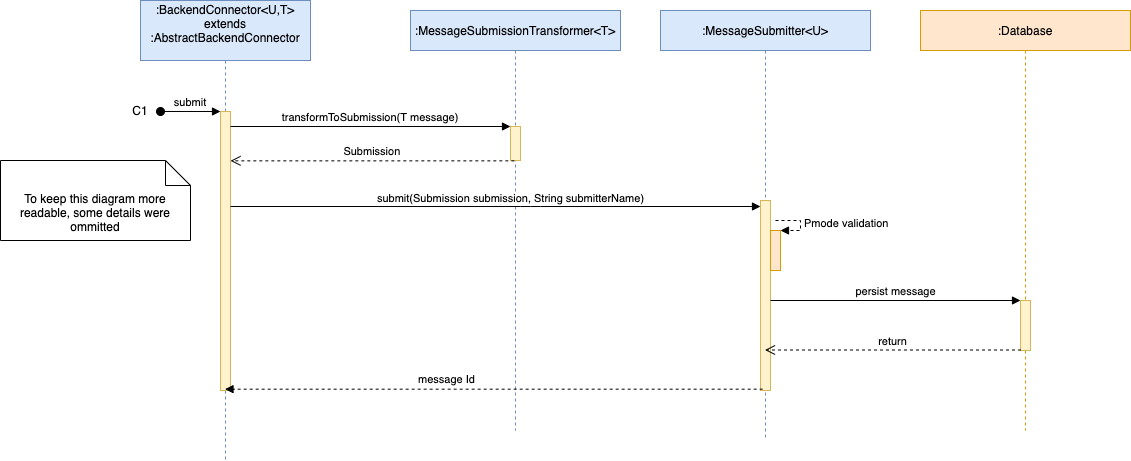
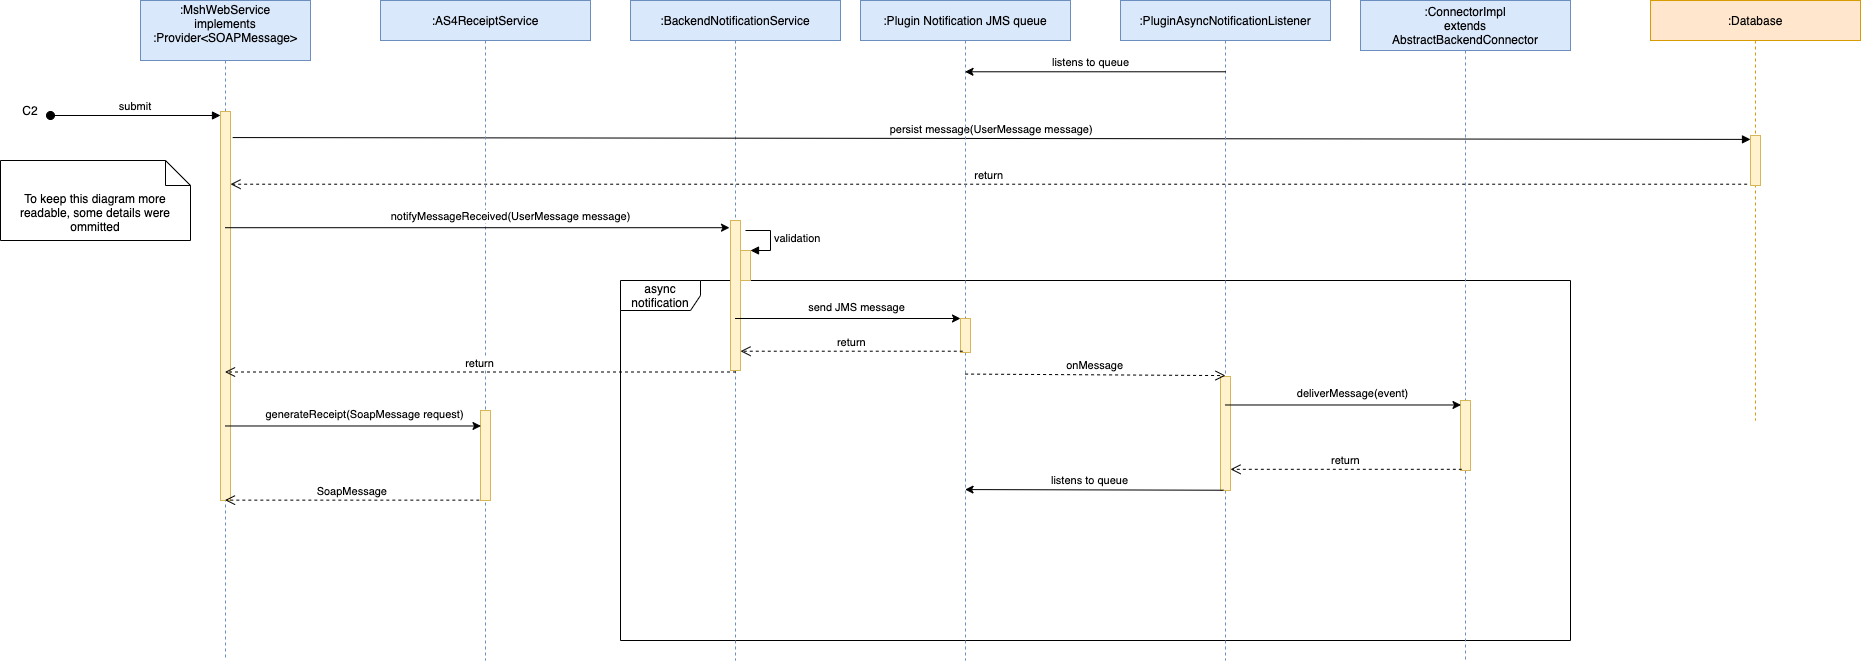
15.3. Implementing a Plugin
A Domibus plugin receives notifications for outgoing and incoming messages from Domibus via a specific API which is described in the following sections.
Once it receives a notification, a plugin has two options:
-
delivers directly the notification to the backend (C1/C4)
-
persists the notification (e.g. in a database), and lets the backend pull the notifications on demand.
Depending on the business case, one of the two options above will be used.
A plugin can get the status of a message on demand by calling the
eu.domibus.common.MessageStatus getStatus(java.lang.String
messageId) method.
To get more information in case of errors, the plugin can use a dedicated method:
java.util.List<eu.domibus.common.ErrorResult> getErrorsForMessage(java.lang.String
messsageId).
15.3.1. Extending AbstractBackendConnector
eu.domibus.plugin.AbstractBackendConnector-
provides implementations of most methods defined in
eu.domibus.plugin.BackendConnector. eu.domibus.plugin.AbstractBackendConnector-
should be used as basis for every plugin.
The following methods should be implemented by a plugin:
getMessageSubmissionTransformer()-
Implementations of this interface transform a message of a specific business type to an object of type
eu.domibus.plugin.Submissionwhen submitting a message to Domibus. getMessageRetrievalTransformer()-
Implementations of this interface transform a message of a specific business type to an object of type
eu.domibus.plugin.Submissionwhen received a message from Domibus. eliverMessage(eu.domibus.common.DeliverMessageEvent)-
Delivers the message with the associated messageId to the backend application.
messageReceiveFailed(eu.domibus.common.MessageReceiveFailureEvent)-
This method gets called when an incoming message is rejected by the MSH.
messageSendFailed(eu.domibus.common.MessageSendFailedEvent)::his
method gets called when an outgoing message associated with an
associated PMode[1].errorHandling.Report.ProcessErrorNotifyProducer=true
has finally failed to be delivered.
messageSendSuccess(eu.domibus.common.MessageSendSuccessEvent)-
This method gets called when an outgoing message has been successfully sent to the intended receiving MSH.
messageStatusChanged(eu.domibus.common.MessageStatusChangeEvent)-
This method gets called when the status of a User Message changes.
payloadSubmittedEvent(eu.domibus.common.PayloadSubmittedEvent)-
Notifies the plugins for every payload that has been submitted to C2 but not yet saved.
payloadProcessedEvent(eu.domibus.common.PayloadProcessedEvent event)-
Notifies the plugins for every payload that has been saved by C2.
messageResponseSent(eu.domibus.common.MessageResponseSentEvent event)-
Notifies the plugins on C3 just before a response message is sent back to C2.
15.3.2. Implementing Message transformers
The implementations of the transformer classes are responsible for
transformation between the native backend formats and eu.domibus.plugin.Submission:
-
eu.domibus.plugin.transformer.MessageSubmissionTransformer -
eu.domibus.plugin.transformer.MessageRetrievalTransformer
As there are two different interfaces to implement it is possible to use different DTOs for message submission and reception. This is convenient when those tasks are handled by different backend applications.
As eu.domibus.plugin.Submission is able to represent all kinds of
messages there are many parameters that must be set, with some of them
unknown to the backend application. One approach is to statically set
those values in the transformer classes. Another, more flexible approach
is the usage of overridable default settings as used in the bundled
default JMS plugin. For further details, see the documentation and
implementation of the default JMS plugin.
15.3.3. Receiving notifications
Domibus sends notifications to the plugins when different message events occur. Domibus notifies the plugins either synchronously, via callbacks, or asynchronously, via a JMS queue. More information about which callbacks are available can be found in eu.domibus.plugin.BackendConnector interface.
For example, the WS Plugin receives notifications on the
jms/domibus.notification.webservice queue.
Notification Types
eu.domibus.common.NotificationType):public enum NotificationType \{
MESSAGE_RECEIVED, MESSAGE_FRAGMENT_RECEIVED,
MESSAGE_SEND_FAILURE, MESSAGE_FRAGMENT_SEND_FAILURE,
MESSAGE_RECEIVED_FAILURE, MESSAGE_FRAGMENT_RECEIVED_FAILURE,
MESSAGE_SEND_SUCCESS, MESSAGE_FRAGMENT_SEND_SUCCESS,
MESSAGE_STATUS_CHANGE, MESSAGE_FRAGMENT_STATUS_CHANGE;}The notification types available are:
-
MESSAGE_RECEIVED- C3 receives a UserMessage from C2 -
MESSAGE_FRAGMENT_RECEIVED- C3 receives a UserMessage fragment from C2 -
MESSAGE_SEND_FAILURE- C2 fails to send a UserMessage to C3 -
MESSAGE_FRAGMENT_SEND_FAILURE- C2 fails to send a UserMessage fragment to C3 -
MESSAGE_RECEIVED_FAILURE- C3 fails to receive a UserMessage -
MESSAGE_FRAGMENT_RECEIVED_FAILURE- C3 fails to receive a UserMessage -
MESSAGE_SEND_SUCCESS- C2 sends successfully a UserMessage to C3 -
MESSAGE_FRAGMENT_SEND_SUCCESS- C2 sends successfully a UserMessage fragment to C3 -
MESSAGE_STATUS_CHANGE- UserMessage status changes -
MESSAGE_FRAGMENT_STATUS_CHANGE- UserMessage fragment status changes
Each plugin may configure its own list of notification types for which
it expects to be notified. This list is optional. By default, the
plugins that use PULL mode receive notifications for
MESSAGE_RECEIVED, MESSAGE_SEND_FAILURE,
MESSAGE_RECEIVED_FAILURE while the PUSH plugins receive
notifications for all notification types.
A plugin can override the default list of notifications for which it
wants to be notified. This can be done by setting the list of
notifications via the method
eu.domibus.plugin.AbstractBackendConnector#setRequiredNotifications.
For example, the WS Plugin configure the list of notifications in the plugin property file and overrides its list of notifications:

Synchronous notifications
A plugin receives notifications synchronously if no
eu.domibus.plugin.notification.PluginAsyncNotificationConfiguration is
configured for the plugin. This means that Domibus calls in the same
thread the plugin notification method, for instance when a message is
sent successfully it will call
eu.domibus.plugin.BackendConnector#messageSendSuccess(eu.domibus.common.MessageSendSuccessEvent).
While receiving a message, a plugin can throw an exception,
eu.domibus.plugin.exception.PluginMessageReceiveException, in order to
send a specific error message to the sender.
Asynchronous notifications
A plugin can be configured to receive notifications asynchronously from Domibus. In this mode, Domibus sends a JMS message to the plugin notification queue. The plugin JMS listener consumes JMS notification messages from the notification queue and then it will notify the plugin.
In order to receive asynchronous notifications, a plugin must create a
eu.domibus.plugin.notification.AsyncNotificationConfiguration Spring
bean.
The class eu.domibus.plugin.notification.PluginAsyncNotificationConfiguration
implements the eu.domibus.plugin.notification.AsyncNotificationConfiguration
interface and it can be used to create the async configuration.
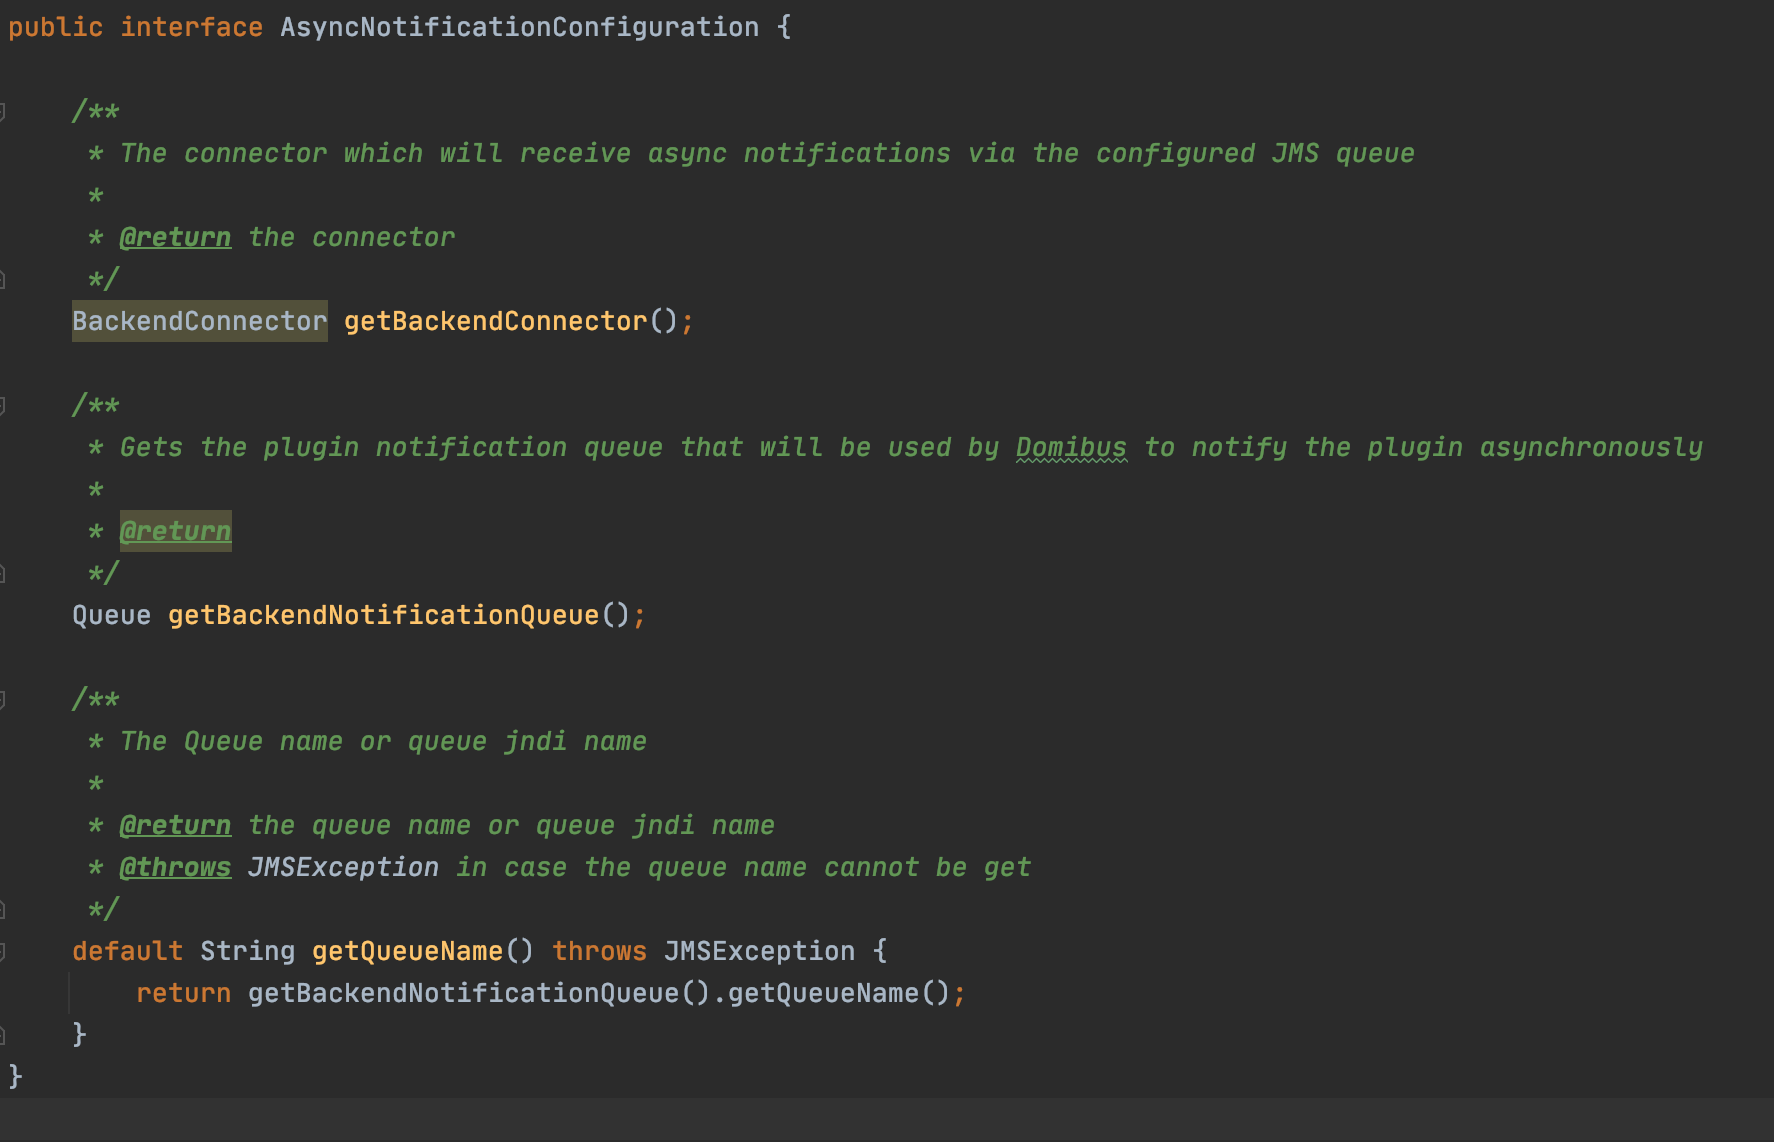
The AsyncNotificationConfiguration must be configured with the plugin
BackendConnector instance, the plugin JMS notification queue where
Domibus will send JMS messages to notify the plugin and the JMS queue
name.
For instance, please find below how the WS Plugin configures the
AsyncNotificationConfiguration Spring bean instance for Tomcat using
Java configuration:

15.3.4. Conditional Spring bean creation
Some Spring beans must be created conditionally depending on the server on which Domibus is deployed. When using Java configuration, a plugin can take advantage of the server conditions that are already existing in the Plugin API:
-
ApplicationServerCondition - `TRUEwhen Domibus is deployed on WebLogic or WildFly -
TomcatCondition-TRUEwhen Domibus is deployed on Tomcat -
WebLogicCondition-TRUEwhen Domibus is deployed on WebLogic -
WildFlyCondition-TRUEwhen Domibus is deployed on WildFly
For instance, the following Spring bean will be created when Domibus is deployed on Tomcat:
@Conditional(TomcatCondition.class)
@Configuration
public class FSPluginTomcatConfiguration15.3.5. Plugin initialization
Plugins can execute initialization logic using a @PostConstruct annotation in a public method in a Spring bean.
This is linear if the initialization of a Spring bean does not depend on other Spring beans. But, in most cases, a Spring bean is using other dependencies to perform its initialization logic.
Using a @PostConstruct annotation has its disadvantages:
-
Can create circular dependencies because the Spring context is not yet fully initialized.
-
The order of the initialization logic across multiple Spring beans is not easy to control.
To mitigate these disadvantages, Domibus offers the possibility of plugins performing initialization logic after the Spring context is fully initialized.
Domibus uses the interface PluginInitializer which has the following methods:
-
void initializeNonSynchronized(): Executes without any locking mechanism. In a cluster environment this method can be executed in parallel in multiple cluster nodes. -
void initializeWithLockIfNeeded():-
in a cluster environment - Executes with locking mechanism. Only one node is executing this method at any given time in this scenario.
-
in a single node - Executes without locking mechanism.
-
For a plugin to execute initialization logic, you need to:
-
Implement the
PluginInitializerin a Spring bean annotated with@org.springframework.stereotype.Service -
Return the
PluginInitializerbean in theeu.domibus.plugin.BackendConnector#getPluginInitializermethod of theBackendConnectorimplementation.
15.3.6. Validation of the submission
There are uses cases when it is required that the Submission object is validated before it is being delivered to the plugin. For instance, the user might want to verify that one of all the payloads is valid against a custom XSD schema. In this case, it does not make sense to deliver the message to the plugin for processing if it is not valid.
In order to better understand why the current API is not sufficient for this use case we have to understand first how the Submission object is delivered to the plugin for processing.
There are two transactions involved in the Submission processing:
-
In the first transaction, the message is stored in the database and a signal is sent internally via JMS to trigger the Submission processing.
-
A JMS listener is listening to Submission processing events and triggers the processing.
If the Submission is validated in the second step it would be too late because the Submission has been already saved and accepted for processing in the first step. This is the reason why we need to perform the Submission validation in the first step. If the Submission is not valid, an exception will be raised and the processing will not be performed.
The API for Submission validation can be found in the plugin API under
the package eu.domibus.plugin.validation.
Hereunder you can find the class diagram of the classes involved in the submission validation:
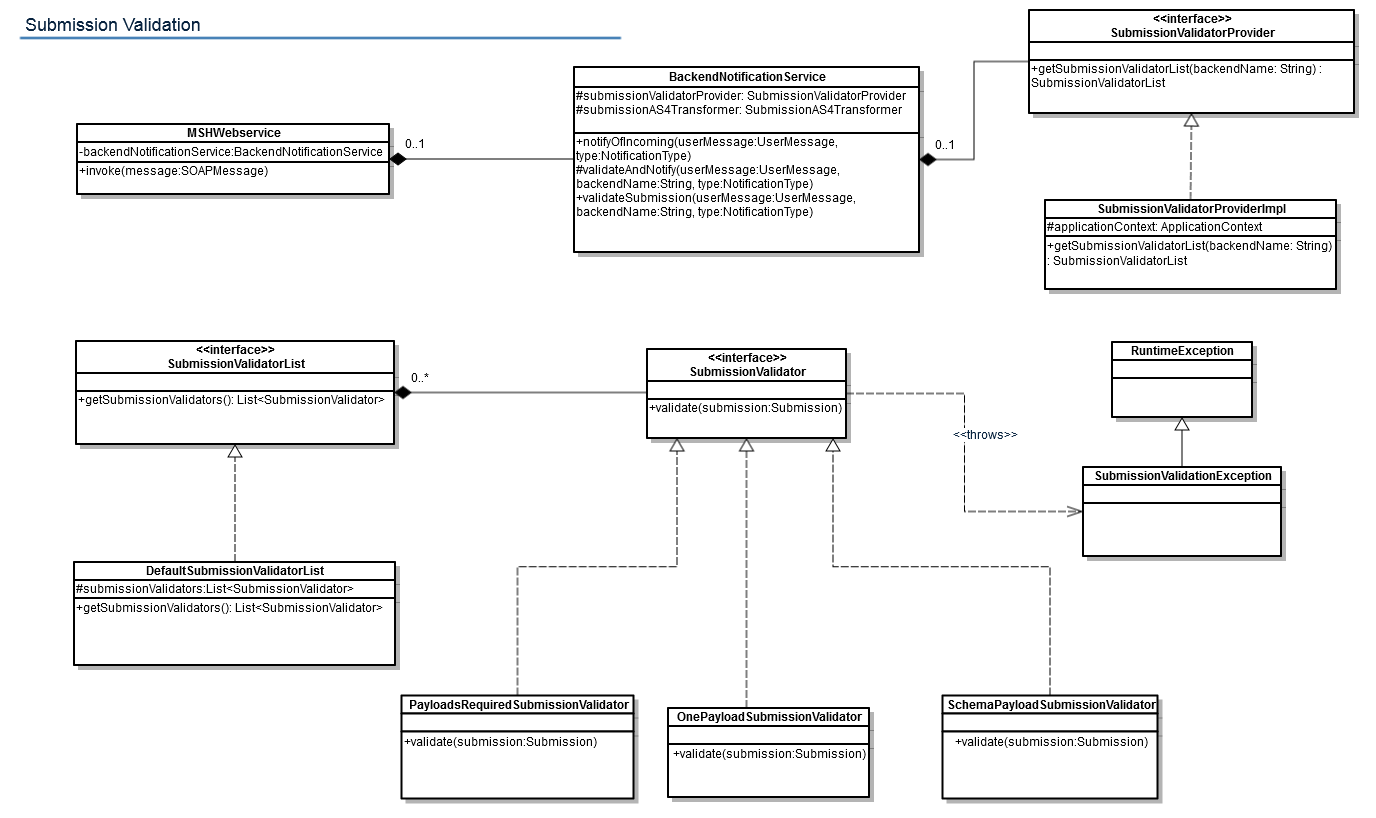
In order to validate the Submission object, one has to declare in the
plugin Spring context a bean of type eu.domibus.plugin.validation.SubmissionValidatorList.
The bean id needs to contain the plugin name. The core will automatically discover
the bean of type SubmissionValidatorList and perform the validation by
calling the validate method on each configured SubmissionValidator.
In the plugin API there is already a default implementation of the
SubmissionValidatorList interface DefaultSubmissionValidatorList
that has an java.util.ArrayList for maintaining the list of validators.
By default Domibus comes with 3 implementations of the
SubmissionValidator interface. An example how to use them can be found
in the next paragraph.
- eu.domibus.submission.validation.OnePayloadSubmissionValidator
-
validates that there is at least one payload present in the Submission
- eu.domibus.submission.validation.PayloadsRequiredSubmissionValidator
-
validates that there is only one payload present in the Submission
- eu.domibus.submission.validation.SchemaPayloadSubmissionValidator
-
validates that the payloads are valid against a custom XSD schema
Below is an extract of a custom plugin Spring context where we can see that a custom validator has been implemented and there are 3 validators used to validate the Submission:
<!-- custom validator -->
<bean id="customValidator"
class="eu.domibus.submission.validation.CustomSubmissionValidator"/>
<bean id="customJaxbContext" class="javax.xml.bind.JAXBContext"
factory-method="newInstance">
<**constructor-arg type="java.lang.String"
value="eu.domibus.plugin.custom.domain"/> +
</**bean**>
_<!-- schema validator -->
<bean id="customPayloadSchemaValidator"
class="eu.domibus.submission.validation.SchemaPayloadSubmissionValidator">
<property name="jaxbContext" ref="customJaxbContext"/>
<property name="schema" value="classpath:xsd/as4Payload.xsd"/>
</bean>
+
__<!-- validators list -->
__<bean id="customSubmissionValidatorList"
class="eu.domibus.plugin.validation.DefaultSubmissionValidatorList">
<property name="submissionValidators">
<list>
<ref bean="onePayloadSubmissionValidator"/>
<ref bean="customValidator"/>
<ref bean="customPayloadSchemaValidator"/>
</list>
</property>
</bean>15.3.7. Plugin Security
Plugins security is disabled by default.
To configure Domibus to require authorization, set domibus.auth.unsecureLoginAllowed to FALSE in the domibus.properties configuration file.
|
Important
|
When security for plugins is activated:
|
Authentication
The service eu.domibus.ext.services.AuthenticationExtService provided in the plugin API can be used by the plugins to authenticate the request.
It provides to the plugins two Java methods for authentication:
|
|
|---|---|
|
|
Blue Coat is the name of the reverse proxy at the EC. It forwards the request in HTTP with the certificate details inside the request (“Client-Cert” header key).
The authenticate method evaluates the three supported authentication methods in the following order: Basic Authentication, X509Certificates, Blue Coat certificates. The first authentication method found is executed, and additional authentication methods available aren’t evaluated.
Users configured in the Plugin User UI page can authenticate and call any operation
provided by the eu.domibus.plugin.AbstractBackendConnector class.
By default, there are two plugin users defined:
-
admin, with the role
ROLE_ADMIN; -
user, with the role
ROLE_USER,configured with Original User,
urn:oasis:names:tc:ebcore:partyid-type:unregistered:C1.
Custom plugins can use their own custom authentication providers and perform different types of authentications.
In case of custom authentication:
-
the Spring
SecurityContextHolderhas to set correctly theauthenticationparameter after a successful authentication:SecurityContextHolder.getContext().setAuthentication(authentication) -
It is mandatory that the method
getPrincipal()of the authentication parameter set above returns the original user value associated to the authenticated user. -
This original user value is used to authorize the user to a specific message.
|
See Also
|
For more information on how it is implemented, see Authorization. |
Authorization
The authorization for the method defined in eu.domibus.plugin.AbstractBackendConnector is performed at Java method level using the Spring @PreAuthorize annotation.
@PreAuthorize("hasAnyRole('ROLE_USER', 'ROLE_ADMIN')")
public void hasUserOrAdminRole() {}
@PreAuthorize("hasAnyRole('ROLE_ADMIN')")
public void hasAdminRole() {}There are three roles defined for the plugin users:
-
ROLE_AP_ADMIN: -
ROLE_ADMIN -
ROLE_USER
Below is a table mapping user roles and the methods from the eu.domibus.plugin.AbstractBackendConnector class they are allowed to call and when.
Roles |
Methods |
||||||||||
|---|---|---|---|---|---|---|---|---|---|---|---|
|
|
||||||||||
|
|
15.3.8. Logging
The logging service is provided in the domibus-logging module, which is released together with the main Domibus application.
|
See Also
|
For more information about the |
private static final DomibusLogger LOG =
DomibusLoggerFactory.getLogger(BackendWebServiceImpl.class);15.3.9. Caching
Domibus has two types of caching mechanisms available:
-
Local - Available when Domibus is deployed in a single instance as well as in a cluster.
Use this cache when you don’t want to replicate the cache across the cluster deployment. -
Distributed - Only available in a cluster deployment.
Use this cache when you want to replicate the cache across the cluster deployment.
Local cachex
Domibus uses Ehcache implementation for local caching using @Cacheable annotations or programmatically.
At plugin level you can add two configuration files for Ehcache, to define their specific cache names.
|
Important
|
All configured caches are merged into the Domibus Ehcache manager. |
Ehcache Default File
Regarding the default Ehcache file (classpath file), the:
-
filename convention is
<pluginname>-plugin-default-ehcache.xml, where<pluginname>stands for the name of the plugin. For example, for the default WS plugin, the file name isws-plugin-default-ehcache.xml. -
expected location for this file (in a Java project) is:
/src/main/resources/config/ehcache/.-
While in the plugin’s .jar, this cache file is located at
/config/ehcache/.
-
|
Note
|
Cache names defined in this file need to be prefixed with a
plugin name to avoid collision with Domibus cache names.
Otherwise, Domibus will throw an exception and will not deploy. |
<ehcache>
<cache name="wsplugin.policyCache"
maxBytesLocalHeap="5m"
timeToLiveSeconds="3600"
overflowToDisk="false">
</cache>
</ehcache>External cache
-
The filename convention is
<pluginname>-plugin-ehcache.xml, where<pluginname>stands for the name of the plugin. For example, for the default WS plugin, the file name isws-plugin-ehcache.xml. -
The expected location is:
$\{domibus.config.location}/plugins/config.
Where{domibus.config.location}stands for your Domibus installation directory.
|
Note
|
The cache names defined here can override the ones defined in the classpath file (see Ehcache Default File), they must not override with Domibus cache names. |
<ehcache>
<cache name="wsplugin.policyCache" (1)
maxBytesLocalHeap="5m"
timeToLiveSeconds="360"
overflowToDisk="false">
</cache>
<cache name="wsplugin.crlByCert"
maxBytesLocalHeap="5m"
timeToLiveSeconds="3600"
overflowToDisk="false">
</cache>
</ehcache>-
In this example,
wsplugin.policycacheoverrides the name defined in the classpath file.
How Domibus processed multiple declared caches:
-
Parses:
-
default-ehcache.xml(classpath), and -
config/internal/ehcache.xml(which may override the caches declared in the first file).
-
-
Parses:
-
all plugin default files from classpath (.jar)
<pluginname -default-ehcache.xml>, and -
all caches to a plugin cache manager (in memory).
-
-
Next,
-
Parses all plugin non-default files - from
/plugins/configfolders. -
Adds the caches to the same plugins manager, which may override the caches defined at step 2.
-
-
Merges the plugins cache manager (steps 2 and 3) to the Domibus cache manager (step 1).
-
If there is a plugin cache that is overriding a Domibus cache, then Domibus throws a
DomibusCoreExceptionexception and deployment is stopped.
Distributed cache
The distributed cache is only available in a cluster deployment. In a non-cluster deployment, the distributed cache defaults to the local cache.
In a cluster deployment, once you add an entry in a distributed cache, the change is replicated automatically across the cluster members.
The distributed cache is accessible via Java API and via REST.
A custom plugin can access the distributed cache via the
eu.domibus.ext.services.DistributedCacheExtService Java class.
The following methods are available:
-
void createCache(String cacheName): creates or gets a distributed cache with the specified name. If the cache does not exist, it will be created with the default values and near cache configuration specified in thedomibus-default.propertiesfile. -
void createCache(String cacheName, int cacheSize, int timeToLiveSeconds, int maxIdleSeconds): creates or gets a distributed cache with the specified name and configuration. If the cache does not exist, it will be created with the specified configuration and near cache configuration specified in thedomibus-default.propertiesfile. -
void createCache(String cacheName, int cacheSize, int timeToLiveSeconds, int maxIdleSeconds, int nearCacheSize, int nearCacheTimeToLiveSeconds, int nearCacheMaxIdleSeconds): creates or gets a distributed cache with the specified name and configuration. -
void addEntryInCache(String cacheName, String key, Object value) throws CacheExtServiceException: adds an entry in the cache. -
Object getEntryFromCache(String cacheName, String key) throws CacheExtServiceException: gets an entry from the cache. -
void evictEntryFromCache(String cacheName, String key) throws CacheExtServiceException: evicts an entry from the cache
|
See Also
|
For more about Distributed caching, see the Architecture Overview and Configuring Domibus. |
15.3.10. Plugin Services
The Plugin API offers several services such as monitoring or message acknowledgment, which are described below.
Services can be accessed in two ways:
-
Java API - can be used by the plugin implementers of the custom plugins.
-
REST interface - can be used directly by the C1/C4 backends if the network configuration allows it. See also, Domibus REST API docs.
Message acknowledgement service
This service is used to acknowledge when a message is:
-
delivered from C3 to the backend;
-
processed by the backend.
Typical use cases for using MessageAcknowledgementService
A message is:
-
received by C3 from C2: the plugin that handles the message registers an acknowledgment before delivering the message to the backend;
-
processed by the backend and it informs C3 via the plugin; the plugin registers an acknowledgment that the message has been processed by the backend;
-
processed by the backend and informs C3 directly via the REST service exposed by the core; a REST service is exposed containing the same signature as
\{@link MessageAcknowledgeService}.
Ways of performing Message Acknowledgments
There are two ways of performing message acknowledgments between C3 and the backend:
- Synchronously
-
C3 (via the plugin) notifies the backend synchronously and the backend process the messages also synchronously. In this case, there is no need for the backend to send a separate message acknowledgement so the plugin at the C3 side registers the processing of the message by the backend.
Synchronous Message AcknowledgmentBackendResponse backendResponse = plugin.callBackendWS(message) messageAcknowledgeService.acknowledgeMessageDelivered(message.getId(), new Timestamp(System.currentTimeMillis())) messageAcknowledgeService.acknowledgeMessageProcessed(message.getId(), new Timestamp(System.currentTimeMillis())) - Asynchronously
-
C3 notifies the backend synchronously and the backend process the messages asynchronously. In this case, the backend will send a separate message acknowledgement when it manages to process the message successfully.
plugin.sendMessageToTheBackend(message)
messageAcknowledgeService.acknowledgeMessageDelivered(message.getId(),
new Timestamp(System.currentTimeMillis()))Monitoring service
This service is used to monitor failed messages and to restore them if necessary.
Assuming that "failed message" means failed to be sent by the sender access point and getting the status set to SEND_FAILURE, the monitoring service provides the possibility to:
-
List all the failed messages
-
Restore a failed message
-
Restore all messages failed during a specific period
-
Know for how long a message has been failing
-
Get the history of all delivery attempts
-
Delete the payload of a failed message
Command service
This service is used to execute commands in a cluster.
A plugin can execute a cluster command using the steps below:
-
Implement the command logic in a Spring service bean which implements the
eu.domibus.ext.services.CommandExtTaskinterface. The command task must use a unique command name and must indicate that it can handle the command in thecanHandlemethod.@Service public class CustomCommandTask implements CommandExtTask \{ public static final String COMMAND_NAME = "mycommand"; @Override public boolean canHandle(String command) \{ return COMMAND_NAME.equals(command); } @Override public void execute(Map<String, String> properties) \{ //custom logic } } -
Trigger the execution of the command using the method
eu.domibus.ext.services.CommandExtService#executeCommand(String commandName, Map<String, Object> properties).
The command name is the name of the command defined in the step above. Custom parameters can be passed to the command using the properties parameter.
Backend Connector Provider Service
This service is used to check and validate the backend providers configuration in relation to the enabled state, meaning that Domibus requires at least one plugin to be enabled on each domain.
void validateConfiguration(final String domainCode)-
To trigger the validation of the enable state configuration on a domain, this method throws a `ConfigurationException ` exception if there is no plugin enabled on the respective domain.
boolean canDisableBackendConnector(String backendName, final String domainCode)-
To verify if the plugin with the specified name can be disabled on the specified domain:
void backendConnectorEnabled(String backendName, String domainCode)-
The specified plugin notifies Domibus that it wants to be enabled on the specified domain. This is necessary because Domibus manages message queues and CRON trigger jobs for a plugin and this method creates these resources for the specified domain.
backendConnectorDisabled(String backendName, String domainCode)-
The specified plugin notifies Domibus that it wants to be disabled on the specified domain. This is necessary because Domibus manages message queues and CRON trigger jobs for a plugin and this method deletes these resources for the specified domain. Validation is performed before:
15.3.11. Password encryption
Passwords configured in the plugin configuration files are stored by default in clear text. But password encryption of Domibus plugins’s defined in the plugin’s configuration file is supported using symmetric encryption with the AES/GCM/NoPadding algorithm.
To use password encryption, users need to implement the
eu.domibus.plugin.encryption.PluginPropertyEncryptionListenerinterface interface.
The plugins' passwords can be configured in property files or in other sources, such as a database.
If password encryption is enabled, when `domibus.password.encryption.active is set to TRUE, Domibus generates the secret keys that are used to encrypt the passwords.
Domibus notifies the subscribed plugin listeners to encrypt their own passwords via the
via the PluginPropertyEncryptionListenerinterface interface.
Custom plugins can use eu.domibus.ext.services.PasswordEncryptionExtService,to handle password encryption.
Password encryption is already implemented for the Default File System Plugin, which you can use as template for implementing password encryption for your custom plugins.
For example, the fsplugin.authentication.password set as
fsplugin.authentication.password=test123 when encrypted the result is:
fsplugin.authentication.password=ENC(4DTXnc9zUuYqB0P/q7RtRHpG9VJLs3E=).
At the API level, the password properties are decrypted automatically at
runtime by the eu.domibus.ext.services.DomibusPropertyExtService service
when they are retrieved, so there plugins are not require to perform additional actions.
15.3.12. Enable awareness of plugins
To signal that plugins can be enabled or disabled, you can implement the EnableAware interface.
This can be implemented per domain in the case of Multitenant environments.
For users' convenience, AbstractBackendConnector already implements this interface.
boolean isEnabled(final String domainCode)-
The default implementation returns TRUE for backward compatibility. In the
AbstractBackendConnectorclass, there is the protected method,doIsEnabledthat checks the value of the property that specifies if a domain is enabled. To do this, the method asks the plugin’s implementation to provide the property manager and the property name by calling the two methods below:-
DomibusPropertyManagerExt getPropertyManager() -
String getDomainEnabledPropertyName()
-
If a property manager is not specified by the implementing plugin, the
domibus property provider is used instead.
A plugin implementor can call this method when overriding the isEnabled.
Default plugins do exactly this.
void setEnabled(final String domainCode, final boolean enabled)-
The default implementation does nothing for backward compatibility. The
doSetEnabledprotected method inAbstractBackendConnectorchecks if the enabled property value has the required value. If it does not have it, it sets the property value to the required value.
The default property change listener for this property is calledDefaultEnabledChangeListener. It calls one of the following methods, depending on the requested value:-
void backendConnectorEnabled(String backendName, String domainCode) -
void backendConnectorDisabled(String backendName, String domainCode)
-
These methods are described in Backend Connector Provider Service.
String getName()-
Provides the name of the plugin.
boolean shouldCoreManageResources()-
The default implementation returns false for backward compatibility. Default plugins return true. This means that Domibus will create and destroy some resources (like message listener containers and CRON triggers) when a plugin is enabled or disabled on a domain.
PluginMessageListenerContainer getMessageListenerContainerFactory()-
The default implementation returns
NULL, for backward compatibility. The custom implementation should return the plugin’s service that manages the plugin message listener containers' factory and which is used by Domibus to create and destroy them on behalf of the plugin.
At startup, Domibus ensures that at least one plugin is enabled per domain. When Domibus loads the plugins at startup, if all plugins are disabled, it will enable one plugin.
15.4. Plugin properties
A plugin is expected to need to define its specific set of properties at some point,
apart from the Domibus properties.
Plugin properties are configured in a property file, such as ws-plugin.properties
in the case of the default WS plugin.
Domibus supports plugins using integrated property management.
The plugin must: 1. Define its properties in the plugin property file, 2. Create the properties' metadata, a property metadata manager and a property manager, to manage how and where these properties are retrieved and set.
15.4.1. Property files
A plugin can configure properties in two locations:
-
in the classpath
-
the file system.
Domibus introspects the classpath for files under the config location which ends
xin plugin-default.properties.
When using Maven, the plugin can configure the default property file under src/main/resources/config.
Once a default property file is found, Domibus adds all the properties
in the central org.springframework.context.support.PropertySourcesPlaceholderConfigurer.
|
Important
|
A plugin cannot configure another PropertySourcesPlaceholderConfigurer, neither via Java configuration nor XML configuration (context:property-placeholder).
|
A plugin can also configure an external property file located under
{domibus.config.location}/plugins/config. The properties defined in the
external property file override the default properties defined in the
classpath.
15.4.2. Property metadata
To integrate into the property management, one needs to create a property manager. This can be achieved by:
-
Creating a class that implements the
DomibusPropertyManagerExtinterface or -
By extending the abstract class
DomibusPropertyExtServiceDelegateAbstract.
If the properties are intended to be managed using its own property bag then you should implement the interface directly. If the properties are to be stored in the Domibus property bag then one should extend the abstract class.
If you are extending the abstract class (as, for example, the default JMS plugin does),
implement only the Map method, and provide the map of properties metadata.
public abstract Map <String, DomibusPropertyMetadataDTO> (1)
getKnownProperties();-
Where the
DomibusPropertyMetadataDTOclass stores the attributes of a property.
The most relevant attributes are:
-
name- the name of the property, the same as the one stored in the file with the value. -
type- used for validation when changing them at runtime.
Can be:NUMERIC,BOOLEAN,CONCURRENCY,EMAIL,CRONorSTRING. -
writable- specifies if the property can be changed at runtime. -
usage- Options areGLOBAL,DOMAIN,SUPERor a combination of them, as described in Domibus Architecture. -
withFallback– falls back to the global value for the domain property. -
storedGlobally– must be-
FALSE: if the plugin manages its value -
TRUE: if Domibus property provider does it.
-
For plugins to manage properties internally, you need to:
-
Implement all the methods of the
DomibusPropertyManagerExtinterface. -
Besides providing the map of property metadata as described above, you need to implement the
getandsetmethods to store and retrieve the property value from the bag. -
The
storedGloballyattribute must be set to false.
If a property is marked as writable, it must be possible to change it at runtime and it will appear in the admin console properties page (and users will be able to change it), so the set methods need to be implemented accordingly. If some custom code needs to be executed while changing it, you need to:
-
create a class that implements the
PluginPropertyChangeListenerinterface, -
and the method
handlesProperty()must return TRUE if thepropertyNameparameter is equal to the property name for which the custom code must be executed.
If a property has domain usage, the property manager needs to manage a different value for each domain. In this case, the methods
-
String getKnownPropertyValue(String propertyName) -
void setKnownPropertyValue(String propertyName, String propertyValue)
need to get and set the value for the current domain of the Domibus.
15.5. Plugin configuration and deployment
Message routing configuration and plugin deployment instructions for all supported platforms can be found in Domibus Configuration.
15.6. API Documentation
Domibus scans automatically the classpath inside the plugin’s .jar file:
-
The filename convention is
<pluginname>-domibusServlet.xml, as in the example:config/ws-plugin-domibusServlet.xml. -
The expected location (in the Java project) is:
/src/main/resources/config/,-
while in the plugin’s .jar, this file is located at `/config/;
-
this file should contain the package name used for all the REST APIs (Example:
com.custom.plugin.rest):<beans xmlns="http://www.springframework.org/schema/beans" xmlns:context="http://www.springframework.org/schema/context" xmlns:xsi="http://www.w3.org/2001/XMLSchema-instance" xsi:schemaLocation=" http://www.springframework.org/schema/beans http://www.springframework.org/schema/beans/spring-beans-3.0.xsd http://www.springframework.org/schema/context http://www.springframework.org/schema/context/spring-context-3.0.xsd"> <context:component-scan base-package="com.custom.plugin.rest" /> </beans>
-
package com.custom.plugin.rest;
@RestController
@RequestMapping(value = "/custom/plugin")
public class CustomPluginConfiguration {
@GetMapping(path = "/example")
public ResponseEntity<String> get() {
return ResponseEntity.ok("rest service triggered");
}This API will be called with the path:
|
Note
|
Standard Javadoc documentation for the API can be downloaded from: https://ec.europa.eu/digital-building-blocks/wikis/display/DIGITAL/Domibus+releases. |
15.7. Multitenancy
To understand how Multitenancy works in Domibus, please refer to Multitenancy in Domibus Architecture, especially the Plugins sections.
After reading about the Domibus architecture, the following should be clear regarding multitenant environments:
-
Authentication is always required to submit a message (C1 to C2),
-
Each plugin user is associated to one domain exclusively,
-
Each domain has its own schema in the database,
-
A general schema exists to match users to domains,
-
Default plugins already work in multitenant environment; they can be used as examples.
As a requirement, Custom plugins should work in a Domibus multitenant environment.
The Domibus Plugin API supports the handling of multiple domains and accessing domain-specific database schemas.
Handling Domains
@Autowired
protected DomibusConfigurationExtService domibusConfigurationExtService;
boolean isMultiTenantAware =
domibusConfigurationExtService.isMultiTenantAware();@Autowired
private DomainContextExtService domainContextExtService;
DomainDTO domainDTO = domainContextExtService.getCurrentDomainSafely();When the plugin uses asynchronous execution, the domain code is required to be configured manually.
Consider the scenario where a message is put in a JMS queue and a worker picks it up and sends it.
-
Along with the message, the domain code must be added to the JMS message.
-
The consumer should first get the domain based on the domain code, set it as current domain, and only then execute the job.
-
Finally, the plugin is responsible to clear the current domain.
@Autowired
protected DomainExtService domainExtService;
final DomainDTO = domainExtService.getDomain(domainCode)@Autowired
protected DomainContextExtService domainContextExtService;
try {
domainContextExtService.setCurrentDomain(currentDomain);
// … executeJob
} finally {
domainContextExtService.clearCurrentDomain();
}Accessing the Database
Every domain has its own schema in the database. In case the plugin needs a new table to persist plugin specific data, it is recommended to keep the same segregation as in the Domibus core and add a new table in the database schema of each domain.
The recommended naming convention is:
-
<pluginname>TB<name>for tables storing plugin data. -
<pluginname>QRTZ<name>for quartz tables. See also Creating a Quartz Job.
Example
The example below shows how to save message info into a new table:
-
Create the tables in the database (requires database admin user access).
-
Table Name:
WS_PLUGIN_TB_MESSAGE -
Columns:
-
ID_PK[primary key (auto increment)] -
DESCRIPTION
-
-
-
Create the entity class:
import javax.persistence.; @Entity @Table(name = "WS_PLUGIN_TB_MESSAGE") public class MessageInfoEntity { @Id + @Column(name = "ID_PK") private long entityId; @Column(name = "DESCRIPTION") private String description; /*** @return the primary key of the entity ***/ public long getEntityId() { return this.entityId; } public void setEntityId(long entityId) { this.entityId = entityId; } public MessageInfoEntity(final String description) { this.description = description; } public String getDescription() { return description; } public void setDescription(String description) { this.description = description; } } -
Create a basic DAO implementation providing the standard CRUD operations. The class reuses Domibus'
EntityManager.public abstract class BasicDao<T> { protected final Class<T> typeOfT; @PersistenceContext(unitName = "domibusEM") protected EntityManager em; /*** @param typeOfT The entity class this DAO provides access to ***/ public BasicDao(final Class<T> typeOfT) \{ this.typeOfT = typeOfT; } public <T> T findById(Class<T> typeOfT, String id) \{ return em.find(typeOfT, id); } @Transactional(propagation = Propagation.REQUIRED) public void create(final T entity) \{ em.persist(entity); } @Transactional(propagation = Propagation.MANDATORY) public void delete(final T entity) \{ em.remove(em.merge(entity)); } public T read(final long id) \{ return em.find(this.typeOfT, id); } @Transactional(propagation = Propagation.MANDATORY) public void updateAll(final Collection<T> update) \{ for (final T t : update) \{ this.update(t); } } @Transactional(propagation = Propagation.MANDATORY) public void deleteAll(final Collection<T> delete) \{ for (final T t : delete) \{ this.delete(t); } } @Transactional(propagation = Propagation.MANDATORY) public void update(final T entity) \{ em.merge(entity); } public void flush() \{ em.flush(); } }NoteEntityManageris already configured in Domibus core to be multitenant aware and persist the data in the right table of the current domain. -
Create the MessageInfoDao class, that extends the BasicDao:
@Repository public class MessageInfoDao extends BasicDao<MessageInfoEntity> \{ + public MessageInfoDao() \{ super(MessageInfoEntity.class); } } -
Save the message info:
@Autowired + MessageInfoDao messageInfoDao; String description = “New message messageId = " messageInfo.getMessageId(); messageInfoDao.create(new MessageInfoEntity(description));
15.7.1. Creating a Quartz Job
To create a new Quartz job that executes plugin specific tasks, it is
recommended to extend the DomibusQuartzJobExtBean abstract class and
override the executeJob() method with the specific actions.
If you follow this implementation, the domain configuration is handled internally by Domibus.
@DisallowConcurrentExecution
// Only one Worker runs at any time on the same node
public class MyPluginWorker extends DomibusQuartzJobExtBean {
@Override
protected void executeJob(JobExecutionContext context, DomainDTO domain)
{
//do plugin specific tasks
}
}<bean id="myPluginWorkerJob"
class="org.springframework.scheduling.quartz.JobDetailFactoryBean">
<property name="jobClass" value="eu.domibus.plugin.worker.
MyPluginWorker "/>
<property name="durability" value="true"/>
</bean><bean id="MyPluginWorkerTrigger"
class="org.springframework.scheduling.quartz.CronTriggerFactoryBean"
scope="prototype">
<property name="jobDetail" ref=" myPluginWorkerJob "/>
<property name="cronExpression" value=" 0 0/1 * * * ?"/>
<property name="startDelay" value="20000"/>
</bean>|
Note
|
The default FileSystem plugin provides examples of how to create new Quartz jobs to purge sent, received and failed files that were archived. |
15.7.2. Setting the domain MDC in logs
|
See Also
|
For more about information, see Logging. |
In multi-tenant scenarios, the domain name is logged in an Mapped
Diagnostic Context (MDC) field represented in the logback configuration by
[%X{d_domain}].
The DomibusLogger class should be used for this purpose.
Within the plugins, domain MDC can be set in the logs using the
following code:
+
import eu.domibus.logging.DomibusLogger;
import eu.domibus.logging.DomibusLoggerFactory;
import static eu.domibus.logging.DomibusLogger.MDC_DOMAIN;
private static final DomibusLogger LOG =
DomibusLoggerFactory.getLogger(….class);
LOG.putMDC(MDC_DOMAIN, domain.getCode());15.8. Removed API and Migrating
Domibus 5.0 introduces the deprecation of several classes and methods from the Plugin API. Here you can find more information about these changes and how to use the new API.
NotificationListener
-
The
NotificationListenerinterface, used by plugins to receive async notifications was replaced byeu.domibus.plugin.notification.AsyncNotificationConfiguration. -
The
NotificationListenerServiceclass was implementing:-
eu.domibus.plugin.NotificationListener -
eu.domibus.plugin.MessageLister
-
|
See Also
|
For more migration information, see Asynchronous notifications. |
Methods removed from the NotificationListener interface
Obsolete |
Replacement |
||
|---|---|---|---|
|
|
||
|
- |
||
|
|
||
|
|
||
|
|
Additional changes in classes and methods
Obsolete |
|
||
|---|---|---|---|
Replacement |
|
||
Obsolete |
|
||
Replacement |
|
||
Methods from the |
|||
Obsolete |
|
||
Replacement |
|
||
Obsolete |
|
||
Replacement |
|
||
Obsolete |
|
||
Replacement |
|
||
Obsolete |
|
||
Replacement |
(removed) |
||
Plugin Mode |
|||
Obsolete |
Plugin mode concepts |
||
Replacement |
|
||
Methods from the |
|||
Obsolete |
|
||
Replacement |
|
||
Obsolete |
|
||
Replacement |
|
||
Methods from the |
|||
Obsolete |
|
||
Replacement |
|
||
15.8.1. Plugin Configuration Sample Migration
Below is an example with an old plugin configuration and the explanation on how to migrate to the new plugin configuration. This example features the WS Plugin.
<amq:queue id="notifyBackendWebServiceQueue"
physicalName="domibus.notification.webservice"/>
<bean id="backendWebservice"
class="eu.domibus.plugin.webService.impl.BackendWebServiceImpl">
<constructor-arg value="backendWebservice"/>
</bean>
<bean id="webserviceNotificationListenerService"
class="eu.domibus.plugin.NotificationListenerService"
c:queue-ref="notifyBackendWebServiceQueue" c:mode="PULL"
p:backendConnector-ref="backendWebservice"/><bean id="backendWebservice"
class="eu.domibus.plugin.webService.impl.WebServicePluginImpl">
<constructor-arg value="backendWebservice"/>
</bean>
<bean id="webserviceNotificationListenerService"
class="eu.domibus.plugin.notification.PluginAsyncNotificationConfiguration"
c:queue-ref="notifyBackendWebServiceQueue"
c:backendConnector-ref="backendWebservice"/>
</bean>
|
Extensions
16. Extension Development
Here you can find technical specifications of Domibus extension mechanism. In particular, this document lays out applicable guidelines to support the technical implementation of an extension.
The scope of this document is to define:
-
The functional aspects of the extension mechanism,
-
The technical and operational aspects of the extension mechanism.
This document is intended for the Directorate Generals and Services of the European Commission, Member States (MS) and companies of the private sector wanting to customize the incoming AS4 messages authorisation and signing certificate trust validation.
In particular:
-
Business Architects will find it useful for understanding the possible integration towards external trust systems.
-
Analysts and developers will find it useful to understand and implement how to customize message trust and authorisation.
-
Testers can use this document to test the use cases described.
-
Overview of the extension mechanism and links to related information.
-
Functional specifications of the existing extension mechanism and an overview of the customisation possibilities.
-
Technical specifications of the existing extension mechanism and an overview of the customisation possibilities. In-depth description of the extension interfaces.
-
How to build and register a custom extension.
-
List of configuration files useful for extension development.
The extension cookbook defines the technical and operational aspects of Domibus extension mechanism with links to the functional specifications. It also provides guidelines for the adequate implementation of the interfaces.
The extension mechanism allows the customisation of AS4 message signing certificate trust validation and AS4 message authorisation in a flexible way.
Extensions are dependent on the domibus-iam-spi module, which is
released together with the main Domibus application. Any changes to
previous API versions will be addressed in a migration guide.
It is assumed that the reader is aware of the operational, technical and functional context of eDelivery Domibus access point:
-
OASIS ebXML Messaging Services
16.1. Functional information
16.1.1. Trust validation
Identity certificates are issued and digitally signed by a Certificate Authority. The Certificate Authority that signed your own certificates is called an Intermediate Certificate Authority (ICA), because it was issued by another Certificate Authority. This process of issuing and signing continues until there is one Certificate Authority that is called the Root Certificate Authority (CA).
The whole process of proving identity when issuing the certificates, auditing the certificate authorities and the cryptographic protections of the digital signatures establish the basis of Trust for certificates.
Default Domibus behaviour
Domibus uses WS-Policy framework to express the access point MSH webservice constraints and requirements. Please consult the Security Policies section to have an overview of the different configuration provided with the Domibus distribution.
Domibus uses an on disk (private) KeyStore to store the access point private certificate and a second on disk (public) KeyStore to store public certificates of counterpart access point. See also the Certificates for setup instructions.
Domibus can ensure the trust in two ways:
-
Direct trust: if the leaf certificate is present and valid in the public KeyStore,
-
Indirect trust: if the leaf certificate is not present in the public KeyStore, the leaf certificate issuer is checked until the certificate root is reached. Practically, Domibus trusts an incoming message if the certificate chain, excluding the leaf, is present and valid in the public KeyStore. This is typically the case for a dynamic receiver profile.
Incoming AS4 messages are signed with the sender certificate. The AS4 protocol uses WSS SOAP Message Security which references X509 certificate by one of the following means:
-
Reference to a subject key identifier
To configure Domibus to reference certificate by subject key identifier, please use the provided eDeliveryAS4Policy policy.
Domibus will use the subject key identifier contained in the AS4 SOAP envelope to extract the signing certificate from the public KeyStore. If the certificate is found and valid, the AS4 message will be considered as trusted. This type of configuration only supports direct trust method.
-
Reference to an issuer and a serial number#
To configure Domibus to reference certificate by issuer and serial number, please use the provided eDeliveryAS4Policy_IS policy.
Domibus will use issuer and serial number contained in the AS4 SOAP envelope to extract the signing certificate from the public KeyStore. If the certificate is found and valid, the AS4 message will be considered as trusted. This type of configuration only supports direct trust method.
-
Reference to a binary security token
To configure Domibus to extract the certificate out of the AS4 message SOAP envelope, please use the provided eDeliveryAS4Policy_BST policy.
Domibus will extract the signing certificate from the AS4 SOAP envelope and use its issuer and serial number to retrieve its equivalent from the public KeyStore.
If the certificate is found and valid, the AS4 message will be considered as trusted. If the leaf certificate is not found within the public KeyStore, Domibus will try to trust the message against the trust chain as explain above. This type of configuration supports both direct and indirect trust method.
-
Reference to a Binary Security token with PKI path#
To configure Domibus to extract the certificate and its trust certificate chain directly out of the AS4 message SOAP envelope, please use the provided eDeliveryAS4Policy_BST_PKI policy.
Generally, the chain is composed of the leaf signing certificate, the ICA and the CA.
Domibus verifies the signing trust path of the certificate chain. To achieve this verification, Domibus expects to find the CA certificate of the chain within the public KeyStore.
If the CA is present and valid, and the signing path of the chain is valid, the AS4 message will be considered as trusted. This type of configuration only supports indirect trust method.
Custom behaviour
By creating a new Trust extension, one can bypass the default Domibus behaviour previously explained.
There is one certificate trust validation extension provided with the Domibus distribution: the domibus-authentication-dss-extension.
For more information about the DSS extension, please refer to the
chapter “DSS Extension Configuration” in Domibus Administration guide
[REF2].
Trust validation sequence
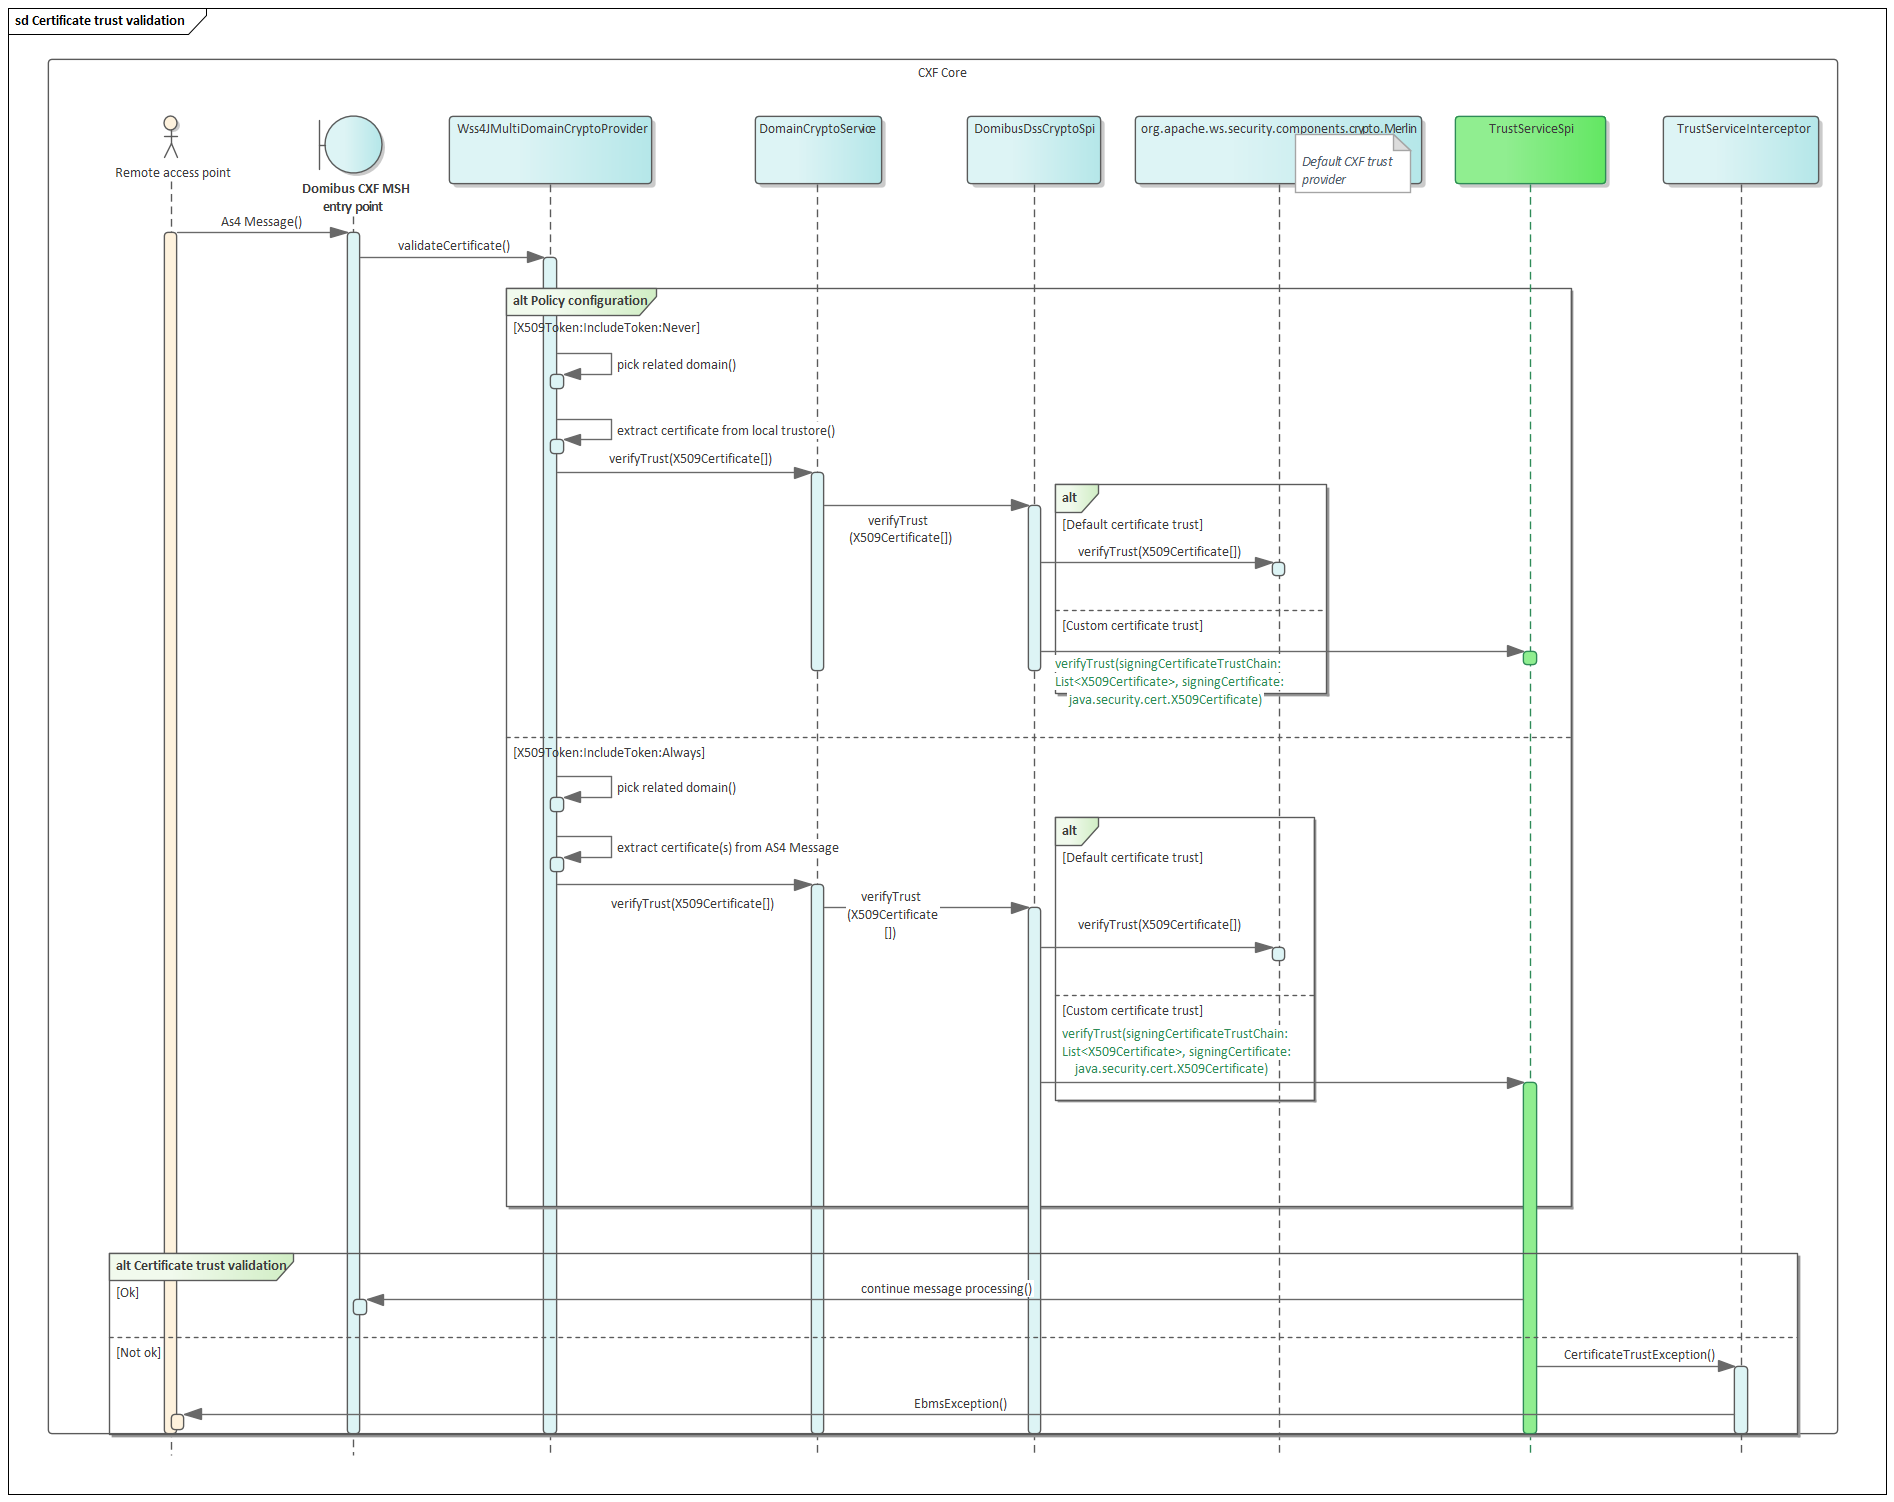
16.1.2. Authorisation
The authorisation extension goal is to provide the possibility to accept or refute messages based on an aggregation of data extracted from different parts of the Domibus system. Information related to certificate, PMode and AS4 message content is provided to the extension.
Default Domibus behaviour
The default Domibus trust mechanism is verifying AS4 message authorisation with the following configurable means:
-
Subject expression validation
By setting a valid regular expression within the “domibus.sender.trust.validation.expression” property, Domibus will apply the regular expression to the signing certificate “subject distinguished name” (see also X509 Certificate specifications).
If the subject distinguished name does not match with the regular expression, the authorisation process will end and reject the AS4 message.
If domibus.sender.trust.validation.expression is empty, no validation
is performed on the certificate subject distinguished name.
-
Public keystore alias validation
By setting domibus.sender.trust.validation.truststore_alias property
to true, Domibus will extract the party name configured in the PMode
that corresponds to the PartyId present within the AS4Message.
The process is as follows:
-
The process looks in the PMode for the value “configuration/businessProcesses/parties/identifier@partyId” that is equal to the value “/eb:Messaging/eb:UserMessage/eb:PartyInfo/eb:From/eb:PartyId” from the AS4 message.
-
Out of that entry, the process extracts the value “configuration/businessProcesses/parties/party@name” to retrieve the name attributed to that party within the PMode.
-
The party name is then used as an alias to extract a certificate from the public KeyStore.
-
If the certificate found is not equal to the one used to sign the message, the authorisation process will end and reject the AS4 message.
-
If no certificate is found for the given alias, Domibus logs a warning but the authorisation process continues.
-
By setting domibus.sender.certificate.subject.check property to TRUE,
and extra validation is performed on the alias. The authorisation
process verifies that the certificate “subject distinguished name”
contains the alias. If it does not, the authorisation process will end
and reject the AS4 message.
Custom behaviour
By creating a new authorisation extension, one can bypass the default Domibus behaviour previously explained.
An authorisation extension can use information from the AS4 Message, the signing certificate and the PMode to perform a custom authorisation.
No default implementation is provided with Domibus.
Authorisation sequence
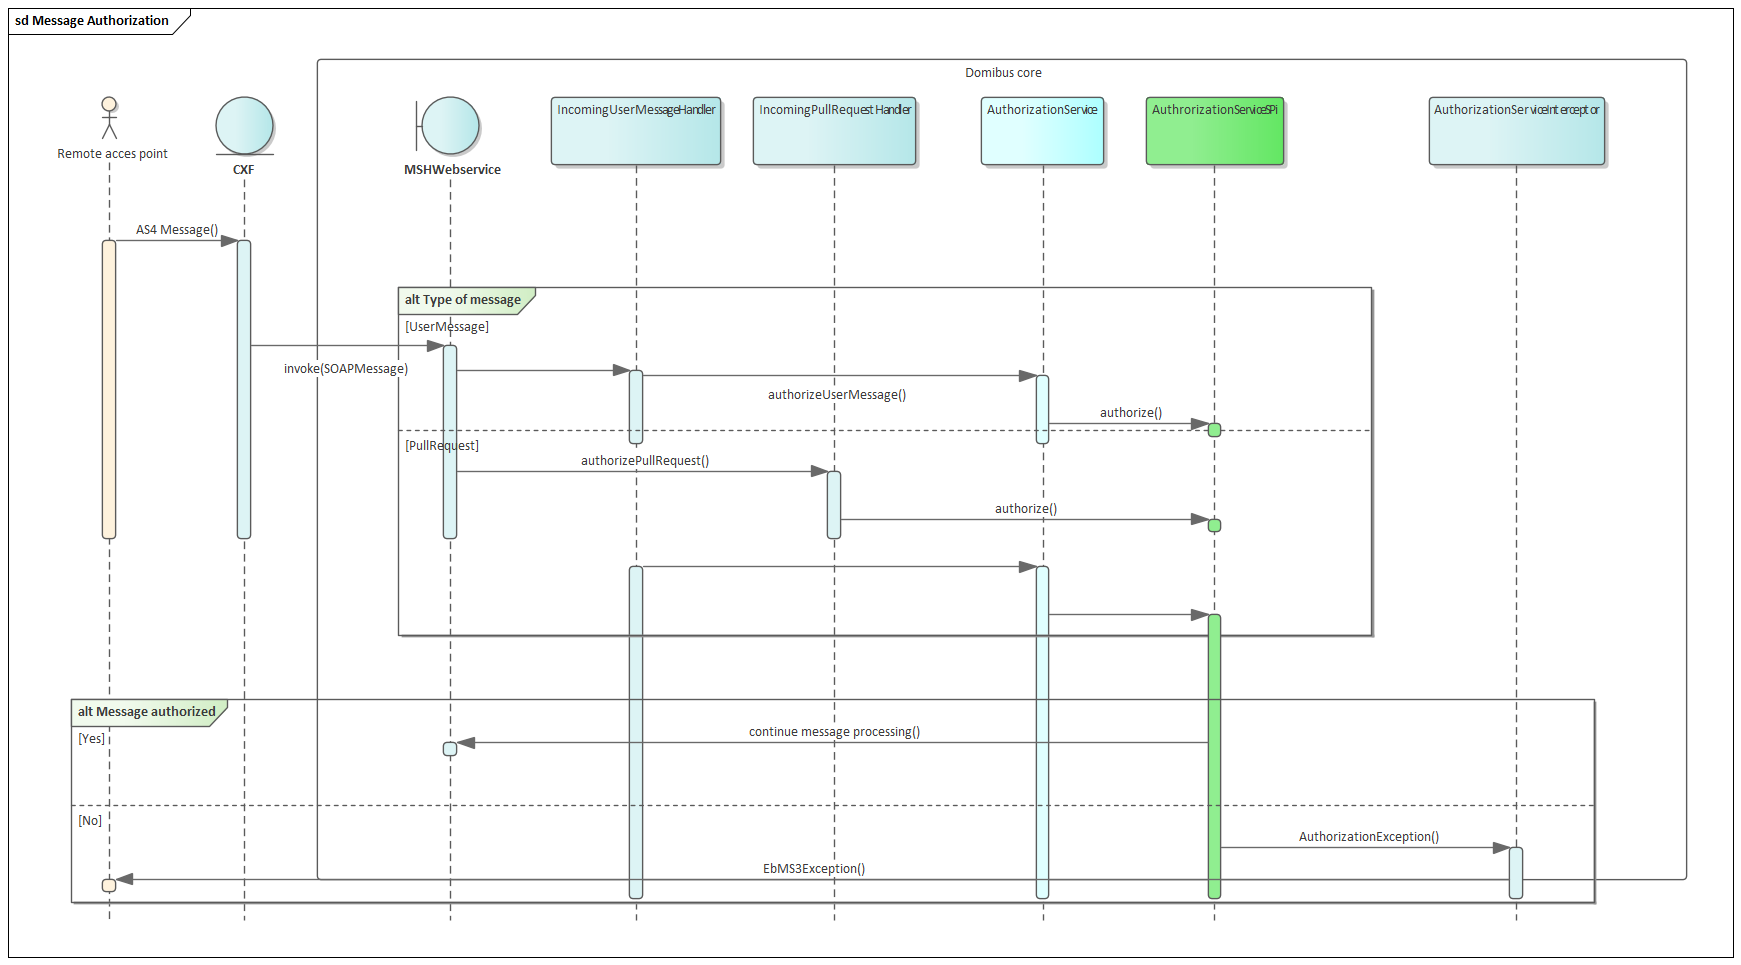
16.2. Technical information
16.2.1. Implementing TrustServiceSpi interface
The interface has 2 methods:
-
verifyTrust -
getIdentifier
The verifyTrust method
The verifytrust method purpose is to validate the trust of the
incoming AS4 message signing certificate.
As explain in section 3.1, the location from where the signing certificate is extracted depends on the security policy used.
The Domibus security policy configuration will determine from where to
extract the certificates that will be passed as parameter to the
verifytrust method.
If the method executes without exception, the signing certificate of the incoming AS4 Message will be considered as trusted and the processing of the message will resume.
void verifyTrust(List<X509Certificate> signingCertificateTrustChain,
X509Certificate signingCertificate) throws CertificateTrustException;If any runtime exception is triggered, the message is refused, and the exception is transformed into an EBMS exception by Domibus.
By throwing a CertificateTrustException exception, one can more precisely control the type of EBMS exception thrown by Domibus. A CertificateTrustException to EBMSException mapping table is documented in section 4.1.1.2.
The following table documents the location of certificates used as verifyTrust method parameters, based on the security policies provided with Domibus.
| Policy name | Certificate token reference | Certificate location | Description |
|---|---|---|---|
eDeliveryAS4Policy.xml |
Key identifier See also section 3.3.1 of OASIS Web Services Security document. |
Receiver trust store |
With this policy, Domibus extracts the signing certificate from the configured public KeyStore. |
eDeliveryAS4Policy_BST.xml |
Binary security token See also 3.3.2 of OASIS Web Services Security document. |
AS4 Message |
With this policy, Domibus extracts the signing certificate from the AS4 message. |
eDeliveryAS4Policy_BST_PKIP.xml |
Binary security token with PKIPATH See also section 3.1.2 and 3.3.2 of OASIS Web Services Security. |
AS4 Message |
With this policy, Domibus extracts the signing certificate and its truth path from the AS4 message. |
eDeliveryAS4Policy_IS.xml |
Issuer and serial number. See also section 3.3.3 of OASIS Web Services Security document. |
Receiver trust store |
With this policy, Domibus extracts the signing certificate from the configured public KeyStore. |
Only the eDeliveryAS4Policy_BST and eDeliveryAS4Policy_BST_PKIP policies extract the signing certificate from the AS4 Message. Therefore, if the trust validation custom extension requires not to use the public KeyStore for incoming messages trust validation, one of those policies should be used.
Data dictionary
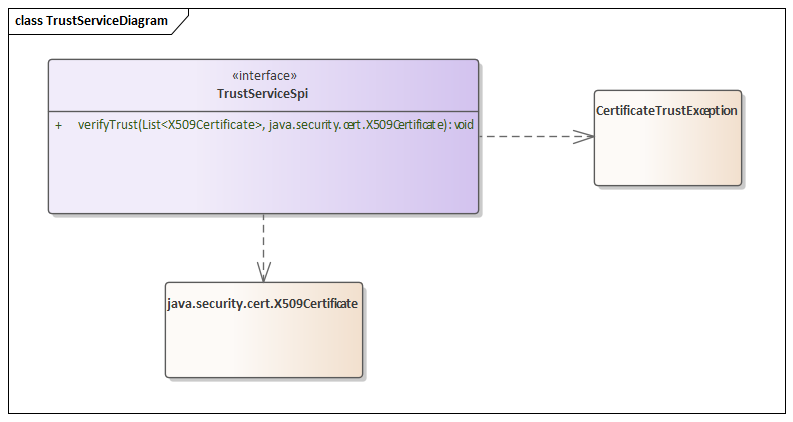
The following table describes the parameters of the verifytrust method:
| Class | Field | Data origin | Description |
|---|---|---|---|
List <X509Certificate> |
See X509 Certificate specification |
AS4 Message or Domibus public KeyStore store depending on the policy configuration. |
List of java.security.cert.X509 Certificate containing the signing certificate chain of trust. |
X509Certificate |
See X509 Certificate specification |
AS4 Message or Domibus public KeyStore store depending on the policy configuration. |
The signing certificate. |
The following table describes the parameters of the CertificateTrustException class:
| Class | Field | Data origin | Description |
|---|---|---|---|
CertificateTrustException |
N/A |
N/A |
Runtime exception allowing to control the type of EBMSException triggered by Domibus. |
trustErrorCode |
N/A |
Enumeration containing distinct trust error code. |
|
message |
N/A |
Default exception message. |
Exception mapping
Throwing a CertificateTrustException from the trust extension gives the
flexibility to control the type of EBMS exception returned by Domibus.
| EBMS Exception Error Code | EBMS Exception Message | TrustException code | Severity | Description |
|---|---|---|---|---|
EBMS:0004 |
T0003: Technical exception |
CONFIGURATION |
failure |
Please use to notify any configuration issue. |
EBMS:0004 |
Unknown error occurred |
TRUST_VALIDATION |
failure |
Please use to notify a certificate trust path validation issue. |
EBMS:0001 |
T0001: Certification validation problem. |
OTHER_VALIDATION |
failure |
Please use to notify any other certificate validation. |
EBMS:0004 |
T0003: Technical exception |
UNKNOWN |
failure |
Please use to notify any other exception. |
Any other runtime exception thrown by the authorisation module will be transformed into an EBMS exception with code EBMS:0004 and “T0003:Technical issue” as message.
The getIdentifer method
The domibus.extension.iam.authentication.identifier property is a domain specific property, which provides a way to configure the trust extension to be used. Per default the property value is DEFAULT_AUTHENTICATION_SPI. With the default configuration, Domibus will behave as described in the section 3.1.2.
In order to configure Domibus to use a specific trust extension for the domain, the above property value should be set with the value returned from the getIndentifer() method of the registered custom trust extension. A description of how to register the extension is available in section 5.2.
The property being domain specific, a Domibus configured for multitenancy can choose different trust strategy per domain.
For more information on the multitenancy feature of Domibus, see Multitenancy.
The extension developer is free to choose a meaningful name. However, the returned value of the getIdentifer() function should be compliant with the property file format as described in the document REF9.
String getIdentifier();
16.2.2. Implementing AuthorizationServiceSpi interface
The interface has 3 methods:
-
2 authorize methods
-
getIdentifier method
The UserMessage and PullRequest authorize methods
Two authorize methods are used as trust authorization for UserMessage
and PullRequest respectively.
This method is used to authorize an incoming AS4 UserMessage received by Domibus:
void authorize(
List<X509Certificate> signingCertificateTrustChain,
X509Certificate signingCertificate,
UserMessageDTO userMessageDTO,
UserMessagePmodeData userMessagePmodeData) throws
AuthorizationException;This method is used to authorize an incoming AS4 PullRequest received by Domibus:
void authorize(List<X509Certificate> signingCertificateTrustChain,
X509Certificate signingCertificate,
PullRequestDTO pullRequestDTO,
PullRequestPmodeData pullRequestPmodeData) throws
AuthorizationException;If the previous methods are executed without exception, the incoming AS4 Message will be authorized, and the processing of the message will continue.
If any runtime exception is triggered, the message will be refused, and the exception will be transformed into an EBMS exception by Domibus. By throwing an AuthorizationException runtime exception, one can more precisely control the type of EBMS exception thrown by Domibus. An AuthorizationException to EBMSException mapping table is documented in section 4.2.1.2.
Data dictionary
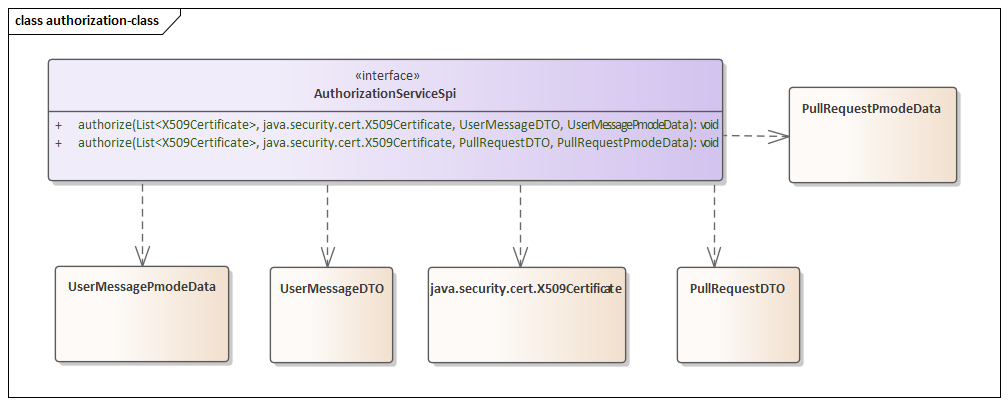
The following table describes the authorize method parameters:
| Class | Field | Data origin | Description |
|---|---|---|---|
List<X509Certificate> |
See also the X509Certificate specifications |
AS4 Message or Domibus public KeyStore depending on the policy configuration. |
List of java.security.cert.X509Certificate containing the signing certificate chain of trust. |
X509Certificate |
See also the X509Certificate specifications |
AS4 Message or Domibus public KeyStore depending on the policy configuration. |
The signing certificate. |
UserMessageDTO |
N/A |
AS4 UserMessage |
The UserMessageDTO class is a model class mapping the AS4 UserMessage model. Please refer to the class model below for detailed information. |
UserMessagePmodeData |
N/A |
PMode |
The UserMessagePmodeData class is a model class grouping PMode information related to the received AS4 UserMessage. |
serviceName |
PMode |
PMode service name associated with the received AS4 Message. |
|
actionName |
PMode |
PMode action name associated with the received AS4 Message. |
|
partyName |
PMode |
PMode sender party name associated with the received AS4 Message. |
The UserMessageDTO parameter has the following class structure:
UserMessageDTO model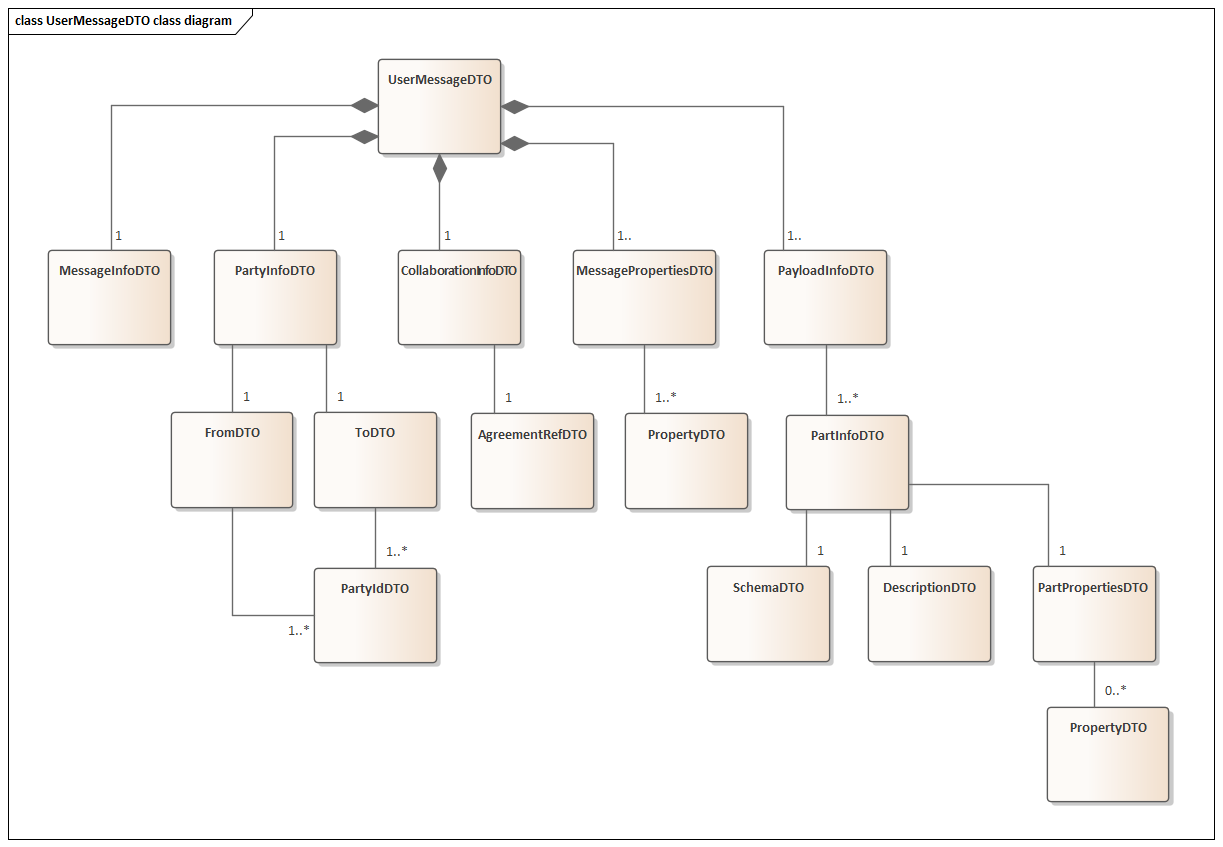
The following table describes the mapping between the class model and the AS4 UserMessage fields. See ebMS3 specification document for detailed AS4 UserMessage content.
| Class | Field | Data origin | Description |
|---|---|---|---|
UserMessageDTO |
N/A |
eb:Messaging/eb:UserMessage |
ebMS3 specifications. |
mpc |
eb:Messaging/eb:UserMessage/@mpc |
ebMS3 specifications. |
|
MessageInfoDTO |
eb:Messaging/eb:UserMessage/eb:MessageInfo |
ebMS3 specifications. |
|
timestamp |
eb:Messaging/eb:UserMessage/eb:MessageInfo/eb:Timestamp: |
ebMS3 specifications. |
|
messageId |
eb:Messaging/eb:UserMessage/eb:MessageInfo/eb:MessageId: |
ebMS3 specifications. |
|
refToMessageId |
eb:Messaging/eb:UserMessage/eb:MessageInfo/eb:RefToMessageId |
ebMS3 specifications. |
|
PartyInfoDTO |
eb:Messaging/eb:UserMessage/eb:PartyInfo |
ebMS3 specifications. |
|
FromDTO |
eb:Messaging/eb:UserMessage/eb:PartyInfo/eb:From |
ebMS3 specifications. |
|
role |
eb:Messaging/eb:UserMessage/eb:PartyInfo/eb:From/eb:Role |
ebMS3 specifications. |
|
PartyIdDTO |
ebMS3 specifications. |
||
value |
eb:Messaging/eb:UserMessage/eb:PartyInfo/eb:From/eb:PartyId |
ebMS3 specifications. |
|
type |
eb:Messaging/eb:UserMessage/eb:PartyInfo/eb:From/eb:PartyId@type |
ebMS3 specifications. |
|
ToDTO |
eb:Messaging/eb:UserMessage/eb:PartyInfo/eb:To |
ebMS3 specifications. |
|
role |
eb:Messaging/eb:UserMessage/eb:PartyInfo/eb:To /eb:Role |
ebMS3 specifications. |
|
PartyIdDTO |
ebMS3 specifications. |
||
value |
eb:Messaging/eb:UserMessage/eb:PartyInfo/eb:To/eb:PartyId |
ebMS3 specifications. |
|
type |
eb:Messaging/eb:UserMessage/eb:PartyInfo/eb:To/eb:PartyId@type |
ebMS3 specifications. |
|
CollaborationInfoDTO |
eb:Messaging/eb:UserMessage/eb:CollaborationInfo |
ebMS3 specifications. |
|
conversationId |
eb:Messaging/eb:UserMessage/eb:CollaborationInfo/eb:ConversationId |
ebMS3 specifications. |
|
action |
eb:Messaging/eb:UserMessage/eb:CollaborationInfo/eb:Action |
ebMS3 specifications. |
|
AgreementRefDTO |
|||
value |
eb:Messaging/eb:UserMessage/eb:CollaborationInfo/eb:AgreementRef |
ebMS3 specifications |
|
type |
eb:Messaging/eb:UserMessage/eb:CollaborationInfo/eb:AgreementRef@type |
ebMS3 specifications |
|
pmode |
eb:Messaging/eb:UserMessage/eb:CollaborationInfo/eb:AgreementRef@pmode |
ebMS3 specifications |
|
ServiceDTO |
|||
value |
eb:Messaging/eb:UserMessage/eb:CollaborationInfo/eb:Service |
ebMS3 specifications |
|
type |
eb:Messaging/eb:UserMessage/eb:CollaborationInfo/eb:Service@type |
ebMS3 specifications |
|
MessagePropertiesDTO |
eb:Messaging/eb:UserMessage/eb:MessageProperties |
ebMS3 specifications. |
|
PropertyDTO |
ebMS3 specifications. |
||
value |
eb:Messaging/eb:UserMessage/eb:MessageProperties/eb:Property |
ebMS3 specifications. |
|
name |
eb:Messaging/eb:UserMessage/eb:MessageProperties/eb:Property@name |
ebMS3 specifications. |
|
type |
eb:Messaging/eb:UserMessage/eb:MessageProperties/eb:Property@type |
ebMS3 specifications |
|
PayloadInfoDTO |
eb:Messaging/eb:UserMessage/eb:PayloadInfo |
ebMS3 specifications. |
|
PartInfoDTO |
eb:Messaging/eb:UserMessage/eb:PayloadInfo/eb:PartInfo |
ebMS3 specifications. |
|
PartInfoDTO |
ebMS3 specifications. |
||
href |
eb:Messaging/eb:UserMessage/eb:PayloadInfo/eb:PartInfo/@href |
ebMS3 specifications. |
|
inBody |
Domibus |
Can be used to submit a message on the backend interface in order to send the payload of the AS4 UserMessage within the SOAP envelope body. This way of sending messages is not supported in the AS4 profile and is therefore not recommended. |
|
mime |
Domibus |
Contains the payload content type. |
|
SchemaDTO |
eb:Messaging/eb:UserMessage/eb:PayloadInfo/eb:PartInfo/eb:Schema |
ebMS3 specifications. |
|
location |
eb:Messaging/eb:UserMessage/eb:PayloadInfo/eb:PartInfo/eb:Schema@location |
ebMS3 specifications. |
|
version |
eb:Messaging/eb:UserMessage/eb:PayloadInfo/eb:PartInfo/eb:Schema@version |
ebMS3 specifications. |
|
namespace |
eb:Messaging/eb:UserMessage/eb:PayloadInfo/eb:PartInfo/eb:Schema@namespace |
ebMS3 specifications. |
|
DescriptionDTO |
Domibus |
Deprecated, please use PartPropertiesDTO |
|
PartPropertiesDTO |
eb:Messaging/eb:UserMessage/eb:PayloadInfo/eb:PartInfo/eb:PartProperties |
List containing the properties. |
|
PropertyDTO |
ebMS3 specifications. |
||
value |
eb:Messaging/eb:UserMessage/eb:PayloadInfo/eb:PartInfo/eb:PartProperties |
ebMS3 specifications. |
|
type |
eb:Messaging/eb:UserMessage/eb:PayloadInfo/eb:PartInfo/eb:PartProperties@type |
ebMS3 specifications. |
|
name |
eb:Messaging/eb:UserMessage/eb:PayloadInfo/eb:PartInfo/eb:PartProperties@name |
ebMS3 specifications. |
The following table describes the parameters of the AS4 PullRequest
authorize method:
| Class | Field | Data origin | Description |
|---|---|---|---|
List<X509Certificate> |
Check X509Certificate specifications |
AS4 Message or Domibus trust store depending on the policy configuration. |
List of java.security.cert.X509Certificate containing the chain of trust of the signing certificate. |
X509Certificate |
Check X509Certificate specifications |
AS4 Message or Domibus trust store depending on the policy configuration. |
The signing certificate. |
PullRequestDTO |
eb:Messaging/eb:SignalMessage/eb:PullRequest |
The PullRequestDTO class is a model class mapping the AS4 PullRequest model. |
|
mpc |
eb:Messaging/eb:SignalMessage/eb:PullRequest@mpc |
||
PullRequestPmodeData |
mpcName |
PMode |
PMode MPC name for the received AS4 PullRequest. |
The following table describes the parameters of the AuthorizationException method:
| Class | Field | Data origin | Description |
|---|---|---|---|
AuthorizationException |
N/A |
N/A |
Runtime exception allowing to control the type of EBMSException triggered by Domibus. |
authorizationError |
N/A |
Enumeration containing distinct error code. |
|
messageId |
N/A |
Field containing the message id or the refused message. |
Exception mapping
Throwing an AuthorizationException from the authorisation extension gives the flexibility to control the type of EBMS exception returned by Domibus. It also ensures that the message id of the failed message is copied within the EBMS exception.
| EBMSException Error Code | EBMSException Message | AuthorizationException code | Severity | Description |
|---|---|---|---|---|
EBMS:0001 |
Message contained in the TrustException. |
INVALID_FORMAT |
failure |
Please use to notify any format issue. |
EBMS:0004 |
A0001:Authorization to access the targeted application refused to sender. |
AUTHORIZATION_REJECTED |
failure |
Please use to notify any authorisation rejection. |
EBMS:0004 |
A0003:Technical issue. |
AUTHORIZATION_MODULE_CONFIGURATION_ISSUE AUTHORIZATION_SYSTEM_DOWN |
failure |
Please use to notify any issue with the authorisation system. |
EBMS:0004 |
A0002:Technical issue. |
AUTHORIZATION_CONNECTION_REJECTED |
failure |
Please use to notify any connection issue with the authorisation system. |
Any other runtime exception thrown by the authorisation module will be transformed into an EBMS exception with code EBMS:0004 and “A0003:Technical issue” as a message.
The getIdentifer function
The domibus.extension.iam.authorization.identifier property is a domain specific property providing a way to configure the authorisation extension to be used. Per default the property value is DEFAULT_AUTHORIZATION_SPI. With the default configuration Domibus will behave as described in the section 3.2.2.
In order to configure Domibus to use a specific authorisation extension for a domain, the above property value should be set with the value returned from the getIndentifer() method of the extension. A description of how to register the extension is available in section 5.2. The property being domain specific, a Domibus configured for multitenancy can choose different trust strategy per domain.
|
See Also
|
For more about the multitenancy feature of Domibus, see Multitenancy. |
The extension developer is free to choose a meaningful name. However,
the returned value of the getIdentifer() function should be compliant
with the property file format.
String getIdentifier();16.3. Building an extension
The recommended way to build an extension is to use Maven and the maven-shade-plugin.
By setting the Domibus main POM as the parent POM, the extension benefits from the dependency management of Domibus. The following rule should be respected:
-
Before using a library within your custom extension, please verify if the library exists within the Domibus dependencies. If it does, use the same version as the one existing in the dependency management.
-
If the needed library exists, set its scope as provided.
The complete pom.xml is detailed in the section 6.1.
16.3.1. Dependency management
The following xml samples highlight the specific aspects of an extension pom configuration:
-
Use the main Domibus pom as parent pom. The
<modelVersion>must reflect the Domibus version that the extension is built for:
<xml version="1.0" encoding="UTF-8">
<project xmlns="http://maven.apache.org/POM/4.0.0"
xmlns:xsi="http://www.w3.org/2001/XMLSchema-instance"
xsi:schemaLocation="http://maven.apache.org/POM/4.0.0
http://maven.apache.org/xsd/maven-4.0.0.xsd">
<parent>
<artifactId>domibus</artifactId>
<groupId>eu.domibus</groupId>
<version>4.2-SNAPSHOT</version>
</parent>
<modelVersion>4.0.0</modelVersion>
<artifactId>your_artifact_id</artifactId>
<name> your_artifact_name</name>The minimum set of dependencies to implement an extension is the following:
-
the
$\{project.version}corresponds to the version defined in the <version> tag in the <parent> block; -
any library provided by Domibus dependency management should have a provided
<scope>.
<dependencies>
<!-- Domibus dependencies -->
<dependency>
<groupId>eu.domibus</groupId>
<artifactId>domibus-ext-model</artifactId>
<version>$\{project.version}</version>
<scope>provided</scope>
</dependency>
<dependency>
<groupId>eu.domibus</groupId>
<artifactId>domibus-iam-spi</artifactId>
<version>$\{project.version}</version>
<scope>provided</scope>
</dependency>
<dependency>
<groupId>eu.domibus</groupId>
<artifactId>domibus-logging</artifactId>
<version>$\{project.version}</version>
<scope>provided</scope>
</dependency>
</dependencies>-
domibus-ext-modelcontains cross module classes. The DTO objects described above are defined in this library. -
domibus-iam-spiis the core extension library containing the interfaces described above and their related model. -
domibus-loggingis not mandatory but its usage is recommended because it keeps a uniform logging style with the Domibus core.
The use of other dependencies existing in Domibus dependencies should be
configured as follows:
NOTE: The <scope> is set as provided and there is no version
definition as it is inherited from the Domibus dependency management:
<dependency>
<groupId>org.springframework</groupId>
<artifactId>spring-context</artifactId>
<scope>provided</scope>
</dependency>16.3.2. Logging
The logging service is provided in the domibus-logging module, which is released together with the main Domibus application.
For more information about the domibus-logging module, see the Domibus Software Architecture.
private static final DomibusLogger LOG = DomibusLoggerFactory.getLogger(BackendWebServiceImpl.class);16.4. Registering an extension
Domibus has a main configuration folder. For more information, see Domibus Deployment to know how to configure that folder for the various application servers supported by Domibus.
In the following sections, we will refer to that folder as $\{domibus.config.location}.
16.4.1. Properties configuration
In order to configure Domibus to use a custom trust extension, please
adapt the $\{domibus.config.location}/domibus.properties file. Uncomment
the property domibus.extension.iam.authentication.identifier and set its
value to the value returned by the getIdentifier() method of the
TrustServiceSpi interface implementation.
In order to configure Domibus to use a custom authorisation extension,
please adapt the $\{domibus.config.location}/domibus.properties file.
Uncomment the property domibus.extension.iam.authorization.identifier
and set its value to the to the value returned by the getIdentifier()
method of the AuthorizationServiceSpi interface implementation.
16.4.2. Deployment
To install a custom extension for Domibus, please follow the steps below:
-
Stop the application server.
-
Copy the custom plugin jar file into the plugins folder:
$\{domibus.config.location}/extensions/lib -
Make sure that the steps in section 5.2.1 are completed.
-
Start the application server.
16.5. POM samples
The following link references the latest production parent pom.xml of Domibus. It contains the dependency management of Domibus:
-
The following link references the latest production pom.xml used in the Domibus-authentication-dss-extension module of Domibus:
|
See Also
|
17. Extension Validation
In this section we lay out the applicable guidelines that support the technical implementation of an extension and the relevant technical specifications behind the Domibus Validation Extension mechanism.
This content is aimed at the Directorate Generals and Services of
the European Commission, Member States (MS) and companies of the private
sector wanting to customize the incoming AS4 messages authorisation and
signing certificate trust validation. Namely:
* Business Architects - information about the available validation options.
* Analysts and developers - information on how to customize the UserMessage validation implementation.
* Testers - information that supports them in testing the described use cases.
This content assumes the reader is aware of the operational, technical and functional context of eDelivery Domibus Access Point described in:
17.1. Extension Validation Overview
The validation extension mechanism allows:
-
the customisation of the AS4
UserMessagevalidation prior to it being saved in the database and delivered to the plugins. -
the validation of the
UserMessageand its payloads if requested from a custom plugin.
A validation extension must implement the SPI defined in domibus-MSH-spi
module, which is released together with the main Domibus application.
Any changes to previous API versions will be documented in a migration guide.
17.2. AS4 UserMessage validation
In several scenarios, it is useful to validate the received AS4
UserMessage metadata and associated payloads before saving them
in the database and delivering them to the plugins. A common example
is the scanning of received messages using an antivirus.
Default Domibus behaviour
After an AS4 UserMessage is received via the MSH endpoint, Domibus saves:
-
the AS4 metadata in the database and,
-
the associated payloads in the database or in the file system.
Domibus does not perform any sort of validation in this case, and delivers the received messages to the configured plugin.
Custom behaviour
You implement a custom validation for the received AS4 UserMessages by creating a custom Validation Extension,
The validation of the UserMessage can be performed synchronously or
asynchronously.
- Synchronous validation
-
the
UserMessageis rejected (considered not valid) at the receiving Domibus, acting as C3, aSignal error messageis sent back as a response to the sending C2. This is useful whenever C2 needs to know synchronously, theUserMessagereceived is rejected by the validation process in place. - Asynchronous validation
-
this type of validation can be implemented if the validation of the
UserMessageand its associated payloads are likely to take a long time. Which might be the case when theUserMessagepayloads are scanned using an antivirus. In this scenario, it is no longer possible to synchronously return a signal with an error to the sending C2 Access Point.
Choosing between synchronous validation and asynchronous validation depends on the business case in question and the expected processing time of the validation implemented.
17.3. Validation Extension Interface
The Validation Extension SPI has, in this version, one interface:
eu.domibus.core.spi.validation.UserMessageValidatorSpi
Creating a Validator
To create a validator, two conditions must be met:
-
The class implementing the interface must be a bean. One way to achieve this is by annotating the class with
@Serviceor@Componentannotations.@Component public class CustomMessageValidation implements UserMessageValidatorSpi \{ -
The class implementing the interface must have a package name starting with the prefix
eu.domibus:package eu.domibus.my.custom.validator;
17.4. Implementing the Validation Interface
To implement the eu.domibus.core.spi.validation.UserMessageValidatorSpi interface, you have two possible methods:
-
validateUserMessage -
validatePayload
The validateUserMessage method
The validateUserMessage method validates the incoming AS4 UserMessage
and its associated payloads.
If the:
-
validation passes, Domibus continues its normal processing, saves the incoming
UserMessagein the database and informs the configured plugin. -
validation fails, the method must throw a
UserMessageValidatorSpiExceptioncontaining the details of the error. The exception is transformed by Domibus into an EBMS3 exception and a signal with an error is sent as a response to the sending C2.
Data dictionary
| Class | Field | Description |
|---|---|---|
|
userMessage |
AS4 UserMessage metadata and its associated payloads received by C3. |
| Class | Field | Data origin | Description |
|---|---|---|---|
|
N/A |
N/A |
Runtime exception raised in case the validation fails. |
The validatePayload method
The validatePayload method validates an AS4 UserMessage payload on demand,
for instance, from a custom plugin.
A typical use case for this method is to scan the payloads using an antivirus solution.
If the validation fails, the method must throw a
UserMessageValidatorSpiException that contains the details of the error.
Data dictionary
| Class | Field | Description |
|---|---|---|
|
payload |
AS4 UserMessage payload to be validated on demand. |
|
mimeType |
The mime type of the payload. |
17.5. Implementing an extension
The recommended way to implement an extension is to use Maven and the maven-shade-plugin.
By setting the Domibus main POM file as the parent POM, your extension benefits from Domibus' dependency management and, consequently, you need to follow the rule below:
|
See Also
|
A sample of a complete POM file ( |
17.5.1. Maven Dependency Management
The following XML samples highlight the specific aspects of an extension’s
POM configuration:
-
Use the main Domibus POM as parent POM. The
<modelVersion>must reflect the Domibus version that the extension is built for:
<xml version="1.0" encoding="UTF-8">
<project xmlns="http://maven.apache.org/POM/4.0.0"
xmlns:xsi="http://www.w3.org/2001/XMLSchema-instance"
xsi:schemaLocation="http://maven.apache.org/POM/4.0.0
http://maven.apache.org/xsd/maven-4.0.0.xsd">
<parent>
<artifactId>domibus</artifactId>
<groupId>eu.domibus</groupId>
<version5.0>SNAPSHOT</version5.0>
</parent>
<modelVersion>4.0.0</modelVersion>
<artifactId>your_artifact_id</artifactId>
<name>your_artifact_name</name>The minimum set of dependencies to implement an extension is the following:
-
the
$\{project.version}corresponds to the version defined in the<parent>.<version>tag; -
any library provided by Domibus dependency management should have a provided
<scope>.
<dependencies>
<!-- Domibus dependencies -->
<dependency>
<groupId>eu.domibus</groupId>
<artifactId>domibus-ext-model</artifactId> (1)
<version>$\{project.version}</version>
<scope>provided</scope>
</dependency>
<dependency>
<groupId>eu.domibus</groupId>
<artifactId>domibus-MSH-spi</artifactId> (2)
<version>$\{project.version}</version>
<scope>provided</scope>
</dependency>
<dependency>
<groupId>eu.domibus</groupId>
<artifactId>domibus-logging</artifactId> (3)
<version>$\{project.version}</version>
<scope>provided</scope>
</dependency>
</dependencies>-
domibus-ext-modelcontains cross-module classes. The DTO objects described above are defined in this library. -
domibus-MSH-spiis the library containing the interfaces described above and their related model. -
domibus-loggingis not mandatory but its usage is recommended because it keeps an harmonized logging style with the Domibus core.
The use of other dependencies existing in Domibus dependencies management should be configured as follows:
<dependency>
<groupId>org.springframework</groupId>
<artifactId>spring-context</artifactId>
<scope>provided</scope> (1)
</dependency>-
<scope>is set asprovidedand there is no version attribute as it is inherited from the Domibus dependency management.
Logging
The logging service is provided in the domibus-logging module, which is
released together with the main Domibus application.
private static final DomibusLogger LOG =
DomibusLoggerFactory.getLogger(BackendWebServiceImpl.class);|
See Also
|
Find more information about the |
17.6. Registering an extension
Domibus has a main configuration folder referenced by the
domibus.config.location property.
To know how to configure the specified folder for the various application servers supported by Domibus, see Configuring Domibus.
Generally we use $\{domibus.config.location} as token referring to that folder as the location depends on where you have installed Domibus in your system.
17.6.1. Deployment
To install a custom validation extension in Domibus, perform the steps below:
-
Stop the application server;
-
Copy the custom plugin’s jar file into the plugins folder:
$\{domibus.config.location}/extensions/lib -
Start the application server.
|
Properties Reference
The table below details the properties defined in the property file
a|`_path/conf/domibus/domibus.properties that can be used
to configure Domibus.
|
Note
|
All the properties which are commented are considered as default values. Domibus takes into account all the commented default values on start up. If you want to modify the default value of a property, then you must uncomment it and change it to the desired value. |
18. Domibus General Properties
Jump to property category:
| Property Name | Description and Usage | Default |
|---|---|---|
(*) |
Smtp server URL for sending alert |
Installation dependent |
(*) |
Smtp server port |
Installation dependent |
(*) |
Smtp server user |
Installation dependent |
(*) |
Smtp server user password |
Installation dependent |
| Configuration Property | Description and Usage | Default | ||||||||||||||
|---|---|---|---|---|---|---|---|---|---|---|---|---|---|---|---|---|
|
Enables/disables eArchiving. Usage:
|
|
||||||||||||||
|
Defines whether a batch is created even if there are no AS4 messages to archive. Usage:
|
|
||||||||||||||
|
Defines the eArchive queue concurrency. Value Format:
|
|
||||||||||||||
|
eArchive notification queue concurrency. Value Format:
|
|
||||||||||||||
|
eArchive dead letter queue concurrency. Value Format:
|
|
||||||||||||||
CRON expression defining the scheduling of the eArchiving Continuous process job execution. Value Format:
Expected value is a CRON expression.
|
|
|||||||||||||||
|
CRON expression defining the scheduling og the eArchiving Sanity process job execution. Value Format: |
|
||||||||||||||
|
CRON configuration for executing the eArchiving cleanup process. Value Format: |
|
||||||||||||||
|
The creation date of the last 'UserMessage' processed by the eArchiving continuous batch minus the ('messageCheck.delay' hour) is the latest 'userMessage' taken to the sanitizer |
|
||||||||||||||
|
Defines the maximum number of messages in the eArchiving batch. |
|
||||||||||||||
|
Maximum payload size of messages to be archived for one batch(in Mb); 0 to disable. |
|
||||||||||||||
|
Defines the maximum eArchive batches created per batch. |
|
||||||||||||||
|
Delay time in relation to current execution time after which an eArchiving exporting mechanism retrieves messages in their final state. Usage:
|
|
||||||||||||||
|
For methods: history of exports and enqueued batches, also return message list as part of batches objects.
|
|
||||||||||||||
|
Timeout in milliseconds applied to notification calls to the eArchiving client. |
|
||||||||||||||
|
Enables/disables proxy use when notifying the eArchiving client. Usage:
|
|
||||||||||||||
|
Period in days after which a unarchived batch is considered expired. |
|
||||||||||||||
|
Maximum number of eArchive batches that are deleted when the scheduled job is run.
Value Format: N, where N is an integer. |
|
||||||||||||||
|
If set as TRUE, all archived and expired batches in the BD are deleted. |
|
||||||||||||||
Start date is the timestamp of the last message exported by the Continuous job. Example: 1) Property is set to 24 hours, 2) at time of inspection the Sanitizer job determines the start date has been 28h ago. This means the Continuous job has stopped and it triggers this alert.
|
|
|||||||||||||||
|
Enables/disables alerts of system fails to send a notification regarding the eArchiving processes. |
|
||||||||||||||
|
Defines the level of the alert triggered when the system fails to send a notification regarding eArchiving processes. Possible Values:
|
|
||||||||||||||
|
Defines the subject (string) of the email sent informing that an eArchive alert for “Notification failed” was triggered.
Default: |
See description |
||||||||||||||
|
Enables/disables the eArchiving “Non-final message” alert. The “Non-final message” alert informs you if there are any non-final messages that were not exported by the Sanitizer job.
|
|
||||||||||||||
|
Defines the level of the “Non-final message” alert. The “Non-final message” alert informs you if there are any non-final messages that were not exported by the Sanitizer job. Possible Values: |
|
||||||||||||||
|
Defines the subject (string) of the email sent informing that an eArchive alert for “Message not in final state” was triggered.
Default: |
See description |
||||||||||||||
|
Enable/disable the alert that eArchiving Continuous job has stopped.
|
|
||||||||||||||
|
Defines the level of the “Start date stopped” alert. The “Start date stopped” alert informs you if the Continuous job has stopped. Possible Values: |
|
||||||||||||||
|
Defines the subject (string) of the email sent informing that an eArchive alert for “Start date stopped” was triggered. The “Start date stopped” alert informs you if the Continuous job has stopped.
Default: |
See description |
||||||||||||||
|
Enable when the eArchiving client needs to receive notifications with additional details, such as message start date or end date. |
|
||||||||||||||
|
Enables/disables the eArchiving message export failed alert. |
|
||||||||||||||
|
Alert level for eArchiving message export failed alert. |
|
||||||||||||||
|
eArchiving message export failed alert mail subject.
Default: |
See description |
||||||||||||||
|
CRON configuration for executing the eArchiving process needed to reexport stuck messages. |
|
||||||||||||||
|
Number of minutes to add to the interval used to search for batches stuck in STARTED statuses. Usage: |
|
||||||||||||||
(*) |
Defines the recipients alerts emails. Usage: Example
|
See description |
||||||||||||||
(*) |
Example
|
See description |
||||||||||||||
|
CRON configuration for cleaning alerts. |
|
||||||||||||||
|
Lifetime in days of alerts before cleaning. |
|
||||||||||||||
|
Concurrency to process the alerts. |
|
||||||||||||||
|
Frequency of failed alerts retry. |
|
||||||||||||||
|
Elapsed time in minutes between alert retry. |
|
||||||||||||||
|
Maximum number of attempts for failed alerts. |
|
||||||||||||||
| Configuration Property | Description and Usage | Default |
|---|---|---|
|
Specifies the amount of time, in milliseconds that used to check if any quartz triggers are blocked. Default value is 10 minutes. |
|
| Configuration Property | Description and Usage | Default |
|---|---|---|
Distributed cache is only used when Domibus runs in a cluster eg domibus.deployment.clustered=true. |
||
|
Maximum used heap size in megabytes. |
|
|
The maximum number of seconds for each entry to stay in the cache. Entries that are older than timeToLiveSeconds will be automatically evicted from the cache. Updates on the entry will change the eviction time. Any integer between 0 and Integer.MAX_VALUE. 0 means infinite. Default is 1h. |
|
|
Maximum number of seconds for each entry to stay idle in the cache. Entries that are idle (not touched) for more than max idle seconds will get automatically evicted from the cache. Entry is touched if get(), getAll(), put() or containsKey() is called. Any integer between 0 and Integer.MAX_VALUE. 0 means infinite. Default is 3600. The time precision is limited by 1 second. The MaxIdle that less than 1 second can lead to unexpected behaviour. |
|
|
The near cache default size for the distributed cache. |
|
|
The maximum number of seconds for each entry to stay in the near cache. |
|
|
Set the maximum number of seconds each entry can stay in the Near Cache as untouched (not-read). Entries that are not read (touched) more than domibus.cache.distributed.nearcache.idle.max value will get removed from the Near Cache. |
|
|
Sets the port the distributed cache member will try to bind on. A valid port value is between 0 and 65535. A port number of 0 will let the system pick up an ephemeral port. |
|
|
Sets if a distributed cache member is allowed to find a free port by incrementing the port number when it encounters an occupied port. If you explicitly want to control the port a distributed cache member is going to use, set domibus.cache.distributed.port.autoincrement to false. In this case, the distributed cache member is going to try the port and if the port is not free, the member will not start and throw an exception. If this value is set to true, the distributed cache will start at the port specified and will try until it finds a free port, or until it runs out of ports to try. |
|
|
The maximum number of ports allowed to use in case autoincrement is set to true. |
|
|
Sets the well known members of the distributed cache. Can be a comma separated string, eg '10.11.12.1,10.11.12.2' which indicates multiple members are going to be added. |
|
| Configuration Property | Description and Usage | Default |
|---|---|---|
|
Disk cache location, used in the ehCache configuration by all caches with a disk storage tier. |
|
| Configuration Property | Description and Usage | Default |
|---|---|---|
|
CRON configuration for cleaning error logs without message IDs. |
|
|
CRON job to delete error logs without message iDs older than this property days. |
|
|
Maximum number of error logs to be deleted in each run. |
|
| Configuration Property | Description and Usage | Default |
|---|---|---|
|
Fixed suffix used to generate a random _Message ID.
Message ID format is |
|
|
Messages resend job execution interval as a CRON expression. |
|
| Configuration Property | Description and Usage | Default |
|---|---|---|
|
The retry strategy grants a few extra seconds to avoid not sending the last attempt.
|
|
(*) |
It is the retry CRON job to send the messages. It is set by default to every 5 seconds. |
|
|
List of parties for which the smart retry mechanism is enabled. The smart retry mechanism prevents message retry to be sent to a party already identified as not reachable by the monitoring feature. Usage:
Example:
|
- |
|
Retry strategy adds these extra minutes to the interval used to search back for messages in +
For performance reasons, the default interval is 10 minutes. |
|
| Configuration Property | Description and Usage | Default |
|---|---|---|
|
Set the SMLZone if Domibus needs to be used under Dynamic discovery model. This property is only mandatory if an SML is used. |
|
|
Whether dynamic discovery is used or not. |
|
|
The property specifies the dynamic discovery client to be used for the dynamic process. Possible values: OASIS and PEPPOL. |
|
|
This information is passed to the PEPPOL client that needs to know whether the usage is for PRODUCTION or TESTING mode. |
|
|
Apart from validating response of signer certificates against the truststore, the Oasis Dynamic Discovery Client gives the possibility to add (optional) a regular expression to validate any certificate metadata related to the subject of the signer certificate. Example: domibus.dynamicdiscovery.oasisclien.regexCertificateSubjectValidation=”.$”.or".*EHEALTH_SMP.$" |
- |
|
Apart from validating the response of the signer certificates against the truststore, the PEPPOL Dynamic Discovery Client gives the possibility to add (optional) a regular expression to validate the subject of the SMP signer certificate when only the issuer chain is added to the truststore. |
|
|
List of certificate policy OIDs separated by comma. To trust/allow
certificate, at least one must be in the service metadata signer’s Empty value disables the certificate policy validation. Example:
|
- |
|
The role of the responder PartyId may be defined here for both PEPPOL and OASIS. |
|
|
The type of the PartyId may be defined here (default values are: urn:fdc:peppol.eu:2017:identifiers:ap for PEPPOL and urn:oasis:names:tc:ebcore:partyid-type:unregistered for OASIS). Default: |
See description |
|
The AS4 transport profile by which the endpoint is identified in the SMP response. Default: |
See description |
|
CRON expression used for configuring the the Retention worker scheduling. Defines the schedule for the Retention job that deletes: Default: Schedules execution for every Saturday at 23:00h. |
|
|
Retention in hours before deleting the following entities:
Entities are deleted if they are not looked up during the configured time interval. If property value is empty, the entities aren’t deleted. |
|
| Configuration Property | Description and Usage | Default |
|---|---|---|
JMS |
||
domibus.jms.queue.pull |
Domibus internal queue used for dispatching the pull requests. |
See description |
|
Concurrency configured for executing internal commands. |
|
| Configuration Property | Description and Usage | Default |
|---|---|---|
|
If true the quartz scheduler jobs are clustered. This property is mandatory, it should be set to true if the deployment of Domibus is done in a cluster. |
|
| Configuration Property | Description and Usage | Default |
|---|---|---|
|
Allows chunking when sending messages to other Access Points. |
|
|
If domibus.dispatcher.allowChunking is true, this property sets the threshold at which messages start getting chunked (in bytes). Messages under this limit do not get chunked. Defaults to 100 MB. |
|
|
Specify concurrency limits via a "lower-upper" String, e.g. "5-10", or a simple upper limit String, e.g. "10" (the lower limit will be 1 in this case) when sending messages to other Access Points. |
|
|
Specify concurrency limits via a "lower-upper" String, e.g. "5-10", or a simple upper limit String, e.g. "10" (the lower limit will be 1 in this case) when sending large messages (SplitAndJoin) to other Access Points. |
|
|
Specifies if the connection will be kept alive between C2 and C3. Default value is |
|
|
For connection between the access points – C2 & C3. Specifies the amount of time, in milliseconds, that the consumer will attempt to establish a connection before it times out. 0 is infinite. |
|
|
For connection between the access points – C2 & C3. Specifies the amount of time, in milliseconds, that the consumer will wait for a response before it times out. 0 is infinite. |
|
|
Cache the dispatcher clients used for communication between the access points. |
|
|
Priority rule name. The rule name will be further used to specify additional rule properties. |
- |
|
Service value to be matched against the sent message. |
- |
|
List of actions separated by comma to be matched against the sent message. |
- |
|
Priority value assigned to the JMS message. Accepted priority values must be between 1-9 included. |
- |
| Configuration Property | Description and Usage | Default |
|---|---|---|
|
CRON expression used for configuring the message puller scheduling. Value Format: sSec Min Hour Day Month weekday Year. The example shown is running every hour. |
|
|
Number of threads used to parallelize the pull requests. |
|
|
Number of pull requests executed every CRON cycle. |
|
|
Number of threads used to parallelize the sending of pull receipts. |
|
|
Time in second for the system to recover its full pull capacity when job schedule is one execution per second. |
|
|
Pull Retry Worker execution interval as a CRON expression. |
|
|
Allow dynamic initiator on pull requests - 0 or multiple initiators are allowed in the PMode process. WARNING: This property is experimental and should be used only in very specific scenarios. |
|
|
Allow multiple legs configured on the same pull process (with the same security policy). |
|
|
_Force message into READY_TO_PULL when mpc attribute is present. WARNING: This property is experimental and should be used only in very specific scenarios. |
|
|
Mpc initiator separator. This is used when the mpc provides information on the initiator: baseMpc/SEPARATOR/partyName. WARNING: This property is experimental and should be used only in very specific scenarios. |
|
| Configuration Property | Description and Usage | Default |
|---|---|---|
|
CRON expression used for configuring the retention worker scheduling. The retention worker deletes the expired messages (downloaded and not-downloaded). |
|
|
This property is used to tweak the maximum downloaded messages to be deleted by the retention worker. |
|
|
This property is used to tweak the maximum not-downloaded messages to be deleted by the retention worker. |
|
|
This property defines the message deletion strategy. The possible values are DEFAULT and PARTITIONS. The deletion strategy PARTITIONS is only available on Oracle when partitioning was performed on the tables. |
|
|
Specify concurrency limits via a "lower-upper" string, e.g. "5-10", or a simple upper limit string, e.g. "10" (the lower limit will be 1 in this case), when deleting messages. This property is only used when Deletion Strategy is DEFAULT. |
|
|
Maximum number of messages to be deleted by the retention worker in a bulk delete (when not specified in the pMode MPC). Default set to 1000, maximum allowed when using Oracle database.+ This property is only used when the deletion strategy is DEFAULT. |
|
| Configuration Property | Description and Usage | Default |
|---|---|---|
|
Tomcat only: customize the task executor threads count. |
|
|
Property to customize the msh endpoint task executor threads count. Defaults to 100. |
|
| Configuration Property | Description and Usage | Default |
|---|---|---|
dateTime format |
Pattern accepted by Domibus for AS4 connection for the type dateTime. Possible values:
Default: |
See description |
|
When an initiator backend client submits messages to Domibus for transmission, with the message id field populated, then the message id should be RFC2822 compliant. The pattern specified here ensures this validation. This field is optional. In case the existing client does not match this message id pattern during submission, then this property can be omitted to skip the validation. |
|
|
If activated Domibus will verify before sending a User Message if the receiver’s
certificate is valid and not revoked. If the receiver’s certificate is
not valid or it has been revoked, Domibus will not send the message and
it will mark it as |
|
|
If activated, Domibus will verify before sending a User Message if his own certificate
is valid and not revoked. If the certificate is not valid or it has been
revoked, Domibus will not send the message and it will mark it as
|
|
|
If activated, Domibus will verify before receiving a User Message if the sender’s certificate is valid and not revoked. If the certificate is not valid or it has been revoked, Domibus will not accept the message (default is true). |
|
|
Enables/disables both the authorization and the validation checks on the
sender’s certificate. |
|
|
Check that sender’s certificate matches the certificate stored in the truststore. The certificate is loaded from the truststore based on the alias (party name). |
|
|
When this property is not empty, Domibus will verify, before receiving a message, if the subject of the sender’s certificate matches the regular expression. |
Empty (no regular expression) |
|
List of certificate policy OIDs separated by comma. When this property is not empty, Domibus will verify before receiving a message that the certificate contains at least one certificate policy OID in certificatePolicy extension. |
Empty (no certificate policy is required) |
|
Check that the subject of the sender’s certificate contains the alias (party name). Because this check is very restrictive, it is set by default to |
|
| Configuration Property | Description and Usage | Default | ||
|---|---|---|---|---|
|
This property specifies the maximum number of messages that would be served when the 'listPendingMessages' operation is invoked. Setting this property is expected to avoid timeouts due to huge result sets being served. A value of 0 would return all the pending messages. This property is optional. Omitting this property would default the result set size to 500.
|
|
||
|
The maximum number of messages to be listed from the JMS queues. Setting this property is expected to avoid timeouts due to huge results being served. Setting this property to zero returns all messages. |
|
||
|
Domibus internal queue used for alerts. |
|
||
|
Regular expression used for identifying the internal queues in the Admin Page. |
`domibus\.(internal |
||
DLQ |
backend\.jms |
notification\.jms |
||
notification\.webservice |
notification\.kerkovi |
notification\.filesystem)` |
||
|
Defines JMS Session cache size. |
|
||
|
Tomcat only |
|
||
| Configuration Property | Description and Usage | Default | ||
|---|---|---|---|---|
|
The property specifies if authentication is required or not. |
|
||
|
Maximum connection attempts before the account gets locked (suspended). |
|
||
|
Property defining how many seconds the account remains locked (suspended) before it is automatically unlocked by the system. |
|
||
|
CRON job that determines the interval at which the system checks for account to be reactivated. |
|
||
|
When a certificate is about to expire, the system will log a warning. The warning will appear as from the expiration date minus the offset in days. |
|
||
|
CRON expression that specifies the frequency of the certificate revocation check. |
|
||
|
Position of the Bouncy Castle in the security list.
|
|
||
|
The list of protocols to be excluded from CRL list. Possible values: HTTP, HTTPS, FTP, FILE, LDAP, etc). |
- |
||
|
Domibus encrypts the configured passwords if activated. |
|
||
|
Enable this property if the password encryption is activated. Add the list of configured passwords to be encrypted. |
Server-dependent value |
||
|
The location where the encrypted key is stored. Default: |
See description |
||
| Configuration Property | Description and Usage | Default | ||
|---|---|---|---|---|
|
The location of the keystore. Default: |
See description |
||
|
The type of the used keystore. |
|
||
|
The password used to load the keystore. Accepted characters are: !\"#$%&\'()*+,-./0123456789:;<=>?@ABCDEFGHIJKLMNOPQRSTUVWXYZ[\\]^_`abcdefghijklmnopqrstuvwxyz\{|}~
|
|
||
|
The alias from the keystore of the private key. Accepted characters are: !\"#$%&\'()*+,-./0123456789:;<=>?@ABCDEFGHIJKLMNOPQRSTUVWXYZ[\\]^_`abcdefghijklmnopqrstuvwxyz\{|}~
|
|
||
|
The private key password. |
|
||
|
The location of the truststore. |
|
||
|
The type of truststore in use. |
|
||
|
The password used to load the trustStore. Accepted characters are: !\"#$%&\'()*+,-./0123456789:;<=>?@ABCDEFGHIJKLMNOPQRSTUVWXYZ[\\]^_`abcdefghijklmnopqrstuvwxyz\{|}~
|
test123 |
||
| Configuration Property | Description and Usage | Default |
|---|---|---|
|
Packages to be scanned (comma-separated) by the EntityManagerFactory. |
|
|
The JDBC driver class used for connecting to the database. |
- |
|
This property makes Hibernate generate the appropriate SQL for the chosen database. |
- |
|
Pretty print the SQL in the log and console. |
|
|
The classname of a TransactionFactory to use with Hibernate Transaction API. |
- |
|
The classname of the TransactionManagerLookup. |
- |
| Configuration Property | Description and Usage | Default |
|---|---|---|
|
Tomcat only |
|
|
Tomcat only |
|
|
Tomcat only |
See description |
|
Tomcat only: the service URL of the MBeanServer. Default: |
See description |
|
Tomcat only The port that the JMX connector will use for connecting to ActiveMQ. |
|
|
Tomcat only: |
|
|
Tomcat only: The username that is allowed to connect to the ActiveMQ broker. |
|
|
Tomcat only: |
- |
|
The persistence enabled flag. |
|
| Configuration Property | Description and Usage | Default |
|---|---|---|
|
Tomcat only (XA datasource) The fully qualified underlying XADataSource class name. Default: |
See description |
|
Tomcat only (XA datasource) Sets the maximum amount of seconds that a connection is kept in the pool before it is destroyed automatically. |
|
|
Tomcat only (XA datasource) Sets the minimum pool size. The amount of pooled connections will not go below this value. The pool will open this amount of connections during initialization. |
|
|
Tomcat only (XA datasource) Sets the maximum pool size. The amount of pooled connections will not go above this value. |
|
|
Tomcat only (XA datasource) The host name or the IP address of the database server. |
|
|
Tomcat only (XA datasource) The port number of the database server. |
|
|
Tomcat only (XA datasource) A user who has access to the Domibus database schema. |
|
|
Tomcat only (XA datasource)
The password of the user defined in the
|
|
|
Tomcat only (XA datasource) The JDBC URL connection. It re-uses the properties for the user and password defined above. Default: |
See description |
|
Tomcat only The Domibus database schema. |
|
|
Tomcat only (Non-XA datasource) The JDBC driver class name. |
|
|
Tomcat only (Non-XA datasource): the JDBC URL connection. Default: |
See description |
domibus.datasource.user |
Tomcat only (Non-XA datasource) A user who has access to the Domibus database schema. |
|
|
Tomcat only (Non-XA datasource)
The password of the user defined in the |
|
|
Allows the client to automatically request the public key from the server if set to TRUE (Optional). |
|
|
Multitenancy only Schema used by Domibus to configure the association of users to domains, the super users and other things that are not related to a specific domain. This property is mandatory for Multitenancy mode. |
|
| Configuration Property | Description and Usage | Default |
|---|---|---|
Properties for configuring plugin users security policy |
||
|
Plugin user security property: Number of console login attempts before the user is deactivated. |
|
|
Plugin user security property: Time in second for a suspended plugin user to be reactivated. (1 hour per default if property is not set, if 0 the user will not be reactivated). |
|
|
Plugin user security property: CRON job that determines the interval at which the system checks for plugin account to be reactivated. |
|
| Configuration Property | Description and Usage | Default |
|---|---|---|
|
Property where you can specify the title in the Tab of Admin Console. |
|
|
The limit when calculating the number of message logs (disabled when 0). |
|
|
Description. |
`` |
|
Description |
`` |
| Configuration Property | Description and Usage | Default |
|---|---|---|
In case your Access Point has to use a proxy server you can configure it with these properties. |
||
|
Specifies if Domibus default proxy is enabled. Values are |
|
|
Host name of the proxy server. |
- |
|
Port of Proxy server. |
- |
|
Username for authentication on the proxy server. |
- |
|
Defines Domibus proxy’s password. |
- |
|
Indicates that hosts should be accessed directly (as opposed to via the proxy). |
- |
| Configuration Property | Description and Usage | Default |
|---|---|---|
|
Enable/disable the entire alert module. |
|
|
Allow to disable alert mail sending. |
|
|
SMTP Socket I/O timeout value in milliseconds. |
|
|
Enable/disable the messaging alert module. |
|
|
Message status change that should be notified by the messaging alert module. Comma-separated. |
|
|
Alert levels corresponding to message status defined in previous property ( Possible Values: |
|
|
Messaging alert module mail subject. |
|
|
Enable/disable the login failure alert of the authentication module. |
|
|
Alert level for login failure. |
|
|
Login failure mail subject. |
|
|
Enable/disable the account disable alert of the authentication module. |
|
|
Alert level for account disabled. |
|
|
Time when the account disabled alert should be triggered. Possible values: Usage:
|
|
|
Account disabled mail subject. |
|
|
Enable/disable the imminent certificate expiration alert of certificate scanner module. |
|
|
Frequency in days between alerts. |
|
|
Certificate imminent expiration alert level. |
|
|
Certificate imminent expiration mail subject. |
|
|
Enable/disable the certificate expired alert of certificate scanner module. |
|
|
Frequency in days between alerts. |
|
domibus.alert.cert.expired.duration_days |
Number of days after the revocation when the system should trigger alerts for the expired certificate. |
|
|
Certificate expired alert level. |
|
|
Certificate expired mail subject. |
|
|
Frequency in days between alerts sent when attempting to delete a partition that contains messages not in final state. |
|
| Configuration Property | Description and Usage | Default |
|---|---|---|
Properties for configuring alerts for plugin users security policy. |
||
|
Enable/disable the imminent password expiration alert. |
|
|
Number of days before expiration as for how long before expiration the system should send alerts. |
|
|
Frequency in days between alerts. |
|
|
Password imminent expiration alert level. |
- |
|
Password imminent expiration mail subject. |
|
|
Enable/disable the imminent password expiration alert. |
|
|
Number of days after expiration as for how long the system should send alerts. |
|
|
Frequency in days between alerts. |
|
|
Password expiration alert level. |
|
|
Password expiration mail subject. |
|
| Configuration Property | Description and Usage | Default |
|---|---|---|
Properties for configuring alerts for plugin user authentication |
||
domibus.alert.plugin.user.login_failure.active |
Enable/disable the login failure alert of the authentication module. |
- |
domibus.alert.plugin.user.login_failure.level |
Alert level for login failure. |
LOW |
domibus.alert.plugin.user.login_failure.mail.subject |
Login failure mail subject. |
Login failure |
domibus.alert.plugin.user.account_disabled.active |
Enable/disable the account disable alert of the authentication module. |
|
domibus.alert.plugin.user.account_disabled.level |
Alert level for account disabled. |
HIGH |
domibus.alert.plugin.user.account_disabled.moment |
Time when the account disabled alert should be triggered: Possible values: AT_LOGON, WHEN_BLOCKED Usage:
|
|
domibus.alert.plugin.user.account_disabled.subject |
Account disabled mail subject. |
Account disabled |
| Configuration Property | Description and Usage | Default |
|---|---|---|
domibus.attachment.temp.storage.location |
SplitAndJoin only: Domibus uses a file system location for storing temporary data when processing SplitAndJoin messages. In a cluster configuration the temporary file system storage needs to be accessible by all the nodes from the cluster. |
- |
domibus.dispatcher.splitAndJoin.concurrency |
SplitAndJoin only: specify concurrency limits via a "lower-upper" String, e.g. "5-10", or a simple upper limit String, e.g. "10" (the lower limit will be 1 in this case) when sending the SourceMessage receipt (Split and Join) to other Access Points. |
1 |
domibus.dispatcher.splitAndJoin.payloads.schedule.threshold |
SplitAndJoin only: The threshold value in MB to switch from synchronous to asynchronous saving of outgoing SourceMessage payloads. |
1000 |
domibus.splitAndJoin.receive.expiration.cron |
SplitAndJoin only: CRON expression that specifies the frequency of the checking if the joinInterval has expired. |
0 0/5 * * * ? |
| Configuration Property | Description and Usage | Default |
|---|---|---|
Properties related to Metrics configuration. |
||
|
Enable jmx reporter for dropwizard metrics. It is not recommended to gather metrics via JMX. However, it can be helpful for development and browsing purposes. |
|
domibus.metrics.sl4j.reporter.enable |
Enable sl4j reporter for dropwizard metrics. |
|
domibus.metrics.sl4j.reporter.period.time.unit |
The time unit used to configure the frequency of writing statistics into the statistic.log file. Possible values: SECONDS, MINUTES, HOURS. |
MINUTES |
domibus.metrics.sl4j.reporter.period.number |
The number of period of the previously time unit used to configure the frequency of writing statistics into the statistic.log file. E.g. the default configuration will write statistics with the file every 1 MINUTE. |
1 |
domibus.metrics.monitor.memory |
Activate dropwizard memory metrics. |
|
domibus.metrics.monitor.gc |
Activate dropwizard GC metrics. |
|
domibus.metrics.monitor.cached.threads |
Activate dropwizard cached threads metrics. |
|
domibus.metrics.monitor.jms.queues |
Activate dropwizard JMS Queues metrics. |
|
domibus.metrics.monitor.jms.queues.refresh.period |
Amount of time (in seconds) the JMS count will be cached. Count is not cached. |
0 |
domibus.metrics.monitor.jms.queues.show.dlq.only |
Add metrics for only for DLQ queue count only. |
|
| Configuration Property | Description and Usage | Default |
|---|---|---|
Properties related to admin user security policy management. |
||
domibus.passwordPolicy.pattern |
Password minimum complexity rules (empty to disable password complexity enforcement). Default: ^(?=.*[0-9])(?=.*[a-z])(?=.*[A-Z])(?=.*[~`!@#$%^&+=\\-_<>.,?:;*/()|\\[\\]\{}'"\\\\]).\{8,32}$
|
See description |
|
Password validation message in case it does not meet the rools opposite left. Password requirements
Minimum length: 8 characters. |
- |
|
Password expiration policy in days. |
|
|
Default password expiration policy in days. |
|
|
Password expiration policy: number of days before expiration when the system warns users at login. |
|
|
Password reuse policy: do not reuse any of the last N passwords.
Usage: |
|
|
Default password validation policy enabled/disabled. |
|
|
CRON expression that specifies the frequency of the password expiration check. |
|
| Configuration Property | Description and Usage | Default |
|---|---|---|
Properties related to plugin user security policy management |
||
|
Password minimum complexity rules. Usage: Default: ^(?=.*[0-9])(?=.*[a-z])(?=.*[A-Z])(?=.*[~`!@#$%^&+=\\-_<>.,?:;*/()|\\[\\]\{}'"\\\\]).\{8,32}$
|
See description |
|
Password validation message in case it does not meet the rools stated opposite left. Password requirements
Minimum length: 8 characters. |
- |
|
Password expiration policy in days. |
|
|
Default password expiration policy in days. |
|
|
Password reuse policy: do not reuse any of the last N passwords. |
|
| Configuration Property | Description and Usage | Default | ||||
|---|---|---|---|---|---|---|
|
Whether Domibus encrypts the payloads stored in the database or file system. |
|
||||
|
Temporary files are excluded from deletion if this regular expression matches the file name. |
|
||||
|
List of directories to check for cleaning the temporary files. |
|
||||
|
CRON expression that specifies the frequency of checking if the temporary payloads have expired. |
|
||||
|
The threshold in minutes for considering the temporary payloads as expired. The expired temporary payloads are scheduled to be deleted. |
|
||||
|
Path to preferred location for storing message’s payloads. Usage: In order to enable the file system storage please add the following property: where: This property expects an absolute path when specifying
|
- |
||||
| Configuration Property | Description and Usage | Default |
|---|---|---|
|
TLS truststore for DSS data-loader. Default: |
See description |
|
TLS truststore password for DSS data-loader. |
|
|
TLS truststore type DSS dataloader. |
|
|
Override cacert truststore path if needed. |
- |
|
Cacert truststore type. |
|
|
Cacert truststore password. It is recommended to change the password value. |
- |
|
Enable/disable CRL check within DSS performed by Domibus. |
|
| Configuration Property | Description and Usage | Default |
|---|---|---|
|
CRON expression that specifies the frequency of test messages sent to monitor the C2-C3 connections. |
|
|
Specifies the parties for which to monitor the connection (comma-separated list). |
- |
| Configuration Property | Description and Usage | Default |
|---|---|---|
|
Name of the authentication extension used to verify the chain trust. Defaults to CXF. |
|
|
Name of the authorization extension used to check incoming message authorization. Default is truststore check. |
|
| Configuration Property | Description and Usage | Default |
|---|---|---|
messageFactoryClass |
The factory for creating SOAPMessage objects Defaults:
|
See description |
|
WebLogic specific |
|
|
WebLogic specific |
|
|
If disabled, Domibus will not notify the plugins when the state of the User Message changes. |
|
|
If disabled, Domibus will not save the non-repudiation audit data. |
|
(*) |
This property should be set to true if Domibus needs to retry sending the failed messages. |
|
|
List of characters that are not accepted for user input in admin console. |
|
|
Number of threads used to parallelize the dispatching of messages to the plugins. |
|
|
Prints the raw |
|
|
Prints the AS4 payload in the logs while |
|
|
Prints the AS4 metadata in the logs when |
|
|
The size limit at which messages are truncated in the logs when |
|
|
Enables offloading the SSL connection to another application (e.g. SSL Forward Proxy). |
|
|
The maximum length accepted for a property value, in bytes. |
|
|
Description |
`` |
|
Description |
`` |
|
Characters that are accepted in user input |
- |
|
Number of threads used to parallelize the dispatching of messages to the plugins. |
|
|
Enables the validation of domibus properties values (default to TRUE). |
|
|
Domibus instance/environment name. |
|
|
Defines if message payload is deleted on send failure.
Defaults to |
|
|
Defines if message payload is deleted on send success.
Set to |
|
|
If disabled, Domibus will not save the message attempt details when there is a failure sending a message. |
|
|
Description |
`` |
|
The list of mime-types that will not be compressed (in outgoing messages) even if compression is turned on for the given message. Default: |
See ~description |
The properties that are specific to super users (ROLE_AP_ADMIN) are
defined in a separate file called super-domibus.properties, a file that
can be found along with the others. See Domibus Super-User Properties.
These properties are related to password policy and alert configuration for super users. For more information see, [multitentanty_users].
19. Domibus Super-User Properties
| Property Name | Description and Usage | Default |
|---|---|---|
|
Cron configuration for cleaning superuser alerts. |
|
|
Lifetime in days of superuser alerts. |
|
|
Enable/disable the super user alert module. |
|
|
Enable/disable the superuser alert mail sending. |
|
|
Frequency of failed super user alert retry. |
|
|
Elapsed time in minutes between super user alert retry. |
|
|
Maximum number of attempts for failed super user alert |
|
|
Enable/disable the login failure super user alert of the authentication module. |
|
|
Super user alert level for login failure. |
|
|
Super user login failure alert mail subject. |
|
|
Enable/disable the account disabled super user alert of the authentication module. |
|
|
Super user alert level for account disabled. |
|
|
Time when the account disabled super user alert should be triggered. Possible values:
|
|
|
Super user account disabled alert mail subject. |
|
20. WS Plugin Properties
Here’s a list of the properties used for configuring the WS Plugin.
| Configuration Property | Description and Usage | Default |
|---|---|---|
|
When TRUE enables the support for MTOM. |
|
|
Enable the schema validation. By default, the schema validation has been disabled due to performance reasons. For large files, it is recommended to keep the schema validation as disabled. |
|
|
The maximum number of pending messages to be listed from the pending messages table. Setting this property is expected to avoid timeouts due to huge _resultsets being served. Setting this property to zero returns all pending messages._ |
|
|
The notifications sent by Domibus to the plugin. The following values are possible:
|
|
|
Timeout values for communication between the ws plugin and the backend service |
|
|
ReceiveTimeout - Specifies the amount of time, in milliseconds, that the consumer will wait for a response before it times out. 0 is infinite. |
|
|
Allows chunking when sending messages to the backend service |
|
|
If |
|
|
Specifies if the connection will be kept alive between C2-C1 and C3-C4. |
|
|
Specify concurrency limits via a "lower-upper" String, e.g. "5-10", or a simple
upper limit String, e.g. "10" (the lower limit will be 1 in this case) |
|
|
Enables push notifications to the Backend. |
|
|
Description of the rule X |
- |
|
Recipient that will trigger the rule (ex: urn:oasis:names:tc:ebcore:partyid-type:unregistered:C1). If empty, the rule is triggered for any recipient. |
- |
|
End point used to submit a message to the backend (ex: http://localhost:8080/backend) |
- |
|
Cron expression for the retry mechanism to push to backend |
- |
|
Type of notifications to be sent to the Backend:
|
- |
|
Basic authentication username that will be added to the http header of push notification requests to C4. If not specified, no authorization header will be added. |
- |
|
Basic authentication password that will be added to the http header of push notification requests to C4. If not specified, no authorization header will be added. |
- |
|
If TRUE, the |
|
21. JMS Plugin Properties
Here’s a list of the properties used for configuring the JMS Plugin.
| Property name | Default value | Description | Domain specific |
|---|---|---|---|
|
jms/domibus.notification.jms |
This queue is used by Domibus to notify the JMS Plugin about message events. |
No |
|
jms/domibus.backend.jms.inQueue |
This queue is the entry point for messages to be sent to Domibus via the JMS plugin |
No |
|
5-20 |
Concurrency setting for the in queue |
No |
|
jms/domibus.backend.jms.outQueue |
This queue contains the received messages, the backend listens to this queue to consume the received messages |
Yes |
|
jms/domibus.backend. |
This queue is used to inform the backend about the message status after sending a message to Domibus |
Yes |
|
jms/domibus.backend.jms.errorNotifyConsumer |
This queue is used to inform the backend that an error occurred during the processing of receiving a message |
Yes |
|
jms/domibus.backend.jms. |
This queue is used to inform the backend that an error occurred during the processing of sending a message |
Yes |
|
MESSAGE_RECEIVED, |
The notifications sent by Domibus to the plugin. The following values
are possible:
MESSAGE_RECEIVED, |
|
Upgrade Guides
For the guide(s) to upgrade to this release, see the Upgrading to 5.1.8 in Domibus Upgrade Guides.
Support
Domibus Documentation is maintained by the eDelivery Support Team. For any questions, comments or requests for change, please contact:
-
Hours: 8AM to 6PM (Normal EC working Days)
|